Page 178 of 247

176Vehicle careCaution
Overfilled engine oil must be
drained or suctioned out. If the oil exceeds the maximum level, do
not start the vehicle and contact a
workshop.
Capacities 3 226.
Fit the cap on straight and tighten it.
Engine coolant The factory filled coolant provides
freeze protection down to approx.
-37 °C.
Caution
Only use approved antifreeze.
Coolant and antifreeze 3 217.
Coolant level
Caution
Too low a coolant level can cause engine damage.
If the cooling system is cold, the
coolant level should be above the
MIN mark. Top up if the level is low.
9Warning
Allow the engine to cool before
opening the cap. Carefully open
the cap, relieving the pressure
slowly.
To top up, use a 1:1 mixture of
released coolant concentrate mixed
with clean tap water. If no coolant
concentrate is available, use clean
tap water. Install the cap tightly. Have
the coolant concentration checked
and have the cause of the coolant
loss remedied by a workshop.
Washer fluid
Fill with clean water mixed with a
suitable quantity of approved
windscreen washer fluid which
contains antifreeze.
Page 179 of 247

Vehicle care177Caution
Only washer fluid with a sufficient
antifreeze concentration provides
protection at low temperatures or
a sudden drop in temperature.
Washer fluid 3 217.
Brakes In the event of minimum thickness of
the brake lining, a squealing noise
sounds during braking.
Continued driving is possible but
have the brake lining replaced as
soon as possible.
Once new brake linings are installed,
do not brake unnecessarily hard for
the first few journeys.
Brake fluid
9 Warning
Brake fluid is poisonous and
corrosive. Avoid contact with eyes,
skin, fabrics and painted surfaces.
The brake fluid level must be betweenthe MIN and MAX marks.
If fluid level is below MIN seek the
assistance of a workshop.
Brake fluid 3 217.
Vehicle battery
The vehicle battery is maintenance-
free provided that the driving profile
allows sufficient charging of the
battery. Short-distance-driving and
frequent engine starts can discharge
the battery. Avoid the use of
unnecessary electrical consumers.
Batteries do not belong in household
waste. They must be disposed of at
an appropriate recycling collection
point.
Laying up the vehicle for more than
four weeks can lead to battery
discharge. Disconnect the clamp from the negative terminal of the vehicle
battery.
Ensure the ignition is switched off
before connecting or disconnecting
the vehicle battery.
Battery discharge protection 3 107.
Anti-theft alarm system 3 31.
Replacing the vehicle battery Notice
Any deviation from the instructions
given in this section may lead to temporary deactivation or
disturbance of the stop-start system.
Page 181 of 247
Vehicle care179● See the Owner's Manual forfurther information.
● Explosive gas may be present in the vicinity of the vehicle battery.
Power saving mode
This mode deactivates electrical
consumers to avoid excessive
discharging of the vehicle battery.
These consumers, such as the
infotainment system, windscreen
wipers, low beam headlights,
courtesy light, etc. can be used for a
total maximum time of about
40 minutes after ignition is switched
off.
Deactivating power saving mode
Power saving mode is deactivated
automatically when the engine is
restarted. Run the engine for a
sufficient charge:
● for less than 10 minutes to use the consumers for approx.
5 minutes
● for more than 10 minutes to use the consumers for up to approx.
30 minutesDiesel fuel system bleeding
If the tank has been run dry, the diesel fuel system must be bled. Switch on
the ignition three times for
15 seconds at a time. Then crank the
engine for a maximum of
40 seconds. Repeat this process after
no less than 5 seconds. If the engine fails to start, seek the assistance of a
workshop.
Wiper blade replacement
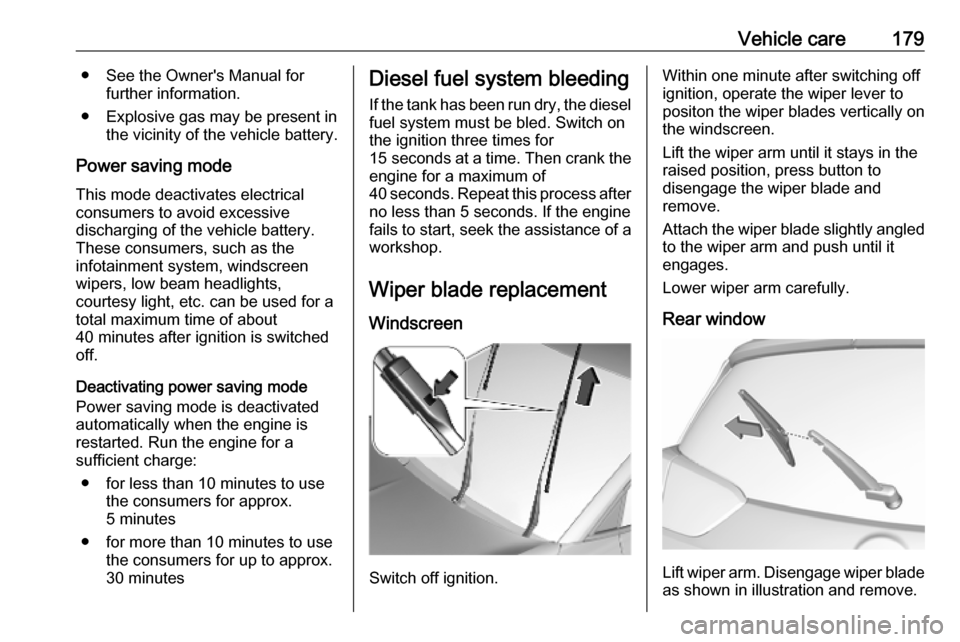
Windscreen
Switch off ignition.
Within one minute after switching off
ignition, operate the wiper lever to
positon the wiper blades vertically on
the windscreen.
Lift the wiper arm until it stays in the
raised position, press button to
disengage the wiper blade and
remove.
Attach the wiper blade slightly angled
to the wiper arm and push until it
engages.
Lower wiper arm carefully.
Rear window
Lift wiper arm. Disengage wiper blade as shown in illustration and remove.
Page 182 of 247
180Vehicle careAttach the wiper blade slightly angledto the wiper arm and push until it
engages.
Lower wiper arm carefully.Bulb replacement
Switch off the ignition and switch off
the relevant switch or close the doors.
Only hold a new bulb at the base. Do
not touch the bulb glass with bare
hands.
Use only the same bulb type for
replacement.
Replace headlight bulbs from within the engine compartment.
Bulb check After a bulb replacement switch on
the ignition, operate and check the
lights.Halogen headlights1:high beam, turn light2:low beam
Page 190 of 247

188Vehicle care4. Insert bulb holder and turnclockwise.
5. Insert left end of the lamp, slide to
the left and insert right end.
Number plate light
The number plate light is designed as
LEDs and cannot be changed. In
case of defective LEDs, have them
replaced by a workshop.
Interior lights
Have the following bulbs replaced by
a workshop:
● courtesy light, reading lights
● load compartment light
● instrument panel illuminationElectrical system
Fuses Data on the replacement fuse mustmatch the data on the defective fuse.
The three fuse boxes are located in: ● engine compartment
● instrument panel
Before replacing a fuse, turn off the
respective switch and the ignition.
A blown fuse can be recognised by its melted wire.Caution
Do not replace the fuse until the
cause of the fault has been
remedied.
Some functions are protected by
several fuses.
Fuses may also be inserted without
existence of a function.
Fuse extractor
A fuse extractor may be located in the
fuse box in the engine compartment.
The extractor has two sides, each
side is designed for a different type of fuses.
Grab the fuse with the fuse extractor
and withdraw the fuse.
Page 191 of 247
Vehicle care189Engine compartment fusebox
The fuse box is in the front left of the
engine compartment.
Disengage the cover and remove it.
No.Circuit1Fan climate control system2–3Body fuse box4–5Instrument panel fuse box6Engine cooling unit7Body control module8Engine control fuel pump9Engine controlNo.Circuit10Engine control11Engine control12Engine cooling unit13Body control module14Intelligent battery sensor15–16Front fog lights17–18High beam right19High beam left20Engine control fuel pump21Starter22–23Starter24Trailer hitch25Instrument panel fuse box26Transmission control module
Page 192 of 247
190Vehicle careNo.Circuit27Body control module28Engine control module29Front wiper30Body control module
After having changed defective fuses,
close the fuse box cover and press
until it engages.
If the fuse box cover is not closed
correctly, malfunction may occur.
Instrument panel fuse box
Fuse box on the left side of the
instrument panel
In right-hand drive vehicles, the fuse
box is located behind a cover in the
glovebox. Open the glovebox and
remove the cover.
No.Circuit1Interior mirror, exhaust system,
electric power steering, clutch
sensor, LPG, exterior mirror
adjustment, inductive charging2–3Trailer hitch4Horn5Windscreen washer pump
front / rear6Windscreen washer pump
front / rear
Page 200 of 247
198Vehicle care2.Pull speed limit label from sealant
bottle and place it in driver's
visible area.
3. Remove the electrical connection cable and air hose from the
stowage compartments on the
underside of the compressor.
4. Screw the compressor air hose to
the connection on the sealant
bottle.
5. Fit the sealant bottle into the bracket on the compressor.
Set the compressor near the tyre
in such a way that the sealant
bottle is upright.
6. Unscrew valve cap from defective
tyre.7. Screw the filler hose to the tyre valve.
8. The switch on the compressor must be set to J.
9. Connect the compressor plug to the power outlet 3 74.
To avoid discharging the battery, we recommend running the
engine.


