2018 YAMAHA YZ65 warning
[x] Cancel search: warningPage 35 of 90
Instrument and control functions
4-9
4
EAU84381
A djustin g the front fork
WARNING
EWA10181
Always a djust both fork le gs equally,
otherwise poor han dlin g an d loss of
sta bility may result.
This front fork is equipped with re-
bound damping force adjusting screws
and compression damping force ad-
justing screws.
NOTICE
ECA10102
To avoi d d amag ing the mechanism,
d o not attempt to turn beyon d the
maximum or minimum settin gs.
Re boun d d ampin g force
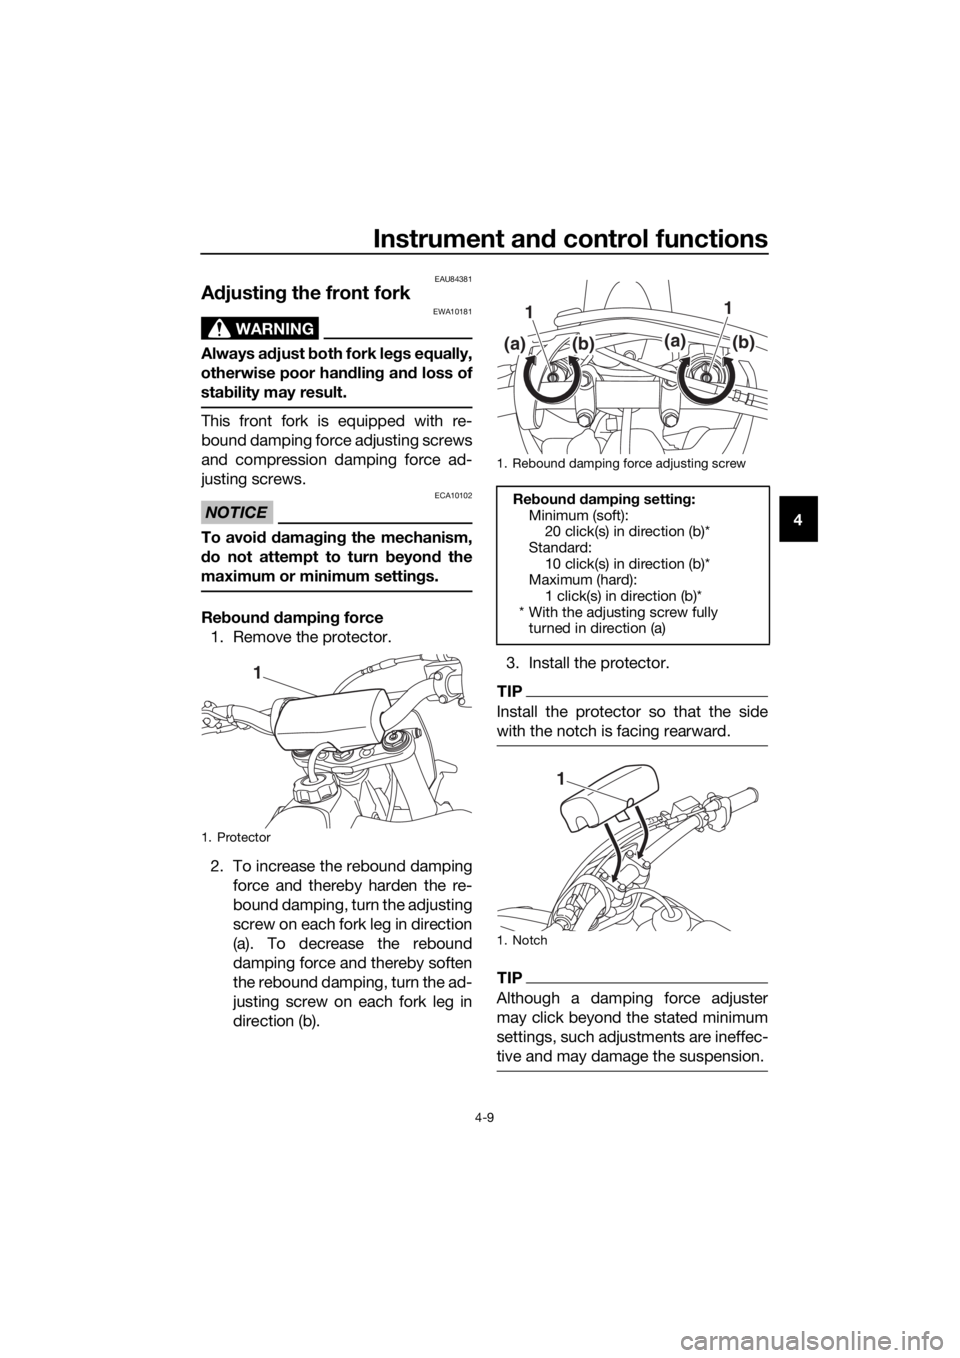
1. Remove the protector.
2. To increase the rebound damping force and thereby harden the re-
bound damping, turn the adjusting
screw on each fork leg in direction
(a). To decrease the rebound
damping force and thereby soften
the rebound damping, turn the ad-
justing screw on each fork leg in
direction (b). 3. Install the protector.
TIP
Install the protector so that the side
with the notch is facing rearward.
TIP
Although a damping force adjuster
may click beyond the stated minimum
settings, such adjustments are ineffec-
tive and may damage the suspension.
1. Protector
1
1. Rebound damping force adjusting screw
Re
boun d d ampin g settin g:
Minimum (soft): 20 click(s) in direction (b)*
Standard: 10 click(s) in direction (b)*
Maximum (hard):
1 click(s) in direction (b)*
* With the adjusting screw fully turned in direction (a)
1. Notch
1 1
(a)
(b)(a)(b)
1
UBR880E0.book Page 9 Friday, February 16, 2018 8:32 AM
Page 36 of 90
Instrument and control functions
4-10
4 Compression
dampin g force
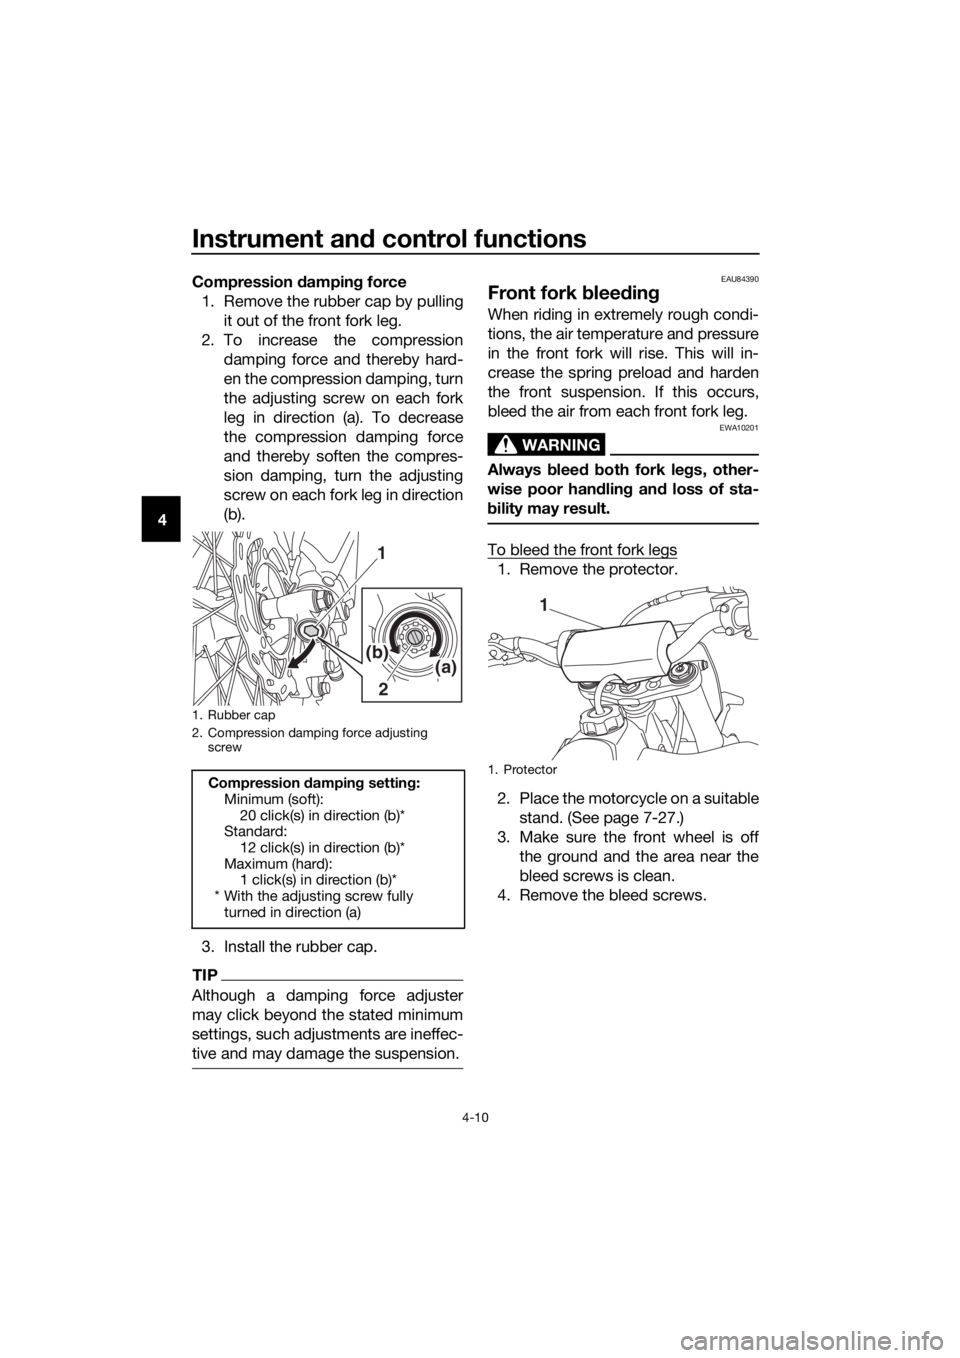
1. Remove the rubber cap by pulling it out of the front fork leg.
2. To increase the compression damping force and thereby hard-
en the compression damping, turn
the adjusting screw on each fork
leg in direction (a). To decrease
the compression damping force
and thereby soften the compres-
sion damping, turn the adjusting
screw on each fork leg in direction
(b).
3. Install the rubber cap.
TIP
Although a damping force adjuster
may click beyond the stated minimum
settings, such adjustments are ineffec-
tive and may damage the suspension.
EAU84390
Front fork blee din g
When riding in extremely rough condi-
tions, the air temperature and pressure
in the front fork will rise. This will in-
crease the spring preload and harden
the front suspension. If this occurs,
bleed the air from each front fork leg.
WARNING
EWA10201
Always blee d b oth fork le gs, other-
wise poor han dlin g an d loss of sta-
b ility may result.
To bleed the front fork legs
1. Remove the protector.
2. Place the motorcycle on a suitable
stand. (See page 7-27.)
3. Make sure the front wheel is off the ground and the area near the
bleed screws is clean.
4. Remove the bleed screws.
1. Rubber cap
2. Compression damping force adjusting screw
Compression dampin g settin g:
Minimum (soft): 20 click(s) in direction (b)*
Standard:
12 click(s) in direction (b)*
Maximum (hard): 1 click(s) in direction (b)*
* With the adjusting screw fully turned in direction (a)
2
1
(a)(b)
1. Protector
1
UBR880E0.book Page 10 Friday, February 16, 2018 8:32 AM
Page 40 of 90
Instrument and control functions
4-14
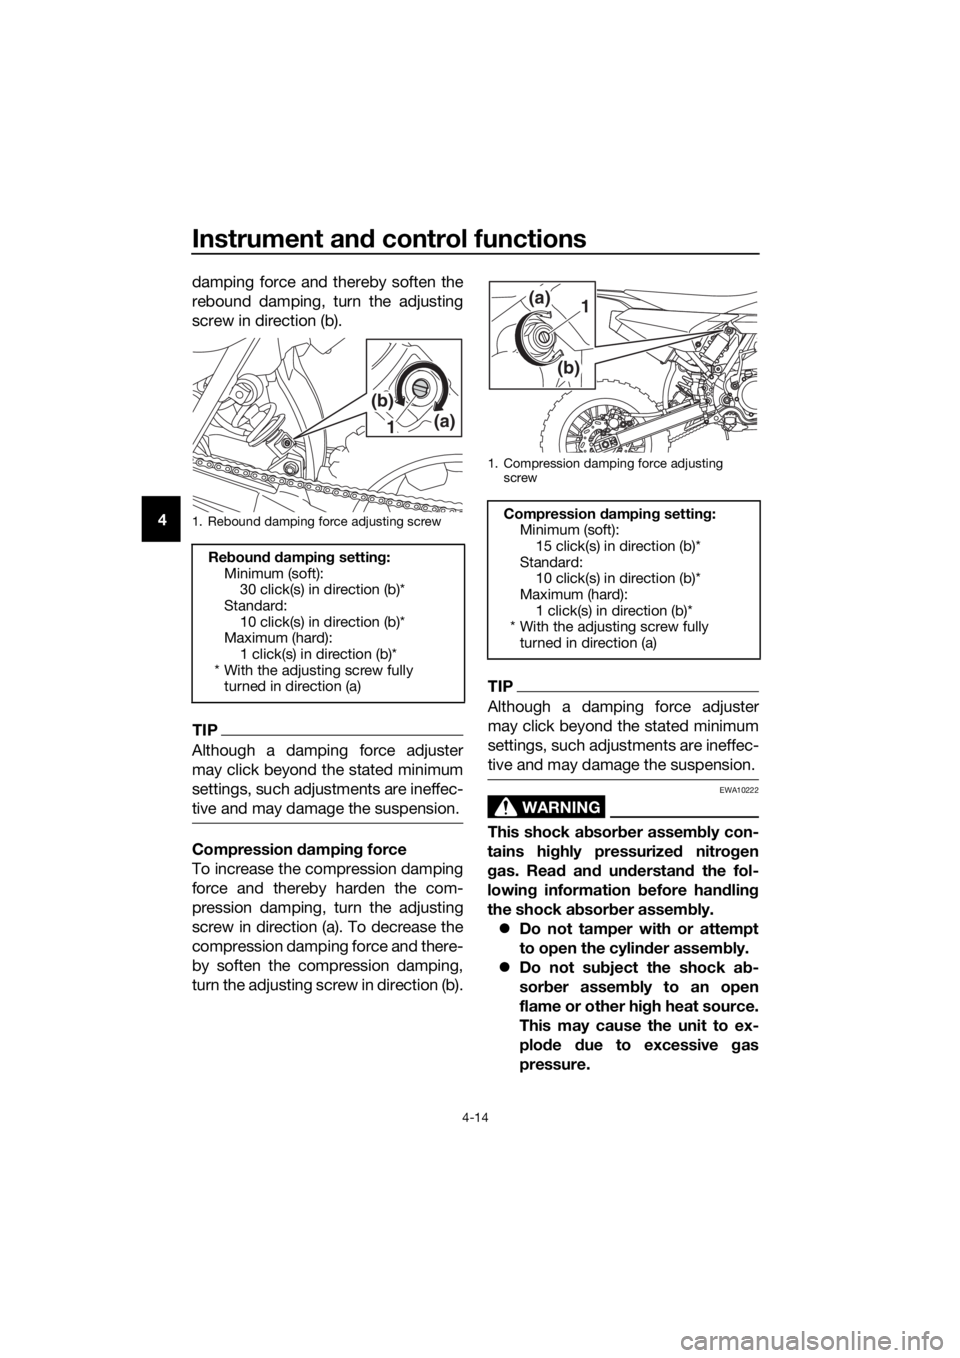
4 damping force and thereby soften the
rebound damping, turn the adjusting
screw in direction (b).
TIP
Although a damping force adjuster
may click beyond the stated minimum
settings, such adjustments are ineffec-
tive and may damage the suspension.
Compression
dampin g force
To increase the compression damping
force and thereby harden the com-
pression damping, turn the adjusting
screw in direction (a). To decrease the
compression damping force and there-
by soften the compression damping,
turn the adjusting screw in direction (b).
TIP
Although a damping force adjuster
may click beyond the stated minimum
settings, such adjustments are ineffec-
tive and may damage the suspension.
WARNING
EWA10222
This shock a bsor ber assem bly con-
tains hi ghly pressurize d nitro gen
g as. Rea d an d un derstan d the fol-
lowin g information before han dlin g
the shock a bsor ber assem bly.
Do not tamper with or attempt
to open the cylind er assembly.
Do not su bject the shock a b-
sor ber assem bly to an open
flame or other hi gh heat source.
This may cause the unit to ex-
plo de due to excessive g as
pressure.
1. Rebound damping force adjusting screw
Re boun d d ampin g setting :
Minimum (soft): 30 click(s) in direction (b)*
Standard: 10 click(s) in direction (b)*
Maximum (hard):
1 click(s) in direction (b)*
* With the adjusting screw fully turned in direction (a)
1(a)
(b)
1. Compression damping force adjusting
screw
Compression dampin g settin g:
Minimum (soft): 15 click(s) in direction (b)*
Standard: 10 click(s) in direction (b)*
Maximum (hard):
1 click(s) in direction (b)*
* With the adjusting screw fully turned in direction (a)
(b)
(a)1
UBR880E0.book Page 14 Friday, February 16, 2018 8:32 AM
Page 41 of 90
Instrument and control functions
4-15
4
Do not deform or damag e the
cylin der in any way. Cylin der
d amag e will result in poor
d ampin g performance.
Do not d ispose of a damag ed or
worn-out shock a bsor ber as-
sem bly yourself. Take the shock
a b sor ber assem bly to a Yamaha
d ealer for any service.
EAU41382
Remova ble si destan d
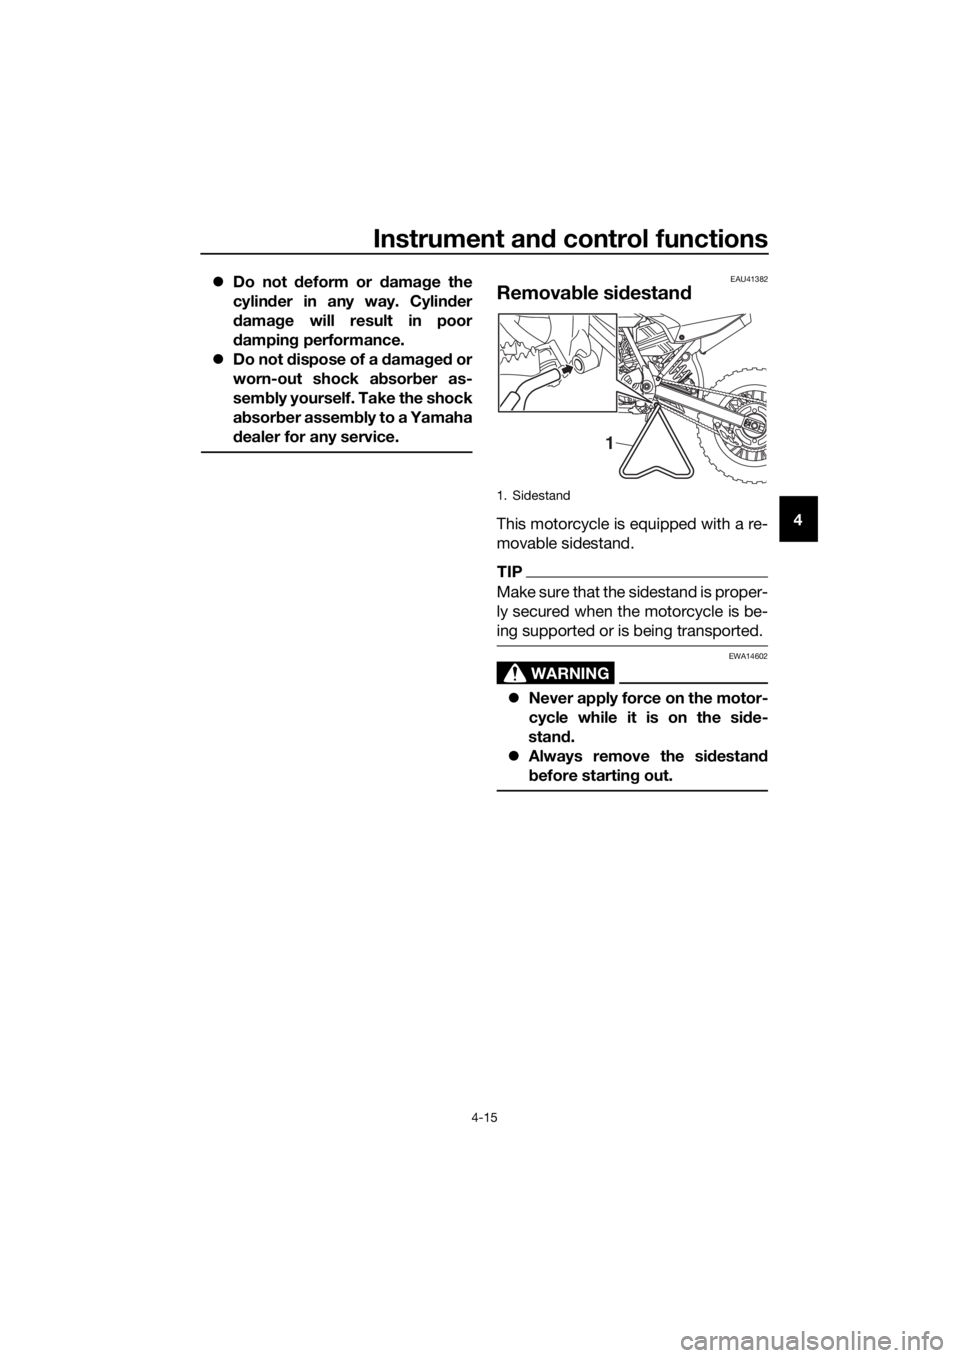
This motorcycle is equipped with a re-
movable sidestand.
TIP
Make sure that the sidestand is proper-
ly secured when the motorcycle is be-
ing supported or is being transported.
WARNING
EWA14602
Never apply force on the motor-
cycle while it is on the si de-
stan d.
Always remove the si destan d
b efore startin g out.
1. Sidestand
1
UBR880E0.book Page 15 Friday, February 16, 2018 8:32 AM
Page 43 of 90

For your safety – pre-operation checks
5-1
5
EAU63441
Inspect your vehicle each time you use it to make sure the vehicle is in safe oper-
ating condition. Always follow the inspection and maintenance procedures and
schedules described in the Owner’s Manual.
WARNING
EWA11152
Failure to inspect or maintain the vehicle properly increases the possibility
of an acci dent or equipment d amage. Do not operate the vehicle if you fin d
any prob lem. If a pro blem cannot be corrected b y the proce dures provi ded
in this manual, have the vehicle inspecte d b y a Yamaha d ealer.
Before using this vehicle, check the following points:
ITEM CHECKSPAGE
Fuel • Check fuel level in fuel tank.
• Always use a fresh mixture of gasoline and oil.
• Check fuel line for leakage.
• Check fuel tank breather hose for obstructions, cracks
or damage, and check hose connection. 4-4, 4-6
Tr a n s m i s s i o n o i l • Check for leakage. 7-7
Coolant • Check coolant level.
• If necessary, add recommended coolant to specified
level.
• Check cooling system for leakage. 7-8
Front brake • Check operation.
• If soft or spongy, have Yamaha dealer bleed hydraulic
system.
• Check brake pads for wear.
• Replace if necessary.
• Check fluid level in reservoir.
• If necessary, add specified brake fluid to specified level.
• Check hydraulic system for leakage. 7-18,
7-19
Rear brake • Check operation.
• If soft or spongy, have Yamaha dealer bleed hydraulic
system.
• Check brake pads for wear.
• Replace if necessary.
• Check fluid level in reservoir.
• If necessary, add specified brake fluid to specified level.
• Check hydraulic system for leakage. 7-18,
7-19
Clutch • Check operation.
• Lubricate cable if necessary.
• Check lever free play.
• Adjust if necessary. 7-16
Throttle g rip • Make sure that operation is smooth.
• Check throttle grip free play.
• If necessary, adjust throttle grip free play. 7-13,
7-23
UBR880E0.book Page 1 Friday, February 16, 2018 8:32 AM
Page 45 of 90
Operation and important ri din g points
6-1
6
EAU15952
Read the Owner’s Manual carefully to
become familiar with all controls. If
there is a control or function you do not
understand, ask your Yamaha dealer.
WARNING
EWA10272
Failure to familiarize yourself with
the controls can lead to loss of con-
trol, which coul d cause an acci dent
or injury.
EAU41308
Startin g an d warmin g up a
col d en gine
1. Turn the fuel cock lever to “ON”.
2. Shift the transmission into the
neutral position.
3. Turn the starter (choke) on and completely close the throttle. (See
page 4-7.)
4. Start the engine by pushing the kickstarter lever down.
5. When the engine is warm, turn the starter (choke) off.
TIP
The engine is warm when it responds
quickly to the throttle with the starter
(choke) turned off.
NOTICE
ECA11043
For maximum en gine life, never ac-
celerate har d when the en gine is
col d!
UBR880E0.book Page 1 Friday, February 16, 2018 8:32 AM
Page 47 of 90

Operation and important ri din g points
6-3
6
an
d d rive train, which are not
d esi gne d to withstan d the
shock of force d shifting .
EAU16691To start out an d accelerate
1. Pull the clutch lever to disengage the clutch.
2. Shift the transmission into first gear.
3. Open the throttle gradually and si- multaneously release the clutch
lever slowly.
4. Once the motorcycle has reached a speed high enough to change
gears, close the throttle, and at the
same time, quickly pull the clutch
lever in.
5. Shift the transmission into second gear. (Make sure not to shift the
transmission into the neutral posi-
tion.)
6. Open the throttle halfway and gradually release the clutch lever.
7. Follow the same procedure when
shifting to the next gear.
EAU16711To decelerate
1. Close the throttle and apply both the front and the rear brakes to
slow the motorcycle.
2. Downshift through the gears and shift the transmission into the neu-
tral position when the motorcycle
is almost completely stopped.
EAU41506
Engine break-in
WARNING
EWA10322
Failure to properly maintain the vehi-
cle or performin g maintenance ac-
tivities incorrectly may increase
your risk of injury or death durin g
service or while usin g the vehicle. If
you are not familiar with vehicle ser-
vice, have a Yamaha d ealer perform
service.
TIP
Before starting the engine for the first
time, the air filter must be lubricated.
(See page 7-10.)
En gine break-in proce dure
1. Fill the fuel tank with a break-in oil- fuel mixture as follows.
2. Start and warm up the engine. Check the operation of the con-
trols and the engine stop switch.
(See page 4-1.)
3. Operate the motorcycle in the low- er gears at moderate throttle
openings for 5 to 8 minutes. Stop
the engine and check the spark
plug condition (see page 7-6); it
will show a rich condition during
break-in.
4. Allow the engine to cool. Restart the engine and operate the motor-
cycle as in the step above for 5
minutes. Then, very briefly shift to
Recommen ded 2-stroke en gine oil:
YAMALUBE 2R
Mixin g ratio ( gasoline to oil):
15:1
UBR880E0.book Page 3 Friday, February 16, 2018 8:32 AM
Page 49 of 90

Operation and important ri din g points
6-5
6
EAU17192
Parkin g
When parking, stop the engine, and
then turn the fuel cock lever to “OFF”.
WARNING
EWA10312
Since the en gine an d exhaust
system can become very hot,
park in a place where ped estri-
ans or chil dren are not likely to
touch them and b e burne d.
Do not park on a slope or on soft
groun d, otherwise the vehicle
may overturn, increasin g the
risk of a fuel leak an d fire.
Do not park near g rass or other
flammab le materials which
mi ght catch fire.
UBR880E0.book Page 5 Friday, February 16, 2018 8:32 AM