2018 YAMAHA FJR1300AE wheel
[x] Cancel search: wheelPage 64 of 122
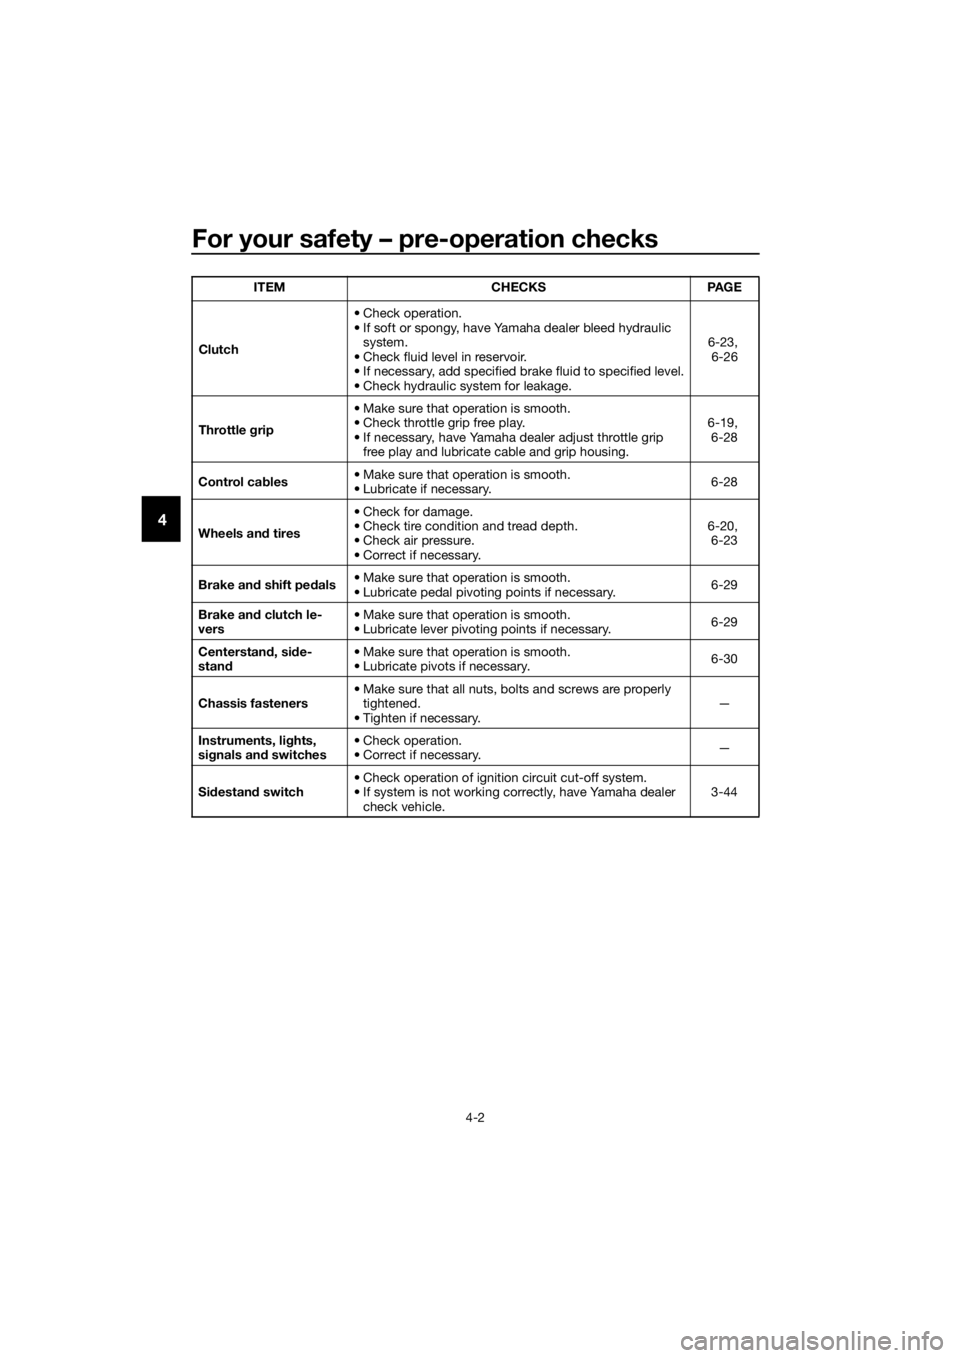
For your safety – pre-operation checks
4-2
4
Clutch• Check operation.
• If soft or spongy, have Yamaha dealer bleed hydraulic
system.
• Check fluid level in reservoir.
• If necessary, add specified brake fluid to specified level.
• Check hydraulic system for leakage. 6-23,
6-26
Throttle grip • Make sure that operation is smooth.
• Check throttle grip free play.
• If necessary, have Yamaha dealer adjust throttle grip
free play and lubricate cable and grip housing. 6-19,
6-28
Control ca bles • Make sure that operation is smooth.
• Lubricate if necessary.
6-28
Wheels an d tires •Check for damage.
• Check tire condition and tread depth.
• Check air pressure.
• Correct if necessary. 6-20,
6-23
Brake an d shift pe dals • Make sure that operation is smooth.
• Lubricate pedal pivoting points if necessary. 6-29
Brake an d clutch le-
vers • Make sure that operation is smooth.
• Lubricate lever pivoting points if necessary.
6-29
Centerstan d, si de-
stan d • Make sure that operation is smooth.
• Lubricate pivots if necessary.
6-30
Chassis fasteners • Make sure that all nuts, bolts and screws are properly
tightened.
• Tighten if necessary. —
Instruments, li ghts,
si gnals an d switches • Check operation.
• Correct if necessary.
—
Si destan d switch • Check operation of ignition circuit cut-off system.
• If system is not working correctly, have Yamaha dealer
check vehicle. 3-44
ITEM CHECKS PAGE
UB96E1E0.book Page 2 Monday, July 10, 2017 10:57 AM
Page 68 of 122

Operation and important rid ing points
5-4
5 clutch lever in, use the brakes to
slow the motorcycle, and continue
to downshift as necessary.
4. Once the motorcycle has stopped, the transmission can be
shifted into the neutral position.
The neutral indicator light should
come on and then the clutch lever
can be released.
WARNING
EWA17380
Improper brakin g can cause
loss of control or traction. Al-
ways use b oth brakes an d apply
them smoothly.
Make sure that the motorcycle
and the en gine have sufficiently
slowe d b efore shiftin g to a low-
er gear. En gag in g a lower gear
when the vehicle or en gine
speed is too hi gh coul d make
the rear wheel lose traction or
the en gine to over-rev. This
coul d cause loss of control, an
acci dent an d injury. It coul d also
cause en gine or drive train dam-
a g e.
EAU64150Recommen ded shift points
The recommended shift points during
acceleration and deceleration are
shown in the table below.
EAU16811
Tips for re ducin g fuel con-
sumption
Fuel consumption depends largely on
your riding style. Consider the follow-
ing tips to reduce fuel consumption:
Shift up swiftly, and avoid high en-
gine speeds during acceleration.
Do not rev the engine while shift-
ing down, and avoid high engine
speeds with no load on the en-
gine.
Turn the engine off instead of let-
ting it idle for an extended length
of time (e.g., in traffic jams, at traf-
fic lights or at railroad crossings).
Shift up points:
1st → 2nd: 20 km/h (12 mph)
2nd → 3rd: 30 km/h (19 mph)
3rd → 4th: 40 km/h (25 mph)
4th → 5th: 50 km/h (31 mph)
5th → 6th: 60 km/h (37 mph)
Shift down points:
6th → 5th: 45 km/h (28 mph)
5th → 4th: 35 km/h (22 mph)
4th → 3rd: 25 km/h (16 mph)
UB96E1E0.book Page 4 Monday, July 10, 2017 10:57 AM
Page 74 of 122

Periodic maintenance an d a djustment
6-4
6
EAU71372
General maintenance an d lu brication chart
NO. ITEM
1 *Dia
gnostic system
check • Perform dynamic inspection
using Yamaha diagnostic tool.
• Check the error codes. √√√√√√
2 *Air filter element • Clean.
√√
• Replace. √√
3 *Clutch • Check operation, fluid level and
vehicle for fluid leakage. √√√√√
4 *Front brake • Check operation, fluid level,
and for fluid leakage.
• Replace brake pads if neces- sary. √√√√√√
5 *Rear brake • Check operation, fluid level,
and for fluid leakage.
• Replace brake pads if neces- sary. √√√√√√
6 *Brake hoses • Check for cracks or damage.
√√√√√
• Replace. Every 4 years
7 *Brake flui d • Change. Every 2 years
8 *Wheels • Check runout and for damage.
• Replace if necessary. √√√√
9 *Tires • Check tread depth and for
damage.
• Replace if necessary.
• Check air pressure.
• Correct if necessary. √√√√√
10 *Wheel bearin gs • Check bearing for looseness or
damage. √√√√
11 *Swin
garm pivot
b earin gs • Check operation and for exces-
sive play. √√√√
12 *Steerin g b earin gs • Check bearing assemblies for
looseness. √√ √
•
Moderately repack with lithium-
soap-based grease. √√
X 1000 km
CHECK OR
MAINTENANCE JOB
X 1000 mi ODOMETER
READINGSANNUAL CHECK
1 10203040
0.6 6 12 18 24
UB96E1E0.book Page 4 Monday, July 10, 2017 10:57 AM
Page 84 of 122

Periodic maintenance an d a djustment
6-14
6 12. Start the engine, and then let it idle
for several minutes while checking
it for oil leakage. If oil is leaking,
immediately turn the engine off
and check for the cause.
TIP
After the engine is started, the engine
oil level warning light should go off if
the oil level is sufficient.
NOTICE
ECA10402
If the oil level warnin g li ght flickers
or remains on even if the oil level is
correct, immed iately turn the en gine
off an d have a Yamaha d ealer check
the vehicle.
13. Turn the engine off, and then check the oil level and correct it if
necessary.
EAU20017
Final gear oil
The final gear case must be checked
for oil leakage before each ride. If any
leakage is found, have a Yamaha deal-
er check and repair the vehicle. In ad-
dition, the final gear oil level must be
checked and the oil changed as fol-
lows at the intervals specified in the
periodic maintenance and lubrication
chart.
WARNING
EWA10371
Make sure that no forei gn mate-
rial enters the final gear case.
Make sure that no oil gets on
the tire or wheel.
To check the final gear oil level
1. Place the vehicle on the center- stand.
TIP
Make sure that the vehicle is posi-
tioned straight up when checking the
oil level. A slight tilt to the side can re-
sult in a false reading.
2. Remove the final gear oil filler boltand its gasket, and then check the
oil level in the final gear case.
TIP
The oil level should be at the brim of
the filler hole.
UB96E1E0.book Page 14 Monday, July 10, 2017 10:57 AM
Page 91 of 122

Periodic maintenance an d a djustment
6-21
6
WARNING
EWA10512
Never overloa d your vehicle. Opera-
tion of an overloa ded vehicle coul d
cause an acci dent.
Tire inspection
The tires must be checked before each
ride. If the center tread depth reaches
the specified limit, if the tire has a nail
or glass fragments in it, or if the side-
wall is cracked, have a Yamaha dealer
replace the tire immediately.
TIP
The tire tread depth limits may differ
from country to country. Always com-
ply with the local regulations.
WARNING
EWA10472
Have a Yamaha dealer replace
excessively worn tires. Besi des
b ein g ille gal, operatin g the vehi-
cle with excessively worn tires
d ecreases ri din g sta bility an d
can lead to loss of control.
The replacement of all wheel
and b rake-relate d parts, inclu d-
in g the tires, shoul d b e left to a
Yamaha dealer, who has the
necessary professional knowl-
e dg e an d experience to d o so.
Ride at mo derate spee ds after
chan gin g a tire since the tire
surface must first b e “broken
in” for it to develop its optimal
characteristics.
Tire information
Tire air pressure (measure d on col d
tires): 1 person:Front:
250 kPa (2.50 kgf/cm², 36 psi)
Rear: 290 kPa (2.90 kgf/cm², 42 psi)
2 persons: Front:250 kPa (2.50 kgf/cm², 36 psi)
Rear: 290 kPa (2.90 kgf/cm², 42 psi)
Maximum load *:
212 kg (467 lb)
* Total weight of rider, passenger, car- go and accessories
1. Tire sidewall
2. Tire tread depth
Minimum tire trea d d epth (front an d
rear): 1.6 mm (0.06 in)
1. Tire air valve
2. Tire air valve core
3. Tire air valve cap with seal
UB96E1E0.book Page 21 Monday, July 10, 2017 10:57 AM
Page 93 of 122

Periodic maintenance an d a djustment
6-23
6
EAU21963
Cast wheels
To maximize the performance, durabil-
ity, and safe operation of your vehicle,
note the following points regarding the
specified wheels.
The wheel rims should be
checked for cracks, bends, warp-
age or other damage before each
ride. If any damage is found, have
a Yamaha dealer replace the
wheel. Do not attempt even the
smallest repair to the wheel. A de-
formed or cracked wheel must be
replaced.
The wheel should be balanced
whenever either the tire or wheel
has been changed or replaced. An
unbalanced wheel can result in
poor performance, adverse han-
dling characteristics, and a short-
ened tire life.
EAU22074
Clutch lever
Since this model is equipped with a hy-
draulic clutch, adjusting the clutch le-
ver free play is not needed. However, it
is necessary to check the clutch fluid
level and check the hydraulic system
for leakage before each ride. (See page
6-26.) If the clutch lever free play does
become excessive, and shifting be-
comes rough or clutch slippage oc-
curs, causing poor acceleration, there
may be air in the clutch system. If there
is air in the hydraulic system, have a
Yamaha dealer bleed the system be- fore operating the motorcycle.
UB96E1E0.book Page 23 Monday, July 10, 2017 10:57 AM
Page 101 of 122

Periodic maintenance an d a djustment
6-31
6
EAU45512
Checkin g the steerin g
Worn or loose steering bearings may
cause danger. Therefore, the operation
of the steering must be checked as fol-
lows at the intervals specified in the
periodic maintenance and lubrication
chart.
1. Place the vehicle on the center- stand. WARNING! To avoi d inju-
ry, securely support the vehicle
so there is no dan ger of it fallin g
over.
[EWA10752]
2. Hold the lower ends of the front fork legs and try to move them for-
ward and backward. If any free
play can be felt, have a Yamaha
dealer check or repair the steer-
ing.
EAU23292
Checkin g the wheel bearin gs
The front and rear wheel bearings must
be checked at the intervals specified in
the periodic maintenance and lubrica-
tion chart. If there is play in the wheel
hub or if the wheel does not turn
smoothly, have a Yamaha dealer
check the wheel bearings.
UB96E1E0.book Page 31 Monday, July 10, 2017 10:57 AM
Page 108 of 122

Motorcycle care and stora ge
7-1
7
EAU37834
Matte color caution
NOTICE
ECA15193
Some mo dels are equipped with
matte colore d finishe d parts. Be
sure to consult a Yamaha dealer for
a d vice on what pro ducts to use be-
fore cleanin g the vehicle. Usin g a
b rush, harsh chemical prod ucts or
cleanin g compoun ds when cleanin g
these parts will scratch or damag e
their surface. Wax also shoul d not
b e applied to any matte colored fin-
ishe d parts.
EAU54671
Care
While the open design of a motorcycle
reveals the attractiveness of the tech-
nology, it also makes it more vulnera-
ble. Rust and corrosion can develop
even if high-quality components are
used. A rusty exhaust pipe may go un-
noticed on a car, however, it detracts
from the overall appearance of a mo-
torcycle. Frequent and proper care
does not only comply with the terms of
the warranty, but it will also keep your
motorcycle looking good, extend its
life and optimize its performance.
Before cleanin g
1. Cover the muffler outlets with plastic bags after the engine has
cooled down.
2. Make sure that all caps and cov- ers as well as all electrical cou-
plers and connectors, including
the spark plug caps, are tightly in-
stalled.
3. Remove extremely stubborn dirt, like oil burnt onto the crankcase,
with a degreasing agent and a
brush, but never apply such prod-
ucts onto seals, gaskets and
wheel axles. Always rinse the dirt
and degreaser off with water.
Cleanin g
NOTICE
ECA10773
Avoi d usin g stron g aci dic wheel
cleaners, especially on spoke d
wheels. If such pro ducts are
use d on har d-to-remove dirt, do
not leave the cleaner on the af-
fected area any lon ger than in-
UB96E1E0.book Page 1 Monday, July 10, 2017 10:57 AM