2018 VOLVO XC60 T8 fold seats
[x] Cancel search: fold seatsPage 193 of 674

SEATS AND STEERING WHEEL
}}
* Option/accessory.191
Adjusting the rear seat headrestraints
Adjust the center head restraint in the rear seat to the seat occupant's height. Fold down theoutboard head restraints to improve rear visibil-ity.
Adjusting the center head restraint
The center head restraint should be adjusted to suit the passenger's height. The entire back ofthe head should be covered if possible. Manuallymove the restraint up or down as needed.
To lower the restraint, push and hold the button (see illustration) while carefully lowering the headrestraint.
WARNING
The center seat head restraint must be in its lowest position when the seat is not occupied.When the center seat is occupied, the headrestraint must be correctly adjusted to thepassenger's height, covering the entire backof the head if possible.
Electrically folding down the rear seat's outboard head restraints *
The outer head restraints can be folded via the center display's function view. The head restraintcan be folded down when the vehicle is in igni- tion mode 0.
Page 194 of 674

||
SEATS AND STEERING WHEEL
* Option/accessory.
192 Tap the
Headrest Fold button
to activate/deactivate folding.
Manually push the head restraint until it clicks into position.
WARNING
Do not lower the head restraint if there are passengers in any of the rear seats.
WARNING
The head restraint must be locked in the upright position after it has been folded up.
Manually folding down the rear seat's outboard head restraints
For models with electrically folding backrests *,
the outboard head restraints are folded manually using the control on the top of the seat (see illus- tration
). For vehicles without electrically fold-
ing backrests, fold down the outboard head restraints using the inner control on the top of the seat (see illustration
).
Related information
• Folding down the rear seat backrests (p. 188)
Steering wheel controls and horn The steering wheel has a horn and controls for e.g. driver support systems and voice control.
Steering wheel keypads and paddles
*.
Driver support system controls 2
.
Paddle * for manually shifting gears (auto-
matic transmission).
Controls for voice commands, adjusting the head-up display, accessing menus and mes-sages, and handling phone calls.
2 Speed limiter *, Cruise Control, Adaptive Cruise Control *, Distance Alert * and Pilot Assist *.
Page 580 of 674
||
LOADING, STORAGE AND PASSENGER COMPARTMENT
* Option/accessory.
578
Extra cargo space
The rear seat backrests can be folded down to increase cargo compartment space and simplifyloading. If the rear seat backrests are foldeddown, make sure that no objects loaded into thevehicle prevent the WHIPS system for the frontseats from functioning correctly. The ski hatch in the rear seat can be folded down to carry skis or other long, thin objects.
Raising/lowering the rear end of the
vehicle *
The rear end of the vehicle can be lowered orraised for easier loading or to facilitate attaching a trailer*.
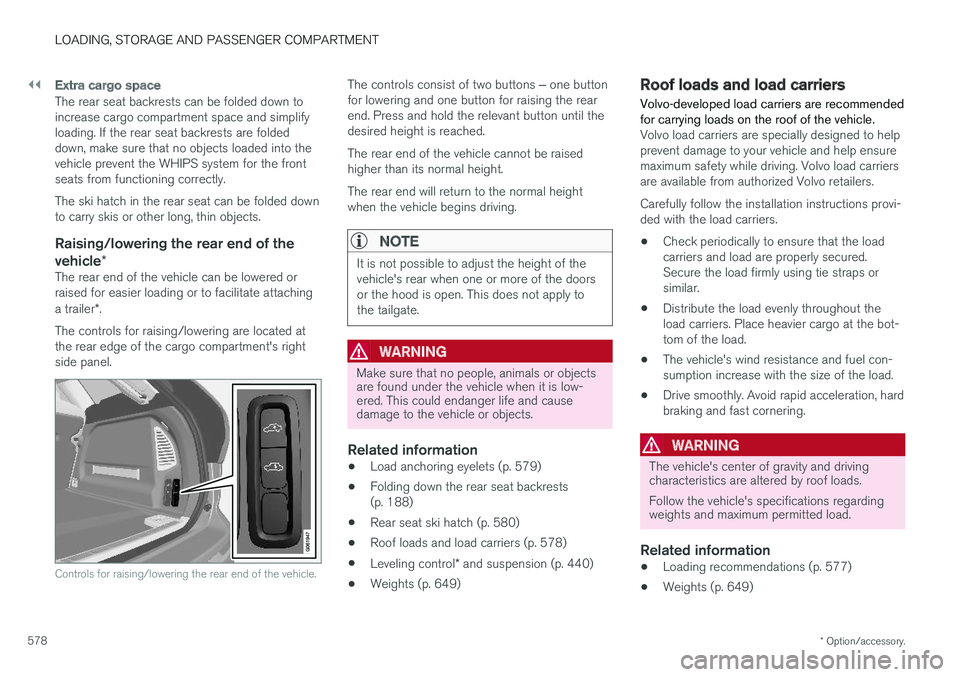
The controls for raising/lowering are located at the rear edge of the cargo compartment's rightside panel.
Controls for raising/lowering the rear end of the vehicle.
The controls consist of two buttons ‒ one button
for lowering and one button for raising the rear end. Press and hold the relevant button until thedesired height is reached. The rear end of the vehicle cannot be raised higher than its normal height. The rear end will return to the normal height when the vehicle begins driving.
NOTE
It is not possible to adjust the height of the vehicle's rear when one or more of the doorsor the hood is open. This does not apply tothe tailgate.
WARNING
Make sure that no people, animals or objects are found under the vehicle when it is low-ered. This could endanger life and causedamage to the vehicle or objects.
Related information
• Load anchoring eyelets (p. 579)
• Folding down the rear seat backrests (p. 188)
• Rear seat ski hatch (p. 580)
• Roof loads and load carriers (p. 578)
• Leveling control
* and suspension (p. 440)
• Weights (p. 649)
Roof loads and load carriers Volvo-developed load carriers are recommended for carrying loads on the roof of the vehicle.
Volvo load carriers are specially designed to help prevent damage to your vehicle and help ensuremaximum safety while driving. Volvo load carriersare available from authorized Volvo retailers. Carefully follow the installation instructions provi- ded with the load carriers. •Check periodically to ensure that the load carriers and load are properly secured.Secure the load firmly using tie straps orsimilar.
• Distribute the load evenly throughout theload carriers. Place heavier cargo at the bot-tom of the load.
• The vehicle's wind resistance and fuel con-sumption increase with the size of the load.
• Drive smoothly. Avoid rapid acceleration, hardbraking and fast cornering.
WARNING
The vehicle's center of gravity and driving characteristics are altered by roof loads. Follow the vehicle's specifications regarding weights and maximum permitted load.
Related information
•Loading recommendations (p. 577)
• Weights (p. 649)
Page 586 of 674

||
LOADING, STORAGE AND PASSENGER COMPARTMENT
* Option/accessory.
584
4. Screw the provided screw into place using
the provided 6 mm Allen wrench. Repeat on the other side. Recommended torque:20 Nm (15 ft-lb).
> Check to make sure the steel grid issecurely in place.
5. Return the backrest to the upright position. For more information on necessary tools and pro- cedures for installing/removing, see the assem-bly instructions provided with the steel grid.
CAUTION
The steel cargo grid cannot be folded up or down when a cargo compartment cover ismounted.
Related information
• Loading recommendations (p. 577)
• Load anchoring eyelets (p. 579)
Installing and removing the cargo
net
*
The cargo net helps prevent objects in the cargo compartment from entering the passenger com-partment in the event of a sudden stop or hardbraking.
The cargo net is attached at four points.
For safety reasons, the cargo net must always be mounted and secured according to the followingdescription. The net is made of strong nylon weave and can be attached in two different locations in the vehi-cle:
• Rear mounting - behind the rear seats.
• Front mounting - behind the front seats.
WARNING
Objects in the cargo compartment must always be securely anchored, even with a cor-rectly installed cargo net.
Installing the cargo net
WARNING
All of the cargo net's upper consoles, hooks and straps must be securely mounted andattached before the net is used. Never use the net if it is damaged.
NOTE
With front mounting, the cargo net is most easily installed via a rear door.
1. Fold out the cargo net and make sure that
the upper rod folds out and locks into posi- tion.
2. Insert one of the net's hooks into the front or rear ceiling mounting point with the straplock facing you.
Page 667 of 674

INDEX
665
in cellular phone 20
in the center display 17, 18
P
Paddle at steering wheel 192 Paint
color code 636
paint damage and touch-up 635, 636
Panoramic roof opening and closing 169
pinch protection 162
sun shade 168, 171
ventilation position 170
PAP – Park Assist Pilot 386, 387, 390, 391, 393, 394
Park Assist Camera 377, 378, 379, 381, 382, 384, 385
settings 382
Park Assist Camera limitations 382
Park Assist Pilot 386, 387, 390, 391, 393, 394
function 386, 387, 391, 393, 394
limitations 391
operation 387, 390
Symbols and messages 394
Park Assist Pilot – PAP 386, 387, 390, 391, 393, 394
parking on hills 424
Parking Assist 372, 373, 374, 375, 376 function 372, 373, 374
Parking brake 422 activate and deactivate 423
automatic activation 424
Low battery charge level 425
Parking climate 220 Symbols and messages 226
Passenger compartment filter 201
Passenger compartment interior 570 center console 571
electrical outlet 572
glove compartment 575
sun visor 576
Passenger compartment lighting 158, 159 auto switch 158
Passing assistance 294, 311
personal information (Privacy Policy) 34
Phone 510 changing to another 514
connect 511
connect automatically 513
connect manually 513
delete 515disconnect 514
phone call 515, 517
text message 516
voice control 143
Pilot Assist 301, 304, 305, 306, 307, 309, 311, 312, 313, 314
pass 311
pinch protection 162 resetting 163
PIN code 523
Polishing 629
Position lights 150
Power 651 electric motor 651
Power folding door mirrors 166
Power panoramic roof 168
Power save mode 459
Power seats 181
Power tailgate 251
Power windows 163, 164 pinch protection 162
Preconditioning 221 start/stop 222
timer 223
Pressure wash 632
Privacy Policy 34