2018 VOLVO V90 seats
[x] Cancel search: seatsPage 409 of 656

STARTING AND DRIVING
}}
407
Braking on salted roads When driving on salted roads, a layer of salt may form on the brake discs and brake pads.
This could increase stopping distance. Maintain an extra large safety distance to the vehicleahead. Make sure to also:
• Apply the brakes from time to time to helpremove salt. Make sure braking does notpose a risk to any other road users.
• Gently apply the brakes when you have fin-ished driving and before driving again.
Related information
• Brakes (p. 405)
• Braking on wet roads (p. 406)
Maintenance of the brake system
Regularly check the brake system components for wear.
To keep the vehicle as safe and reliable as possi- ble, follow the Volvo service schedule specified inthe Warranty and Maintenance Records Informa-tion booklet. New and replaced brake pads andbrake discs do not provide optimal braking effectuntil they are "broken in" by driving a few hun-dred kilometers (miles). Compensate for thereduced braking effect by applying greater pres-sure to the brake pedal. Volvo recommends onlyusing brake pads approved for your Volvo.
CAUTION
The brake system's components should be regularly checked for wear. Contact a workshop for advice on how to do this or let a workshop perform the inspection- an authorized Volvo workshop is recom-mended.
Related information
• Brakes (p. 405)
Parking brake The parking brake helps keep the vehicle sta- tionary by mechanically locking two wheels.
The parking brake controls are located in the tunnel console between the seats.
When the electric parking brake is being applied, a faint sound can be heard from the brake's elec-tric motor. This sound can also be heard duringthe automatic function check of the parkingbrake. If the vehicle is stationary when the parking brake is applied, it will only be applied to the rearwheels. If it is applied while the vehicle is moving,the normal brakes will be used on all four wheels.Braking will be transferred to only the rearwheels when the vehicle is almost stopped.
Page 550 of 656

LOADING, STORAGE AND PASSENGER COMPARTMENT
* Option/accessory.
548
Passenger compartment interior
Overview of the passenger compartment interior and storage spaces.
Front seats
Storage compartment in the door panel and near the steering wheel, glove compartment and sun visors.
Storage compartments with cup holders, electrical out- lets, net pocket * and USB ports in the tunnel console.
Rear seat
Storage compartment in the door panel, cup holders * in
the center seat's backrest, storage pocket * in the front
seat's backrest and electrical outlets in the tunnel con- sole.
WARNING
Store loose objects, such as cell phone, cam- era, remote control for extra equipment, etc.,in the glove compartment or another compart-ment. Otherwise, these could injure people inthe vehicle in the event of hard braking or acollision.
CAUTION
Keep in mind that glossy surfaces can be easily scratched by e.g. metal objects. Do notplace keys, phones or similar items on sensi-tive surfaces.
Related information
• Electrical outlets (p. 550)
• Using the glove compartment (p. 553)
• Sun visors (p. 554)
• Tunnel console (p. 549)
• Connecting a device via the USB port (p. 482)
Page 551 of 656

LOADING, STORAGE AND PASSENGER COMPARTMENT
* Option/accessory.549
Tunnel console The tunnel console is located between the front seats.
Storage compartment with cover *. The cover
can be opened/closed by pressing the han- dle.
Storage compartment with a 12 V outlet and cup holders for the driver and passenger.
Storage compartment and USB port under the armrest.
Climate control panel for the rear seats * or
storage compartment.
WARNING
Store loose objects, such as cell phone, cam- era, remote control for extra equipment, etc.,in the glove compartment or another compart-ment. Otherwise, these could injure people inthe vehicle in the event of hard braking or acollision.
NOTE
One of the sensors for the alarm * is located
under the cup holder in the center console. Avoid placing coins, keys and other metalobjects in the cup holder as this could triggerthe alarm.
CAUTION
Keep in mind that glossy surfaces can be easily scratched by e.g. metal objects. Do notplace keys, phones or similar items on sensi-tive surfaces.
Related information
• Passenger compartment interior (p. 548)
• Electrical outlets (p. 550)
• Climate system controls (p. 214)
Page 558 of 656

||
LOADING, STORAGE AND PASSENGER COMPARTMENT
* Option/accessory.
556
Extra cargo space
The rear seat backrests can be folded down to increase cargo compartment space and simplifyloading. If the rear seat backrests are foldeddown, make sure that no objects loaded into thevehicle prevent the WHIPS system for the frontseats from functioning correctly. The ski hatch in the rear seat can be folded down to carry skis or other long, thin objects.
Related information
• Load anchoring eyelets (p. 557)
• Folding down the rear seat backrests(p. 196)
• Rear seat ski hatch (p. 558)
• Roof loads and load carriers (p. 556)
• Leveling control
* and suspension (p. 428)
• Weights (p. 631)
Roof loads and load carriers Volvo-developed load carriers are recommended for carrying loads on the roof of the vehicle.
Volvo load carriers are specially designed to help prevent damage to your vehicle and help ensuremaximum safety while driving. Volvo load carriersare available from authorized Volvo retailers. Carefully follow the installation instructions provi- ded with the load carriers. •Check periodically to ensure that the load carriers and load are properly secured.Secure the load firmly using tie straps orsimilar.
• Distribute the load evenly throughout theload carriers. Place heavier cargo at the bot-tom of the load.
• The vehicle's wind resistance and fuel con-sumption increase with the size of the load.
• Drive smoothly. Avoid rapid acceleration, hardbraking and fast cornering.
WARNING
The vehicle's center of gravity and driving characteristics are altered by roof loads. Follow the vehicle's specifications regarding weights and maximum permitted load.
Related information
•Loading recommendations (p. 555)
• Weights (p. 631)
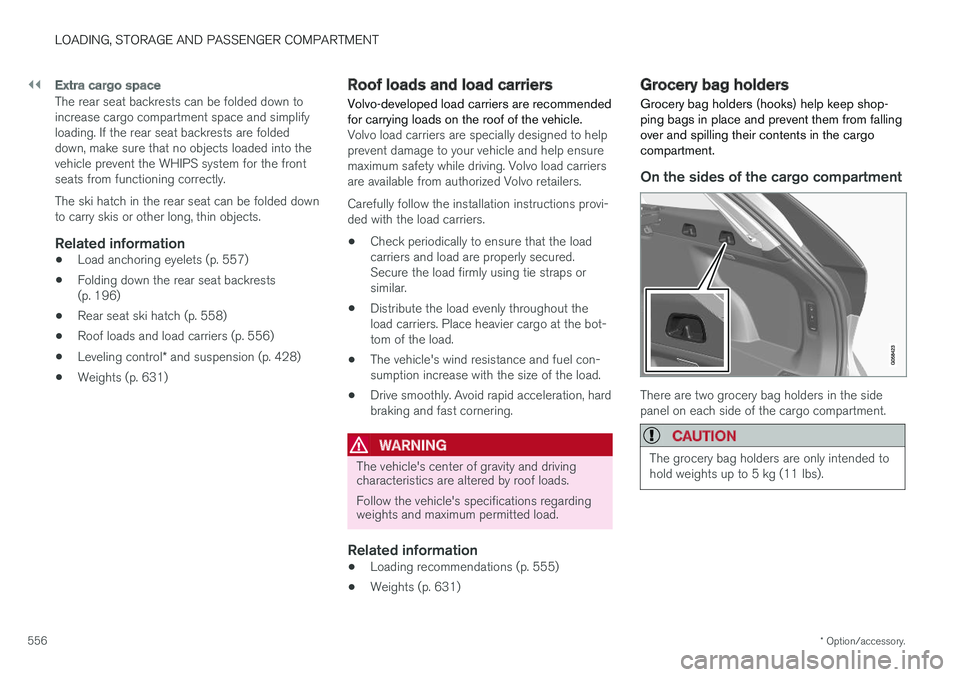
Grocery bag holders Grocery bag holders (hooks) help keep shop- ping bags in place and prevent them from fallingover and spilling their contents in the cargocompartment.
On the sides of the cargo compartment
There are two grocery bag holders in the side panel on each side of the cargo compartment.
CAUTION
The grocery bag holders are only intended to hold weights up to 5 kg (11 lbs).
Page 564 of 656

LOADING, STORAGE AND PASSENGER COMPARTMENT
* Option/accessory.
562
Installing and removing the cargo
net *
The cargo net helps prevent objects in the cargo compartment from entering the passenger com-partment in the event of a sudden stop or hardbraking.
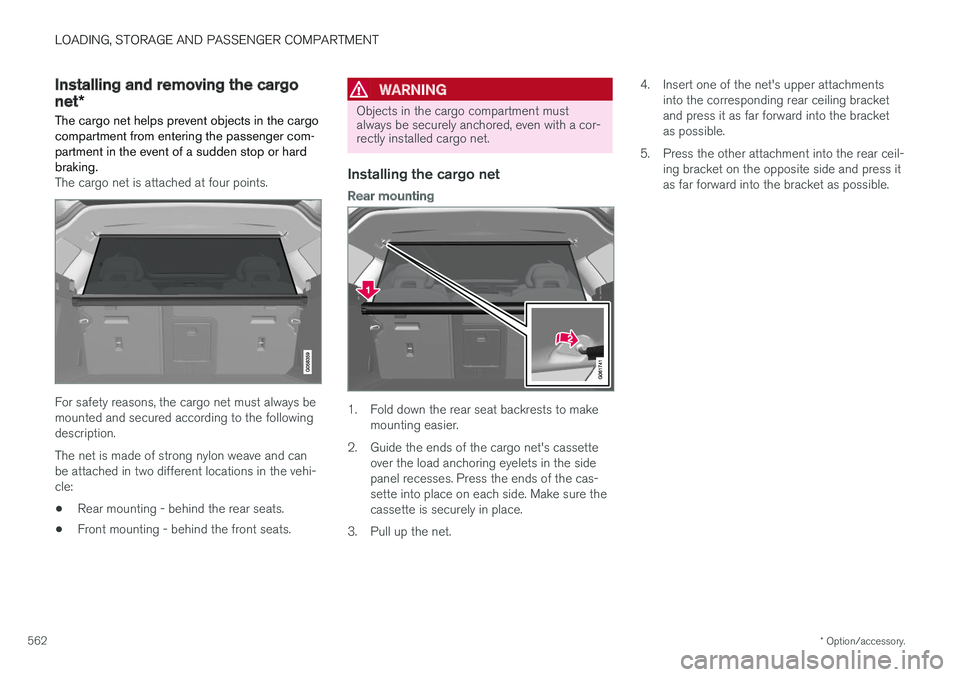
The cargo net is attached at four points.
For safety reasons, the cargo net must always be mounted and secured according to the followingdescription. The net is made of strong nylon weave and can be attached in two different locations in the vehi-cle:
• Rear mounting - behind the rear seats.
• Front mounting - behind the front seats.
WARNING
Objects in the cargo compartment must always be securely anchored, even with a cor-rectly installed cargo net.
Installing the cargo net
Rear mounting
1. Fold down the rear seat backrests to make
mounting easier.
2. Guide the ends of the cargo net's cassette over the load anchoring eyelets in the side panel recesses. Press the ends of the cas-sette into place on each side. Make sure thecassette is securely in place.
3. Pull up the net. 4. Insert one of the net's upper attachments
into the corresponding rear ceiling bracketand press it as far forward into the bracketas possible.
5. Press the other attachment into the rear ceil- ing bracket on the opposite side and press itas far forward into the bracket as possible.
Page 599 of 656

MAINTENANCE AND SERVICE
}}
* Option/accessory.597
Fuse pliers are provided on the inside of the fuse box cover to assist in removing and insertingfuses. There are also spaces for several extra fuses in the fusebox.
PositionsThere is a decal with a diagram of the locationsof the fuses on the inside of the cover.
• Fuses 1-13, 18-30, 35-37 and 46-54 are"Micro" fuses.
• Fuses 14-17, 31-34 and 38-45 are"MCase" fuses and should only be replaced by a workshop 21
.
FunctionAA
– –
– –
– –
Ignition coils (gasoline); spark plugs (gasoline) 15
Oil pump solenoid; A/C mag- netic coupling; heated oxygensensor, center (gasoline); heatedoxygen sensor, rear (diesel)15
FunctionAA
Vacuum regulators; valve; valve for power pulse (diesel)
7.5
Engine control module; actuator; throttle unit; EGR valve (diesel);turbo position sensor (diesel);turbocharger valve (gasoline) 20
Engine control module 5
– –
Solenoids (gasoline); valve; Engine cooling system thermo-stat (gasoline); EGR coolingpump (diesel); glow controlmodule (diesel)10
Spoiler shutter control module; Radiator shutter control module;Relay windings for power pulse(diesel)
5
Heated oxygen sensor, front; Heated oxygen sensor, rear(gasoline)
15
Engine control module 20
Starter motor 40
FunctionAA
Starter motor Shunt
Fuel filter heater (diesel) 30
– –
– –
– –
– –
– –
– –
– –
12 V outlet in tunnel console, front
15
12 V outlet in tunnel console between rear seats15
12 V outlet in trunk/cargo com- partment
* 15
– –
Left-side headlight, some mod- els with LED
B 15
21
An authorized Volvo workshop is recommended.
Page 602 of 656

||
MAINTENANCE AND SERVICE
* Option/accessory.
600 Fuse pliers are provided on the inside of the fuse box cover to assist in removing and insertingfuses. There are also spaces for several extra fuses in the
distribution box in the engine compart-
ment .
Positions
•Fuses 1, 3-21, 23-36, 39-53 and 55-59 are "Micro" fuses.
• Fuses 2-22, 37-38 and 54 are "MCase"fuses and should only be replaced by a work- shop 22
.
FunctionAA
– –
Electrical outlet in tunnel console between rear seats * 30
– –
Movement sensor
* 5
Media player 5
Instrument panel 5
Center console buttons 5
Sun sensor 5
FunctionAA
– –
– –
Steering wheel module 5
Module for start knob and parking brake controls 5
Heated steering wheel
* module 15
– –
– –
– –
– –
Climate system control module 10
– –
Data link connector OBD-II 10
Center display 5
Climate system blower module (front) 40
USB HUB 5
FunctionAA
Instrument lighting; Interior lighting; Rearview mirror auto-dim function
*;
Rain and light sensors *; Rear tun-
nel console keypad, rear seat *;
Power front seats *; Rear door con-
trol panels; Climate system blower module left/right 7.5
Control module for driver support functions
5
Panoramic roof with sun curtain
*20
Head-up display
* 5
Passenger compartment lighting 5
– –
Ceiling console display (seat belt reminder/front passenger side air-bag indicator) 5
– –
Humidity sensor 5
Door module in right-side rear door 20
Fuses in the trunk/cargo compart- ment
10
22
An authorized Volvo workshop is recommended.
Page 604 of 656

MAINTENANCE AND SERVICE
* Option/accessory.
602
Fuses in the cargo compartment The fuses in the cargo compartment help pro- tect electrical components such as the power seats *, airbags and seat belt tensioners.