2018 VOLVO S90 maintenance
[x] Cancel search: maintenancePage 604 of 640

MAINTENANCE AND SERVICE
602
Paintwork
The paintwork consists of multiple layers. It is an important part of the vehicle's corrosion protec-tion and therefore needs to be checked regu-larly.
The most common types of paint damage are minor stone chips, scratches and damage to e.g.the edges of fenders, doors and bumpers. Tohelp prevent corrosion, paint damage should berectified immediately.
Related information
• Touching up minor paint damage (p. 602)
• Color codes (p. 603)
Touching up minor paint damage
The paintwork is an important part of the vehi- cle's corrosion protection and therefore needsto be checked regularly. The most commontypes of paint damage are minor stone chips,scratches and damage to e.g. the edges offenders, doors and bumpers. When repairing paint damage, the vehicle must be clean, dry and have a temperature above15 °C (60 °F).
Touching up minor paint damageTo help prevent corrosion, paint damage should be rectified immediately.
NOTE
When repairing paintwork, it must be clean, dry and at a temperature of at least 15°C.
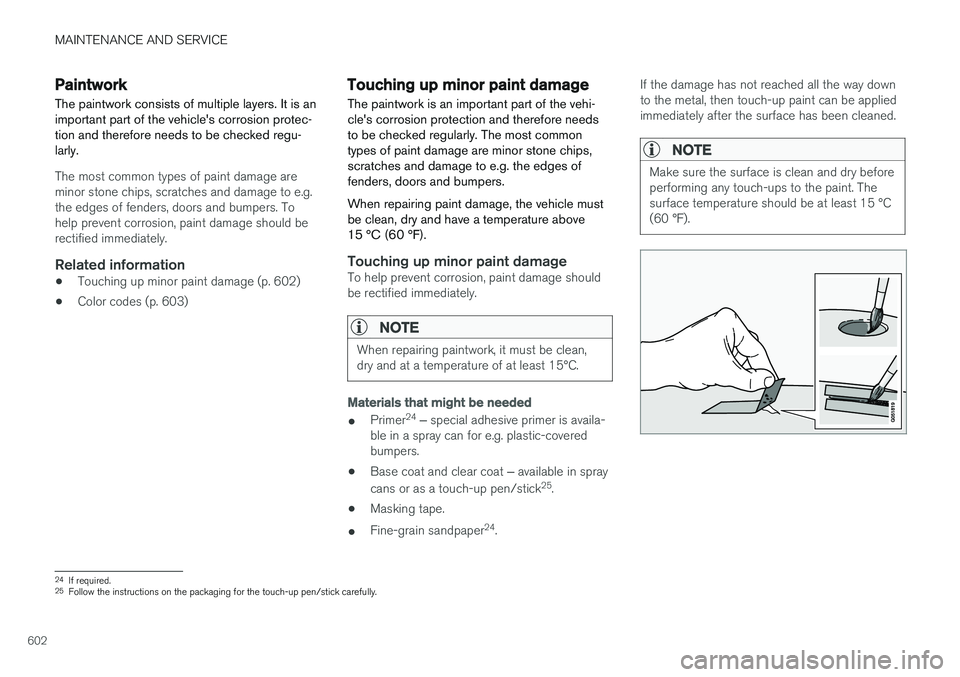
Materials that might be needed
• Primer 24
‒
special adhesive primer is availa-
ble in a spray can for e.g. plastic-covered bumpers.
• Base coat and clear coat
‒ available in spray
cans or as a touch-up pen/stick 25
.
• Masking tape.
• Fine-grain sandpaper 24
. If the damage has not reached all the way downto the metal, then touch-up paint can be appliedimmediately after the surface has been cleaned.
NOTE
Make sure the surface is clean and dry before performing any touch-ups to the paint. Thesurface temperature should be at least 15 °C(60 °F).
24
If required.
25 Follow the instructions on the packaging for the touch-up pen/stick carefully.
Page 605 of 640

MAINTENANCE AND SERVICE
}}
603
1. Place a strip of masking tape over the dam-
aged surface. Pull the tape off so that any loose flakes of paint adhere to it. If the damage goes down to the bare metal, you may need to use primer first. If the paintdamage is on a plastic surface, an adhesiveprimer should be used for better results.Spray the primer into the lid of the spray canand brush on thinly.
2. Light sanding with a very fine-grained sand- paper or similar may be required beforepainting (e.g. if there are uneven edges).Clean the area carefully and let it dry.
3. Thoroughly mix the primer and apply it with a small brush, toothpick or similar. When theprimer is dry, apply one or more coats ofpaint and then a clear coat, letting the paintdry between each application.
If there is a longer scratch, follow the same pro-cedure as above, but first mask off the surround-ing area to protect the undamaged paint. Touch-up pens and spray paints are available at Volvo retailers.
NOTE
If the stone chip has not gone down to the bare metal and an undamaged coat of paintremains, apply base coat and clear coatimmediately after cleaning the surface.
Related information
• Paintwork (p. 602)
• Color codes (p. 603)
Color codes
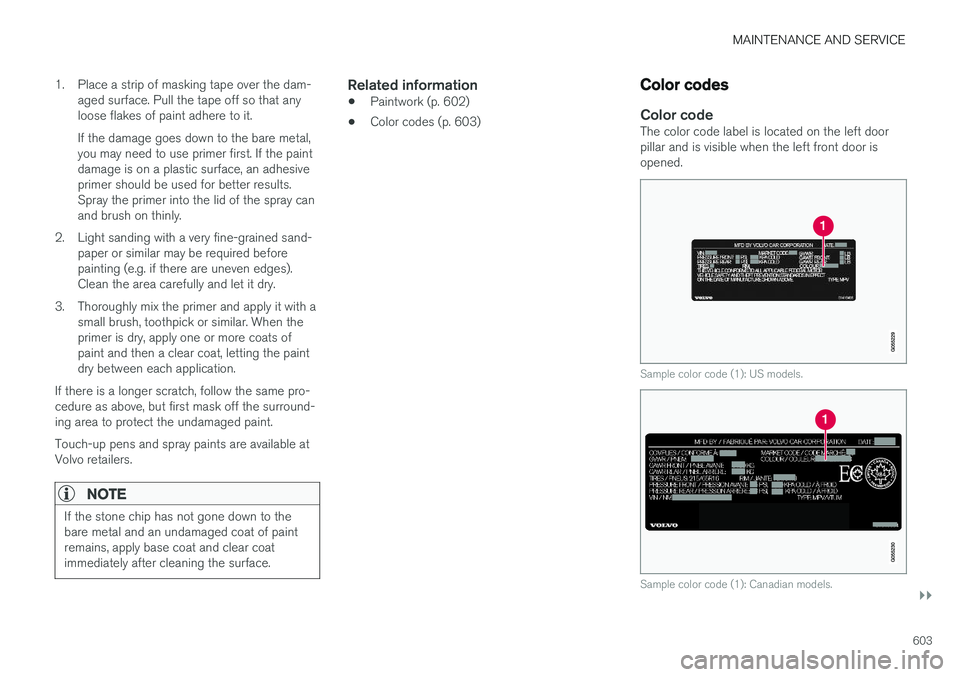
Color codeThe color code label is located on the left door pillar and is visible when the left front door isopened.
Sample color code (1): US models.
Sample color code (1): Canadian models.
Page 606 of 640

||
MAINTENANCE AND SERVICE
604It is important to use the right color.
Related information
•
Paintwork (p. 602)
• Touching up minor paint damage (p. 602)
Replacing windshield wiper blades
The wiper blades help remove water from the windshield. Along with the washer fluid, theyclean the glass and help improve visibility whiledriving. The wiper blades can be replaced.
Replacing wiper blades
Raise the wiper arms to the service position. Service position is activated/deactivated viathe function view in the center display whenthe car is stationary and the windshield wip-ers are not on. Press the button on the wiperblade attachment and pull the wiper bladestraight out, parallel with the wiper arm.
Slide in a new wiper blade until it clicks into place.
3. Check to make sure the blade is securely in place.
4. Press the wiper blade back against the wind- shield.
Wiper blades come in varying lengths.
Page 607 of 640

MAINTENANCE AND SERVICE
}}
* Option/accessory.605
NOTE
The wiper blades are different lengths. The blade on the driver's side is longer than theone on the passenger side.
Related information
•Using the rain sensor (p. 180)
• Using the windshield and headlight washers (p. 182)
• Heated windshield washer nozzles
* (p. 180)
• Using the rain sensor's memory function(p. 181)
• Filling washer fluid (p. 606)
• Windshield wipers in the service position(p. 605)
• Using the windshield wipers (p. 179)
Windshield wipers in the serviceposition
The windshield wiper blades must be in the serv- ice (vertical) position when performing certainoperations, e.g. replacing the blades.
Windshield wipers in the service position.
The windshield wipers must be in the service position when replacing, washing or lifting theblades (e.g. to scrape ice or snow from the wind-shield).
CAUTION
Before placing the wipers in service position, ensure that they have not frozen to the wind-shield.
Activating/deactivating service positionThe service position can be activated/deactivated when the vehicle is stationary and the windshieldwipers are switched off. Service position is acti-vated/deactivated via Function view in the centerdisplay:
Tap the
Wiper Service
Position button. The indicator
light in the button will illuminate when service position is acti-vated. The windshield wiperswill move to the vertical posi-tion when service position is
activated. To deactivate the service position, tap
Wiper Service Position once. The indicator light
in the button will go out when service position is deactivated.
Page 608 of 640

||
MAINTENANCE AND SERVICE
* Option/accessory.
606 The wiper blades will also move out of service position if:
• The windshield wipers are turned on.
• The windshield washers are turned on.
• The rain sensor is activated.
• The vehicle begins moving.
CAUTION
If the wiper arms in service position are raised from the windshield, they must be folded backagainst the windscreen before activating wip-ing, washing or rain sensor as well as beforedeparture. This is to prevent scratching thepaint on the hood.
Related information
• Using the rain sensor (p. 180)
• Using the windshield and headlight washers (p. 182)
• Heated windshield washer nozzles
* (p. 180)
• Using the rain sensor's memory function(p. 181)
• Filling washer fluid (p. 606)
• Replacing windshield wiper blades (p. 604)
• Using the windshield wipers (p. 179)
Filling washer fluid
Washer fluid is used to help keep the headlights and windshield clean. Washer fluid containinganti-freeze should be used in very cold weather(below-freezing temperatures).
Fill washer fluid into the reservoir with the blue cover. The reservoir is used for both the wind- shield washer and the headlight washer *
NOTE
When there is approximately 1 liter (1 qt) of washer fluid remaining, the message Washer
fluid
Level low, refill and the symbol
will be displayed in the instrument panel.
Recommended grade: Washer fluid recom-
mended by Volvo, with frost protection during cold weather and temperatures below the freez- ing point.
CAUTION
Use Volvo's original washer fluid or an equiva- lent fluid with the recommended pH valuebetween 6 and 8, diluted as recommended,e.g. in a 1:1 solution with pH-neutral water.
CAUTION
Use washer fluid with anti-freeze when tem- peratures are below the freezing point to helpkeep the pump, reservoir and hoses fromfreezing.
Volume: The washer fluid reservoir has a volume of 5.5 lit- ers (5.8 qts).
Related information
•
Using the rain sensor (p. 180)
• Using the windshield and headlight washers(p. 182)
• Heated windshield washer nozzles
* (p. 180)
• Using the rain sensor's memory function(p. 181)
• Windshield wipers in the service position(p. 605)
Page 609 of 640

MAINTENANCE AND SERVICE
607
•
Replacing windshield wiper blades (p. 604)
• Using the windshield wipers (p. 179)
Page 626 of 640

INDEX
624
B
Backrestfront seat, adjusting 184, 185, 188, 189 , 190
rear seat, adjusting 192
Battery jump-start 433
Maintenance 573
start 573
support 576
symbols on the battery 577
warning symbols 577
BLIS 337, 338, 339, 340 Blower adjusting 220, 221
air distribution 202
air vents 203
Bluetooth connect 471
connecting vehicle to Internet 489
phone 478
settings 487
Book service and repair 552
Booster cushions 71Brake assist after collision 407
Brake fluidgrade 619
Brake functions 398
Brake light 159
Brakes 399 anti-lock brakes, ABS 399
automatic when stationary 405
Brake Assist System, BAS 400
brake lights 159
brake system 398
emergency brake lights 159
handbrake 401
Maintenance 401
on salted roads 401
on wet roads 400
brake system fluid 619
C
Camera sensor 333
Camera unit 320
Capacity weight 536, 615
Cargo compartment 543
attachment points 545
Car wash 595, 596, 598, 599, 600, 601
Catalytic converter 431 recovery 434
CD player 469
Cell phone, see Phone 479
Center console 539Center display change appearance 129
cleaning 590
climate controls 208
Function view 120
keyboard 124
messages 138, 139, 140
operation 110, 113, 117, 122
overview 107
settings 130, 131, 132
switch off and change volume 129
symbols in status bar 122
views 113
Central locking 247
Change of owner 132
Changing a wheel 522
Checking engine oil level 561
Child restraints 63, 65 booster cushions 71
convertible seats 69
infant seats 67
ISOFIX/LATCH anchors 74
lower attachment points 73
Page 632 of 640

INDEX
630
M
Maintenance 548corrosion protection 601
Max. axle weight 615
Max. roof load 615
Media player 465, 466, 467 compatible file formats 494, 495
voice control 146
Messages and symbols Adaptive Cruise Control 298
Collision warner with auto-brake 335
Messages in BLIS 341
Messages in display 102, 138 handling 103, 139
saved 105, 140
Mileage 85 Misting condensation in headlights 595, 598
Mood lighting 162
O
Occupant safety 43
Occupant weight sensor 56
Octane rating 429
Oil, see also Engine oil 618
On-board diagnostics 548
On-board Diagnostic socket 36
Option/accessory 21
Outside temperature gauge 90
Overheating 431
Owner's information 16
OWNER'S MANUAL 21 in cellular phone 20
in the center display 17, 18
P
Paddle at steering wheel 192 Paint
color code 603
paint damage and touch-up 602, 603
Panoramic roof opening and closing 175
pinch protection 166
sun shade 174, 179
ventilation position 176
PAP – Park Assist Pilot 384, 385, 388, 389, 391, 392
Park Assist Camera 375, 376, 377, 379,
380, 382, 383
settings 380
Park Assist Camera limitations 380
Park Assist Pilot 384, 385, 388, 389, 391, 392
function 384, 385, 389, 391, 392
limitations 389
operation 385, 388
Symbols and messages 392
Park Assist Pilot – PAP 384, 385, 388, 389, 391, 392
parking on hills 404
Parking Assist 370, 371, 372, 373, 374 function 370, 371, 372
Parking brake 401 activate and deactivate 402
automatic activation 403
Low battery charge level 404
Passenger compartment filter 201
Passenger compartment interior 538 center console 539
electrical outlet 539
glove compartment 541
sun visor 542
Passenger compartment lighting 161, 162 auto switch 161