2018 VOLVO S60 INSCRIPTION ECU
[x] Cancel search: ECUPage 57 of 396

SAFETY
}}
55
Related information
•Child safety (p. 46)
• Child restraints (p. 47)
• Infant seats (p. 49)
• Convertible seats (p. 52)
• ISOFIX/LATCH lower anchors (p. 55)
• Top tether anchors (p. 56)
ISOFIX/LATCH lower anchors Lower anchors for ISOFIX/LATCH-equipped child seats are located in the rear, outboardseats, hidden below the backrest cushions.
Using the ISOFIX/LATCH lower child seat anchors
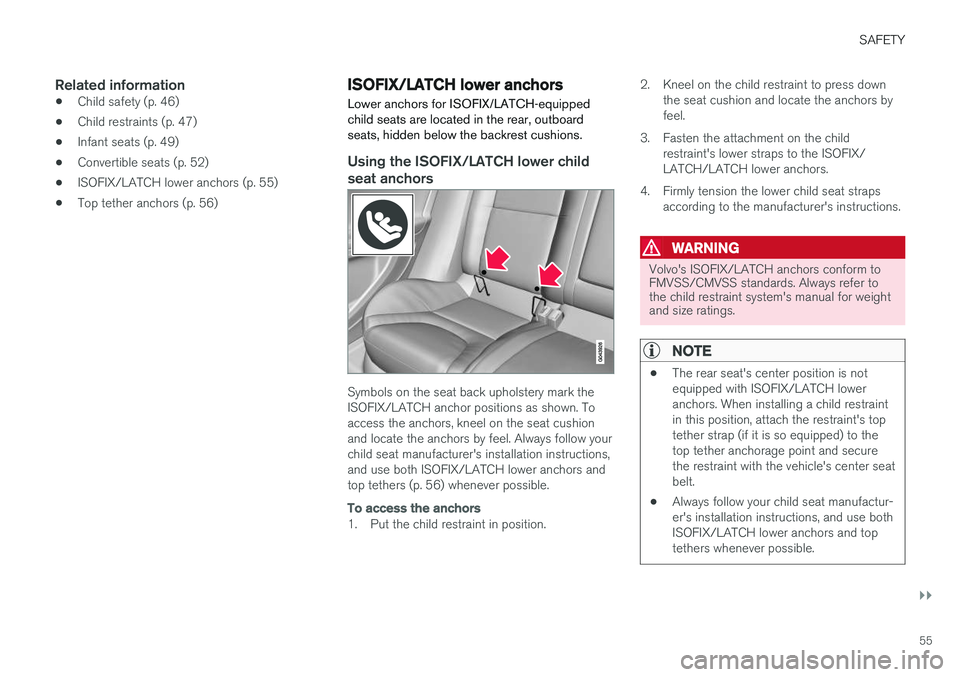
Symbols on the seat back upholstery mark the ISOFIX/LATCH anchor positions as shown. Toaccess the anchors, kneel on the seat cushionand locate the anchors by feel. Always follow yourchild seat manufacturer's installation instructions,and use both ISOFIX/LATCH lower anchors andtop tethers (p. 56) whenever possible.
To access the anchors
1. Put the child restraint in position. 2. Kneel on the child restraint to press down
the seat cushion and locate the anchors by feel.
3. Fasten the attachment on the child restraint's lower straps to the ISOFIX/LATCH/LATCH lower anchors.
4. Firmly tension the lower child seat straps according to the manufacturer's instructions.
WARNING
Volvo's ISOFIX/LATCH anchors conform to FMVSS/CMVSS standards. Always refer tothe child restraint system's manual for weightand size ratings.
NOTE
• The rear seat's center position is not equipped with ISOFIX/LATCH loweranchors. When installing a child restraintin this position, attach the restraint's toptether strap (if it is so equipped) to thetop tether anchorage point and securethe restraint with the vehicle's center seatbelt.
• Always follow your child seat manufactur-er's installation instructions, and use bothISOFIX/LATCH lower anchors and toptethers whenever possible.
Page 58 of 396

||
SAFETY
56
G018631
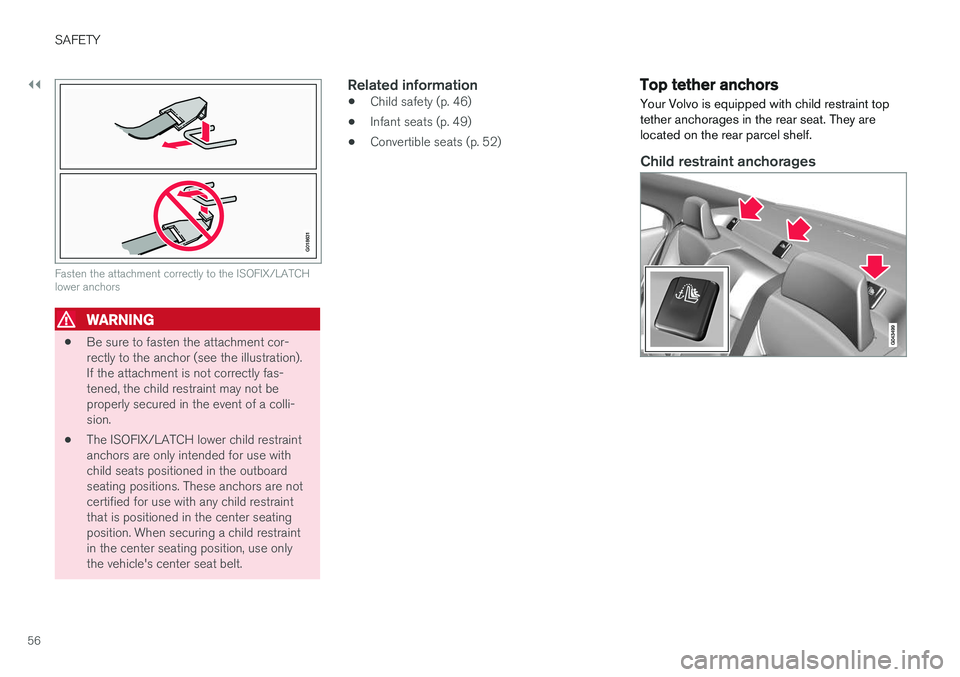
Fasten the attachment correctly to the ISOFIX/LATCH lower anchors
WARNING
•Be sure to fasten the attachment cor- rectly to the anchor (see the illustration).If the attachment is not correctly fas-tened, the child restraint may not beproperly secured in the event of a colli-sion.
• The ISOFIX/LATCH lower child restraintanchors are only intended for use withchild seats positioned in the outboardseating positions. These anchors are notcertified for use with any child restraintthat is positioned in the center seatingposition. When securing a child restraintin the center seating position, use onlythe vehicle's center seat belt.
Related information
• Child safety (p. 46)
• Infant seats (p. 49)
• Convertible seats (p. 52)
Top tether anchors
Your Volvo is equipped with child restraint top tether anchorages in the rear seat. They arelocated on the rear parcel shelf.
Child restraint anchorages
Page 59 of 396

SAFETY
57
Securing a child seat
1. Place the child restraint on the rear seat.
2. Fold up the plastic cover over the anchorageto be used.
3. Route the top tether strap under the head restraint and attach it to the anchor.
4. Fold down the outboard head restraints or lower the center head restraint for easier access to the ISOFIX/LATCH anchor.
5. Attach lower tether straps to the lower ISO- FIX/LATCH anchors. If the child restraint isnot equipped with lower tether straps, or therestraint is used in the center seating posi-tion, follow instructions for securing a childrestraint using the Automatic LockingRetractor seat belt (see Child restraints(p. 47)).
6. Firmly tension all straps. Refer also to the child seat manufacturer's instructions for information on securing the childseat.
WARNING
• Always refer to the recommendations made by the child restraint manufacturer.
• Volvo recommends that the top tetheranchors be used when installing a for-ward-facing child restraint.
• Never route a top tether strap over thetop of the head restraint. The strapshould be routed beneath the headrestraint.
• Child restraint anchorages are designedto withstand only those loads imposed bycorrectly fitted child restraints. Under nocircumstances are they to be used foradult seat belts or harnesses. The ancho-rages are not able to withstand excessiveforces on them in the event of collision iffull harness seat belts or adult seat beltsare installed to them. An adult who uses abelt anchored in a child restraint anchor-age runs a great risk of suffering severeinjuries should a collision occur.
• Do not install rear speakers that requirethe removal of the top tether anchors orinterfere with the proper use of the toptether strap.
Related information
•Child safety (p. 46)
• Infant seats (p. 49) •
Convertible seats (p. 52)
• ISOFIX/LATCH lower anchors (p. 55)
Page 77 of 396

INSTRUMENTS AND CONTROLS
* Option/accessory.75
Ignition mode I
–With the remote key fully pressed into the ignition slot8
, press START/STOP ENGINE
briefly.
Ignition mode II
–With the remote key fully pressed into the ignition slot 8
, press START/STOP ENGINE
for approximately 2 seconds.
Returning to mode 0
To return to mode 0 from mode II or I, press
START/STOP ENGINE briefly.
Starting and stopping the engineSee Starting the engine (p. 250) and Switching off the engine (p. 252) for information on star-ting the engine and switching it off.
Emergency towingSee Towing the vehicle (p. 286) for importantinformation about the remote key when the vehi-cle is being towed.
Related information
•Inserting/removing remote key (p. 73)
Front seats
The front seats can be adjusted in a number of ways to help provide the most comfortable seat-ing position.
Raise/lower the seat, pump up/down.
Front-rear adjustment: lift the bar and move the seat to the position of your choice.
Raise/lower front edge of seat cushion, pump up/down.
Backrest tilt: turn the control to adjust the angle of the backrest.
Electronic lumbar support *. Press the button
to adjust.
Control panel for power seat *, see Front
seats – power seat (p. 76).
WARNING
• Do not adjust the seat while driving. The seat should be adjusted so that the brakepedal can be depressed fully. In addition,position the seat as far rearward as com-fort and control allow.
• Check that the seat is securely lockedinto position after adjusting.
Related information
• Front seats – power seat (p. 76)
• Rear seats – folding backrest (p. 81)
• Rear seats – head restraints (p. 79)
8
Not necessary in vehicles with the optional keyless drive.
Page 78 of 396

INSTRUMENTS AND CONTROLS
* Option/accessory.
76
Front seats – folding backrest *9
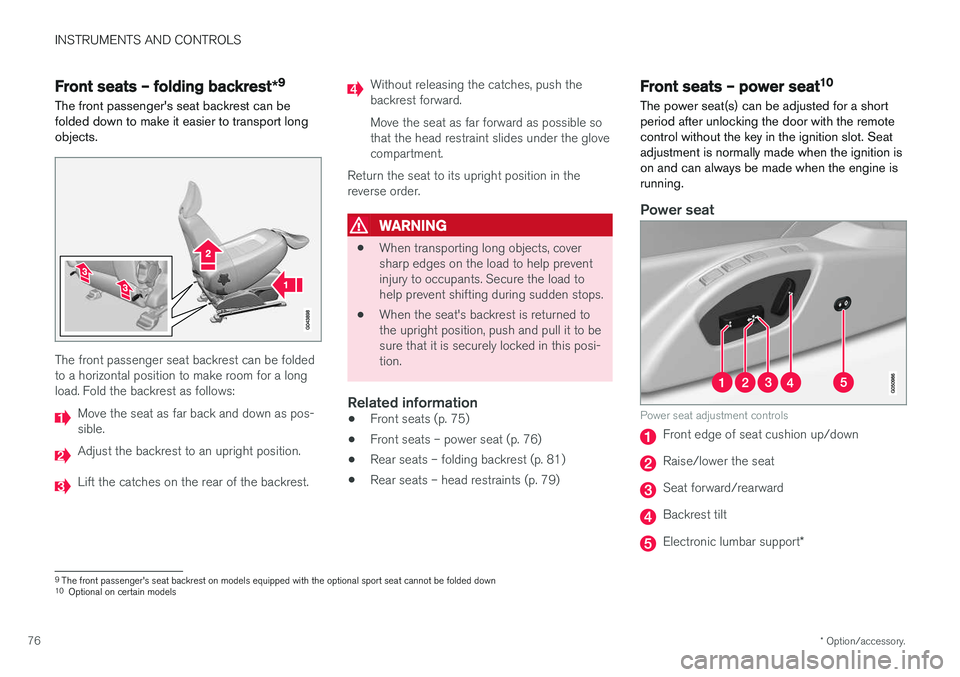
The front passenger's seat backrest can be folded down to make it easier to transport longobjects.
The front passenger seat backrest can be folded to a horizontal position to make room for a longload. Fold the backrest as follows:
Move the seat as far back and down as pos- sible.
Adjust the backrest to an upright position.
Lift the catches on the rear of the backrest.
Without releasing the catches, push the backrest forward. Move the seat as far forward as possible so that the head restraint slides under the glovecompartment.
Return the seat to its upright position in thereverse order.
WARNING
• When transporting long objects, cover sharp edges on the load to help preventinjury to occupants. Secure the load tohelp prevent shifting during sudden stops.
• When the seat's backrest is returned tothe upright position, push and pull it to besure that it is securely locked in this posi-tion.
Related information
•
Front seats (p. 75)
• Front seats – power seat (p. 76)
• Rear seats – folding backrest (p. 81)
• Rear seats – head restraints (p. 79)
Front seats – power seat 10
The power seat(s) can be adjusted for a short period after unlocking the door with the remotecontrol without the key in the ignition slot. Seatadjustment is normally made when the ignition ison and can always be made when the engine isrunning.
Power seat
Power seat adjustment controls
Front edge of seat cushion up/down
Raise/lower the seat
Seat forward/rearward
Backrest tilt
Electronic lumbar support *
9
The front passenger's seat backrest on models equipped with the optional sport seat cannot be folded down
10 Optional on certain models
Page 106 of 396

||
INSTRUMENTS AND CONTROLS
* Option/accessory.
104
Tilt position
G028899
Tilt position, raised at the rear edge
Open by pressing the rear edge of the con- trol upward.
Close by pulling the rear edge of the control downward and hold it until the moonroof hasclosed completely.
HomeLink ®
Wireless Control
System * – introduction
HomeLink ®
can be used to open garage doors,
gates, etc.WARNING
• If you use HomeLink ®
to open a garage
door or gate, be sure no one is near the gate or door while it is in motion.
• When programming a garage dooropener, it is advised to park outside of thegarage.
• Do not use HomeLink ®
with any garage
door opener that lacks safety stop andreverse features as required by U.S. fed-eral safety standards (this includes anygarage door opener model manufacturedbefore April 1, 1982). A garage door thatcannot detect an object - signaling thedoor to stop and reverse - does not meetcurrent U.S. federal safety standards. Formore information, contact HomeLink at:www.homelink.com.
The HomeLink ®
20
Wireless Control System pro-
vides a convenient way to replace up to threehand-held radio-frequency (RF) transmitters usedto activate devices such as gate operators,garage door openers, entry door locks, securitysystems, even home lighting. Additional informa-tion can be found on the Internet at,www.homelink.com/www.youtube.com/HomeLinkGentex or by phoning the hotline at 1–800–355–3515.
20 HomeLink and the HomeLink house are registered trademarks of Gentex Corporation.
Page 107 of 396

INSTRUMENTS AND CONTROLS
}}
* Option/accessory.105
Retain the original transmitter of the RF device you are programming for use in other vehicles aswell as for future HomeLink programming. It isalso suggested that upon the sale of the vehicle,the programmed HomeLink buttons be erasedfor security purposes. Refer to “Resetting Home- Link Buttons” in HomeLink
®
Wireless Control
System * – programming (p. 105).
Using HomeLinkTo operate, simply press and hold the pro- grammed HomeLink button until the traineddevice begins to operate (this may take severalseconds). Activation will now occur for the traineddevice (i.e., garage door opener, gate operator,security system, entry door lock, home/officelighting, etc.). For convenience, the hand-heldtransmitter of the device may also be used at anytime. In the event that there are still programmingdifficulties or questions, contact HomeLink at:www.homelink.com/www.youtube.com/HomeLinkGentex or by phoning the hotline at 1–800–355–3515.
NOTE
If the ignition is switched off, HomeLink will function for 30 minutes after the driver's doorhas been opened.
HomeLink ®
Wireless Control
System * – programming
The HomeLink Wireless Control System pro- vides a convenient way to replace up to threehand-held radio-frequency (RF) transmittersused to activate devices such as gate operators,garage door openers, entry door locks, securitysystems, even home lighting. Additional informa-tion can be found on the Internetatwww.homelink.com/www.youtube.com/HomeLinkGentex or by phoning the hotline at 1–800–355–3515.
NOTE
Some vehicles may require the ignition to be switched on or be in the “accessories” posi-tion for programming and/or operation ofHomeLink. It is also recommended that a newbattery be placed in the hand-held transmitterof the device being programmed to Home-Link for quicker training and accurate trans-mission of the radio-frequency signal. TheHomeLink buttons must be reset first. Whenthis has been completed, Homelink is inlearning mode so that you can perform pro-gramming.
1. Position the end of your hand-held transmit- ter 1–3 inches (5–14 cm) away from the HomeLink button you wish to program whilekeeping the indicator light in view. 2. Simultaneously press and hold both the
chosen HomeLink and hand-held transmitterbuttons until the HomeLink indicator lightchanges from a slow to a rapidly blinkinglight. Now you may release both the Home-Link and hand-held transmitter buttons.
NOTE
Some devices may require you to replace this Programming Step 2 with procedures notedin the “Gate Operator / Canadian Program-ming” section. If the HomeLink indicator lightdoes not change to a rapidly blinking lightafter performing these steps, contact Home-Link at www.homelink.com/www.youtube.com/HomeLinkGentex or byphoning the hotline at 1–800–355–3515.
Page 140 of 396

LOADING AND STORAGE
138
Loading – general
The load carrying capacity of your vehicle is determined by factors such as the number ofpassengers, the amount of cargo, the weight ofany accessories that may be installed, etc.
To increase loading space, the rear seat back- rests can be folded down, see Rear seats – fold-
ing backrest (p. 81).
When loading the trunk, keep the following in
mind:
The trunk lid can be unlocked an pop-ped open slightly via the button locatedon the lighting panel, see Locking/
unlocking – trunk (p. 160).
• Load objects in the trunk against the back- rest whenever possible.
• Unstable loads can be secured to the loadanchoring eyelets with straps or web lash-ings to help keep them from shifting.
• Stop the engine and apply the parking brakewhen loading or unloading long objects. Thegear selector can be knocked out of positionby long loads, which could set the vehicle inmotion.
WARNING
• Stop the engine, put the gear selector in P
, and apply the parking brake when
loading or unloading long objects.
• The vehicle's driving characteristics may change depending on the weight and dis-tribution of the load.
• A 44-pound (20 kg) object produces aforce of 2,200 pounds (1,000 kg) in ahead-on collision at 30 mph (50 km/h).
• The rear seat should not be loaded to alevel higher than 2 in. (5 cm) below theupper edge of the rear side windows.Objects placed higher than this levelcould impede the function of the VolvoInflatable Curtain.
Related information
• Load anchoring eyelets (p. 140)
• Loading – roof load carriers (p. 139)
Ski hatch
There is a hatch in the right section of the rear seat backrest that can be opened for transport-ing long objects.