Page 2 of 502
e view
Fig. 3 Overview of the right side of the vehicle.
Key to Fig. 3
Tail light cluster LightsChanging bulbs
Tank flap Fuel and emission control
Door release lever Doors and central locking button
Roof railing Roof carrier
Exterior mirror Exterior mirrors
Headlights Lights
Lifting points for the jack Changing a wheel
Page 50 of 502

Turn signals
Side lights, dipped beam headlights and main beam headlights
Tail light clusters
Brake lights
Rear fog light
Number plate light
Information on changing bulbs Changing bulbs
DANGER
Please observe important safety information about the front passenger front airbag Fitting and
using chi
WARNING
Driving under the influence of alcohol, drugs, medication or narcotics could cause accidents and fatal
injuries.
Alcohol, drugs, medication and narcotics can severely impair senses, reaction times and driving
safety. This could cause you to lose control of the vehicle.
WARNING
Always observe current traffic regulations and speed limits, and think ahead when driving. The
correct interpretation of the driving situation can make the difference between reaching your
destination safely and having an accident with serious injuries.
NOTICE
Volkswagen is not responsible for any vehicle damage caused by low-quality fuel, inadequate
servicing work or non-availability of Genuine Parts.
Observe the instructions and information for vehicles with an N1 approval Information about
vehicles with N1 approval (light commercial vehicle)
Page 338 of 502

Damaged or dirty wiper blades can scratch the window glass.
can damage the graphite coating of the wiper blades during cleaning.
Wax deposits from car washes on the windscreen and rear window can cause the wiper blades to
rub. Remove wax residue using a special cleaning product or cleaning cloths.
Changing bulbs
Introduction
This chapter contains information on the followingsubjects:
Checklist
Changing bulbs in the front headlights (halogen bulbs)
Changing the bulbs in the headlights (lights with LED technology)
Changing the front turn signal bulbs
Changing bulbs in the front bumper
Changing bulbs in the tail light clusters (LED l
Changing bulbs in the number plate light (LED lights)
Troubleshooting
Changing the vehicle bulbs requires a certain amount of technical skill. Volkswagen therefore
recommends having bulbs replaced by a qualified workshop if you are uncertain. The work must be
performed by an expert if other vehicle parts around the affected bulbs need to be removed.
Volkswagen recommends having bulbs replaced by a Volkswagen dealership.
You should keep a box with spare light bulbs for the lights that ensure the vehicle is roadworthy in
the vehicle at all times. Spare bulbs are available from Volkswagen dealerships. In some countries it
is a legal requirement to have these spare bulbs in the vehicle.
It may be illegal to drive with defective lights of the exterior lighting.
Information on indicator and warning lamps can be found in the troubleshooting section at the end
of the chapter Troubleshooting
LED lights on the vehicle
The exterior lighting may feature LEDs: Owners cannot replace the LEDs themselves. If some LEDs
fail, this may be an indication that more elements are on the point of failure. In this case, have the
lights checked and replaced if necessary at a qualified workshop.
Page 339 of 502

Additional bulb specifications
Some bulbs in headlights or in tail light clusters might have factory specifications that are different to
standard bulbs. The designation is inscribed on the bulb, either on the glass part or on the base.
WARNING
Accidents can occur if roads are not sufficiently illuminated and other road users have difficulty
seeing the vehicle, or cannot see it at all.
WARNING
Changing bulbs incorrectly can cause accidents and serious injuries.
In the
engine compa
injuries can be sustained here.
change a bulb unless you are familiar with the procedure. If you are uncertain of what to
do, the work should be carried out by a qualified workshop.
heat will cause fingerprints to evaporate on the bulb, which in turn will cause the reflector to go
blind.
-edged parts in the headlight housing in the engine compartment and on the tail
light cluster housing. Protect your hands when changing bulbs.
NOTICE
Damage to the electrical system can be caused by water entering the system if the rubber cover or
plastic covers on the headlight housing are not properly mounted after a bulb has been changed.
Checklist Information on changing bulbs
Page 341 of 502
bulb would cause the remaining fingerprint to evaporate and be deposited on the reflector. This will
impair the light output of the headlight.
After changing a bulb, check to ensure that the bulb is working properly. If the bulb is not working
properly, the bulb may not have been inserted properly, may have failed again, or the connector
may have been fitted incorrectly.
Any time you change a bulb at the front of the vehicle, the headlight settings should be checked by a
qualified workshop.
WARNING
Ignoring any of the items on this important safety checklist can lead to accidents and severe injuries.
NOTICE
Always take care when removing or fitting lights to prevent damage to the paintwork or to other
vehicle parts.
Changing bulbs in the front headlights (halogen bulbs)
Fig. 166 In engine compartment: covers on the left-
Page 342 of 502
Fig. 167 In the engine compartment: changing bulbs in the left front headlight.
First read and observe the introductoryinformation and safety warnings
The front headlight does not need to be removed when changing bulbs.
The actions should always be carried out in the specified order:
Fig. 166and Fig. 167
Observe and follow the instructions on the checklist Checklist Information on changing
bulbs
Open the bonnet In the engine compartment
Pull off the rubber cover on the rear side of the headlight. Depending on the version, a hard plastic
cover may be fitted here. Turn the cover anti-clockwise and remove it.
Dipped beam
Main beam
back and out.
Replace the defective bulb with a new bulb of the same type.
Dipped beam it will go.
Main beam
Page 343 of 502

t clockwise as far as it will go.
Close the bonnet In the engine compartment
Changing the bulbs in the headlights (lights with LED technology)
First read and observe the introductoryinformation and safety warnings
These lamps use LED technology. The LEDs cannot be replaced by customers. If some LEDs fail, this
may be an indication that more elements are on the point of failure. In this case, have the lights
checked and renewed if necessary at a qualified workshop.
Changing the front turn signal bulbs
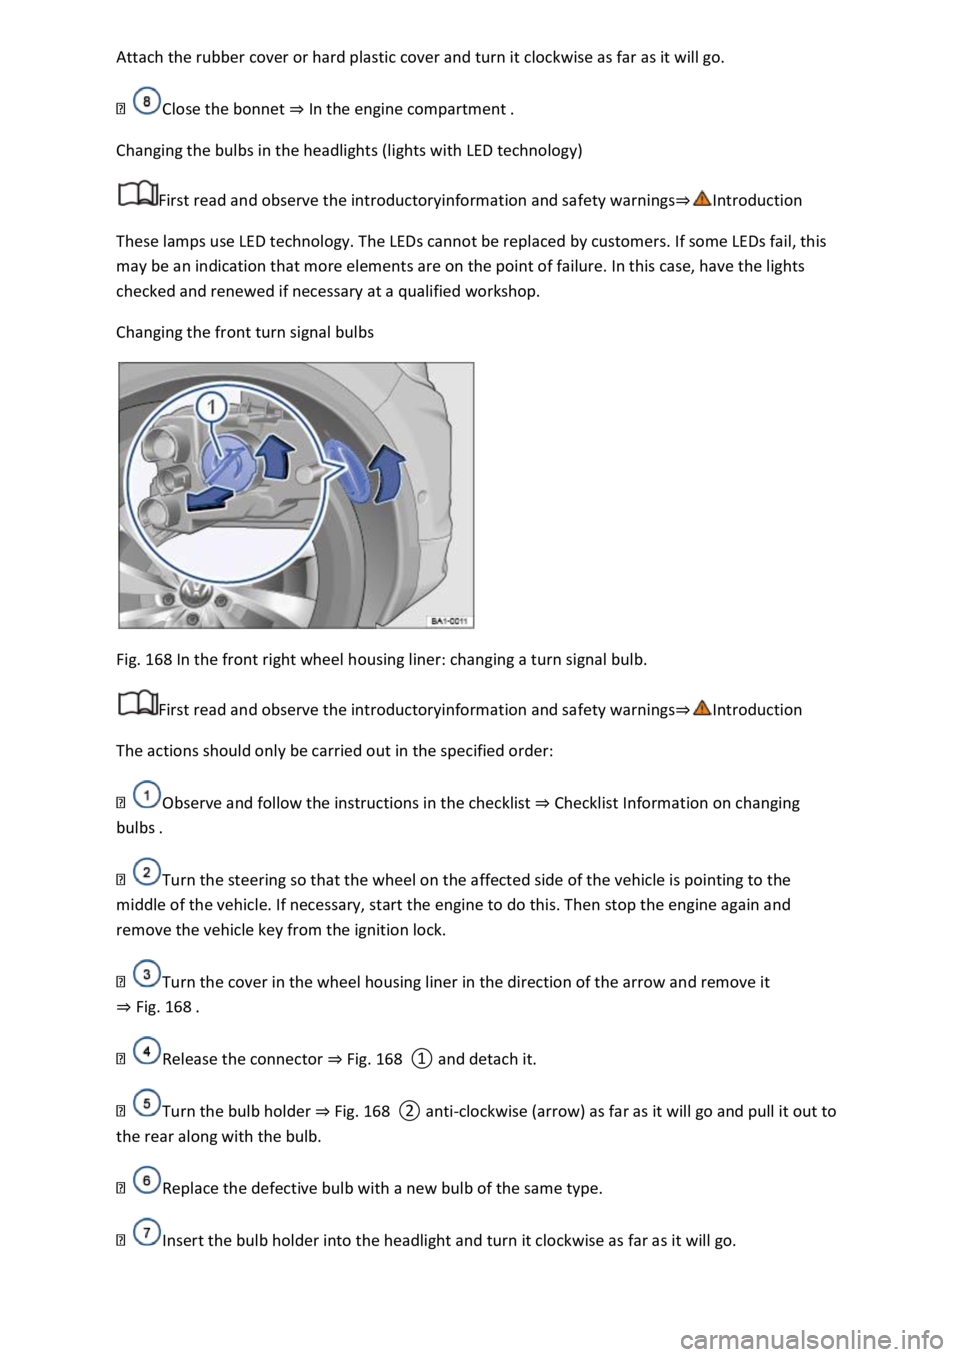
Fig. 168 In the front right wheel housing liner: changing a turn signal bulb.
First read and observe the introductoryinformation and safety warnings
The actions should only be carried out in the specified order:
Observe and follow the instructions in the checklist Checklist Information on changing
bulbs
Turn the steering so that the wheel on the affected side of the vehicle is pointing to the
middle of the vehicle. If necessary, start the engine to do this. Then stop the engine again and
remove the vehicle key from the ignition lock.
Turn the cover in the wheel housing liner in the direction of the arrow and remove it
Fig. 168
Release the connector Fig. 168
Turn the bulb holder Fig. 168clockwise (arrow) as far as it will go and pull it out to
the rear along with the bulb.
Replace the defective bulb with a new bulb of the same type.
Insert the bulb holder into the headlight and turn it clockwise as far as it will go.
Page 344 of 502

Fig. 168Fig. 168
Fit the cover in the wheel housing liner Fig. 168and lock it in position.
NOTICE
the headlight housing is seated properly in order to
prevent damage to the electrical system caused by water entering the system.
damaged.
Changing bulbs in the front bumper
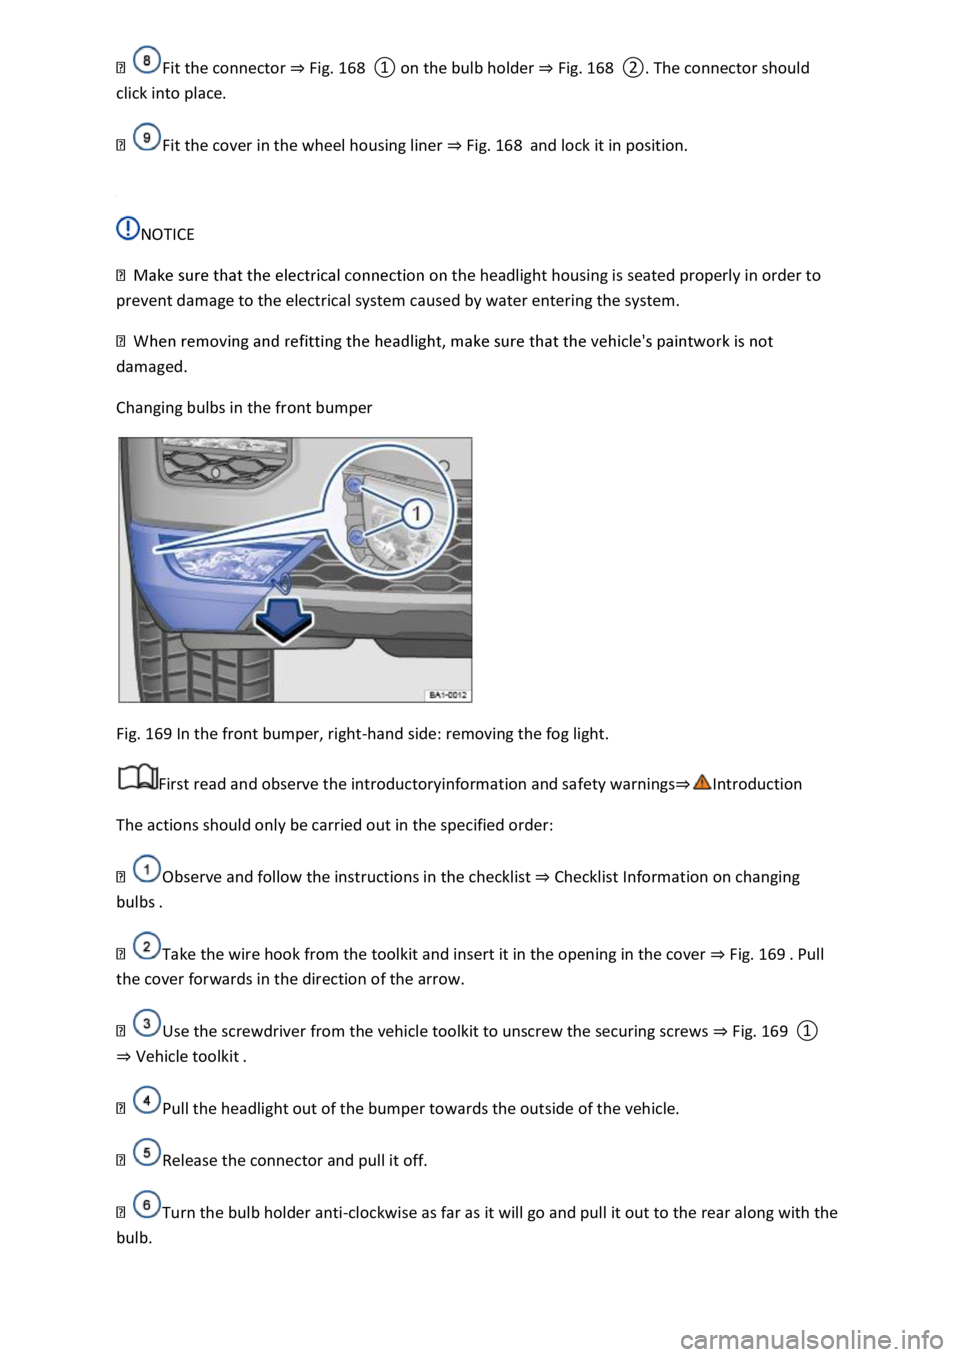
Fig. 169 In the front bumper, right-hand side: removing the fog light.
First read and observe the introductoryinformation and safety warnings
The actions should only be carried out in the specified order:
Observe and follow the instructions in the checklist Checklist Information on changing
bulbs
Take the wire hook from the toolkit and insert it in the opening in the cover Fig. 169
the cover forwards in the direction of the arrow.
Use the screwdriver from the vehicle toolkit to unscrew the securing screws Fig. 169
Vehicle toolkit
Pull the headlight out of the bumper towards the outside of the vehicle.
Release the connector and pull it off.
Turn the bulb holder anti-clockwise as far as it will go and pull it out to the rear along with the
bulb.