Page 149 of 261

Driving and operating147Notice
If AdBlue must be refilled at very low
temperatures, the refilling of AdBlue may not be detected by the system.
In this case, park the vehicle in a
space with a higher ambient
temperature until AdBlue is
liquefied.
Notice
If engine starting is prohibited due to low AdBlue level, we recommend
refilling the tank completely or with a
volume of at least ten litres of AdBlue (depending on AdBlue
consumption).
Avoid minor top-ups (e.g. less than ten litres), otherwise the system may not detect a refill.
Notice
When unscrewing the protective cap from the filler neck, ammonia fumes
may emerge. Do not inhale as the fumes have a pungent smell. The
fumes are not harmful by inhalation.
The vehicle must be parked on a level surface.The filler neck for AdBlue is located
behind the filler flap located on the
right-hand side of the vehicle.
The filler flap can only be opened if the vehicle is unlocked and the right-hand door is opened.9 Danger
Vehicles with stop-start system:
The engine must be switched off
and the ignition key removed, to
avoid risk of engine being
restarted automatically by the
system.
Capacities 3 243.
Filling station
9 Danger
Follow the operating and safety
instructions of the filling station
when refilling AdBlue.
1. Switch off engine and remove key
from ignition switch.
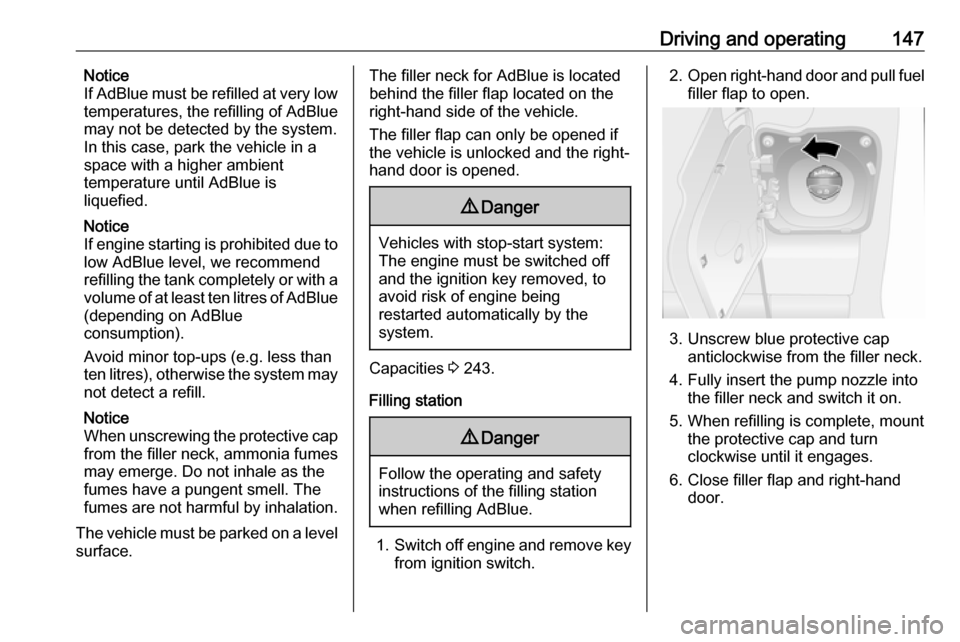
2. Open right-hand door and pull fuel
filler flap to open.
3. Unscrew blue protective cap anticlockwise from the filler neck.
4. Fully insert the pump nozzle into the filler neck and switch it on.
5. When refilling is complete, mount the protective cap and turn
clockwise until it engages.
6. Close filler flap and right-hand door.
Page 171 of 261

Driving and operating169
Remove the fuel filler cap by turning
it anti-clockwise.
The fuel filler cap can be hung on the lower hook of the fuel filler flap.
For refuelling, fully insert the pump
nozzle and switch it on.
After automatic cut-off, it can be
topped up by operating the pump
nozzle a maximum of two more times.
Caution
Wipe off any overflowing fuel
immediately.
When refuelling is complete, replace
the fuel filler cap and turn it clockwise.
Close the fuel filler flap.
Fuel filler cap
Only use genuine fuel filler caps.
Diesel-engined vehicles have special
fuel filler caps.
Fuel consumption - CO 2-
Emissions The fuel consumption (combined) ofthe model Vauxhall Movano is withina range of approx. 30 to 43 mpg.
The CO 2 emission (combined) is
within a range of approx. 173 to 248 g/km.
For the values specific to your
vehicle, refer to the EEC Certificate of
Conformity provided with your vehicle or other national registration
documents.
General information The official fuel consumption and
specific CO 2 emission figures quoted
relate to the EU base model with
standard equipment.Fuel consumption data and CO 2
emission data are determined
according to regulation R (EC)
No. 715/2007 (in the latest applicable version), taking into consideration the
vehicle weight in running order, as
specified by the regulation.
The figures are provided only for the
purpose of comparison between
different vehicle variants and must
not be taken as a guarantee for the
actual fuel consumption of a
particular vehicle.
Additional equipment may result in
slightly higher results than the stated
consumption and CO 2 figures.
Furthermore, fuel consumption is dependent on personal driving style
as well as road and traffic conditions.
Page 185 of 261

Vehicle care183The filter is drained as soon as diesel
fuel emerges from the knurled screw
at the bottom. Retighten the two
screws.
Check diesel fuel filter at shorter
intervals if the vehicle is subjected to
extreme operating conditions.
Diesel fuel system bleeding
If the fuel tank has been run dry, it willbe necessary to air vent or bleed the
diesel fuel system.
Fill the tank with fuel and proceed as
follows:
1. Place a suitable container underneath the fuel filter vent
screw to collect fuel.
2. Loosen the vent screw (arrowed) by one turn.
3. Manually operate the in-line supply pump slowly and steadily
until fuel discharging from the
loosened vent screw is free of air
bubbles.
4. Retighten the vent screw.
In vehicles without an in-line supply
pump, fill the tank with fuel and
proceed as follows:Caution
Do not turn ignition key to position 3 before beginning the bleeding
procedure.
Ignition switch positions 3 133.
1. Turn ignition key to position 2 and
hold for five seconds.
2. Turn key back to position 1 and
wait for three seconds.
3. Repeat Step 1 and 2 multiple times.
4. Turn key to position 3, then return
to 0.
If the engine cannot be started after
several attempts to bleed the diesel
fuel system, seek the assistance of a
workshop.
Wiper blade replacement
Wiper blades on the windscreen If required, use the step located below
the headlights to reach the
windscreen wiper.