Page 179 of 261

Vehicle care177Caution
It is the owner's responsibility to
maintain the proper level of an
appropriate quality oil in the
engine.
Pull out the dipstick, wipe it clean,
reinsert fully, pull out and read the
engine oil level.
When the engine oil level has
dropped to the MIN mark, top-up
engine oil.
Caution
Do not allow the engine oil level to
drop below the minimum level!
We recommend the use of the same
type of engine oil that was used at the
last change.
The engine oil level must not exceed the maximum mark MAX on the
dipstick.
Caution
Overfilled engine oil must be
drained or suctioned out. If the
level exceeds the maximum level,
do not start the vehicle and contact an authorised dealer.
To prevent spillage when
replenishing the engine oil, we
recommend using a funnel. Ensure
funnel is securely located onto the
filler pipe.
A stabilization of the engine oil
consumption will not take place until the vehicle has been driven several
thousand miles. Only then can the
actual degree of consumption be
established.
If consumption exceeds more than
0.6 litres every 600 miles after this
running-in period, consult a
workshop.
Capacities 3 243, Engine oil level
monitor 3 91.
Fit the cap on straight and tighten it.
Page 187 of 261
Vehicle care185High beam
1. Remove headlamp protectivecover.
2. Detach wiring connector from bulb holder.
3. Release spring clip and withdraw bulb holder from reflector
housing.
4. Detach bulb from bulb holder and renew the bulb.
5. Insert bulb holder in reflector housing.
6. Secure with spring clip and attach
wiring connector to bulb holder.
7. Install headlamp protective cover.
Low beam
1. Remove headlamp protective
cover.
2. Detach wiring connector from bulb holder.
3. Rotate bulb holder anti-clockwise to disengage.
4. Withdraw bulb holder from reflector housing.
Page 188 of 261
186Vehicle care
5. Detach bulb from bulb holder andrenew the bulb.
6. Insert the bulb holder, engaging the two lugs in the reflectorhousing and rotate clockwise to
secure.
7. Attach wiring connector to bulb holder.
8. Install headlamp protective cover.
Sidelights
1. Remove protective cover.
2. Detach wiring connector from bulb holder.
3. Rotate bulb holder anti-clockwise to disengage.
4. Withdraw bulb holder from reflector housing.
5. Detach bulb from bulb holder andrenew the bulb.
6. Insert the bulb holder, engaging the two lugs in the reflectorhousing and rotate clockwise to
secure.
7. Attach wiring connector to bulb holder.
8. Install protective cover.
Page 189 of 261
Vehicle care187Adaptive forward lighting
Cornering light
Headlights have separate systems for high beam 1 and low beam 2. The
cornering light 3 is located between
the headlights.
1. Remove protective cover.
2. Detach wiring connector from bulb holder.
3. Rotate bulb holder anti-clockwise to disengage.
4. Withdraw bulb holder from reflector housing.
5. Detach bulb from bulb holder andrenew the bulb.
6. Insert the bulb holder, engaging the two lugs in the reflectorhousing and rotate clockwise to
secure.
7. Attach wiring connector to bulb holder.
8. Install protective cover.
Fog lights
Have the front fog light bulbs replaced
by a workshop.
Front turn signal lights
1. Remove protective cover.
2. Detach wiring connector from bulb holder.
3. Rotate bulb holder anti-clockwise to disengage.
4. Withdraw bulb holder from reflector housing.
Page 190 of 261
188Vehicle care
5. Detach bulb from bulb holder andrenew the bulb.
6. Insert the bulb holder, engaging the two lugs in the reflectorhousing and rotate clockwise to
secure.
7. Attach wiring connector to bulb holder.
8. Install protective cover.
Tail lights
Rear brake, tail, turn signal,
reverse and fog tail lights
1. Remove the upper and lower trim panels from the rear pillar.
2. Unscrew the two nuts from the locating pins on the rear of the
lamp assembly.
3. Withdraw the lamp assembly rearwards from the outer side.
4. Detach wiring connector from lamp assembly.
5. Remove the three screws from the rear of the lamp assembly.
6. Remove bulb holder from the lamp assembly.
Page 192 of 261
190Vehicle careSide turn signal lights1. Push the lamp assembly to the right and pull at the left-hand side
of the lamp assembly to release
from the aperture.
2. Detach wiring connector from lamp assembly.
3. Remove bulb holder from lamp assembly by rotating 90° and
renew bulb.
4. Install bulb holder in lamp assembly.
5. Attach wiring connector to lamp assembly.
6. Insert lamp assembly into aperture and push to the left to
secure.
Mirror turn signal lights 1. Move the lower mirror assembly from the front to access the screw.
2. Remove the screw using a torx screwdriver.
3. Remove bulb holder from the rear
of the lower mirror assembly.
4. Renew bulb.
5. Install bulb holder in lower mirror assembly.
6. Replace the screw.
Centre high-mounted brake light
1. Remove cover from the inside of the rear door.
2. Unscrew the nut from the locating
pin at the rear of the lamp
assembly.
Page 210 of 261
208Vehicle careRear-wheel drive, with twin rear
wheels: Remove the tyre valve
extender from the inner rear
wheel.
2. Install the wheel wrench (depending on vehicle, attach
wheel wrench to adapters)
ensuring that it is located securely
and loosen each wheel bolt/nut by half a turn.
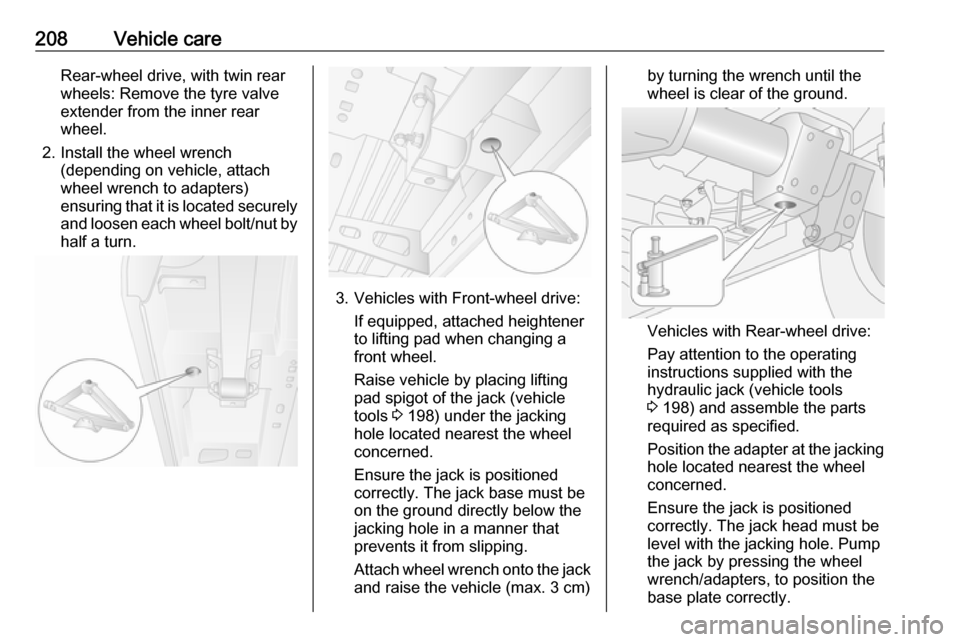
3. Vehicles with Front-wheel drive:
If equipped, attached heightener
to lifting pad when changing a
front wheel.
Raise vehicle by placing lifting
pad spigot of the jack (vehicle
tools 3 198) under the jacking
hole located nearest the wheel
concerned.
Ensure the jack is positioned
correctly. The jack base must be
on the ground directly below the
jacking hole in a manner that
prevents it from slipping.
Attach wheel wrench onto the jack
and raise the vehicle (max. 3 cm)
by turning the wrench until the
wheel is clear of the ground.
Vehicles with Rear-wheel drive:
Pay attention to the operating
instructions supplied with the
hydraulic jack (vehicle tools
3 198) and assemble the parts
required as specified.
Position the adapter at the jacking
hole located nearest the wheel
concerned.
Ensure the jack is positioned
correctly. The jack head must be
level with the jacking hole. Pump
the jack by pressing the wheel
wrench/adapters, to position the
base plate correctly.
Page 211 of 261

Vehicle care209Raise the vehicle (max. 3 cm) bypressing the wheel wrench until
the wheel is clear of the ground.
4. Unscrew wheel bolts/nuts completely and wipe clean with a
cloth.
Put wheel bolts/nuts somewhere
where the threads will not be
soiled.
5. Change the wheel.
6. Screw in the wheel bolts/nuts.
7. Lower vehicle.
8. Install the wheel wrench (depending on vehicle, attach
wheel wrench to adapters)
ensuring that it locates securely
and tighten each wheel bolt/nut in a crosswise sequence. Tighteningtorque is: 172 Nm (Front-wheel
drive), 235 Nm (Rear-wheel drive with twin rear wheels), 264 Nm
(Rear-wheel drive with single rear
wheels).
9. Refit wheel cover. Rear-wheel drive, with twin rear
wheels: Install the tyre valve
extender to the inner rear wheel
before refitting the wheel cover.Notice
If applicable, fit anti-theft bolts
nearest the tyre valve (otherwise it
may not be possible to refit the wheel
cover).
10. Stow the replaced wheel 3 209
and the vehicle tools 3 198.
11. Have the new wheel balanced on the vehicle. Check the tyre
pressure of the installed tyre
3 244 and also the wheel bolt/nut
torque as soon as possible.
Have the defective tyre renewed or
repaired.
Spare wheel Some vehicles are equipped with atyre repair kit instead of a spare wheel 3 204.
If mounting a spare wheel which is
different from the other wheels, this
wheel might be classified as a
temporary spare wheel and the
corresponding speed limits apply,
even though no label indicates this.
Seek the assistance of a workshop to
check the applicable speed limit.Caution
The use of a spare wheel that is smaller than the other wheels or in combination with winter tyres
could affect driveability. Have the defective tyre replaced as soon as
possible.
The spare wheel is held under the
vehicle frame using a winch and
secured by tightening a cable using
the wheel wrench and adapters
(depending on vehicle).
It may be necessary to jack the
vehicle up to gain access to the spare
wheel on a fully loaded vehicle with a flat rear tyre.


