2018 VAUXHALL MOVANO_B reset
[x] Cancel search: resetPage 22 of 261

20Keys, doors and windowsLock cylinders
Designed to free-wheel if they are
forcefully rotated without the correct
key or if the correct key is not fully
inserted. To reset, turn cylinder with
the correct key until its slot is vertical, remove key and then re-insert it. If the
cylinder still free-wheels, turn the key through 180° and repeat operation.
Car Pass The Car Pass contains security
related vehicle data and should
therefore be kept in a safe place.
When the vehicle is taken to a
workshop, this vehicle data is needed
in order to perform certain operations.Radio remote control
Used to operate:
● central locking system
● anti-theft locking system
● anti-theft alarm system
Depending on model, the vehicle may use a 2-button or 3-button remote
control.
The remote control has a range of
approx. five metres. It can be affected
by external influences. The hazard
warning flashers confirm operation.
Handle with care, protect it from
moisture and high temperatures and
avoid unnecessary operation.
Fault
If the central locking system cannot be operated with the remote control,
it may be due to the following:
● The range is exceeded.
● The battery voltage is too low.
● Frequent, repeated operation of the remote control while not in
range, which will require
reprogramming by a workshop.
● Overload of the central locking system by operating at frequent
intervals; the power supply is
interrupted for a short time.
● Interference from higher-power radio waves from other sources.
Unlocking 3 22.
Remote control battery
replacement
Replace the battery as soon as the
range reduces.
Page 31 of 261

Keys, doors and windows29Alternatively, if the vehicle is
unlocked, open the door using the exterior handle (depending on modelvariant). Lift the handle (3) to the
second notch position, then slide the
door backwards using the handle (2)
near the front edge of the door.
Reset
If the door has been opened
manually, the power sliding door
system must be reset.
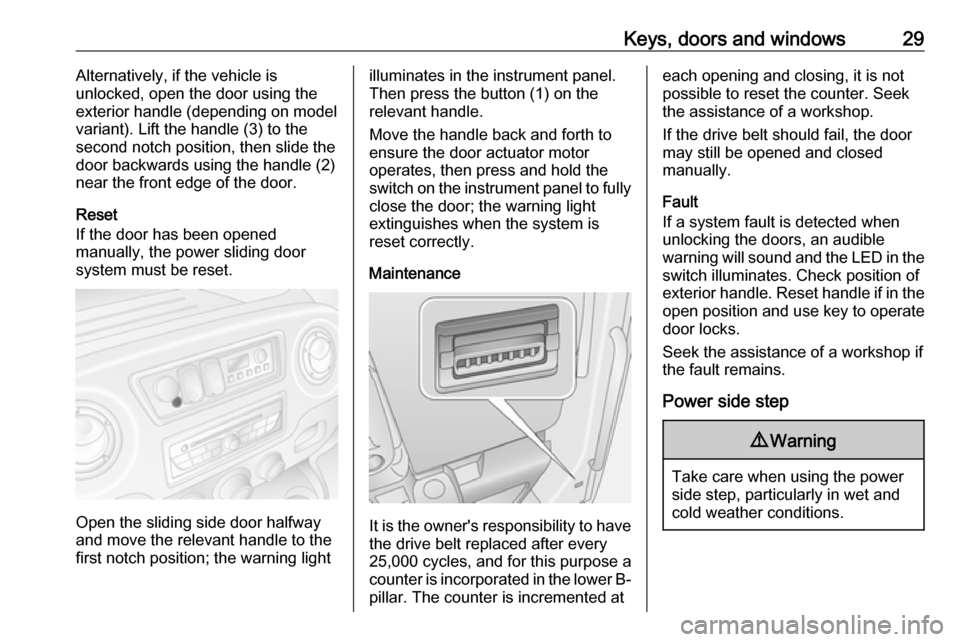
Open the sliding side door halfway
and move the relevant handle to the
first notch position; the warning light
illuminates in the instrument panel.
Then press the button (1) on the relevant handle.
Move the handle back and forth to
ensure the door actuator motor
operates, then press and hold the
switch on the instrument panel to fully
close the door; the warning light
extinguishes when the system is
reset correctly.
Maintenance
It is the owner's responsibility to have
the drive belt replaced after every
25,000 cycles, and for this purpose a
counter is incorporated in the lower B- pillar. The counter is incremented at
each opening and closing, it is not
possible to reset the counter. Seek
the assistance of a workshop.
If the drive belt should fail, the door
may still be opened and closed
manually.
Fault
If a system fault is detected when
unlocking the doors, an audible
warning will sound and the LED in the switch illuminates. Check position of
exterior handle. Reset handle if in the
open position and use key to operate door locks.
Seek the assistance of a workshop if
the fault remains.
Power side step9 Warning
Take care when using the power
side step, particularly in wet and
cold weather conditions.
Page 62 of 261

60Seats, restraints
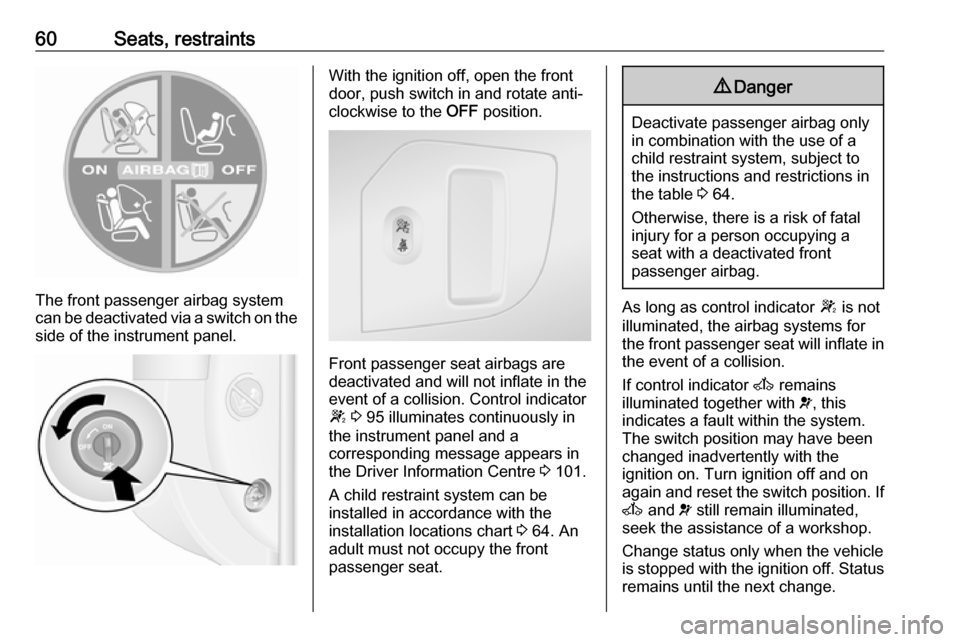
The front passenger airbag system
can be deactivated via a switch on the
side of the instrument panel.
With the ignition off, open the front
door, push switch in and rotate anti-
clockwise to the OFF position.
Front passenger seat airbags are
deactivated and will not inflate in the event of a collision. Control indicator
W 3 95 illuminates continuously in
the instrument panel and a
corresponding message appears in
the Driver Information Centre 3 101.
A child restraint system can be
installed in accordance with the
installation locations chart 3 64. An
adult must not occupy the front
passenger seat.
9 Danger
Deactivate passenger airbag only
in combination with the use of a
child restraint system, subject to
the instructions and restrictions in
the table 3 64.
Otherwise, there is a risk of fatal
injury for a person occupying a
seat with a deactivated front
passenger airbag.
As long as control indicator W is not
illuminated, the airbag systems for the front passenger seat will inflate in the event of a collision.
If control indicator A remains
illuminated together with v, this
indicates a fault within the system.
The switch position may have been
changed inadvertently with the
ignition on. Turn ignition off and on
again and reset the switch position. If
A and v still remain illuminated,
seek the assistance of a workshop.
Change status only when the vehicle
is stopped with the ignition off. Status remains until the next change.
Page 91 of 261

Instruments and controls89Speed limiterMaximum speed may be restricted by
a speed limiter. As a visible indication
of this, a warning label is located on
the instrument panel.
A warning buzzer will sound for
ten seconds if the vehicle briefly
exceeds the set limit.
Notice
Under certain conditions (e.g. steep
inclines) the vehicle speed may
exceed the set limit.
Speed limiter 3 162, cruise control
speed limiter 3 158.Odometer
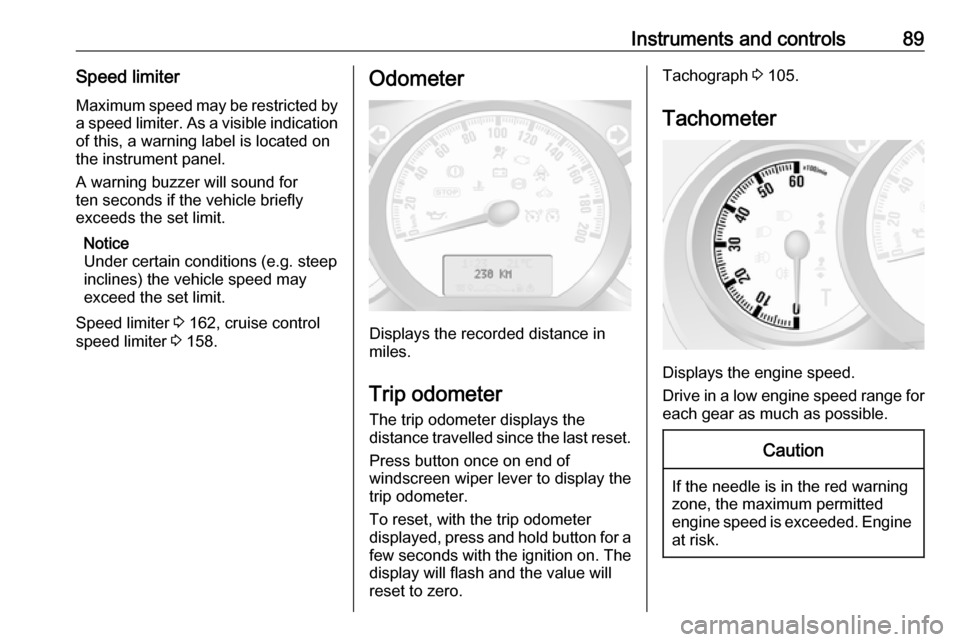
Displays the recorded distance in
miles.
Trip odometer
The trip odometer displays the
distance travelled since the last reset.
Press button once on end of
windscreen wiper lever to display the
trip odometer.
To reset, with the trip odometer
displayed, press and hold button for a few seconds with the ignition on. The display will flash and the value will
reset to zero.
Tachograph 3 105.
Tachometer
Displays the engine speed.
Drive in a low engine speed range for each gear as much as possible.
Caution
If the needle is in the red warning
zone, the maximum permitted
engine speed is exceeded. Engine at risk.
Page 93 of 261

Instruments and controls91Caution
If engine coolant temperature is
too high, stop vehicle, switch off
engine. Danger to engine. Check
coolant level.
For physical reasons, the coolant temperature gauge shows the coolant temperature only if the coolant level is adequate.
Engine oil level monitor
The engine oil level monitor is correct
only if the vehicle is parked on a level
surface with a cold engine.
If the engine oil level is correct when
the ignition is switched on OIL LEVEL
CORRECT appears briefly in the
Driver Information Centre.
If the engine oil is above the minimum level, press the trip computer button
on the end of the wiper lever within
30 seconds of switching on the
ignition. The message OIL LEVEL is
displayed in combination with the
squares that correspond to the oil
level.
As the oil level diminishes, the
squares in the display are replaced
with dashes.▢▢▢▢▢▢:maximum level▢▢▢- - -:intermediate level- - - - - -:minimum level
If the minimum engine oil level is
reached TOP-UP OIL LEVEL is
displayed in combination with control
indicator A after the ignition is
switched on for 30 seconds. Check
and top up engine oil 3 176.
To exit the oil level monitor display,
press either trip computer button.
Trip computer 3 103.
Service display When the ignition is switched on, the
remaining distance before the next
service is due may be shown briefly in the Driver Information Centre. Based
on driving conditions, the interval at
which a service will be indicated can
vary considerably.
When the remaining distance before
the next service is less than
1800 miles or two months, SERVICE
IN appears in the Driver Information
Centre.
When the distance reaches 0 miles or
the service date is due, control
indicators o and A illuminate in the
instrument cluster and SERVICE
DUE appears in the Driver
Information Centre.
The vehicle needs a service. Seek the assistance of a workshop.
Resetting the service display After a service, the service display
must be reset: if available, select the
distance before service display in the
Driver Information Centre, then press and hold button on end of wiper lever
for approx. ten seconds until the
distance before service is displayed
continuously.
Trip computer 3 103.
Driver Information Centre 3 101.
Service information 3 219.
Page 106 of 261

104Instruments and controls● average speed
● distance before service 3 91
● clock 3 86
● cruise control and speed limiter stored speed 3 158
● fault and information messages
● odometer 3 89, trip odometer
3 89
Fuel used
Displays the amount of fuel
consumed since the last reset.
The measurement can be restarted at
any time by pressing and holding the
button on the end of the wiper lever.
Average consumption The value is displayed after driving a
distance of 0.25 miles.
Average consumption is displayed,
taking into consideration the distance
travelled and the fuel used since the
last reset.
The measurement can be restarted at
any time.Instantaneous consumption
The value is displayed after reaching
a speed of 20 mph.
Range The value is displayed after driving a
distance of 0.25 miles.
The range is calculated from the
current contents of the fuel tank and
the average consumption since the
last reset.
The range will not display if control
indicator Y is illuminated in the
instrument cluster 3 99.
The measurement can be restarted at
any time.
Distance travelled
Displays the distance driven since the
last reset.
The measurement can be restarted at
any time.
Average speed The value is displayed after driving adistance of 0.25 miles.The average speed since the last
reset is displayed.
The measurement can be restarted at
any time.
Interruptions in the journey with the
ignition off are not included in the
calculations.
Reset trip computer information
To reset the trip computer, select one of its functions then press and hold
button on end of wiper lever.
The following trip computer
information can be reset:
● fuel used
● average consumption
● distance travelled
● average speed
The trip computer will reset
automatically when the maximum
value of any of the parameters is
exceeded.
Page 122 of 261

120Climate control9Warning
Do not operate the system when
refuelling, when dust or
combustible vapours are present
or in enclosed spaces (e.g.
garage).
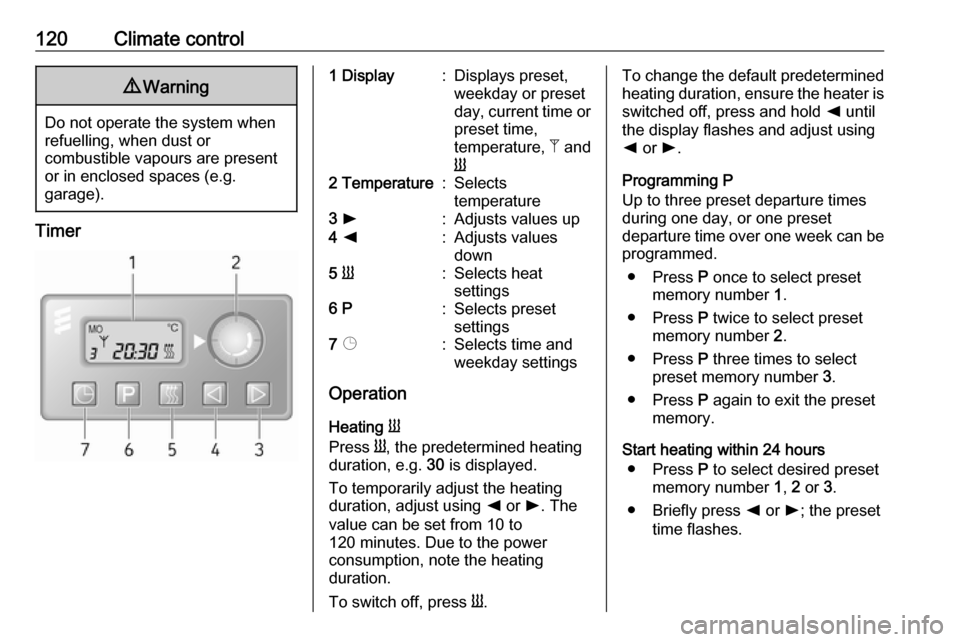
Timer
1 Display:Displays preset,
weekday or preset
day, current time or preset time,
temperature, Z and
Y2 Temperature:Selects
temperature3 l:Adjusts values up4 k:Adjusts values
down5 Y:Selects heat
settings6 P:Selects preset
settings7 Þ:Selects time and
weekday settings
Operation
Heating Y
Press Y, the predetermined heating
duration, e.g. 30 is displayed.
To temporarily adjust the heating
duration, adjust using k or l. The
value can be set from 10 to
120 minutes. Due to the power
consumption, note the heating
duration.
To switch off, press Y.
To change the default predetermined
heating duration, ensure the heater is switched off, press and hold k until
the display flashes and adjust using
k or l.
Programming P
Up to three preset departure times during one day, or one preset
departure time over one week can be programmed.
● Press P once to select preset
memory number 1.
● Press P twice to select preset
memory number 2.
● Press P three times to select
preset memory number 3.
● Press P again to exit the preset
memory.
Start heating within 24 hours ● Press P to select desired preset
memory number 1, 2 or 3.
● Briefly press k or l; the preset
time flashes.
Page 123 of 261

Climate control121●Adjust the preset time using k or
l .
● Press P to confirm and exit the
preset memory.
Start heating up to seven days ● Press P to select desired preset
memory number 1, 2 or 3.
● Briefly press k or l; the preset
time flashes.
● Adjust the preset time using k or
l .
● After five seconds the preset day
flashes.
● Adjust the preset day using k or
l .
● The preset time and day are set once the display changes to the
current time.
Set time and weekday Þ
If the vehicle battery is disconnected or its voltage is too low, the unit will
need to be reset.
● Press Þ until the time flashes.
● Press k or l to change the
current time.● Time is stored when the display stops flashing.
● Wait for weekday to flash.
● Press k or l to change the
weekday.
● Weekday is stored when the display stops flashing.
Heating level
The preferred heating level for
programmed departure times can be set between 10 to 30℃.
To adjust the temperature of the
heating, turn the rotary knob located
on the control panel.turn clockwise:increase
temperatureturn anti-clock‐
wise:decrease
temperature
Rear air conditioning
system
The rear air conditioning system is
activated in conjunction with the front passenger compartment air
conditioning system.
Bus
Rear air vents
Additional air conditioning is supplied
to the rear passenger compartment
via the overhead air vents.