Page 308 of 672
3084-5. Using the driving support systems
Trailer brake controller
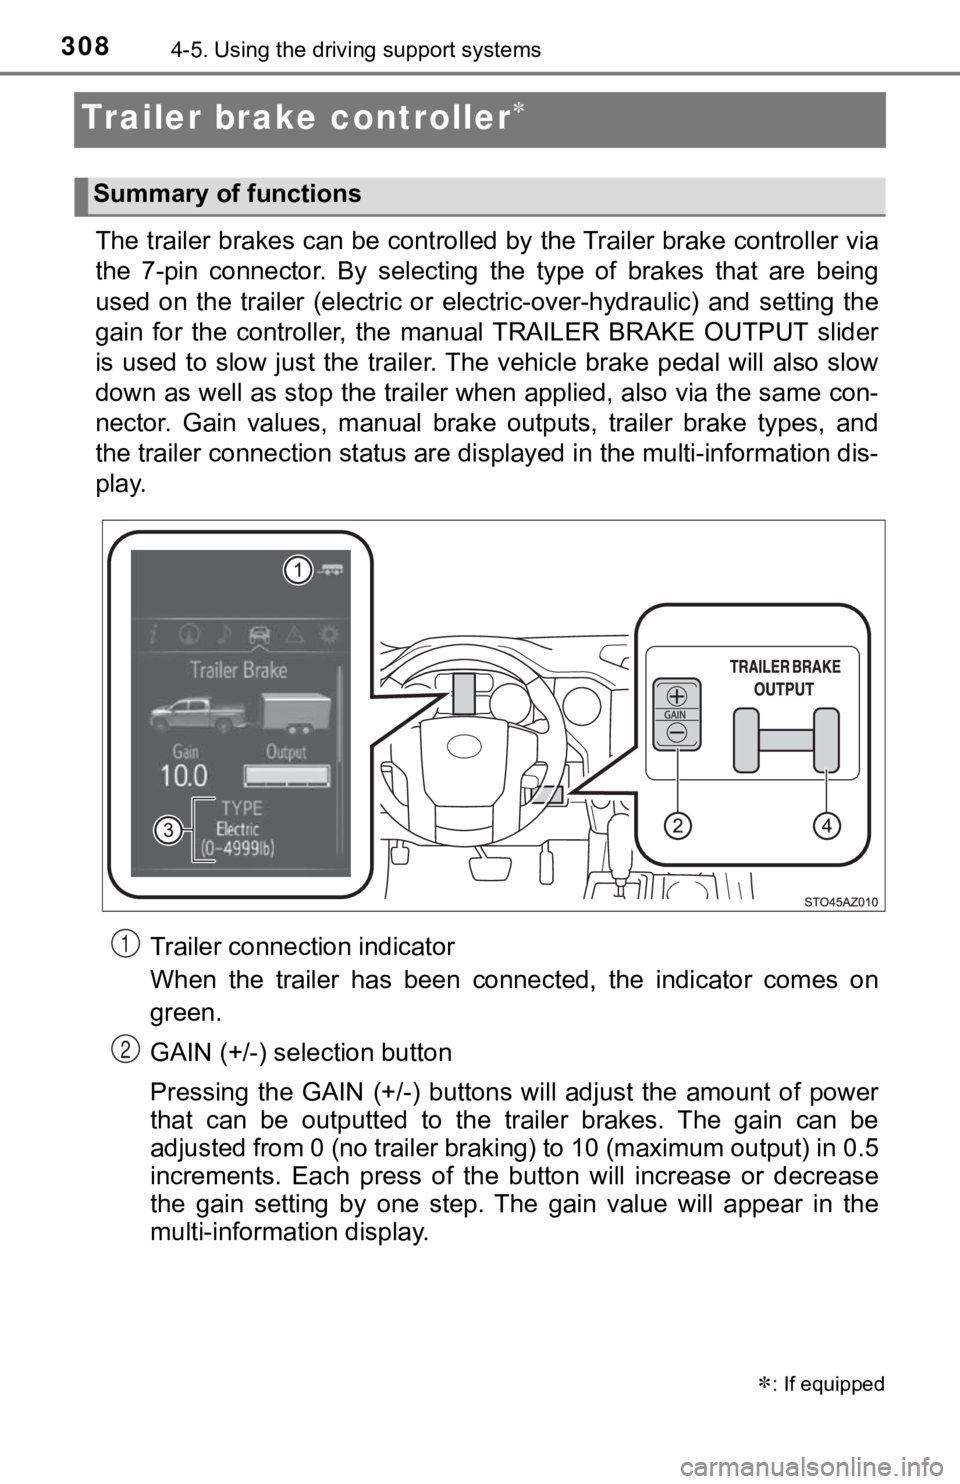
The trailer brakes can be controlled by the Trailer brake contr oller via
the 7-pin connector. By selecting the type of brakes that are being
used on the trailer (electric or electric-over-hydraulic) and s etting the
gain for the controller, the manual TRAILER BRAKE OUTPUT slider
is used to slow just the traile r. The vehicle brake pedal will also slow
down as well as stop the trailer when applied, also via the sam e con-
nector. Gain values, manual brake outputs, trailer brake types, and
the trailer connection status are displayed in the multi-information dis-
play.
Trailer connection indicator
When the trailer has been connected, the indicator comes on
green.
GAIN (+/-) selection button
Pressing the GAIN (+/-) buttons w ill adjust the amount of power
that can be outputted to the trailer brakes. The gain can be
adjusted from 0 (no trailer braking) to 10 (maximum output) in 0.5
increments. Each press of the bu tton will increase or decrease
the gain setting by one step. The gain value will appear in the
multi-information display.
: If equipped
Summary of functions
1
2
Page 310 of 672
![TOYOTA TUNDRA 2018 Owners Manual (in English) 3104-5. Using the driving support systems
Using the GAIN (+/-) selection
buttons, set a starting gain of
5.0.
While driving 20 - 25 mph [35 - 40 km/h], fully apply the
manual
TRA TOYOTA TUNDRA 2018 Owners Manual (in English) 3104-5. Using the driving support systems
Using the GAIN (+/-) selection
buttons, set a starting gain of
5.0.
While driving 20 - 25 mph [35 - 40 km/h], fully apply the
manual
TRA](/manual-img/14/43029/w960_43029-309.png)
3104-5. Using the driving support systems
Using the GAIN (+/-) selection
buttons, set a starting gain of
5.0.
While driving 20 - 25 mph [35 - 40 km/h], fully apply the
manual
TRAILER BRAKE OUTPUT
slider.
Adjust the gain setting, using t he GAIN (+/-) selection buttons , to
either increase or decrease to j ust below the point of trailer wheel
lock-up.
For confirmation, repeat steps and until desired gain setting
is reached (just below point of trailer wheel lock-up).
■ When using the trailer brake control system
Please turn off the intuitive parking assist while towing a tra iler. If left on,
sonar sensors will detect the trailer being towed.
■ When setting the gain
Wheel lock-up occurs when the trailer wheel squeals or tire smo ke occurs.
Trailer wheels may not lock-up while driving heavily loaded trailer. During this
case, adjust the Trailer gain to the highest allowable setting for the towing
condition.
■ When disconnecting and reco nnecting battery terminals
The gain setting data will be reset.
5
6
7
867
Page 324 of 672
3245-1. Basic Operations
Entune Audio
button
Press this button to a ccess the Bluetooth® hands-free system.
( P. 370)
“SETUP” button
Press this button to customi ze the function settings. (P. 329)
“AUDIO” button
Display the “Select Audio Source” screen or audio control
screen. ( P. 3 3 6 )
“TRUCK” button
Press this button to access the fuel consumption information.
( P. 107)
Operations such as listening to audio, using the hands-free
phone, confirming vehicle inform ation and changing multimedia
system settings are started by using the following buttons.
Multimedia system operation buttons
1
2
3
4
Page 456 of 672
4566-4. Using the other interior features
Garage door opener
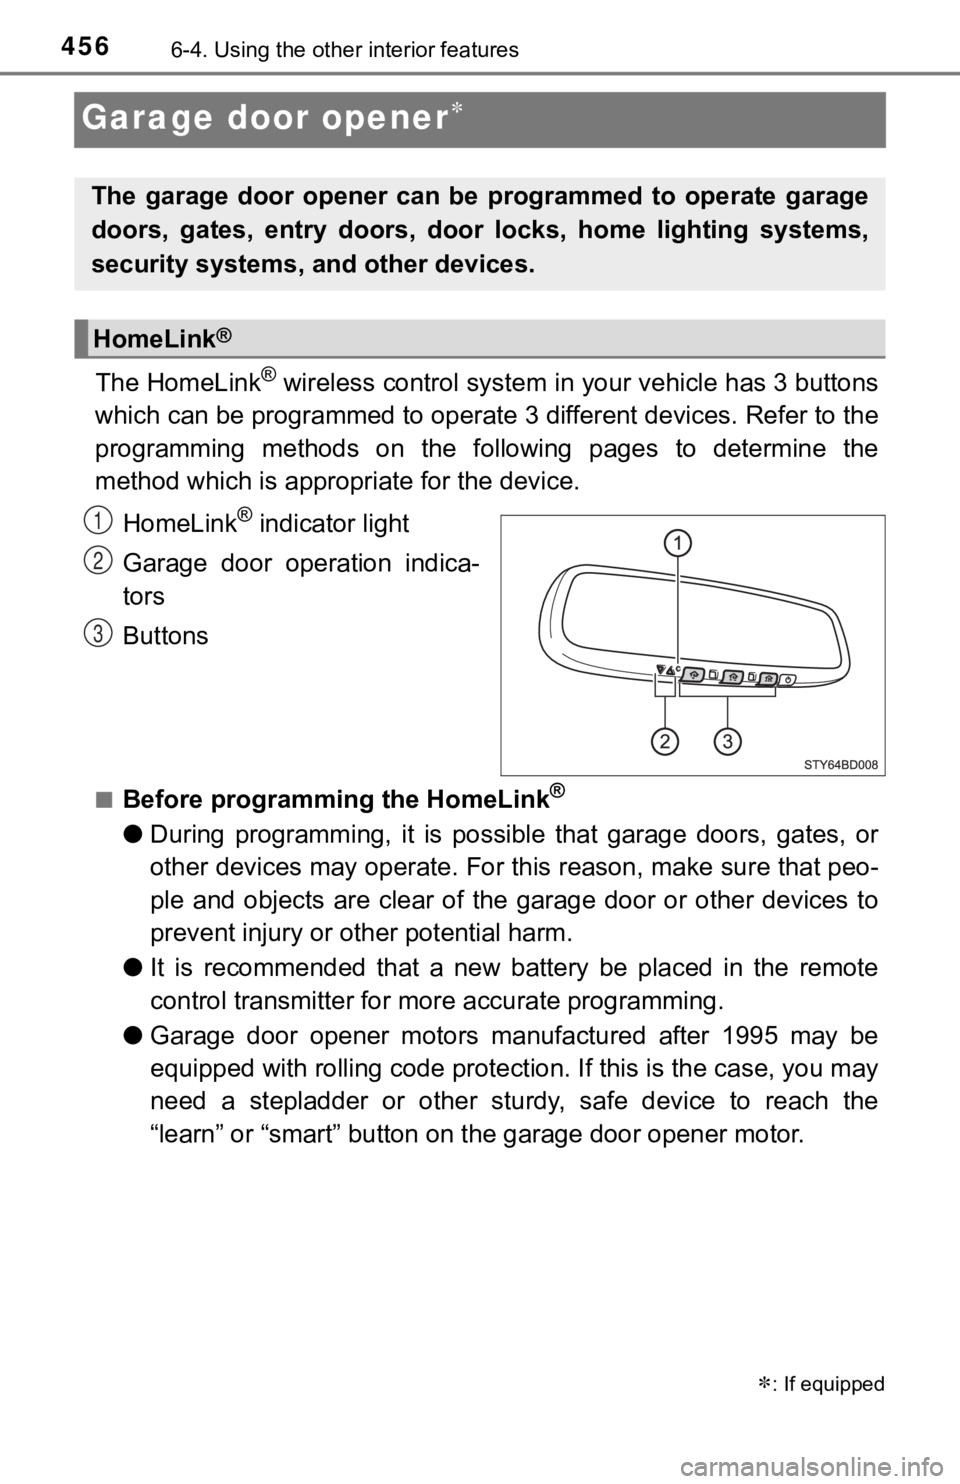
The HomeLink® wireless control system in your vehicle has 3 buttons
which can be programmed to operate 3 different devices. Refer to the
programming methods on the following pages to determine the
method which is approp riate for the device.
HomeLink
® indicator light
Garage door operation indica-
tors
Buttons
■Before programming the HomeLink®
● During programming, it is possible that garage doors, gates, or
other devices may operate. For this reason, make sure that peo-
ple and objects are clear of the garage door or other devices t o
prevent injury or other potential harm.
● It is recommended that a new battery be placed in the remote
control transmitter for mo re accurate programming.
● Garage door opener motors manufactured after 1995 may be
equipped with rolling code pro tection. If this is the case, you may
need a stepladder or other sturdy, safe device to reach the
“learn” or “smart” button on the garage door opener motor.
: If equipped
The garage door opener can be programmed to operate garage
doors, gates, entry doors, door locks, home lighting systems,
security systems, and other devices.
HomeLink®
1
2
3
Page 457 of 672
4576-4. Using the other interior features
6
Interior features
■Programming the HomeLink®
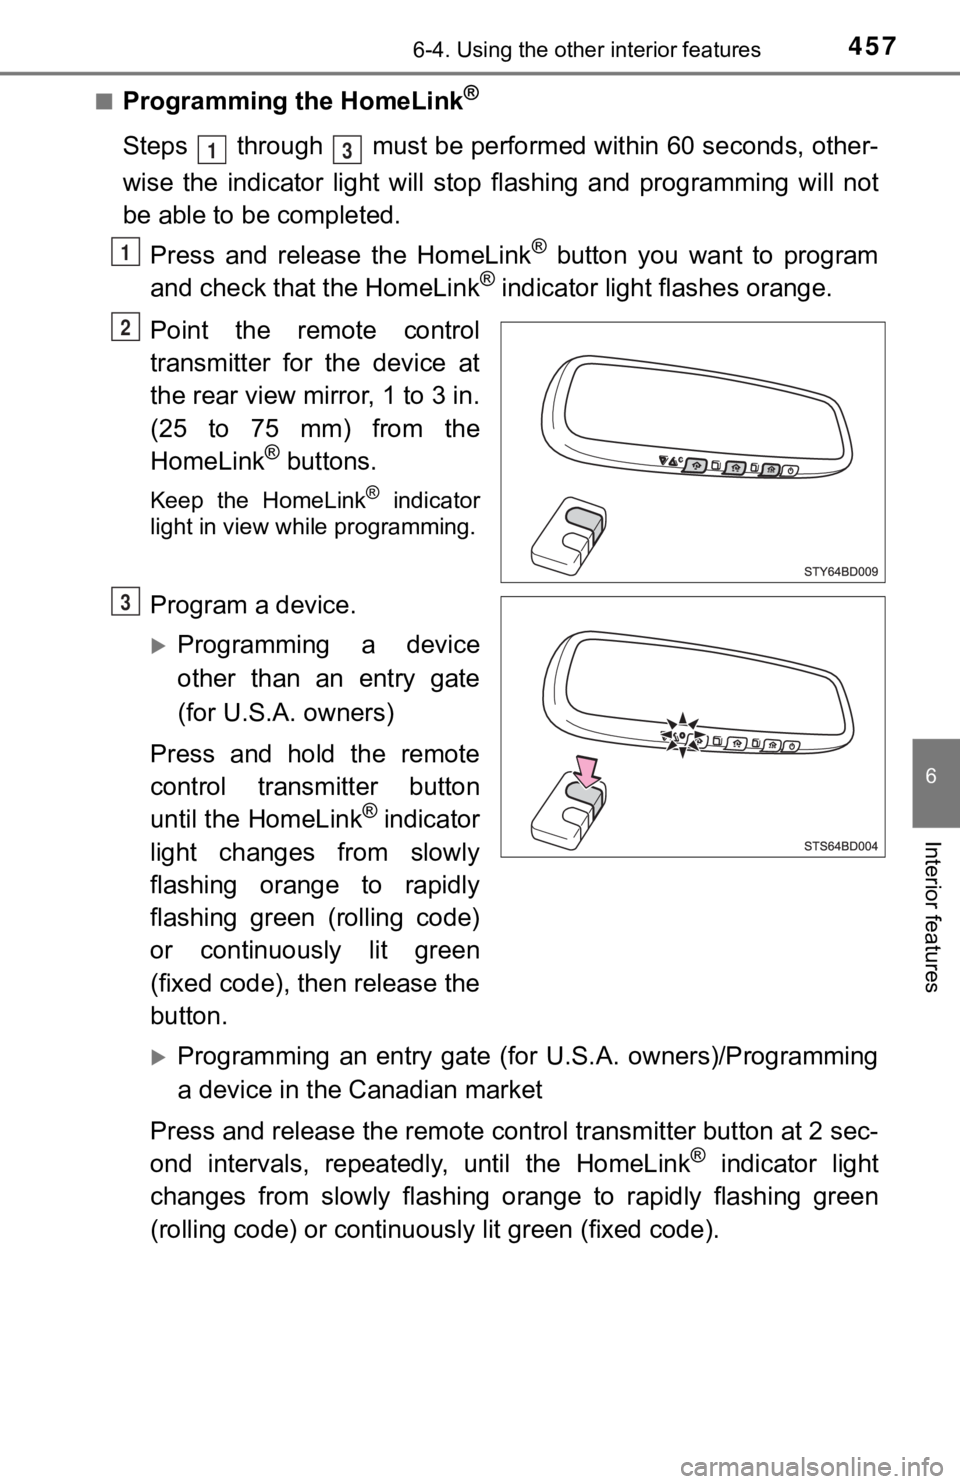
Steps through must be performed within 60 seconds, other-
wise the indicator light will st op flashing and programming wil l not
be able to be completed.
Press and release the HomeLink
® button you want to program
and check that the HomeLink® indicator light flashes orange.
Point the remote control
transmitter for the device at
the rear view mirror, 1 to 3 in.
(25 to 75 mm) from the
HomeLink
® buttons.
Keep the HomeLink® indicator
light in view while programming.
Program a device.
Programming a device
other than an entry gate
(for U.S.A. owners)
Press and hold the remote
control transmitter button
until the HomeLink
® indicator
light changes from slowly
flashing orange to rapidly
flashing green (rolling code)
or continuously lit green
(fixed code), then release the
button.
Programming an entry gate (for U.S.A. owners)/Programming
a device in the Canadian market
Press and release the remote con trol transmitter button at 2 sec-
ond intervals, repeatedly, until the HomeLink
® indicator light
changes from slowly flashing orange to rapidly flashing green
(rolling code) or continuous ly lit green (fixed code).
13
1
2
3
Page 458 of 672
4586-4. Using the other interior features
Test the HomeLink® operation by pressing the newly pro-
grammed button and observi ng the indicator light:
● Indicator light illuminates: Progr amming of a fixed code device
has completed. The garage door or other device should oper-
ate when a HomeLink
® button is pressed and released.
● Indicator light flashes rapidly: The garage door opener motor
or other device is equipped with a rolling code. To complete
programming, firmly press and hold the HomeLink
® button for
2 seconds then release it.
● If the garage door or other device does not operate, proceed
to “Programming a rolling code system”.
Repeat the steps above to program another device for any of the
remaining HomeLink
® buttons.
■Programming a rolling code system
2 or more people may be necessary to complete rolling code pro-
gramming.
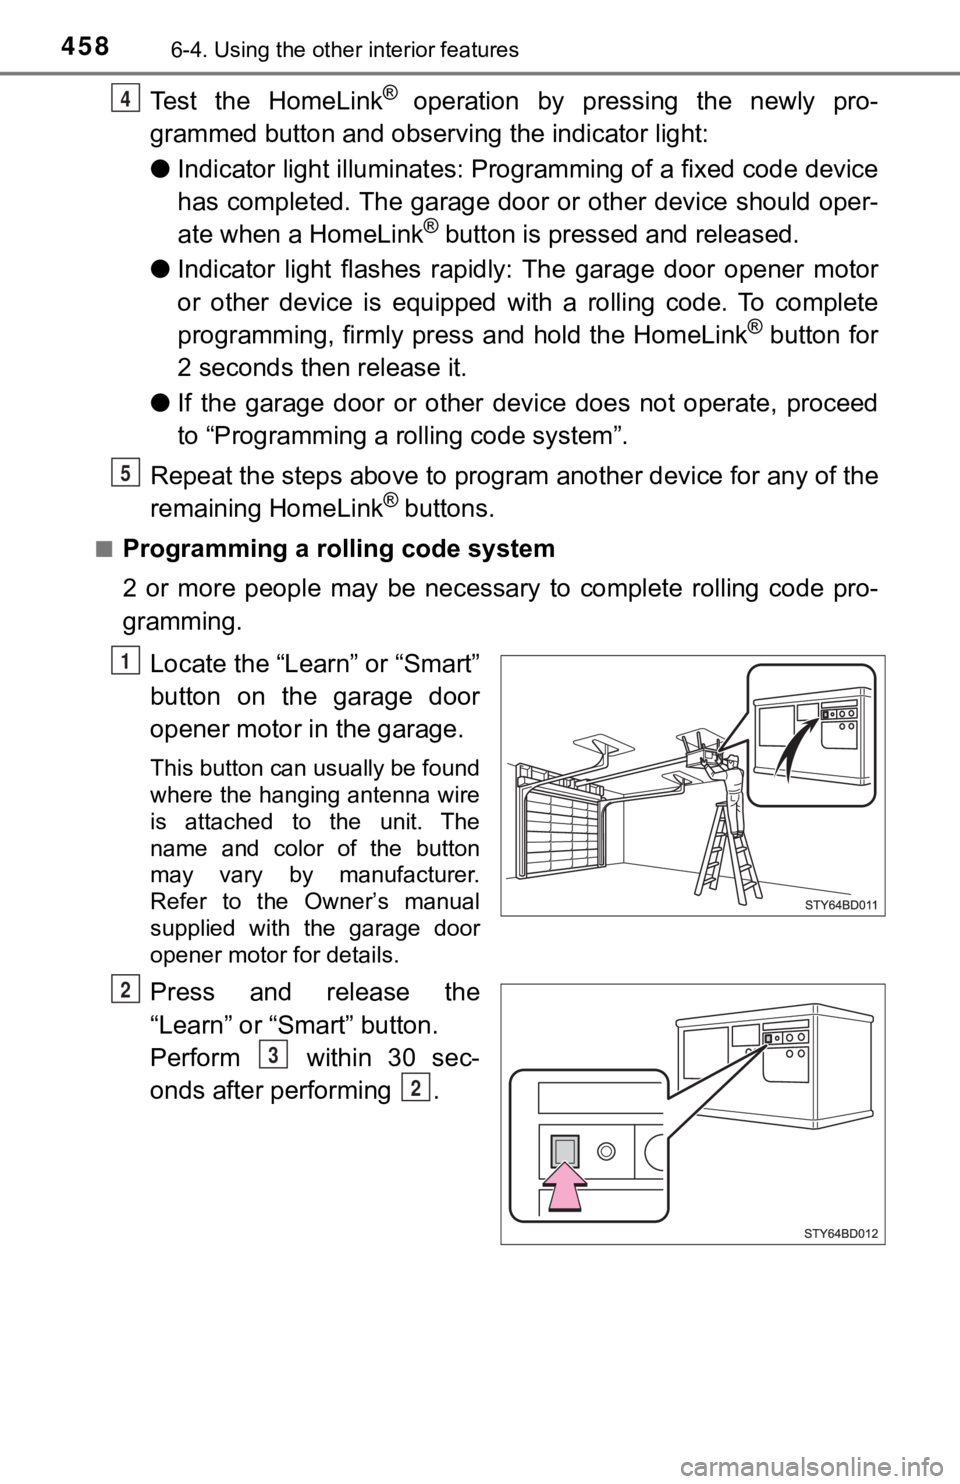
Locate the “Learn” or “Smart”
button on the garage door
opener motor in the garage.
This button can usually be found
where the hanging antenna wire
is attached to the unit. The
name and color of the button
may vary by manufacturer.
Refer to the Owner’s manual
supplied with the garage door
opener motor for details.
Press and release the
“Learn” or “Smart” button.
Perform within 30 sec-
onds after performing .
4
5
1
2
3
2
Page 460 of 672
4606-4. Using the other interior features
Press a programmed HomeLink® button to operate a garage
door.
Within 1 minute of pressing the HomeLink
® button, after the
garage door operation has stopped, press the “Learn” or “Smart”
button on the garage door opener motor. Within 5 seconds of the
establishment of 2-way commu nication with the garage door
opener, both garage door operation indicators in the vehicle wi ll
flash rapidly green and the light on the garage door opener mot or
will blink twice, indicating that 2- way communication is enabled.
■Reprogramming a single HomeLink® button
When the following procedure is performed, buttons which alread y
have devices registered to them can be overwritten:
With one hand, press and hold the desired HomeLink
® button.
When the HomeLink
® indicator starts flas hing orange, release
the HomeLink® button and perform “Programming the Home-
Link®” (it takes 20 seconds for the HomeLink® indicator to
start flashing).
Press the appropriate HomeLink
® button. The HomeLink® indicator
light should turn on.
Operating the HomeLink®
2
3
1
2
1
Page 461 of 672
4616-4. Using the other interior features
6
Interior features
The status of the opening and
closing of a garage door is shown
by the indicators.Opening
Closing
This function is only available if the
garage door opener motor used is
a compatible device. (To check
device compatibility, refer to
www.HomeLink.com
.)
The indicators can operate within approximately 820 ft. (250 m) of
the garage door. However, if there are obstructions between the
garage door and the vehicle, such as houses and trees, feedback
signals from the garage door may not be received.
To recall the previous door operation status, press and release
either HomeLink
® buttons and or and
simultaneously. The last recorded status will be displayed for 3 sec-
onds.
Garage door operation indicators
1
2
ColorStatus
Orange (flashing)Currently opening/closing
GreenOpening/closing has completed
Red (flashing)Feedback signals cannot be received