Page 261 of 504
261
Fuel tank
Opening
If your vehicle is fitted with Stop & Start, never refuel with the engine in STOP mode; you must switch off the ignition using the key, or the START/STOP
button if your vehicle has Smart Entry & Start System.
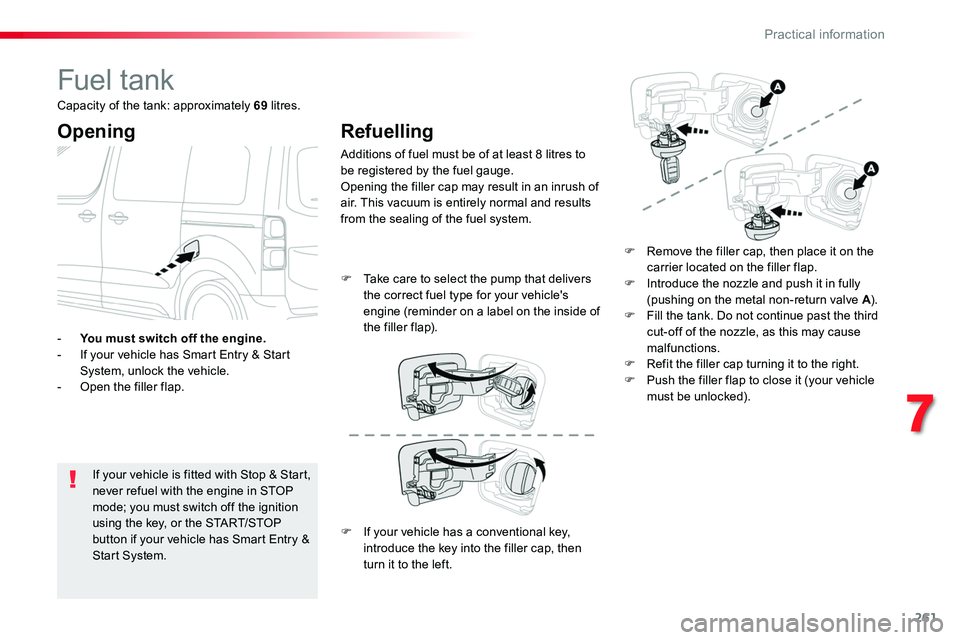
- You must switch off the engine.- If your vehicle has Smart Entry & Start System, unlock the vehicle.- Open the filler flap.
Refuelling
Additions of fuel must be of at least 8 litres to be registered by the fuel gauge.Opening the filler cap may result in an inrush of air. This vacuum is entirely normal and results from the sealing of the fuel system.
F Remove the filler cap, then place it on the carrier located on the filler flap.F Introduce the nozzle and push it in fully (pushing on the metal non-return valve A).F Fill the tank. Do not continue past the third cut-off of the nozzle, as this may cause malfunctions.F Refit the filler cap turning it to the right.F Push the filler flap to close it (your vehicle must be unlocked).
F Take care to select the pump that delivers the correct fuel type for your vehicle's engine (reminder on a label on the inside of the filler flap).
Capacity of the tank: approximately 69 litres.
F If your vehicle has a conventional key, introduce the key into the filler cap, then turn it to the left.
7
Practical information
Page 280 of 504
280
Recommendations on storage
Never store bottles of AdBlue® in your vehicle.
AdBlue® freezes at about -11°C and deteriorates above 25°C. It is recommended that bottles be stored in a cool area and protected from direct sunlight.Under these conditions, the fluid can be kept for at least a year.If the additive has frozen, it can be used once it has completely thawed out.
Procedure
Before starting the top-up procedure, ensure that the vehicle is parked on a flat and level sur face.
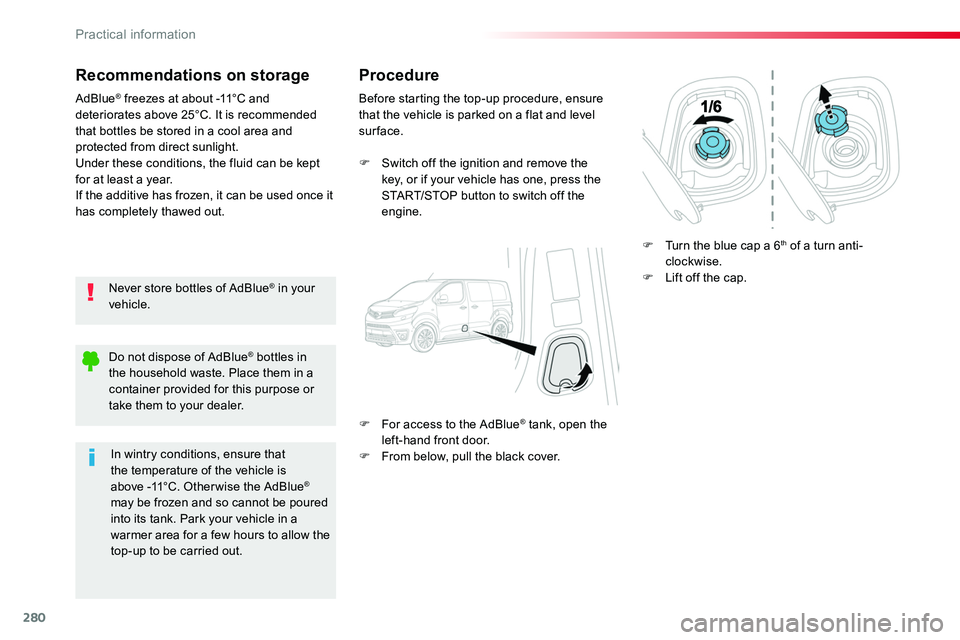
F Switch off the ignition and remove the key, or if your vehicle has one, press the START/STOP button to switch off the engine.
F For access to the AdBlue® tank, open the left-hand front door.F From below, pull the black cover.
F Turn the blue cap a 6th of a turn anti-clockwise.F Lift off the cap.
Do not dispose of AdBlue® bottles in the household waste. Place them in a container provided for this purpose or take them to your dealer.
In wintry conditions, ensure that the temperature of the vehicle is above -11°C. Other wise the AdBlue® may be frozen and so cannot be poured into its tank. Park your vehicle in a warmer area for a few hours to allow the top-up to be carried out.
Practical information
Page 281 of 504
281
F After emptying the bottle, wipe away any spillage around the tank filler using a damp cloth.
If any additive is split or splashed, wash immediately with cold water or wipe with a damp cloth.If the additive has crystallised, clean it off using a sponge and hot water.
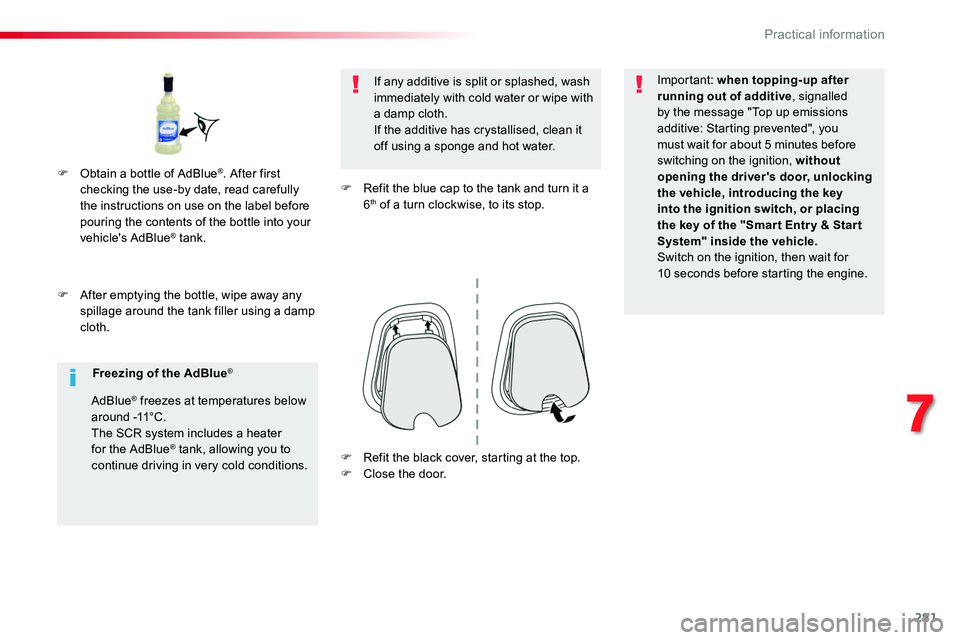
F Refit the blue cap to the tank and turn it a 6th of a turn clockwise, to its stop.
Important: when topping-up after running out of additive, signalled by the message "Top up emissions additive: Starting prevented", you must wait for about 5 minutes before switching on the ignition, without opening the driver's door, unlocking the vehicle, introducing the key into the ignition switch, or placing the key of the "Smar t Entr y & Star t System" inside the vehicle.Switch on the ignition, then wait for 10 seconds before starting the engine.
F Obtain a bottle of AdBlue®. After first checking the use-by date, read carefully the instructions on use on the label before pouring the contents of the bottle into your vehicle's AdBlue® tank.
Freezing of the AdBlue®
AdBlue® freezes at temperatures below around -11°C.
The SCR system includes a heater for the AdBlue® tank, allowing you to continue driving in very cold conditions.F Refit the black cover, starting at the top.F Close the door.
7
Practical information
Page 319 of 504
319
Do not force the lever as locking will not be possible if the clamp is not
positioned correctly; start the procedure again.
Disconnecting the battery
In order to maintain an adequate state of charge for starting the engine, it is recommended that the battery be disconnected if the vehicle is taken out of service for a long period.Wait 2 minutes after switching off the ignition before disconnecting the battery.F close the windows and the doors before disconnecting the battery,F switch off all electrical consumers (audio system, wipers, lighting, ...),F switch off the ignition and wait for four minutes.Having exposed the battery, it is only necessary to disconnect the (+) terminal.
Quick release terminal
Disconnecting the (+) terminal
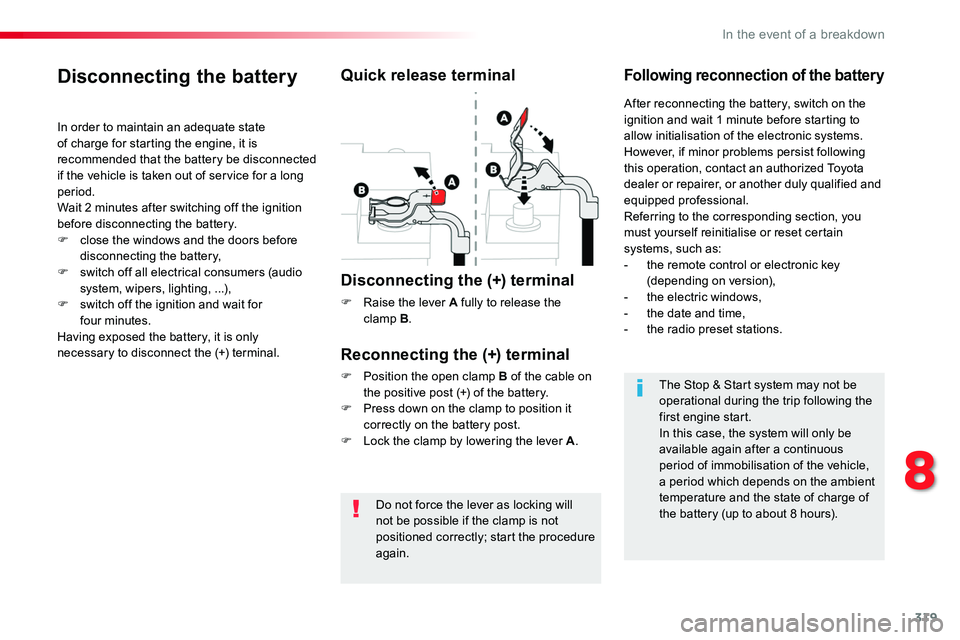
F Raise the lever A fully to release the clamp B.
Following reconnection of the battery
Reconnecting the (+) terminal
F Position the open clamp B of the cable on the positive post (+) of the battery.F Press down on the clamp to position it correctly on the battery post.F Lock the clamp by lowering the lever A.
After reconnecting the battery, switch on the ignition and wait 1 minute before starting to allow initialisation of the electronic systems.However, if minor problems persist following this operation, contact an authorized Toyota dealer or repairer, or another duly qualified and equipped professional.Referring to the corresponding section, you must yourself reinitialise or reset certain systems, such as:- the remote control or electronic key (depending on version),- the electric windows,- the date and time,- the radio preset stations.
The Stop & Start system may not be operational during the trip following the first engine start.In this case, the system will only be available again after a continuous period of immobilisation of the vehicle, a period which depends on the ambient temperature and the state of charge of the battery (up to about 8 hours).
8
In the event of a breakdown
Page 354 of 504
354
1
1
8
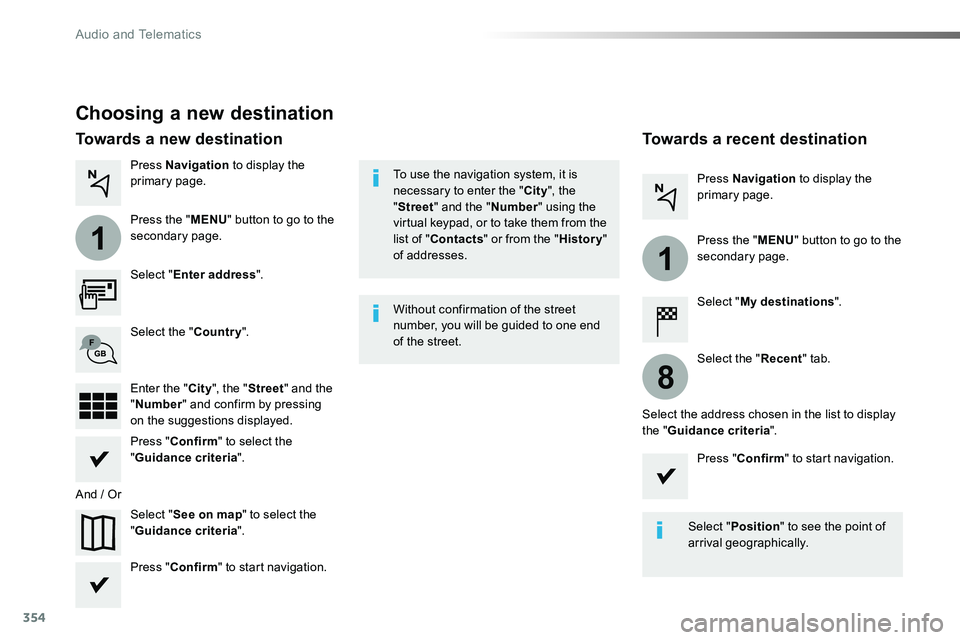
Choosing a new destination
Select "Enter address".
Select "See on map" to select the "Guidance criteria".
Select the "Country".
Press "Confirm" to select the "Guidance criteria".
Press "Confirm" to start navigation.
Press "Confirm" to start navigation.
And / Or
Press Navigation to display the primary page.
Press the "MENU" button to go to the
secondary page.
Towards a new destinationTowards a recent destination
Select "My destinations".
Press Navigation to display the primary page.
Press the "MENU" button to go to the secondary page.
Enter the "City", the "Street" and the "Number" and confirm by pressing on the suggestions displayed.
Select the "Recent" tab.
Select the address chosen in the list to display the "Guidance criteria".
To use the navigation system, it is necessary to enter the "City", the "Street" and the "Number" using the virtual keypad, or to take them from the list of "Contacts" or from the "History" of addresses.
Without confirmation of the street number, you will be guided to one end of the street.
Select "Position" to see the point of arrival geographically.
Audio and Telematics
Page 356 of 504
356
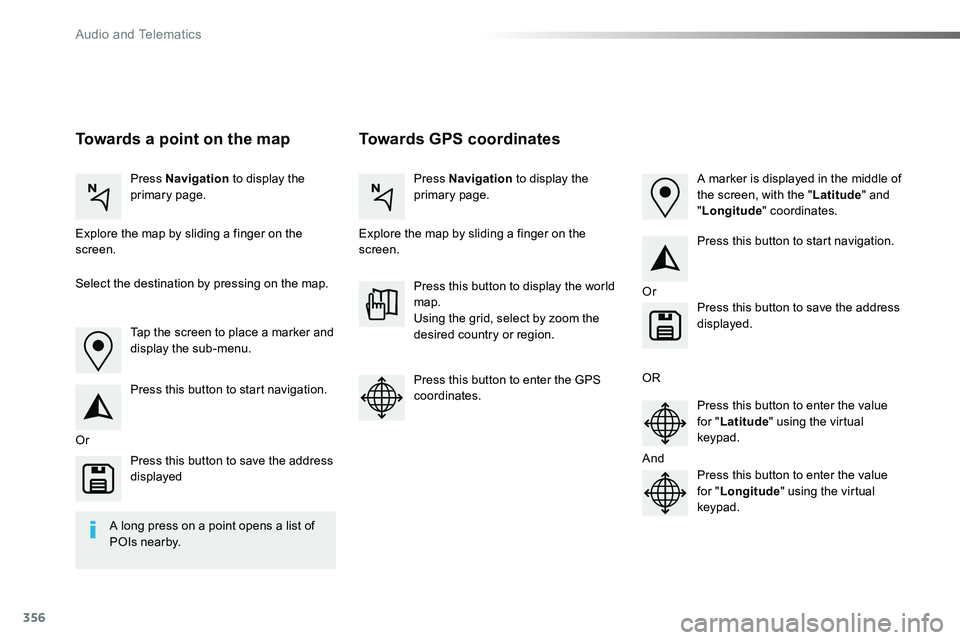
Towards GPS coordinatesTowards a point on the map
Press Navigation to display the primary page.Press Navigation to display the primary page.
Explore the map by sliding a finger on the screen.Explore the map by sliding a finger on the screen.
Tap the screen to place a marker and display the sub-menu.
Or
Or
OR
And
Select the destination by pressing on the map.
Press this button to start navigation.
Press this button to start navigation.
Press this button to display the world map.Using the grid, select by zoom the desired country or region.
Press this button to save the address displayed
Press this button to save the address displayed.
Press this button to enter the GPS coordinates.Press this button to enter the value for "Latitude" using the virtual keypad.
Press this button to enter the value for "Longitude" using the virtual keypad.
A marker is displayed in the middle of the screen, with the "Latitude" and "Longitude" coordinates.
A long press on a point opens a list of
POIs nearby.
Audio and Telematics
Page 367 of 504
367
To distribute information on the declaration of danger zones, you should check the option: "Allow declaration of danger areas".
You can download updates to the system, danger zones and mapping, from the brand's website.The download procedure can be found in the same place.
Declaration of "Danger
areas"
Press Navigation to display the primary page.
Press the "Declare a new danger area" button located in the upper bar of the touch screen.
Select the option "Ty p e" to choose the type of "Danger area".
Select the "Speed" option and enter it using the virtual keypad.
Press "Confirm" to save and distribute the information.
.
Audio and Telematics
Page 371 of 504
371
11
7
8
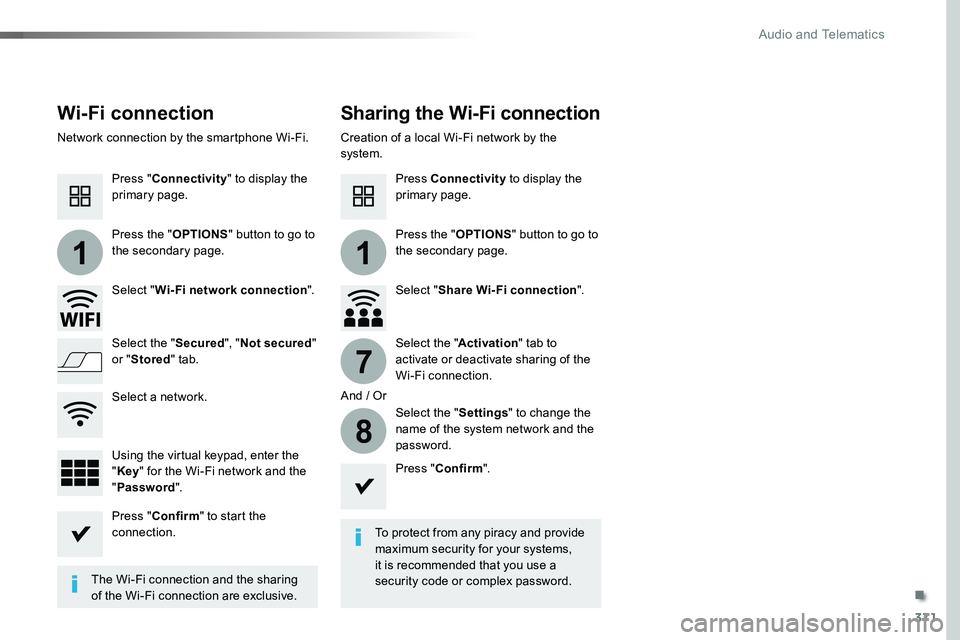
Wi-Fi connectionSharing the Wi-Fi connection
To protect from any piracy and provide maximum security for your systems, it is recommended that you use a security code or complex password.The Wi-Fi connection and the sharing
of the Wi-Fi connection are exclusive.
Press "Confirm".
Press "Confirm" to start the connection.
Press "Connectivity" to display the primary page.
Network connection by the smartphone Wi-Fi.Creation of a local Wi-Fi network by the system.
Press Connectivity to display the primary page.
Press the "OPTIONS" button to go to the secondary page.Press the "OPTIONS" button to go to the secondary page.
Select "Wi-Fi network connection".Select "Share Wi-Fi connection".
And / Or
Select the "Secured", "Not secured" or "Stored" tab.Select the "Activation" tab to activate or deactivate sharing of the Wi-Fi connection.
Select the "Settings" to change the name of the system network and the password.Using the virtual keypad, enter the "Key" for the Wi-Fi network and the "Password".
Select a network.
.
Audio and Telematics