Page 13 of 516

13
Limit the causes of excess
consumption
Spread loads throughout the vehicle; place the heaviest items in the bottom of the boot, as close as possible to the rear seats.Limit the loads carried in the vehicle and reduce wind resistance (roof bars, roof rack, bicycle carrier, trailer...). Use a roof box in preference.Remove roof bars and roof racks after use.
At the end of winter, remove snow tyres and refit your summer tyres.
Observe the recommendations
on maintenance
Check the tyre pressures regularly, when cold, referring to the label in the door aperture, driver's side.Carry out this check in particular:- before a long journey,- at each change of season,- after a long period out of use.Don't forget the spare wheel and the tyres on any trailer or caravan.
Have your vehicle serviced regularly (engine oil, oil filter, air filter, passenger compartment filter...) and observe the schedule of operations recommended in the manufacturer's service schedule.
With a BlueHDi Diesel engine, if the SCR system is faulty your vehicle becomes polluting; go to an authorized Toyota dealer or repairer, or another duly qualified and equipped professional without delay to have the emissions of nitrogen oxides brought back to the legal level.
When refuelling, do not continue after the third cut-off of the nozzle to avoid any over flow.
At the wheel of your new vehicle, it is only after the first 1 800 miles (3 000 kilometres) that you will see the fuel consumption settle down to a consistent average.
.
Eco-driving
Page 94 of 516
94
For more information on the Key, Remote control or Smar t Entr y & Star t System and in particular unlocking the vehicle, refer to the corresponding section.
For more information on the Key, Remote control or Smar t Entr y & Star t System and in particular
on locking the vehicle, refer to the corresponding section.
Rear tailgate
F After unlocking the vehicle with the key, the remote control or the Smart Entry & Start System, pull the handle, then raise the rear tailgate.
Opening
F Lower the rear tailgate using the interior grab handle then push it home to fully close it.
ClosingBack-up control
It allows the mechanical unlocking of the rear tailgate in the event of a battery or central locking system malfunction.
Unlocking
F If fitted to your vehicle and if necessary, fold back the rear seats to gain access to the lock from inside.
Locking after closing
If the fault persists after closing again, the rear tailgate will remain locked.
If the rear tailgate is not fully closed:
- vehicle stationary and engine running, this warning lamp comes on, accompanied by an alert message for a few seconds,- vehicle moving (speed above 6 mph (10 km/h)), this warning lamp comes on, accompanied by an audible signal and an alert message for a few seconds.
F Insert a small screwdriver into hole A of the
lock to unlock the rear tailgate.F Move the latch to the left.
Access
Page 101 of 516
101
F Place the head restraint in the low position, and if fitted to your vehicle, raise the armrest and fold the table on the back of the seat.
Table position for the driver's and/or the front passenger's seat backrest
Check that there is no object that could inter fere with the movement of a seat, both above and below.
On the front passenger's side, this position allows long objects to be carried.On the driver's side, this position allows rear passengers to be helped out of the vehicle (by the emergency services).
F Pull the control fully up and tip the backrest forward.To return to the normal position, pull the control up to release the backrest, then pull the backrest up to its raised position.
3
Ease of use and comfort
Page 104 of 516
104
Head restraint height
adjustment
F To raise the head restraint, pull it upwards.F To remove the head restraint, press the lug A and pull the head restraint upwards.F To put the head restraint back in place, engage the head restraint stems in the openings keeping them in line with the seat back.F To lower the head restraint, press the lug A and the head restraint at the same time.
The head restraint rods have notches which prevent the head restraint lowering; this is a safety device in case of impact.The adjustment is correct when the upper edge of the head restraint is level with the top of the head.Never drive with the head restraints removed; they must be in place and adjusted correctly.
2-seat front bench seat
If fitted to your vehicle, this is fixed and has a seat belt on the backrest for the seat alongside the driver.
For more information on the Seat belts, refer to the corresponding section.
Ease of use and comfort
Page 106 of 516
106
Smart Cargo
Removing the flap
Removable flap
F Holding the flap with one hand, with your other hand turn the control at the top of the flap to release it.F Lower the flap to remove it from its housing.
The cushion of the outer seat of the bench seat can be raised up to the backrest to create additional loading space in the cab.A flap in the partition can be removed to allow long objects to be carried.
Once the removable flap has been removed, you can load long objects under the outer seat.
F Stow it behind the driver's seat, clipping it to the fixing lugs.F Turn the control at the top of the flap to secure it.
Ease of use and comfort
Page 109 of 516
109
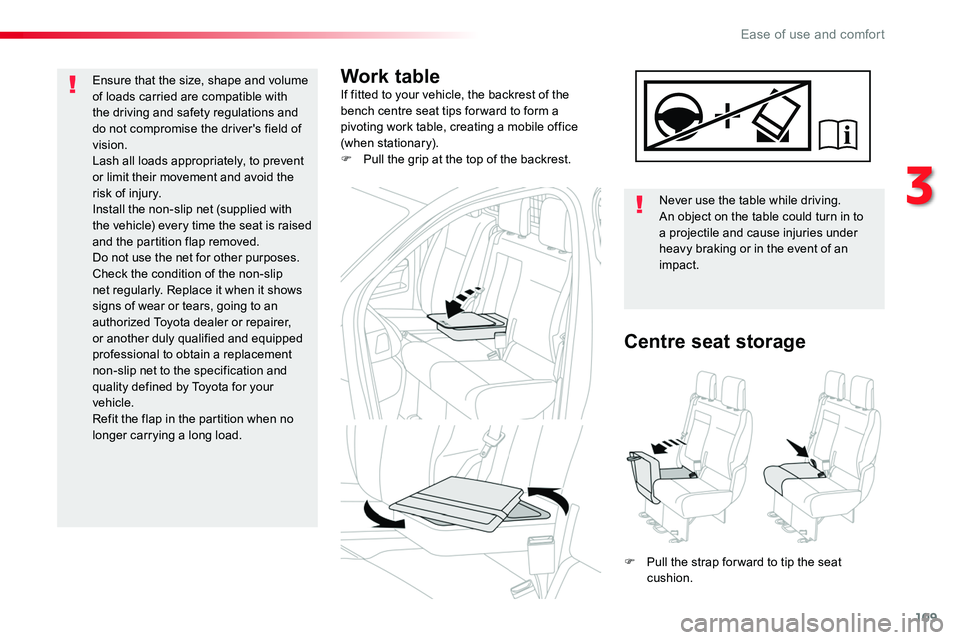
Work tableIf fitted to your vehicle, the backrest of the bench centre seat tips for ward to form a pivoting work table, creating a mobile office (when stationary).F Pull the grip at the top of the backrest.
Never use the table while driving.An object on the table could turn in to a projectile and cause injuries under heavy braking or in the event of an impact.
Centre seat storage
F Pull the strap for ward to tip the seat cushion.
Ensure that the size, shape and volume of loads carried are compatible with the driving and safety regulations and do not compromise the driver's field of vision.Lash all loads appropriately, to prevent or limit their movement and avoid the risk of injury.Install the non-slip net (supplied with the vehicle) every time the seat is raised and the partition flap removed.Do not use the net for other purposes.Check the condition of the non-slip net regularly. Replace it when it shows signs of wear or tears, going to an authorized Toyota dealer or repairer, or another duly qualified and equipped professional to obtain a replacement non-slip net to the specification and quality defined by Toyota for your vehicle.Refit the flap in the partition when no
longer carrying a long load.
3
Ease of use and comfort
Page 119 of 516
119
Mats
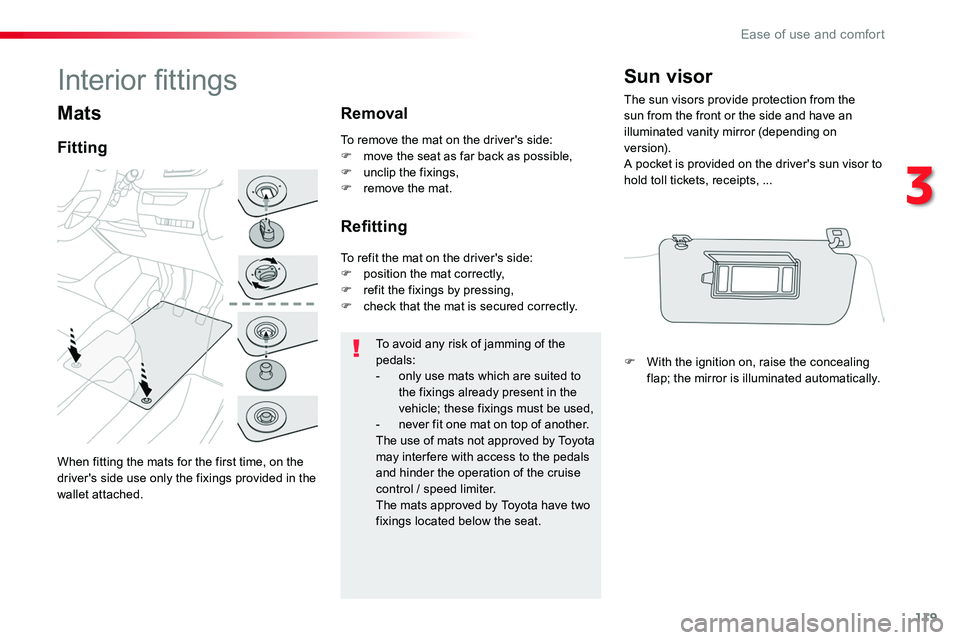
Fitting
Removal
Refitting
To avoid any risk of jamming of the pedals:- only use mats which are suited to the fixings already present in the vehicle; these fixings must be used,- never fit one mat on top of another.The use of mats not approved by Toyota may inter fere with access to the pedals and hinder the operation of the cruise control / speed limiter.The mats approved by Toyota have two fixings located below the seat.
To remove the mat on the driver's side:F move the seat as far back as possible,F unclip the fixings,F remove the mat.
To refit the mat on the driver's side:F position the mat correctly,F refit the fixings by pressing,F check that the mat is secured correctly.
Sun visor
The sun visors provide protection from the sun from the front or the side and have an illuminated vanity mirror (depending on ve r s i o n).A pocket is provided on the driver's sun visor to hold toll tickets, receipts, ...
F With the ignition on, raise the concealing flap; the mirror is illuminated automatically.
Interior fittings
When fitting the mats for the first time, on the driver's side use only the fixings provided in the wallet attached.
3
Ease of use and comfort
Page 123 of 516
123
Load retainer
On the floor, behind the front seats, a horizontal partition protects the driver and front passengers against the risk of load movement.Panel or glazed partitions separate the loading area from the cab.
High load retaining
net
Seating area
fittings
Depending on the vehicle's equipment, the various fittings below are located in the seating area.
This allows the use of the entire load space, up to the roof:- behind the front seats in row 1, when the rear seats (and bench seats) in rows 2 and 3 are folded or removed.- behind the rear seats and bench seats in row 2, when the rear seats (and bench seats) in row 3 are folded or removed.
Upper fixings
Lower fixings (behind row 1)
If your vehicle has fixed one-piece bench seats or seats and bench seats:
F Unclip the anchorage cover in the roof on
each side.
F On each side in row 2, insert the fixings in the floor anchorages (as shown above).
3
Ease of use and comfort