Page 301 of 516
301
Fitting a wheel
F Put the wheel in place on the hub.F Screw in the bolts fully by hand.F If your vehicle is so equipped, pre-tighten the security bolt using the wheelbrace 1 fitted with the security socket 4.F Pre-tighten the other bolts using the wheelbrace 1 o n l y.
F Lower the vehicle fully.F Fold the jack 2 and detach it.
8
In the event of a breakdown
Page 302 of 516

302
F If your vehicle is so equipped, tighten the security bolt using the wheelbrace 1 fitted with the security socket 4.F Tighten the other bolts using the wheelbrace 1 o n l y.F Stow the tools in the tool box.
The tyre inflation pressures are given on this label.
After changing a wheel
Stow the punctured wheel in the carrier.Have the tightening of the bolts and the pressure of the spare wheel checked by an authorized Toyota dealer or repairer, or another duly qualified and equipped professional without delay.Have the punctured wheel repaired and refitted to the vehicle as soon as possible.
If your vehicle has tyre pressure warning system, check the tyre pressures and reinitialise the system.
Tyre Pressure Warning System (TPWS)
The steel spare wheel does not have a sensor.
Wheel with wheel trim
When refitting the wheel, refit the wheel trim by placing its cut-out at the valve, and press round its edge with the palm of your hand.
For more information on Under-inflation detection, refer to the corresponding section.
In the event of a breakdown
Page 312 of 516
312
Courtesy lamps
(front and rear)
Ty p e A, W5W-5W
F Unclip the lens by inserting a thin screwdriver into the cut-outs at each side of the lamp.F Pull the bulb out and change it.F Clip the lens in place and ensure that it is secure.
In the event of a breakdown
Page 315 of 516
315
Courtesy lamps
(front and rear)
For the replacement of this type of LED lamp and light guide, contact an authorized Toyota dealer or repairer, or another duly qualified and equipped professional.A replacement kit for the LEDs is available from Toyota dealers.
Rear lamps
For more information on Changing a bulb and in particular, the types of bulbs, refer to the corresponding section.
Platform cab
F Identify the failed bulb.F Remove the four screws securing the lens.F Pull the lens towards you.F Remove the failed bulb by pressing lightly on it and then turning it a quarter turn clockwise.F Change the bulb.
1. Direction indicators. Ty p e B, P21W-21W2. Brake lamps. Ty p e B, P21W-21W3. Sidelamps. Ty p e B, R10W-10W4. Reversing lamps. Ty p e B, P21W-21W5. Foglamps. Ty p e B, P21W-21W
To reassemble, carry out these operations in reverse order.
8
In the event of a breakdown
Page 321 of 516

321
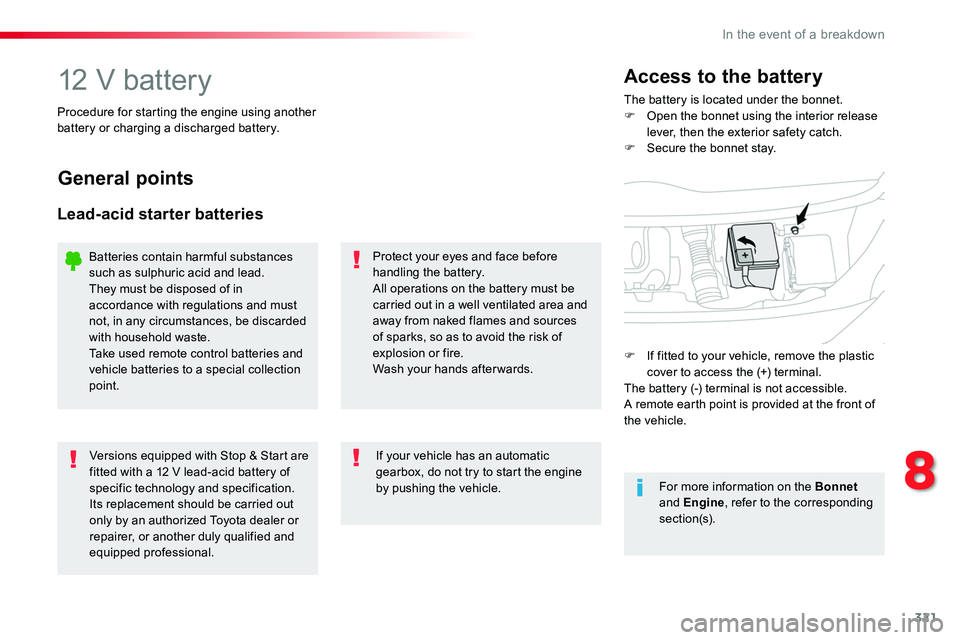
12 V batteryThe battery is located under the bonnet.F Open the bonnet using the interior release lever, then the exterior safety catch.F Secure the bonnet stay.
Access to the battery
Procedure for starting the engine using another battery or charging a discharged battery.
General points
Lead-acid starter batteries
Protect your eyes and face before handling the battery.All operations on the battery must be carried out in a well ventilated area and away from naked flames and sources of sparks, so as to avoid the risk of explosion or fire.Wash your hands afterwards.
Versions equipped with Stop & Start are fitted with a 12 V lead-acid battery of specific technology and specification.Its replacement should be carried out only by an authorized Toyota dealer or repairer, or another duly qualified and equipped professional.
If your vehicle has an automatic gearbox, do not try to start the engine by pushing the vehicle.
Batteries contain harmful substances such as sulphuric acid and lead.They must be disposed of in accordance with regulations and must not, in any circumstances, be discarded with household waste.Take used remote control batteries and vehicle batteries to a special collection point.
For more information on the Bonnet and Engine, refer to the corresponding section(s).
F If fitted to your vehicle, remove the plastic cover to access the (+) terminal.The battery (-) terminal is not accessible.A remote earth point is provided at the front of the vehicle.
8
In the event of a breakdown
Page 379 of 516
379
1
1
1
6
7
8
2
3
4
5
Level 2Level 3Comments
Connectivity
Secondary page
Bluetooth connection
AllDisplay all telephones, connected or disconnected.
ConnectedDisplay all connected telephones.
SearchStart a search for a device to connect.
Connectivity
Secondary page
Wi- Fi network connection
SecuredDisplay secured Wi-Fi networks.
Not securedDisplay non-secured Wi-Fi networks.
StoredDisplay remembered Wi-Fi networks.
Connectivity
Secondary page
Share Wi- Fi connection
ActivationActivate or deactivating the sharing of the Wi-Fi connection.
SettingsSelect a Wi-Fi network found by the system and connect to it.
Save settings.
Functionalities available according to equipment.
.
Audio and Telematics
Page 381 of 516

381
11
7
8
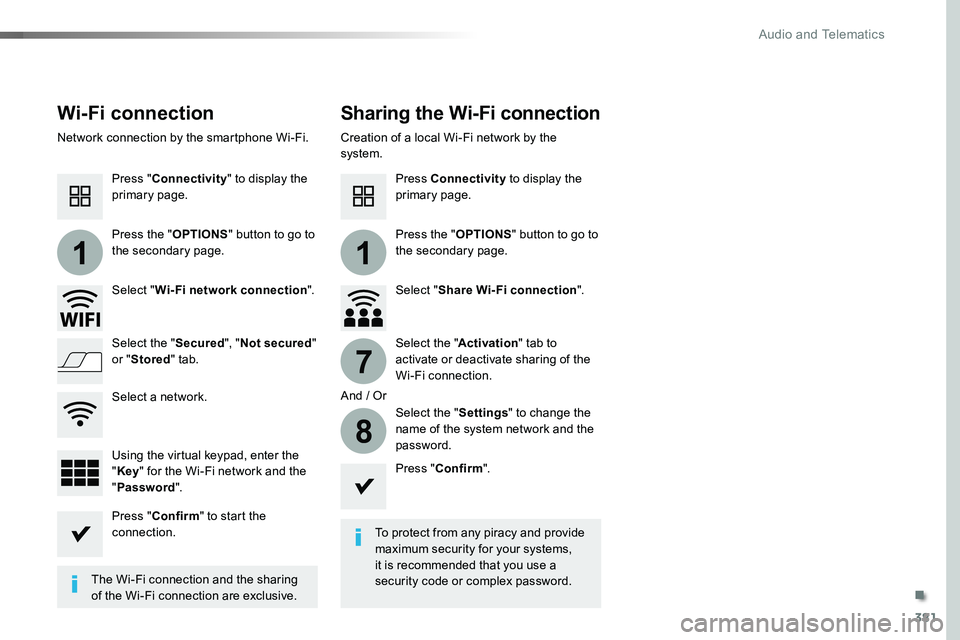
Wi-Fi connectionSharing the Wi-Fi connection
To protect from any piracy and provide maximum security for your systems, it is recommended that you use a security code or complex password.The Wi-Fi connection and the sharing
of the Wi-Fi connection are exclusive.
Press "Confirm".
Press "Confirm" to start the connection.
Press "Connectivity" to display the primary page.
Network connection by the smartphone Wi-Fi.Creation of a local Wi-Fi network by the system.
Press Connectivity to display the primary page.
Press the "OPTIONS" button to go to the secondary page.Press the "OPTIONS" button to go to the secondary page.
Select "Wi-Fi network connection".Select "Share Wi-Fi connection".
And / Or
Select the "Secured", "Not secured" or "Stored" tab.Select the "Activation" tab to activate or deactivate sharing of the Wi-Fi connection.
Select the "Settings" to change the name of the system network and the password.Using the virtual keypad, enter the "Key" for the Wi-Fi network and the "Password".
Select a network.
.
Audio and Telematics
Page 405 of 516
405
1
1
27
28
29
30
23
24
25
26
Level 1Level 2Comments
Telephone
Secondary page
Options
SecurityMake driving safe.
VoicemailEnter and save the number for the telephone voicemail.
RingtoneAdjust the ringtone volume.
StatisticsDisplay data for the telephone connected.
ConfirmSave the options.
Telephone
Secondary page
Quick messages
Delayed
Select a quick message from the categories, as required.
My arrival
Not available
Other
CreateCreate a quick message.
.
Audio and Telematics