Page 344 of 516
344
Steering mounted controls
Media (short press): change the multimedia source.Telephone (short press): call.Call in progress (short press): access to telephone menu.Telephone (long press): reject an incoming call, end call, access to telephone menu.
Decrease volume.
Voice commands:Short press, system voice commands.Long press, smartphone voice commands via the system.Mute / Restore the sound.
Radio (rotate): automatic search for the previous / next station.Media (rotate): previous / next track, move in a list.Short press: Confirm a selection. Other than selection, access to presets.
Radio: display the list of stations.Media: display the list of tracks.Radio, press and hold: update the list of stations received.
Increase volume.
Audio and Telematics
Page 345 of 516
345
12:13
23 °C12:13
23 °C531 kH z
FM/87.5 MHz
87.5MH z 12:13
23 °C 87.5 MHz
12:13
23 °C531 kH z12:13
23 °C
Menus
Settings
Radio MediaConnected navigation
Driving
Connectivity
Telephone
Enter settings for a personal profile and/or adjust the settings for sound (balance, ambience, ...), and the display (language, units, date, time, ...).
Select an audio source, a radio station, display photographs.Enter navigation settings and choose a destination.Use services available in real time, depending on equipment.
Activate, deactivate, adjust the settings for certain vehicle functions.
Operate certain applications on a smartphone connected via MirrorLinkTM.Check the state of Bluetooth and Wi-Fi connections.
Connect a telephone by Bluetooth®, read messages and emails and send quick messages.
.
Audio and Telematics
Page 346 of 516

346
Voice commands
First stepsSteering mounted controlsInformation - Using the system
Press the Push To Talk button and tell me what you'd like after the tone. Remember you can interrupt me at any time by pressing this button. If you
press it again while I'm waiting for you to speak, it'll end the conversation. If you need to start over, say "cancel". If you want to undo something, say "undo". And to get information and tips at any time, just say "help". If you ask to me do something and there's some information missing that I need, I'll give you some examples or take you through it step by step. There's more information available in "novice" mode. You can set the dialogue mode to "expert" when you feel comfortable.
To ensure that voice commands are always recognised by the system, please observe the following recommendations:- speak in a normal tone without breaking up words or raising your voice.- always wait for the "beep" (audible signal) before speaking.- for best operation, it is recommended that the windows and opening roof (if fitted) be closed to avoid inter ference from extraneous noises.- before making a voice command, ask other passengers to not speak.
The voice commands, with a choice of 12 languages (English, French, Italian, Spanish, German, Dutch, Portuguese, Polish, Turkish, Russian, Arabic, Brazilian), are made using the language previously chosen and set in the system.
The voice commands in Arabic for: "Navigate to address" and "Display POI in the city", are not available.
Example of a "voice command" for navigation:"Navigate to address 11 Regent Street, London".
Example of a "voice command" for
the radio and media:"Play ar tist Madonna".
Example of a "voice command" for the telephone:"Call David Miller".
Pressing this button activates the voice commands function.
Audio and Telematics
Page 369 of 516

369
As a safety measure and because it requires sustained attention by the driver, using a smartphone when driving is prohibited.All operations must be done with the vehicle stationary.
Connected navigation services
The principles and standards are constantly changing. For communication between your smartphone and the system to operate correctly, we recommend that you keep your smar tphone's operating system up to date, and the time and date on your smar tphone and the system correct.
The services offered with connected navigation are as follows.A connected services pack:- Weather,- Filling stations,- Car park,- Tr a f f i c ,- POI, local search.A Danger area pack.
Activate the Bluetooth function on the telephone and ensure that it is visible to all (see the "Connectivity" section).
Connect the USB cable.The smartphone is in charge mode when connected by USB cable.
In order to enable the navigation connected services, please ensure to create a Toyota account at my.toyota.eu.
When this "TOMTOM TR AFFIC" logo appears, the services are available.
For access to connected navigation, you can use the connection provided by the vehicle using your smartphone as a modem.Activate and enter settings for sharing the smartphone connection.Restrictions of use:- With MirrorLinkTM, connection sharing is only with a USB connection.
The quality of services depends on the quality of the network connection.
Select a Wi-Fi connection found by the system and connect to it (see the "Connectivity" section).
USB connection
Network connection provided by the user
Bluetooth connection
Wi-Fi connection
.
Audio and Telematics
Page 397 of 516

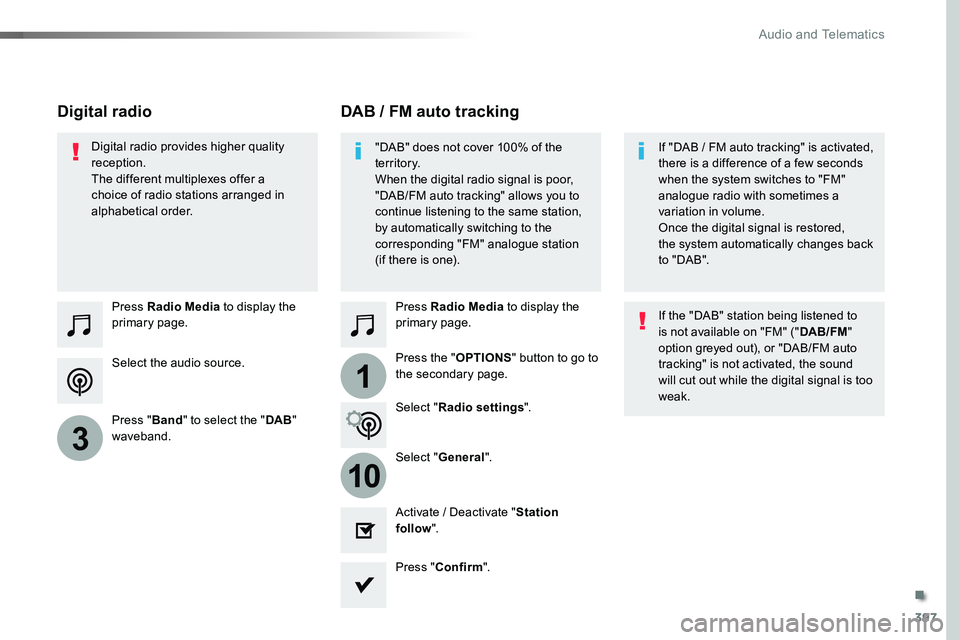
397
1
10
3
Select the audio source.
Press Radio Media to display the primary page.
Press "Band" to select the "DAB" waveband.
Press Radio Media to display the primary page.
Press the "OPTIONS" button to go to the secondary page.
DAB / FM auto trackingDigital radio
"DAB" does not cover 100% of the te r r i to r y.When the digital radio signal is poor, "DAB/FM auto tracking" allows you to continue listening to the same station,
by automatically switching to the corresponding "FM" analogue station (if there is one).
If "DAB / FM auto tracking" is activated, there is a difference of a few seconds when the system switches to "FM" analogue radio with sometimes a variation in volume.
Once the digital signal is restored, the system automatically changes back to " DA B ".
Digital radio provides higher quality reception.The different multiplexes offer a choice of radio stations arranged in alphabetical order.
If the "DAB" station being listened to is not available on "FM" ("DAB/FM" option greyed out), or "DAB/FM auto tracking" is not activated, the sound will cut out while the digital signal is too weak.Select "Radio settings".
Select "General".
Activate / Deactivate "Station follow".
Press "Confirm".
.
Audio and Telematics
Page 398 of 516

398
Media
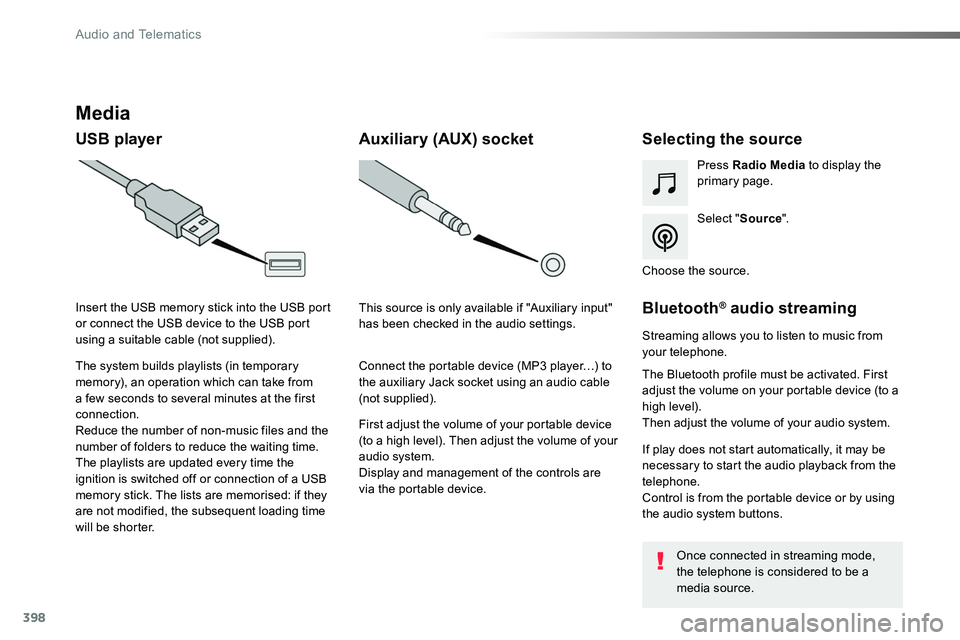
USB playerSelecting the source
Select "Source".
Press Radio Media to display the primary page.
The system builds playlists (in temporary memory), an operation which can take from a few seconds to several minutes at the first connection.
Reduce the number of non-music files and the number of folders to reduce the waiting time.The playlists are updated every time the ignition is switched off or connection of a USB memory stick. The lists are memorised: if they are not modified, the subsequent loading time will be shorter.
Insert the USB memory stick into the USB port or connect the USB device to the USB port using a suitable cable (not supplied).
Auxiliary (AUX) socket
First adjust the volume of your portable device (to a high level). Then adjust the volume of your audio system.Display and management of the controls are via the portable device.
This source is only available if "Auxiliary input" has been checked in the audio settings.
Connect the portable device (MP3 player…) to the auxiliary Jack socket using an audio cable (not supplied).
Choose the source.
Bluetooth® audio streaming
Streaming allows you to listen to music from your telephone.
The Bluetooth profile must be activated. First adjust the volume on your portable device (to a high level).Then adjust the volume of your audio system.
If play does not start automatically, it may be necessary to start the audio playback from the telephone.Control is from the portable device or by using the audio system buttons.
Once connected in streaming mode, the telephone is considered to be a media source.
Audio and Telematics
Page 416 of 516
416
1
1718
19202122
Level 1Level 2
Settings and tools
Setting the time- date
Setting of the profiles
Level 3
Audio and Telematics
Page 417 of 516
417
1
17
18
1
20
19
21
22
Level 1Level 2Level 3Comments
Settings
Secondary page
Setting the time-date
Date
Date
Enter the date and select the date format.
Date format:
Time
TimeSet the time.
Time ZoneDefine the time zone.
Time format:Select the time format: 12h / 24h.
Synchronisation with G PS (UTC):Activate or deactivate synchronisation with GPS.
ConfirmSave the settings.
Settings
Secondary page
Setting of the profiles
Profile 1
Enter settings for the profiles.
Profile 2
Profile 3
Common profile
ConfirmSave the settings.
.
Audio and Telematics