2018 TESLA MODEL S change time
[x] Cancel search: change timePage 56 of 195

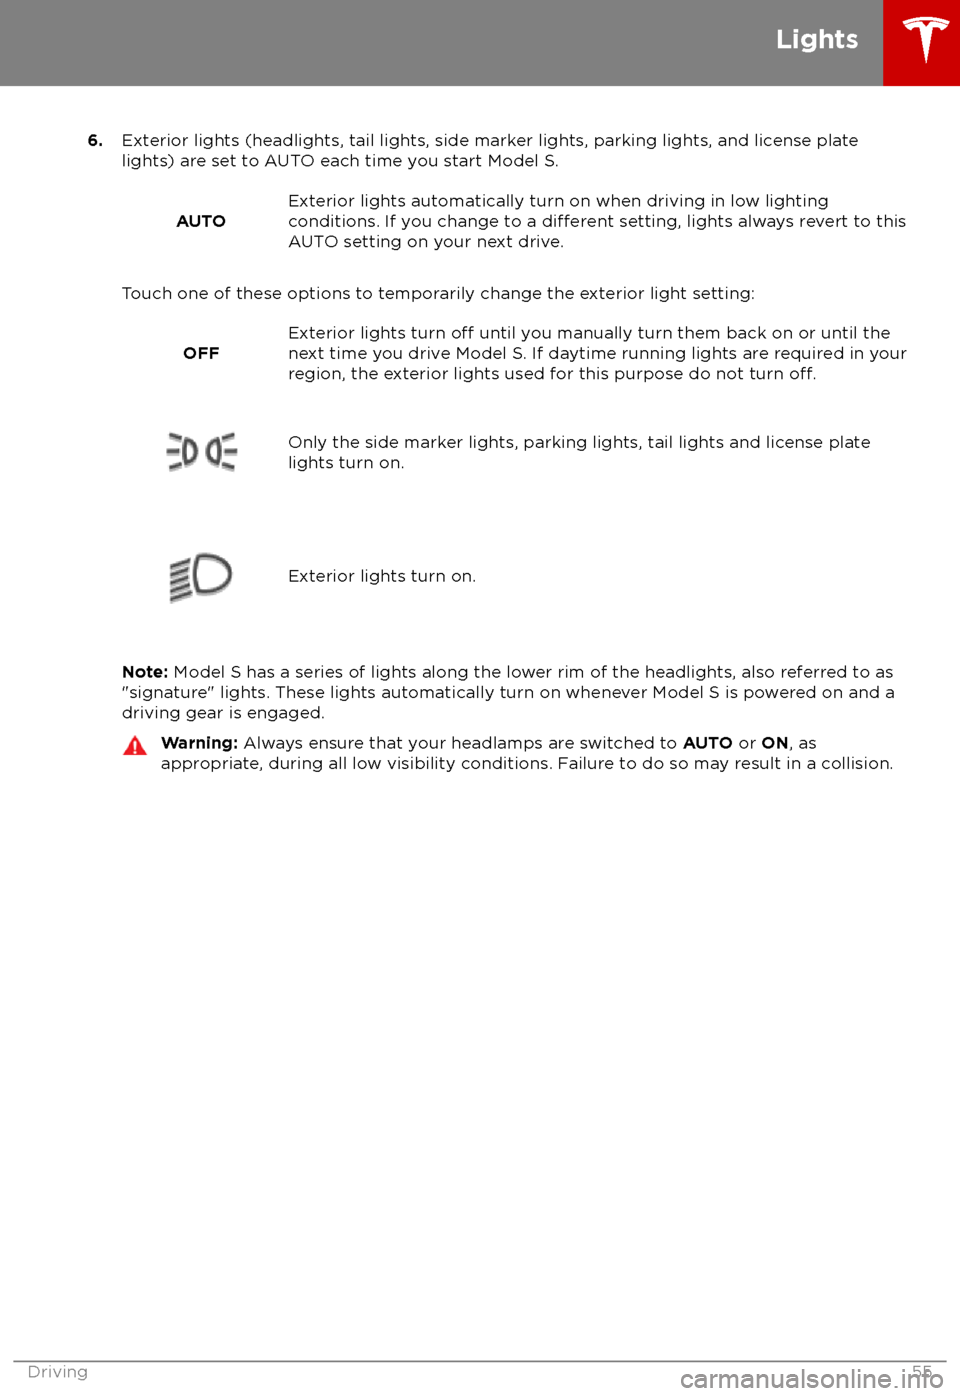
6.Exterior lights (headlights, tail lights, side marker lights, parking lights, and license plate
lights) are set to AUTO each time you start Model S.
AUTOExterior lights automatically turn on when driving in low lighting
conditions. If you change to a different setting, lights always revert to this
AUTO setting on your next drive.
Touch one of these options to temporarily change the exterior light setting:
OFFExterior lights turn off until you manually turn them back on or until the
next time you drive Model S. If daytime running lights are required in your
region, the exterior lights used for this purpose do not turn
off.Only the side marker lights, parking lights, tail lights and license plate
lights turn on.Exterior lights turn on.
Note: Model S has a series of lights along the lower rim of the headlights, also referred to as
"signature" lights. These lights automatically turn on whenever Model S is powered on and a driving gear is engaged.
Warning: Always ensure that your headlamps are switched to AUTO or ON, as
appropriate, during all low visibility conditions. Failure to do so may result in a collision.
Lights
Driving55
Page 58 of 195

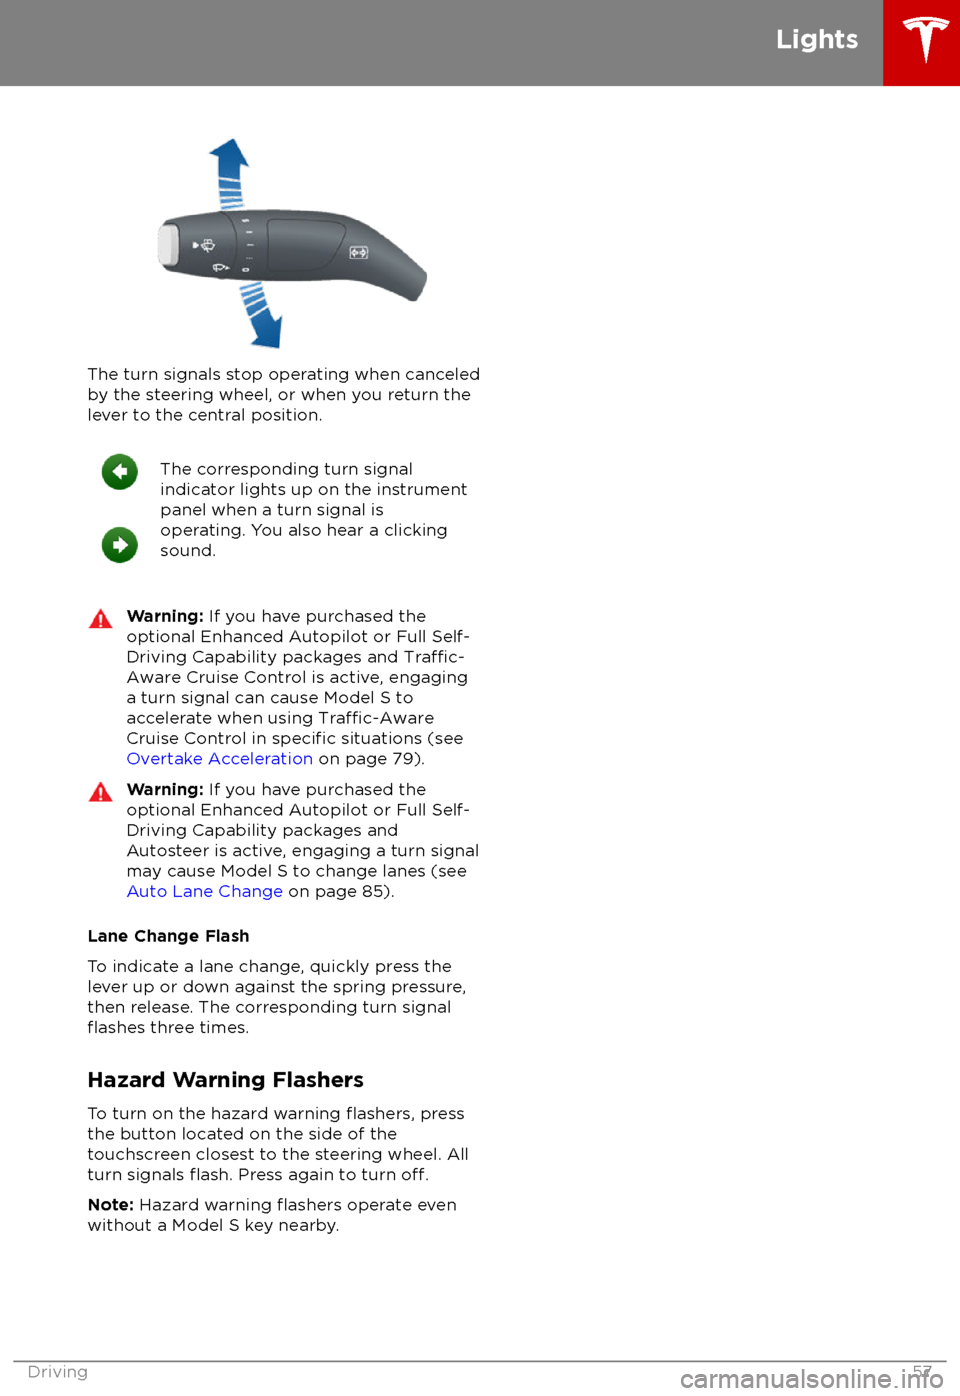
The turn signals stop operating when canceledby the steering wheel, or when you return the
lever to the central position.
The corresponding turn signal
indicator lights up on the instrument
panel when a turn signal is
operating. You also hear a clicking
sound.Warning: If you have purchased the
optional Enhanced Autopilot or Full Self-
Driving Capability packages and
Traffic-
Aware Cruise Control is active, engaging
a turn signal can cause Model S to accelerate when using
Traffic-AwareCruise Control in specific situations (see
Overtake Acceleration on page 79).
Warning: If you have purchased the
optional Enhanced Autopilot or Full Self-
Driving Capability packages and
Autosteer is active, engaging a turn signal
may cause Model S to change lanes (see
Auto Lane Change on page 85).
Lane Change Flash
To indicate a lane change, quickly press the
lever up or down against the spring pressure,
then release. The corresponding turn signal
flashes three times.
Hazard Warning Flashers
To turn on the hazard warning
flashers, press
the button located on the side of the
touchscreen closest to the steering wheel. All
turn signals
flash. Press again to turn off.
Note: Hazard warning flashers operate even
without a Model S key nearby.
Lights
Driving57
Page 62 of 195

Warning: In snowy or icy conditions
Model S may experience traction loss
during regenerative braking, particularly
when in the Standard setting and/or not
using winter tires. Tesla recommends
using the Low setting (see To Set the
Regenerative Braking Level on page 61)
in snowy or icy conditions to help maintain vehicle stability.
The Energy app displays real-time feedbackon the amount of energy being gained by
regenerative braking. You can also display the
power meter on either side of the instrument
panel by choosing Energy using the scroll
button on the steering wheel (see Steering
Wheel on page 41).
The amount of energy fed back to the Battery using regenerative braking can depend on the
current state of the Battery and the charge
level setting that you are using. For example, regenerative braking may be limited if theBattery is already fully charged or if the
ambient temperature is too cold.
Note: If regenerative braking is limited, a
dashed yellow line displays on the power
meter.
To Set the Regenerative Braking Level
You can use the touchscreen to change the
level of regenerative braking:
1. Touch Controls > Driving > Regenerative
Braking .
2. Choose from two levels:
Page 113 of 195

Customizing Climate ControlThe climate control system is designed to automatically provide optimum comfort in most
situations. All you need to do is set the desired temperature, and the air conditioning, air
recirculation, air distribution, and fan speed automatically maintain your selected temperature. You can even keep the climate control system on while you are away from the vehicle so that the
selected temperature is maintained.
To override the automatic setting, touch AUTO to customize individual settings. Then touch the
setting you want to change. When you change a setting, the AUTO icon turns from blue to gray
and RESET AUTO displays instead. Touch RESET AUTO to change all settings on the panel back to
their defaults. Or, you can touch AUTO associated with any individual setting to change it back to
its default.
In addition to the five settings shown above (and described below), if Model S is in Park, a Climate
Timer displays below the above popup (see Keep Climate On on page 114).
1. Touch RESET AUTO to change all settings back to their default values.
2. Touch A/C ON or A/C OFF to turn the air conditioning on and
off, respectively. Turning it offreduces cooling, but saves energy.
Because Model S runs much quieter than a gasoline-powered vehicle, you may notice the
sound of the A/C compressor as it is operating. To minimize noise, reduce the fan speed.
Climate Controls
112Model S Owner
Page 145 of 195

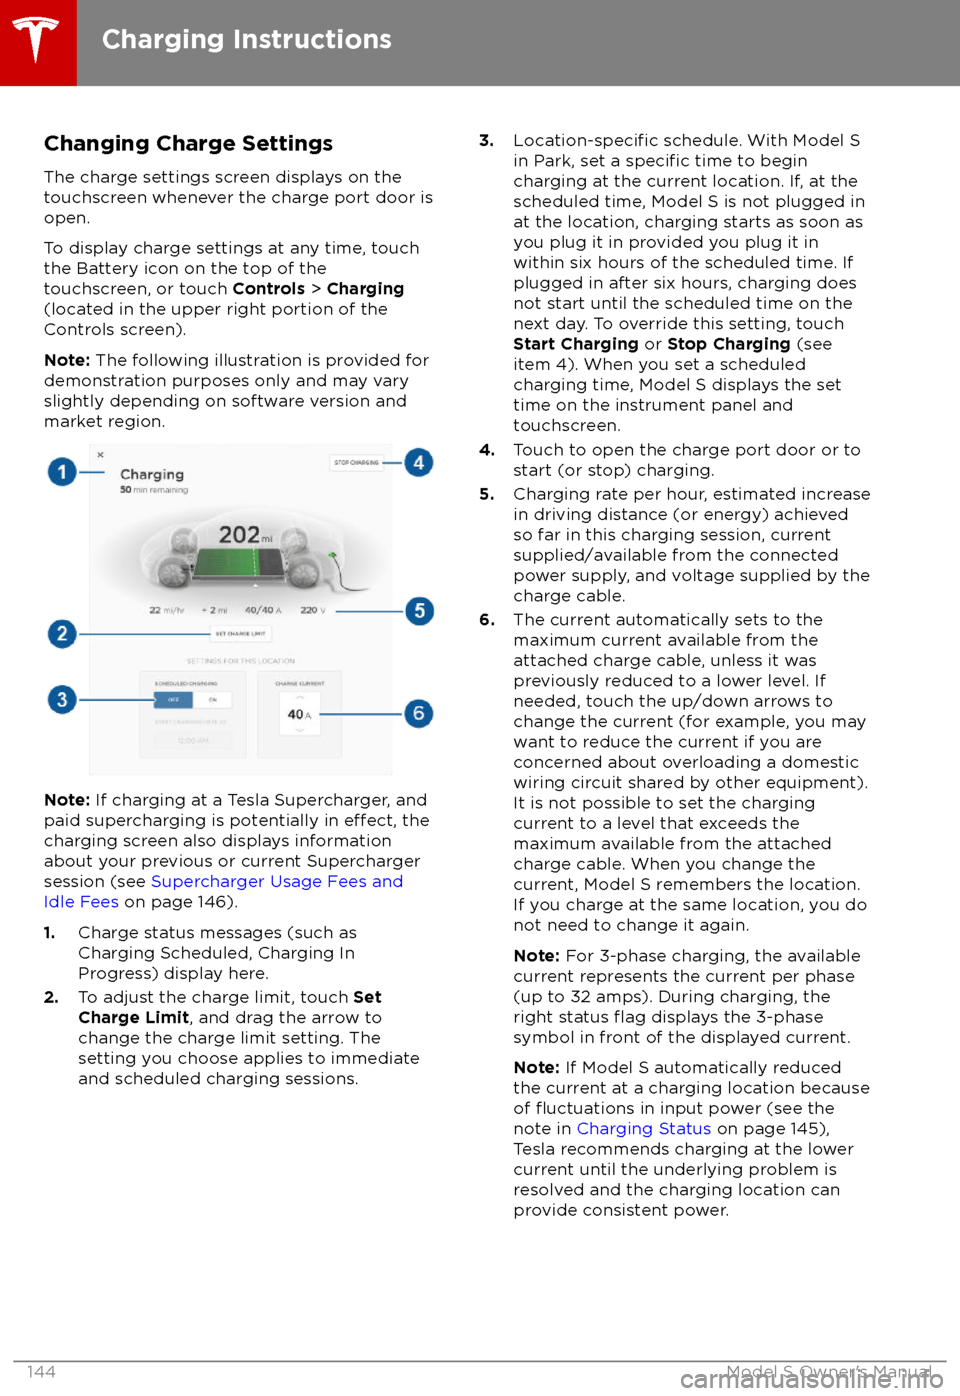
Changing Charge Settings
The charge settings screen displays on the
touchscreen whenever the charge port door is
open.
To display charge settings at any time, touch
the Battery icon on the top of the
touchscreen, or touch Controls > Charging
(located in the upper right portion of the
Controls screen).
Note: The following illustration is provided for
demonstration purposes only and may vary
slightly depending on software version and
market region.
Note: If charging at a Tesla Supercharger, and
paid supercharging is potentially in effect, the
charging screen also displays information
about your previous or current Supercharger
session (see Supercharger Usage Fees and
Idle Fees on page 146).
1. Charge status messages (such as
Charging Scheduled, Charging In
Progress) display here.
2. To adjust the charge limit, touch Set
Charge Limit , and drag the arrow to
change the charge limit setting. The
setting you choose applies to immediate and scheduled charging sessions.
3.Location-specific schedule. With Model S
in Park, set a specific time to begin
charging at the current location. If, at the
scheduled time, Model S is not plugged in
at the location, charging starts as soon as
you plug it in provided you plug it in
within six hours of the scheduled time. If
plugged in after six hours, charging does
not start until the scheduled time on the next day. To override this setting, touchStart Charging or Stop Charging (see
item 4). When you set a scheduled
charging time, Model S displays the set
time on the instrument panel and
touchscreen.
4. Touch to open the charge port door or to
start (or stop) charging.
5. Charging rate per hour, estimated increase
in driving distance (or energy) achieved
so far in this charging session, current
supplied/available from the connected
power supply, and voltage supplied by the
charge cable.
6. The current automatically sets to the
maximum current available from the
attached charge cable, unless it was
previously reduced to a lower level. If
needed, touch the up/down arrows to
change the current (for example, you may
want to reduce the current if you are
concerned about overloading a domestic
wiring circuit shared by other equipment).
It is not possible to set the charging
current to a level that exceeds the
maximum available from the attached charge cable. When you change the
current, Model S remembers the location.
If you charge at the same location, you do
not need to change it again.
Note: For 3-phase charging, the available
current represents the current per phase
(up to 32 amps). During charging, the
right status
flag displays the 3-phase
symbol in front of the displayed current.
Note: If Model S automatically reduced
the current at a charging location because
of
Page 189 of 195

AABS (Anti-lock Braking System) 60
absolute speed limit 97
Acceleration (dual-motor) 104
Acceleration settings 67
access panel, removing 159accessoriesplugging into power socket 122
adaptive headlights 56
air circulation 112
air conditioning 111
air distribution 112
air
filter 115
air suspension 118
air vents 115
airbag, front passenger, disabling 37
airbags 35
alarm 132
all-season tires 151
always connected, setting 70
anti-lock braking (ABS) 60
audioplaying files 119
steering wheel buttons 41
volume control 119
Auto High Beam 56
Auto Lane Change 85
auto-raising suspension 117
automatic emergency braking 94
Autopark 87
Autopilot components 73
Autosteer 82
average range 70
B backup camera 72
battery (12V)complete discharge 140specifications 170Battery (high voltage)care of 140
coolant 159
specifications 170
temperature limits 140
battery (key), replacing 5
blind spot warning 91
Bluetoothdevices, playing audio files from 122
general information 124
phone, pairing and using 124
body repairs 163
body touch up 156
brake
fluid replacement 147
brakesautomatic in emergencies 94fluid level 160brakes (continued)overview of 60specifications 170
brightness of displays 107
C
Cabin Overheat Protection setting 107
cabin temperature control 111
Calendar app 131
camera (rear view) 72
cameras (autopilot) 73
car cover 156
car status, displaying 41, 42
car washes 154
cargo area 11
cargo volume 168
carpets, cleaning 155
CE
certifications 185
CHAdeMO 139
chains 151
change of ownership 110
charge port 142
charge port light 143
chargingcharge settings 144
components and equipment 138
instructions 142
public charging stations 139
scheduling 144
status of 145
charging locations, finding 127
child protectiondisabling liftgate and rear door handles 7
disabling rear window switches 9child seatscleaning 155
disabling front passenger airbag 37
installing and using 24
Tesla built-in rear facing 31
Chill acceleration 67
cleaning 154
climate controls 111
Climate Timer 114
Cold Weather controls 104
collision avoidance assist 93
console12V power socket 122
cup holders 17
USB ports 122
consumption chart 70
contact informationroadside assistance 177coolantBattery, checking level of 159
Battery, replacement interval 147
copyrights 182
Creep 104
Index
188Model S Owner