2018 TESLA MODEL 3 lock
[x] Cancel search: lockPage 25 of 165

2.With the belt unfastened, unreel the
webbing to its limit. Check that unreeling
is free from snags, and visually check the
webbing for wear. Allow the webbing to retract, checking that retraction is smooth
and complete.
3. With the webbing half unreeled, hold the
tongue plate and pull forward quickly. The
mechanism should lock automatically and
prevent further unreeling.
If a seat belt fails any of these tests, contact
Tesla immediately.
For information about cleaning seat belts, see
Seat Belts on page 120.
Seat Belt WarningsWarning: Seat belts should be worn by all
occupants at all times, even if driving for
a very short distance. Failure to do so
increases the risk of injury or death if a
collision occurs.Warning: Secure small children in a
suitable child safety seat (see Child
Safety Seats on page 24). Always follow
the child safety seat manufacturer
Page 47 of 165

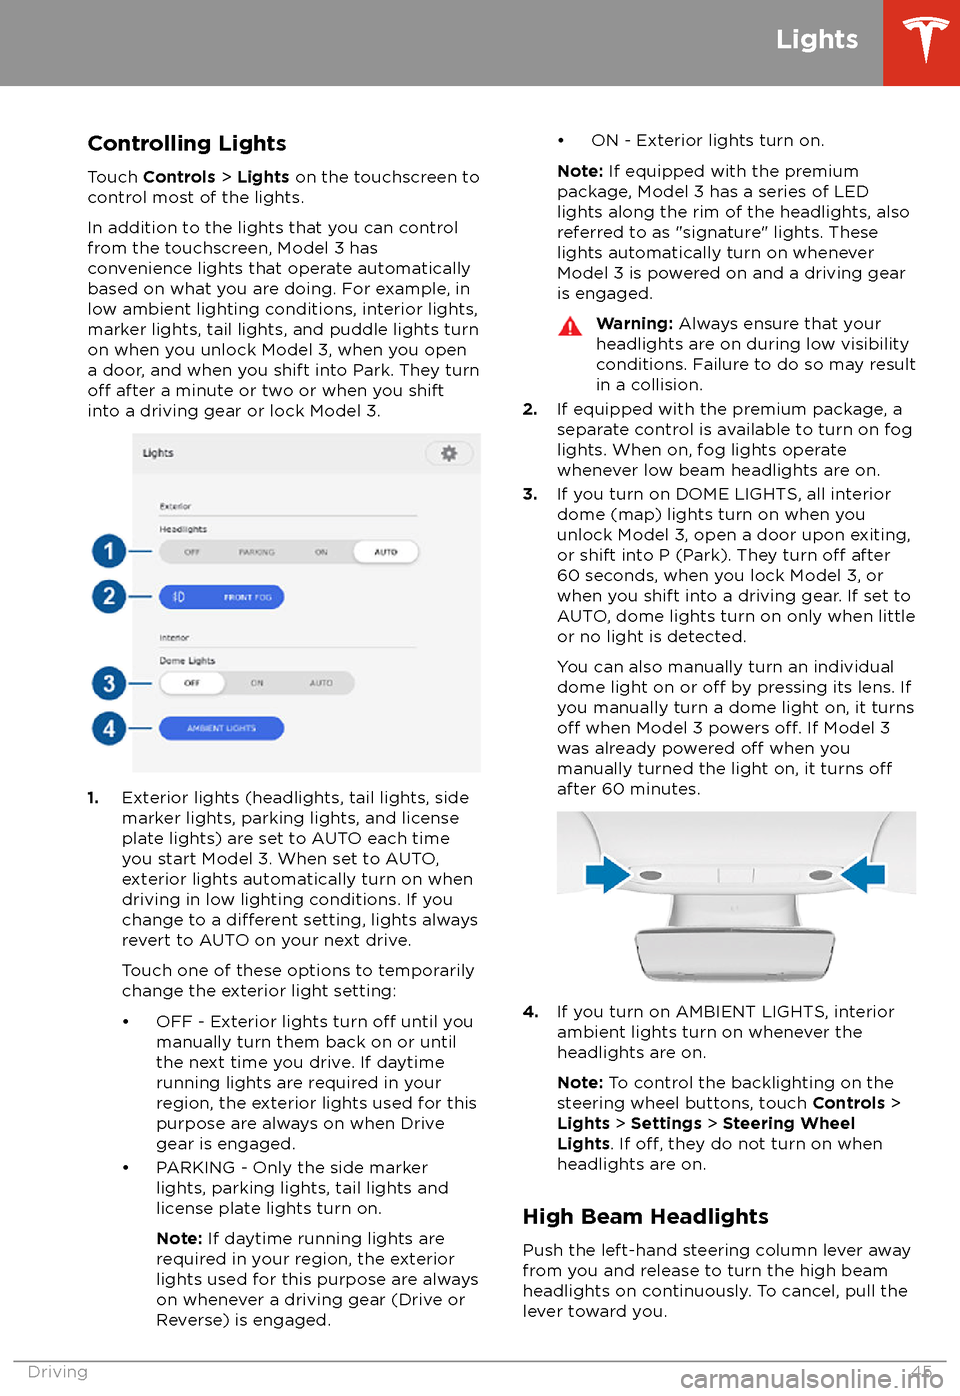
Controlling Lights
Touch Controls > Lights on the touchscreen to
control most of the lights.
In addition to the lights that you can control
from the touchscreen, Model 3 has
convenience lights that operate automatically
based on what you are doing. For example, in
low ambient lighting conditions, interior lights,
marker lights, tail lights, and puddle lights turn
on when you unlock Model 3, when you open
a door, and when you shift into Park. They turn
off after a minute or two or when you shift
into a driving gear or lock Model 3.
1. Exterior lights (headlights, tail lights, side
marker lights, parking lights, and license
plate lights) are set to AUTO each time
you start Model 3. When set to AUTO,
exterior lights automatically turn on when
driving in low lighting conditions. If you
change to a
different setting, lights always
revert to AUTO on your next drive.
Touch one of these options to temporarily
change the exterior light setting:
Page 48 of 165

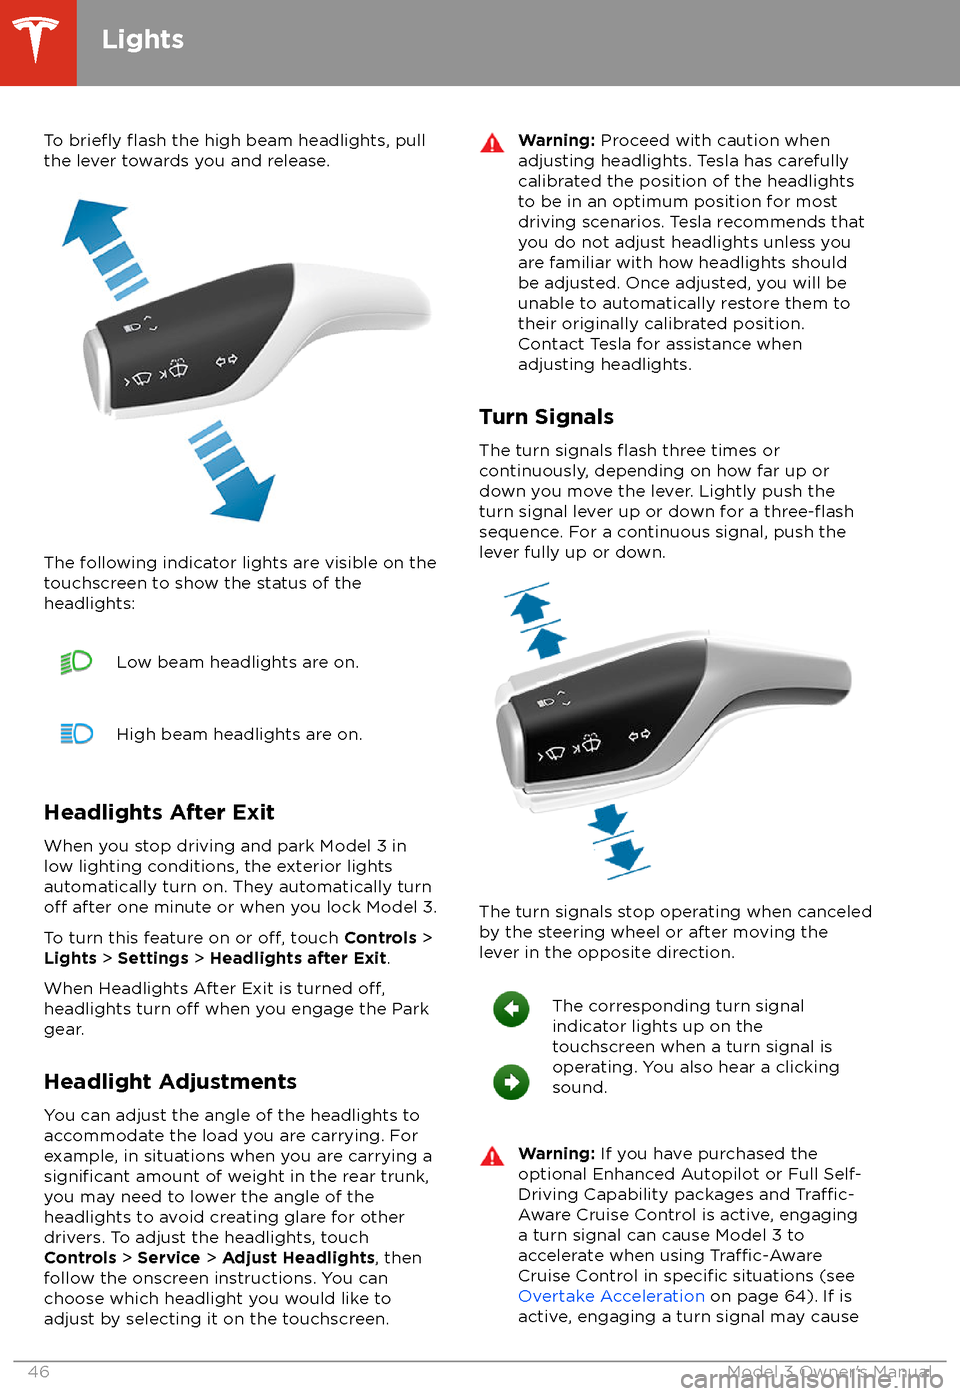
To briefly flash the high beam headlights, pull
the lever towards you and release.
The following indicator lights are visible on the
touchscreen to show the status of the
headlights:
Low beam headlights are on.High beam headlights are on.
Headlights After Exit
When you stop driving and park Model 3 in
low lighting conditions, the exterior lights
automatically turn on. They automatically turn
off after one minute or when you lock Model 3.
To turn this feature on or
off, touch Controls >
Lights > Settings > Headlights after Exit .
When Headlights After Exit is turned
off,headlights turn off when you engage the Park
gear.
Headlight Adjustments You can adjust the angle of the headlights toaccommodate the load you are carrying. For
example, in situations when you are carrying a
significant amount of weight in the rear trunk,
you may need to lower the angle of the
headlights to avoid creating glare for other
drivers. To adjust the headlights, touch
Controls > Service > Adjust Headlights , then
follow the onscreen instructions. You can
choose which headlight you would like to adjust by selecting it on the touchscreen.
Warning: Proceed with caution when
adjusting headlights. Tesla has carefully
calibrated the position of the headlights
to be in an optimum position for most
driving scenarios. Tesla recommends that
you do not adjust headlights unless you
are familiar with how headlights should
be adjusted. Once adjusted, you will be
unable to automatically restore them to their originally calibrated position.
Contact Tesla for assistance when
adjusting headlights.
Turn Signals
The turn signals
flash three times or
continuously, depending on how far up or
down you move the lever. Lightly push the
turn signal lever up or down for a
three-flashsequence. For a continuous signal, push the lever fully up or down.
The turn signals stop operating when canceled
by the steering wheel or after moving the
lever in the opposite direction.
The corresponding turn signal
indicator lights up on the
touchscreen when a turn signal is
operating. You also hear a clicking
sound.Warning: If you have purchased the
optional Enhanced Autopilot or Full Self-
Driving Capability packages and
Traffic-
Aware Cruise Control is active, engaging
a turn signal can cause Model 3 to accelerate when using
Traffic-AwareCruise Control in specific situations (see
Overtake Acceleration on page 64). If is
active, engaging a turn signal may cause
Lights
46Model 3 Owner
Page 51 of 165

Braking SystemsWarning: Properly functioning braking
systems are critical to ensure safety. If you experience a problem with the brake
pedal, brake caliper, or any component of
a Model 3 braking system, contact Tesla
immediately.
Model 3 has an anti-lock braking system (ABS)
that prevents the wheels from locking when
you apply maximum brake pressure. This improves steering control during heavy
braking in most road conditions.
During emergency braking conditions, the
ABS constantly monitors the speed of each
wheel and varies the brake pressure according to the grip available.
The alteration of brake pressure can be felt as
a pulsing sensation through the brake pedal.
This demonstrates that the ABS is operating
and is not a cause for concern. Keep
firm and
steady pressure on the brake pedal while
experiencing the pulsing.
The ABS indicator flashes briefly on
the touchscreen when you first start
Model 3. If this indicator lights up at
any other time, an ABS fault has
occurred and the ABS is not
operating. Contact Tesla. The braking system remains fully operational and
is not
affected by an ABS failure.
However, braking distances may increase.
If the touchscreen displays this
indicator at any time other than
displaying
briefly when you first start
Model 3, a brake system fault is
detected or the brake
fluid level is
low. Contact Tesla immediately.
Emergency Braking
In an emergency, fully press the brake pedal and maintain
firm pressure, even on low
traction surfaces. The ABS varies the braking
pressure to each wheel according to the
amount of traction available. This prevents
wheels from locking and ensures that you stop
as safely as possible.
Warning: Do not pump the brake pedal.
Doing so interrupts operation of the ABS
and can increase braking distance.Warning: Always maintain a safe distance
from the vehicle in front of you and beaware of hazardous driving conditions.
While the ABS can improve stopping
distance, it cannot overcome the laws of physics. It also does not prevent the
danger of hydroplaning (where a layer of
water prevents direct contact between the tires and the road).
Automatic Emergency Braking automatically
applies full braking in situations where a
collision is considered imminent (see Automatic Emergency Braking on page 77).
Warning: Automatic Emergency Braking
is not designed to prevent a collision. At best, it can minimize the impact of a
frontal collision by attempting to reduce
your driving speed. Depending on Automatic Emergency Braking to avoid a
collision can result in serious injury or death.
Brake Wear
Model 3 brake pads are equipped with wear
indicators. A wear indicator is a thin metal
strip attached to the brake pad that squeals as
it rubs against the rotor when the pad wears
down. This squealing sound indicates that the
brake pads have reached the end of their service life and require replacement. To
replace the brake pads, contact Tesla Service.
Warning: Neglecting to replace worn
brake pads damages the braking system
and can result in a braking hazard.
Regenerative Braking
Whenever Model 3 is moving and your foot is
off the accelerator, regenerative braking slows
down Model 3 and feeds any surplus energy back to the Battery.
By anticipating your stops and reducing or
removing pressure from the accelerator pedal
to slow down, you can take advantage of regenerative braking to increase driving range.
Of course, this is no substitute for regular
braking when needed for safety.
Note: If regenerative braking is aggressively
slowing Model 3 (such as when your foot is
completely
off the accelerator pedal at
highway speeds), the brake lights turn on to
alert others that you are slowing down.
Warning: In snowy or icy conditions
Model 3 may experience traction loss
during regenerative braking, particularly
when in the Standard setting and/or not
using winter tires. Tesla recommends
Brakes
Driving49
Page 102 of 165

About the Security SystemIf Model 3 does not detect an authenticated
phone or the key card and a locked door or
trunk is opened, an alarm sounds and the
headlights and turn signals
flash. To deactivate
the alarm, press any button on the mobile app
or tap your key card against the card reader
located below the Autopilot camera on the
driver
Page 106 of 165

Loading New Software
Model 3 updates its software wirelessly,
providing new features throughout your term of ownership. Tesla recommends that you
install software updates as soon as they are
available. The
first time you enter Model 3
after an update is made available, a scheduling window displays on the touchscreen. The
scheduling window displays again at the end
of your
first driving session.
Note: Some software updates can take up to
three hours to complete. Model 3 must be in
Park while the new software is being installed.
To ensure the fastest and most reliable
delivery of software updates, leave the Wi-Fi
turned on and connected whenever possible
(see Connecting to Wi-Fi on page 103).
When a software update is available, a yellow
clock icon appears on the touchscreen
Page 110 of 165

Opening the Charge Port
The charge port is located on the left side of
Model 3, behind a door that is part of the rear
tail light assembly. Park so that the charge
cable easily reaches the charge port.
With Model 3 unlocked (or an authenticated phone is within range) and in Park, press and
release the button on the Tesla charge cable
to open the charge port door.
You can also open the charge port door using
any of these methods:
Page 111 of 165

If the charge port light turns red while
charging, a fault is detected. Check the touchscreen for a message describing the
fault. A fault can occur due to something as
common as a power outage. If a power outage
occurs, charging resumes automatically when power is restored.
Note: When charging, particularly at high
currents, the refrigerant compressor and fan
operate as needed to keep the Battery cool.
Therefore, it is normal to hear sounds during charging.
Note: Air conditioning performance is
generally not
affected by charging. However,
under certain circumstances (for example, you
are charging at high currents during a
particularly warm day), the air coming from
the vents may not be as cool as expected and
a message displays on the touchscreen. This is
normal behavior and ensures that the Battery stays within an optimum temperature range
while charging to support longevity and optimum performance.
Warning: Never spray liquid at a high
velocity (for example, if using a pressure
washer) towards the charge port while
charging. Failure to follow these
instructions can result in serious injury or
damage to the vehicle, charging
equipment, or property.
Stopping Charging
Stop charging at any time by disconnecting
the charge cable or touching Stop Charging
on the touchscreen.
Note: To prevent unauthorized unplugging of
the charge cable, Model 3 must be unlocked
or able to recognize your authenticated phone before you can disconnect the charge cable.
To disconnect the charge cable:
1. Press and hold the button on a Tesla
connector to release the latch. You can
also touch Stop Charging on the charging
screen (see Charging Status and Settings
on page 109).
2. Pull the connector from the charge port.
Note: The charge port automatically closes
within approximately 10 seconds of removing
the connector from the charge port.
Caution: Tesla strongly recommends
leaving Model 3 plugged in when not in use. This maintains the Battery at the
optimum level of charge.Charge Port Light