2018 TESLA MODEL 3 ECU
[x] Cancel search: ECUPage 43 of 165

Shifting Gears
When Model 3 is in Park, you must press the
brake to shift to another gear.
Move the lever up or down to change gears.
If you try to shift into a gear that the current
driving speed prohibits, a chime sounds and
the gear does not change.
Reverse
Push the lever all the way up and release. You
can only shift into Reverse when Model 3 is stopped or moving less than 5 mph (8 km/h).If moving less than 1 mph (1.6 km/h), you must
press the brake.
Neutral
Push the lever up or down to the
first position
and hold it there for more than 1 second to shift into Neutral. Neutral allows Model 3 to
roll freely when you are not pressing the brake
pedal.
If Model 3 is in Park and you use the
touchscreen to release the parking brake
( Controls > Safety & Security ), Model 3 shifts
into Neutral (see Parking Brake on page 50).
Model 3 automatically shifts into Park when
you exit. To leave Model 3 in Neutral, use the touchscreen to engage Transport Mode (see
Instructions for Transporters on page 146).
Drive
Push the lever all the way down and release.
You can shift into Drive when Model 3 is stopped or moving less than 5 mph (8 km/h)
in Reverse. If Model 3 is moving less than 1 mph (1.6 km/h), you must press the brake toshift into Drive.
Note: When in Drive, push the lever all the way
down and release to enable
Traffic-AwareCruise Control (see Traffic-Aware Cruise
Control on page 61). Push the lever all the
way down twice in quick succession to enable
Autosteer (see Autosteer on page 67).
Park
Press the end of the gear selector while Model
3 is stopped. Whenever Model 3 is in Park, the
parking brake is applied.
Model 3 automatically shifts into Park
whenever:
Page 55 of 165

Caution: Keep sensors clean from dirt,
debris, snow, and ice. Avoid using a high
pressure power washer on the sensors
and do not clean a sensor with a sharp or abrasive object that can scratch or
damage its surface.Caution: Do not install accessories or
stickers on or near the parking sensors.
Controlling Audible Feedback
You can use Park Assist with or without
audible feedback. To turn chimes on or
off,touch Controls > Safety & Security >
Settings > Park Assist Chimes .
To mute the chimes temporarily, press the
scroll button on the left side of the steering
wheel or touch the mute button in the bottom left corner of the Park Assist view. The chimesare muted until you shift into a
different gear
or drive over 5 mph (8 km/h).
Limitations and False Warnings
The parking sensors may not function correctly in these situations:
Page 102 of 165

About the Security SystemIf Model 3 does not detect an authenticated
phone or the key card and a locked door or
trunk is opened, an alarm sounds and the
headlights and turn signals
flash. To deactivate
the alarm, press any button on the mobile app
or tap your key card against the card reader
located below the Autopilot camera on the
driver
Page 113 of 165

8.Set a recurring charging schedule for the
location. When you set a scheduled
charging time, Model 3 displays the set
time when you are parked at the
scheduled location. If, at the scheduled
time, Model 3 is not plugged in at the location, charging starts as soon as you
plug it in, provided you plug it in within six
hours of the scheduled time. If plugged in
after six hours, charging does not start
until the scheduled time on the next day.
To override this setting, touch Start
Charging or Stop Charging (see item 4).
Note: If charging at a Tesla Supercharger, the
charging screen also displays information
about your previous or current Supercharger session (see Supercharger Usage Fees and
Idle Fees on page 111).
Supercharger Usage Fees and Idle Fees
When charging using a Tesla supercharger,
PAID SUPERCHARGING information displays
at the bottom of the charging screen. This
information includes the location, the time
that charging started, and an estimate of how
much the session will cost. When you stop
charging, the
final cost displays until a new
Supercharging session begins.
When charging at a Tesla supercharger, you
are subject to idle fees. Idle fees are designed to encourage drivers to move their vehiclefrom the Supercharger when charging iscomplete and are in
effect whenever at least
half of the Superchargers at a site are
occupied. The Tesla mobile app
notifies you
when charging nears completion, and again when charging is complete. Additional
notifications are sent if idle fees are incurred.
Idle fees are waived if you move your vehicle
within
five minutes of charging completion.
Log into your Tesla Account to view fees and
details about Supercharger sessions, set up a payment method, and make payments. Once a
payment method is saved, fees are
automatically paid from your account.
Charging Instructions
Charging111
Page 126 of 165

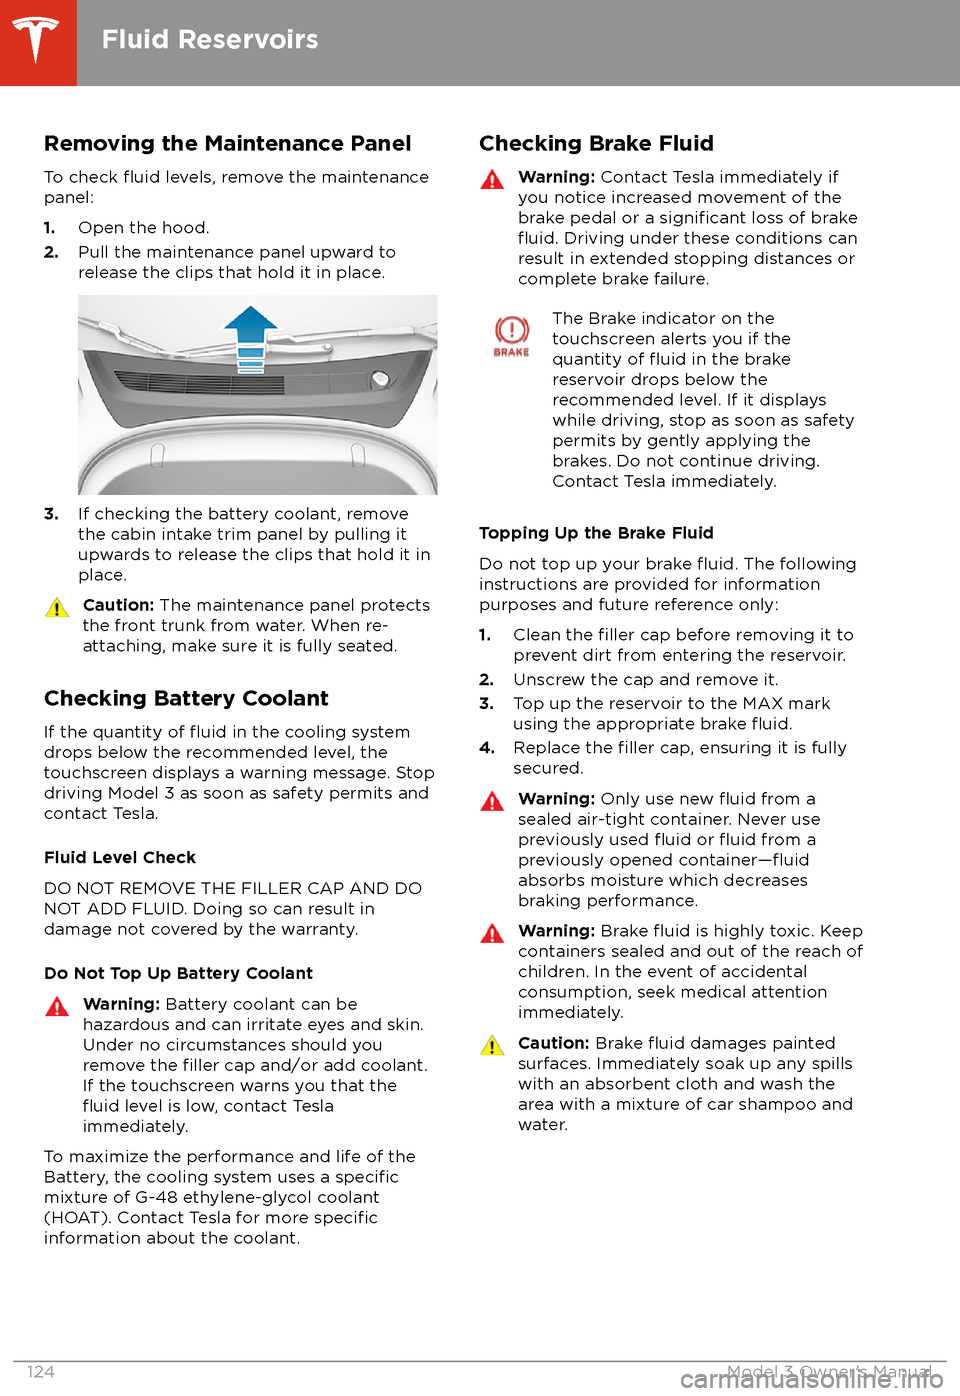
Removing the Maintenance PanelTo check
fluid levels, remove the maintenance
panel:
1. Open the hood.
2. Pull the maintenance panel upward to
release the clips that hold it in place.
3. If checking the battery coolant, remove
the cabin intake trim panel by pulling it
upwards to release the clips that hold it in
place.
Caution: The maintenance panel protects
the front trunk from water. When re-
attaching, make sure it is fully seated.
Checking Battery Coolant
If the quantity of
fluid in the cooling system
drops below the recommended level, the
touchscreen displays a warning message. Stop
driving Model 3 as soon as safety permits and
contact Tesla.
Fluid Level Check
DO NOT REMOVE THE FILLER CAP AND DO
NOT ADD FLUID. Doing so can result in damage not covered by the warranty.
Do Not Top Up Battery Coolant
Warning: Battery coolant can be
hazardous and can irritate eyes and skin.
Under no circumstances should you
remove the
filler cap and/or add coolant.
If the touchscreen warns you that the
fluid level is low, contact Tesla
immediately.
To maximize the performance and life of the
Battery, the cooling system uses a specificmixture of G-48 ethylene-glycol coolant
(HOAT). Contact Tesla for more specificinformation about the coolant.
Checking Brake FluidWarning: Contact Tesla immediately if
you notice increased movement of the brake pedal or a
significant loss of brakefluid. Driving under these conditions can
result in extended stopping distances or complete brake failure.
The Brake indicator on the
touchscreen alerts you if the
quantity of
fluid in the brake
reservoir drops below the
recommended level. If it displays
while driving, stop as soon as safety
permits by gently applying the
brakes. Do not continue driving.
Contact Tesla immediately.
Topping Up the Brake Fluid
Do not top up your brake
fluid. The following
instructions are provided for information purposes and future reference only:
1. Clean the
filler cap before removing it to
prevent dirt from entering the reservoir.
2. Unscrew the cap and remove it.
3. Top up the reservoir to the MAX mark
using the appropriate brake
fluid.4. Replace the filler cap, ensuring it is fully
secured.
Warning: Only use new fluid from a
sealed air-tight container. Never use
previously used
fluid or fluid from a
previously opened container
Page 151 of 165

7.When external 12V power is no longer
required, disconnect both cables from the
terminals on the 12V battery, beginning
with the black negative (-) cable.
8. Replace the cabin intake trim panel by
placing it back in its original location and
pressing down until it is secure.
9. Replace the maintenance panel by placing
it back in its original location and pressing
down until it is secure.
10. Close the hood.
Instructions for Transporters
Roadside Assistance149
Page 163 of 165

passenger front airbag 32phoneauthenticating as a key 6
pairing and using 93
removing as a key 7
phone key 6
PIN 34
power socket 17
power windows 11
powering on and
off 39
Proposition 65 153
public charging stations 106
R radar 58
radio 90
Radio Frequency information 155
rangeregenerative braking 49
range assurance 55
Re-route 97
rear seats, folding and raising 19
rear view camera 56
rear window switches, disabling 11
Recent (Media Player) 91
Recents (navigation) 95
regenerative braking 49
relative speed limit 79
release notes 104
restarting the touchscreen 39
Reverse gear 41
RFID transponders 127
roadside assistance 145
roof racks 133
rotating tires 114
Round Trip Energy (navigating) 97
Routing Preferences 97
S safety defects, reporting 154
safety informationairbags 33
child seats 28
seat belts 23seat beltscleaning 120
in a collision 22
overview of 21
pre-tensioners 22
wearing when pregnant 22
seat covers 20
seat heaters 86, 89
seating capacity 131
seatsadjusting 18seats (continued)heaters 86
security settings 100
sensors 58
service data recording 152
service intervals 112
shifting gears 41
side collision warning 74
slip start 51
smartphoneauthenticating as a key 6
removing as a key 7
software updates 104
software version 5
specificationscargo volume 135
dimensions 134
exterior 134
interior 134
tires 138
weights 135
wheels 138
speed assist 79
speed limit warning 79
stability control 51
starting 39
steering wheeladjusting position 36
adjusting sensitivity 36
buttons 36
lights, controlling 45
scroll buttons 36
steering, automatic 67
Streaming radio 91
summer tires 116
superchargingdescribed 111
idle fees 111
pay-per-use fees 111
suspension specifications 136
T telematics 152
temperatureBattery (high voltage), limits 107
cabin, controls for 86
outside 42
tires 141
tie-down straps 147
Tire and Loading Information label 131
tire noise 116
Tire Pressure Monitoring SystemFCC certification 156
overview of 117
tire pressures, checking 113
tiresall-season 116
Index
Index161