2018 RENAULT TWINGO cooling
[x] Cancel search: coolingPage 155 of 232

4.3
Reading the oil levelThe oil level should be read with the ve-
hicle on level ground, after the engine
has been switched off for some time.
The dipstick must be used to read
the exact oil level and ensure that
the maximum level is not exceeded
(risk of engine damage). Refer to the
following pages.
It is normal for an engine to use oil for
lubrication and cooling of moving parts
and it is normal to top up the level be-
tween oil changes.
However, contact your approved
Dealer if more than 0.5 litres is being
consumed every 600 miles (1,000 km)
after the running in period.
Oil change frequency: check the oil
level from time to time and certainly
before any long journey to avoid the
risk of damaging your engine.
ENGINE OIL LEVEL: general information
A
B
C
In order to prevent splashback, it is
recommended that a funnel be used
when topping up/filling with oil.
– Remove the dipstick and wipe with a
clean, lint-free cloth;
– push the dipstick in as far as it will go (for vehicles equipped with a cap-
type dipstick C, screw the cap in as
far as it will go);
– take out the dipstick again;
– read the level: it should never go below the “min” A or above the
“max” B.
Once the operation has been com-
pleted, ensure that the dipstick is
pushed in as far as it will go or that
the “cap-type dipstick” is completely
screwed in.
Deactivate the Stop and
Start function for any opera-
tion performed in the engine
compartment.
Consult your approved Dealer at
once if you notice an abnormal or
repeated drop in any of the fluid
levels.
Exceeding the maximum
engine oil level
Under no circumstances
must the maximum fill
level B be exceeded: risk of damage
to the engine and catalytic conver-
ter.
If the oil level exceeds the maximum
level, do not start your vehicle and
contact an approved Dealer.
Page 157 of 232

4.5
Engine oil gradeRefer to the Maintenance Service
Booklet for your vehicle.
ENGINE OIL LEVEL: topping up, filling (2/2) OIL CHANGE
Never run the engine in an
enclosed space as exhaust
gases are poisonous.
Engine oil change: if you
are changing the oil when
the engine is hot, be careful
not to scald yourself if the
oil overflows.
Filling: take care when
topping up the oil that
no oil drips onto engine
components - risk of fire.
Remember to refit the cap securely
as there is a risk of fire if oil splashes
onto hot engine components.Please note when work-
ing close to the engine that
it may be hot. The engine
cooling fan may also start
at any moment. The
warning
light in the engine compartment re-
minds you of this.
Risk of injury.
Consult your approved dealer at
once if you notice an abnormal or
repeated drop in any of the fluid
levels.
Deactivate the Stop and
Start function for any opera-
tion performed in the engine
compartment.
Oil changeService interval: refer to the
Maintenance Service Booklet for your
vehicle.
Oil change capacity
Please refer to the maintenance docu-
ment for your vehicle, or contact an au-
thorised dealer.
Always check the engine oil level using
the dipstick, as explained previously (it
should never fall below the minimum
level, or be over the maximum level on
the dipstick).
Page 158 of 232

4.6
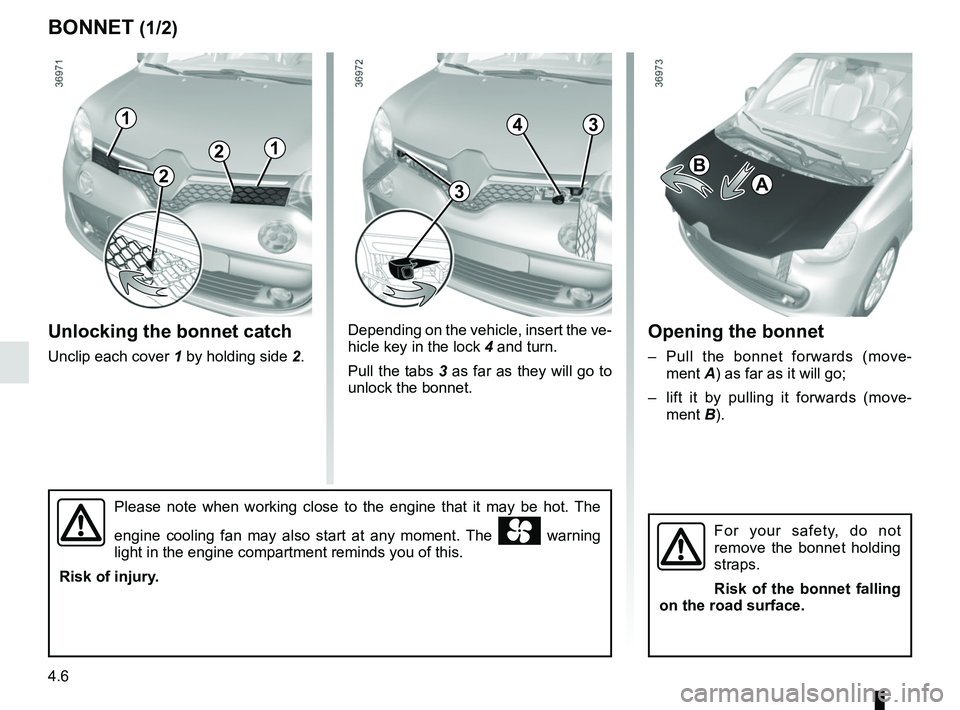
Depending on the vehicle, insert the ve-
hicle key in the lock 4 and turn.
Pull the tabs 3 as far as they will go to
unlock the bonnet.Unlocking the bonnet catch
Unclip each cover 1 by holding side 2.
BONNET (1/2)
1
Opening the bonnet
– Pull the bonnet forwards (move-
ment A) as far as it will go;
– lift it by pulling it forwards (move- ment B).
Please note when working close to the engine that it may be hot. The
engine cooling fan may also start at any moment. The
warning
light in the engine compartment reminds you of this.
Risk of injury.
A
43
3
For your safety, do not
remove the bonnet holding
straps.
Risk of the bonnet falling
on the road surface.
1
2
2B
Page 160 of 232

4.8
Frequency of checking coolant level
Check the coolant level regularly
(very severe damage is likely to be
caused to the engine if it runs out of
coolant).
If the level needs to be topped up, only
use products approved by our Technical
Department which ensure:
– protection against freezing;
– an anti-corrosion protection for the cooling system.
No operations should be
carried out on the cooling
circuit when the engine is
hot.
Risk of burns.
Replacement interval
Refer to the Maintenance Document for
your vehicle.
Coolant level
With the engine switched off and on
level ground, the level when cold must
be between the MINI and MAXI marks
on reservoir 1.
Top this level up when cold before it
reaches the MINI mark.
LEVELS (1/3)
1
When working in the engine
compartment, ensure that
the windscreen wiper stalk
is in the park position.
Risk of injury.For your safety, do not
remove the bonnet holding
straps.
Risk of the bonnet falling
on the road surface.
Before performing any
action in the engine com-
partment, the ignition must
be switched off (please see
the information on “Starting, stop-
ping the engine” in Section 2).
Page 161 of 232

4.9
Level 2
It is normal for the level to drop as the
brake shoes become worn, but it must
never drop lower than the “MINI" warn-
ing line.
If you wish to check the disc and drum
wear yourself, you should obtain the
document explaining the checking pro-
cedure from the manufacturer’s net-
work or web site.
Topping up
After any operation on the hydraulic cir-
cuit, a specialist must replace the brake
fluid.
Only use fluids approved by our
Technical Department (and taken from
a sealed container).
Replacement interval
Refer to the Maintenance Document for
your vehicle.
Brake fluid level
The level should be read with the engine
switched off and on level ground.
This should be checked frequently,
and immediately if you notice even the
slightest loss in braking efficiency.
LEVELS (2/3)
2
Please note when work-
ing close to the engine that
it may be hot. The engine
cooling fan may also start
at any moment. The
warning
light in the engine compartment re-
minds you of this.
Risk of injury.
If there is an abnormal or repeated
drop in the fluid level, please consult
an authorised dealer.
Page 162 of 232

4.10
Filters
The filter elements (air filter, passenger
compartment filter, etc.) should be re-
placed during the maintenance opera-
tions carried out on your vehicle.
Replacement intervals for filter el-
ements: refer to the Maintenance
Document for your vehicle.
Windscreen washer reservoir
Topping up
Engine switched off:
– open the cap 3;
– pull the extending funnel upwards as far as it will go;
– fill until you can see the fluid;
– push the funnel by pressing on it and replace the cap.
Liquid
Screen wash product (product with
antifreeze in winter).
LEVELS (3/3)/FILTERS
3
When working in the engine
compartment, ensure that
the windscreen wiper stalk
is in the park position.
Risk of injury.
No operations should be
carried out on the cooling
circuit when the engine is
hot.
Risk of burns.
If there is an abnormal or repeated
drop in the fluid level, please consult
an authorised dealer.
For your safety, do not
remove the bonnet holding
straps.
Risk of the bonnet falling
on the road surface.
Please note when work-
ing close to the engine that
it may be hot. The engine
cooling fan may also start
at any moment. The
warning
light in the engine compartment re-
minds you of this.
Risk of injury.
Before performing any
action in the engine com-
partment, the ignition must
be switched off (please see
the information on “Starting, stop-
ping the engine” in Section 2).
Page 163 of 232

4.11
Replacing the battery 1
As this operation is complex, we advise
you to contact an approved Dealer.
This is located under the bonnet and
does not need to be serviced. Yo u
should not open it or add any fluid. Label A
Observe the indications on the battery:
–
2 naked flames and smoking are for-
bidden;
– 3 eye protection required;
– 4 keep away from children;
– 5 explosive materials;
– 6 refer to the handbook;
– 7 corrosive materials.
BATTERY
2
Handle the battery with
care as it contains sulphuric
acid which must not come
into contact with the eyes
or skin. If it does, wash the affec-
ted area with plenty of cold water. If
necessary, consult a doctor. Ensure
that naked flames, red hot objects
and sparks do not come into contact
with the battery as there is a risk of
explosion.
The battery is a specific type, please ensure it is replaced with the same
type. Consult an approved dealer.
A234
567
Please note when work-
ing close to the engine that
it may be hot. The engine
cooling fan may also start
at any moment. The
warning
light in the engine compartment re-
minds you of this.
Risk of injury.
1
For your safety, do not
remove the bonnet holding
straps.
Risk of the bonnet falling
on the road surface.
Page 180 of 232

5.10
For your safety, do not
remove the bonnet holding
straps.
Risk of the bonnet falling
on the road surface.
Dipped/Main beam headlight
To change the bulb:
– disconnect wiring 1;
– remove cover A;
– unclip the spring 3 and remove the
bulb.
Bulb type: H4.
It is essential to use anti-U.V. 55W
bulbs so as not to damage the plastic
on the headlights.
Do not touch the bulb glass. Hold it
by its base.
When the bulb has been changed,
make sure you refit the cover correctly.
FRONT HEADLIGHTS: changing bulbs (1/2)
Direction indicator lights
Turn the bulb holder 2 a quarter of a
turn and take out the bulb.
Bulb type: PY21W.
Once the bulb has been replaced,
check that it is properly secured.
A
3
2
The bulbs are under pres-
sure and can break when
replaced.
Risk of injury.
1
Please note when work-
ing close to the engine that
it may be hot. The engine
cooling fan may also start
at any moment. The
warning
light in the engine compartment re-
minds you of this.
Risk of injury.