Page 242 of 364

3.26
FIXED GLASS ROOF
To slide the curtain 1
With the ignition on:
– full opening: move the mark 3 on
the button 2 towards position B. The
marks in between correspond to the
intermediate positions of the sun-
blind.
– to close: move mark 3 on button 2
to position 0.
1
Driver’s responsibility
Never leave your vehicle
with the RENAULT card or
key inside, and never leave
a child, adult who is not self-suffi-
cient or a pet, even for a short while.
They may pose a risk to themselves
or to others by starting the engine,
activating equipment such as the
electric windows or by locking the
doors.
If something gets trapped, reverse
the direction of travel as soon as
possible by turning button 2 fully to
the right (position B).
Risk of serious injury.
3
0
A
B2
Special features
If the fixed sunroof blind detects resist-
ance when closing (arm etc.), it stops
and then moves back several centime-
tres.
Operating fault
If the blind will not close, turn switch 2
to position A or B to open the blind,
then turn switch 2 to position 0 until the
blind is fully closed.
If the blockage persists, contact an ap-
proved dealer.
2
Page 255 of 364
3.39
To adjust the angle of the
headrest
Depending on the vehicle, move sec-
tion A towards or away from you to the
required position.
To adjust side supportsDepending on the vehicle, sections B
can be adjusted independently to the
desired position.
Storage position 2 for the
headrest
Press tab 1 and lower the headrest
completely.
REAR HEADRESTS
Position for useLift the headrest fully until it locks.
To remove the headrestLower the seatback slightly, press the
tab 1 and remove the headrest.
To refit the headrestInsert the headrest rods into the
sleeves, and lower the headrest until it
locks.
2
The headrest is a safety
component; check that it is
fitted and in the correct po-
sition. The top of the head-
rest should be as close as possible
to the top of the head.
1
B
A
B
When the headrest is set at the
lowest position, this is for storage
only. It should not be in this position
when a seat is occupied.
Page 263 of 364
3.47
Removal
– Unhook the two cords 1.
– Lift the parcel shelf 2 upwards, then pull it towards you.
To refit it, proceed in reverse order to
removal.
REAR PARCEL SHELF
1
Do not place any heavy or
solid objects on the parcel
shelf.
These may pose a risk to
the vehicle occupants if the driver
has to brake suddenly or if the vehi-
cle is involved in an accident.
2
2
Page 264 of 364

3.48
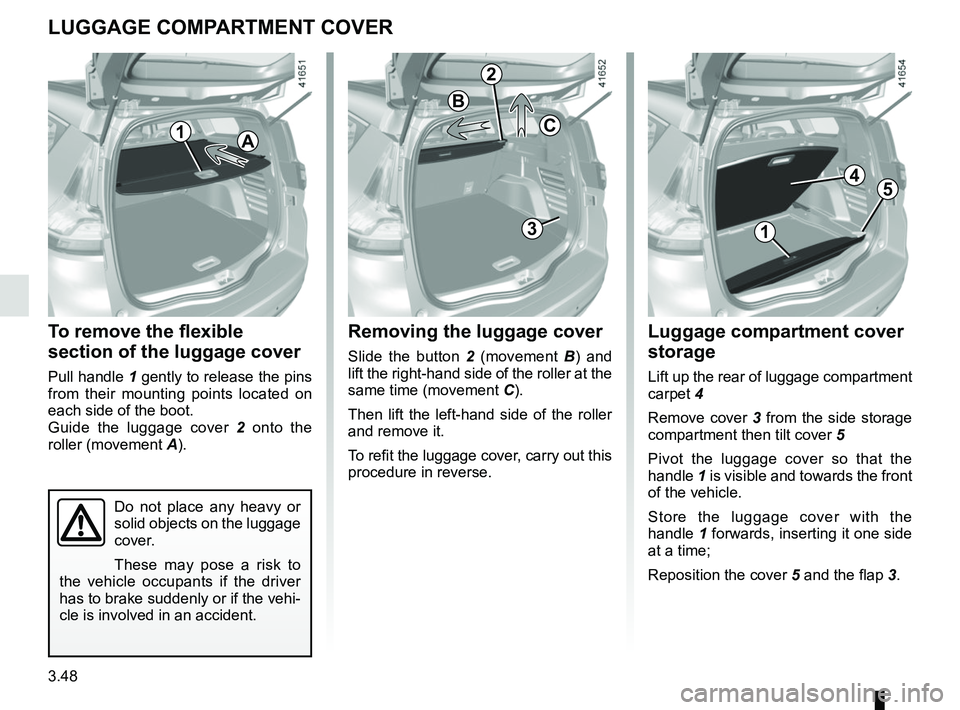
Removing the luggage cover
Slide the button 2 (movement B ) and
lift the right-hand side of the roller at the
same time (movement C).
Then lift the left-hand side of the roller
and remove it.
To refit the luggage cover, carry out this
procedure in reverse.
To remove the flexible
section of the luggage cover
Pull handle 1 gently to release the pins
from their mounting points located on
each side of the boot.
Guide the luggage cover 2 onto the
roller (movement A).
LUGGAGE COMPARTMENT COVER
1
Luggage compartment cover
storage
Lift up the rear of luggage compartment
carpet 4
Remove cover 3 from the side storage
compartment then tilt cover 5
Pivot the luggage cover so that the
handle 1 is visible and towards the front
of the vehicle.
Store the luggage cover with the
handle 1 forwards, inserting it one side
at a time;
Reposition the cover 5 and the flap 3.
2
B
A
31
C
45
Do not place any heavy or
solid objects on the luggage
cover.
These may pose a risk to
the vehicle occupants if the driver
has to brake suddenly or if the vehi-
cle is involved in an accident.
Page 268 of 364
3.52
Permissible nose weight, maxi-
mum permissible towing weight,
braked and unbraked: refer to
the information on “Weights” in
Section 6.
Choice and fitting of towing
equipment
Maximum weight of towing equip-
ment: 38 kg
For fitting and conditions of use,
refer to the equipment’s fitting in-
structions.
Please keep these instructions with
the rest of the vehicle documenta-
tion.
TRANSPORTING OBJECTS towbar
A
A: 866 mm (short chassis).
A: 1,023 mm (long chassis).
If the towbar ball obscures the regis-
tration plate or the rear fog lights, it
should be removed when not in use.
In all cases, comply with local leg-
islation.
Page 283 of 364

4.11
12 VOLT BATTERY (1/2)
1
Battery 1 does not require any mainte-
nance. You should not open it or add
any fluid.
Handle the battery with care
as it contains sulphuric acid
which must not come into
contact with the eyes or
skin. If it does, wash the affected
area with plenty of cold water. If
necessary, consult a doctor.
Ensure that naked flames, red hot
objects and sparks do not come into
contact with the battery as there is a
risk of explosion.
Depending on the vehicle, a system
continuously checks the battery charge
status. If this decreases, the message
“Battery low start engine” is displayed
on the instrument panel. In this case,
start the engine and the message on
the instrument panel will disappear.
The charge status of your battery can
decrease especially if you use your ve-
hicle:
– for short journeys;
– for driving in town;
– when the temperature drops;
– after extended use of energy-con- suming devices (radio, etc.) with the
engine switched off.
Please note when work-
ing close to the engine that
it may be hot. In addition,
the engine cooling fan may
start at any moment. The
warning light in the engine compart-
ment reminds you of this.
Risk of injury.
Before performing any
action in the engine com-
partment, the ignition must
be switched off (please see
the information on “Starting, stop-
ping the engine” in Section 2).
Page 285 of 364

4.13
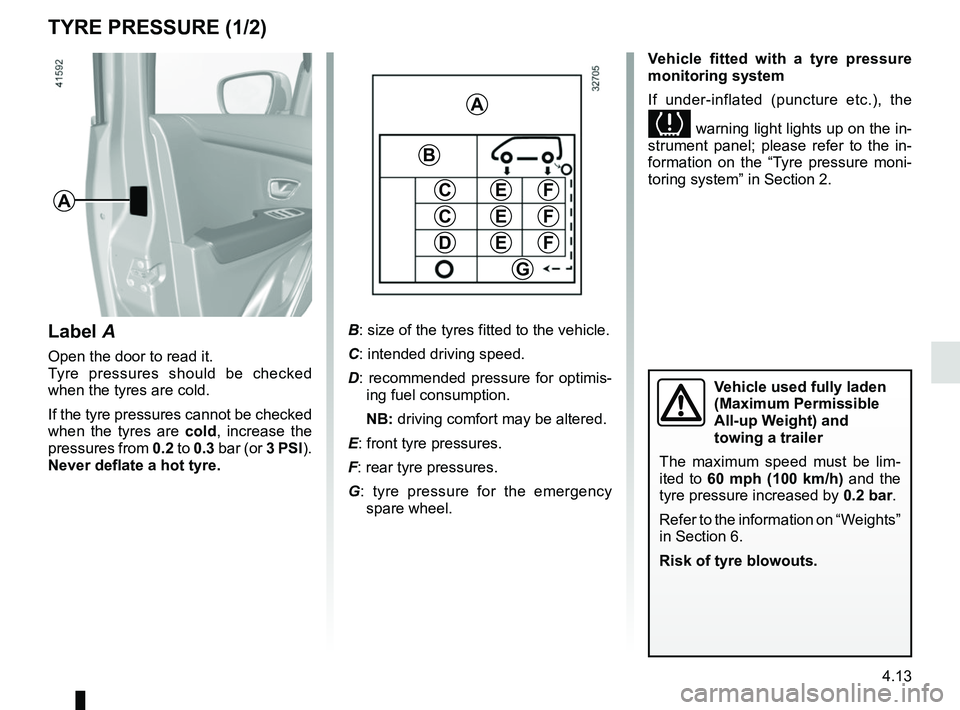
TYRE PRESSURE (1/2)
A
Label A
Open the door to read it.
Tyre pressures should be checked
when the tyres are cold.
If the tyre pressures cannot be checked
when the tyres are cold, increase the
pressures from 0.2 to 0.3 bar (or 3 PSI).
Never deflate a hot tyre. Vehicle fitted with a tyre pressure
monitoring system
If under-inflated (puncture etc.), the
warning light lights up on the in-
strument panel; please refer to the in-
formation on the “Tyre pressure moni-
toring system” in Section 2.
B: size of the tyres fitted to the vehicle.
C: intended driving speed.
D: recommended pressure for optimis- ing fuel consumption.
NB: driving comfort may be altered.
E: front tyre pressures.
F: rear tyre pressures.
G : tyre pressure for the emergency
spare wheel.
A
C
D
FE
G
B
C
E
E
F
F
Vehicle used fully laden
(Maximum Permissible
All-up Weight) and
towing a trailer
The maximum speed must be lim-
ited to 60 mph (100 km/h) and the
tyre pressure increased by 0.2 bar.
Refer to the information on “Weights”
in Section 6.
Risk of tyre blowouts.
Page 293 of 364

5.1
Section 5: Practical advice
Puncture/emergency spare wheel . . . . . . . . . . . . . . . . . . . . . . . . . . . . . . . . . . . . \
. . . . . . . . . . . . . . . 5.2
Tyre inflation kit . . . . . . . . . . . . . . . . . . . . . . . . . . . . . . . . . . . .\
. . . . . . . . . . . . . . . . . . . . . . . . . . . . . 5.5
Tools . . . . . . . . . . . . . . . . . . . . . . . . . . . . . . . . . . . .\
. . . . . . . . . . . . . . . . . . . . . . . . . . . . . . . . . . . . . 5.9
Wheel trim . . . . . . . . . . . . . . . . . . . . . . . . . . . . . . . . . . . . \
. . . . . . . . . . . . . . . . . . . . . . . . . . . . . . . . . 5.11
Changing a wheel . . . . . . . . . . . . . . . . . . . . . . . . . . . . . . . . . . . .\
. . . . . . . . . . . . . . . . . . . . . . . . . . . 5.12
Tyres (tyre and wheel safety, use in winter) . . . . . . . . . . . . . . . . . . . . . . . . . . . . . . . . . . . .\
. . . . . . . 5.14
Headlights (changing bulbs) . . . . . . . . . . . . . . . . . . . . . . . . . . . . . . . . . . . .\
. . . . . . . . . . . . . . . . . . . 5.17
Rear lights (changing bulbs) . . . . . . . . . . . . . . . . . . . . . . . . . . . . . . . . . . . .\
. . . . . . . . . . . . . . . . . . . 5.19
Indicator lights (changing bulbs) . . . . . . . . . . . . . . . . . . . . . . . . . . . . . . . . . . . .\
. . . . . . . . . . . . . . . . 5.23
Interior lighting: changing bulbs . . . . . . . . . . . . . . . . . . . . . . . . . . . . . . . . . . . . \
. . . . . . . . . . . . . . . . . 5.24
Fuses . . . . . . . . . . . . . . . . . . . . . . . . . . . . . . . . . . . . \
. . . . . . . . . . . . . . . . . . . . . . . . . . . . . . . . . . . . . 5.27
Battery: troubleshooting. . . . . . . . . . . . . . . . . . . . . . . . . . . . . . . . . . . . \
. . . . . . . . . . . . . . . . . . . . . . . 5.29
RENAULT card: battery . . . . . . . . . . . . . . . . . . . . . . . . . . . . . . . . . . . . \
. . . . . . . . . . . . . . . . . . . . . . . 5.31
Radio frequency remote control: batteries. . . . . . . . . . . . . . . . . . . . . . . . . . . . . . . . . . . . \
. . . . . . . . . 5.32
Accessories . . . . . . . . . . . . . . . . . . . . . . . . . . . . . . . . . . . . \
. . . . . . . . . . . . . . . . . . . . . . . . . . . . . . . . 5.33
Wipers (replacing blades) . . . . . . . . . . . . . . . . . . . . . . . . . . . . . . . . . . . .\
. . . . . . . . . . . . . . . . . . . . . 5.34
Towing: breakdown . . . . . . . . . . . . . . . . . . . . . . . . . . . . . . . . . . . .\
. . . . . . . . . . . . . . . . . . . . . . . . . . 5.36
Tow eye . . . . . . . . . . . . . . . . . . . . . . . . . . . . . . . . . . . . \
. . . . . . . . . . . . . . . . . . . . . . . . . . . . . . . . . . . 5.37
Operating faults . . . . . . . . . . . . . . . . . . . . . . . . . . . . . . . . . . . . \
. . . . . . . . . . . . . . . . . . . . . . . . . . . . . 5.38