2018 RENAULT SCENIC remote control
[x] Cancel search: remote controlPage 39 of 364

1.33
METHODS OF RESTRAINT IN ADDITION TO THE FRONT SEAT BELTS (2/4)
Load limiter
Above a certain severity of impact, this
mechanism is used to limit the force of
the belt against the body so that it is at
an acceptable level.
driver and passenger front
Airbags
Fitted to the driver and passenger side.
The presence of this equipment is indi-
cated by the word “airbag” on the steer-
ing wheel, dashboard (in the area of the
airbag A) and, depending on the vehi-
cle, a label on the lower section of the
windscreen.
Each airbag system consists of:
– an airbag and gas generator fitted on the steering wheel for the driver and
in the dashboard for the passenger;
– an electronic unit for system monitor- ing which controls the gas generator
electrical trigger system;
– remote sensors;
– a single
å warning light on the
instrument panel.
A
The airbag system uses py-
rotechnic principles. This
explains why, when the
airbag inflates, it will gener-
ate heat, produce smoke (this does
not mean that a fire is about to start)
and make a banging noise. In a situ-
ation where an airbag is required, it
will inflate immediately and this may
cause some minor, superficial graz-
ing to the skin or other problems.
Page 69 of 364

1.63
DRIVER’S POSITION, LEFT-HAND DRIVE (2/2)
The equipment fitted, described below, DEPENDS ON THE VERSION AND COUNTRY.
1 Air vent.
2 Demister outlet.
3 Stalk for:
– direction indicator lights;
– exterior lights;
– rear fog lights.
4 Steering wheel with driver’s Airbag
location, horn.
5 Instrument panel.
6 Head-up display.
7 Controls for:
– on-board computer information
read-out and vehicle settings cus-
tomisation menu,
– remote radio and navigation
system.
8 Steering column stalk for wind-
screen and rear screen wash/
wiper.
9 Heating or air conditioning con-
trols.
10 Multifunction touch-screen.
11 Multifunction screen controls:
– screen activation/deactivation;
– volume;
– welcome menu;
– driving aids menu;
– settings.
12 Switches for:
– hazard warning lights;
– electric door locking.
13 Passenger Airbag location.
14 glove box or storage drawer.
15 Controls for:
– front seat heating;
– activation/deactivation, depend-
ing on the vehicle, of the ECO
mode;
– activation/deactivation of the
parking distance control system;
– activation/deactivation of the
function Stop and Start.
16 Assisted parking brake control.
17 Main switch for:
– speed limiter;
– cruise control;
– adaptive cruise control.
18 Gearstick.
19 Accessories and multimedia sock-
ets.
20 Multi-Sense control.
21
Automatic gearbox gear display.
22 Handbrake.
23 Engine start/stop button (vehicles
with RENAUL
T card).
24 Ignition switch (vehicles with key).
25 Control for adjusting steering
wheel height and reach.
26 Cruise control/speed limiter and
adaptive cruise control controls.
28 Bonnet release control.
29 Controls for:
– headlight beam height remote ad-
justment;
– instrument panel lighting dimmer.
Page 71 of 364

1.65
DRIVING POSITION: RIGHT-HAND DRIVE (2/2)
The equipment fitted, described below, DEPENDS ON THE VERSION AND COUNTRY.
10 Head-up display.
11 Instrument panel.
12 Steering wheel with driver’s Airbag
location, horn.
13 Controls for:
– on-board computer information
read-out and vehicle settings cus-
tomisation menu,
– remote radio and navigation
system.
14 Steering column stalk for wind-
screen and rear screen wash/
wiper.
15 Controls for:
– headlight beam height remote ad-
justment;
– instrument panel lighting dimmer.
16 Ignition switch (vehicles with key).
17 Control for adjusting steering
wheel height and reach.
18 Engine start/stop button (vehicles
with RENAULT card).
19 Switches for:
– hazard warning lights;
– electric door locking.
20 Assisted parking brake control.
21 Main switch for:
– speed limiter;
– cruise control;
– adaptive cruise control.
22 Handbrake.
23 Accessories and multimedia sock-
ets.
24 Multi-Sense control.
25 Gearstick.
26 glove box or storage drawer.
27 Automatic gearbox gear display.
28 Bonnet release control.
1 Air vent.
2 Demister outlet.
3 Passenger Airbag location.
4 Controls for:
– front seat heating;
– activation/deactivation, depend-
ing on the vehicle, of the ECO
mode;
– activation/deactivation of the
parking distance control system;
– activation/deactivation of the
function Stop and Start.
5
Heating or air conditioning con-
trols.
6 Multifunction touch-screen.
7 Multifunction screen controls:
– screen activation/deactivation;
– volume;
– welcome menu;
– driving aids menu;
– settings.
8 Stalk:
– direction indicator lights;
– exterior lights;
– rear fog lights.
9 Cruise control/speed limiter and
adaptive cruise control controls.
Page 119 of 364

1.113
FUEL TANK (3/3)
Persistent smell of
fuel
If you notice a persistent
smell of fuel you should:
– stop the vehicle as soon as traf- fic conditions allow and switch off
the ignition;
– switch on the hazard warning lights and ask your passengers
to leave the vehicle and to keep
away from traffic;
– contact an authorised dealer.
Vehicles with RENAULT card
With the card RENAULT in the pas-
senger compartment, press the start
button 3 without pressing any of the
pedals. Wait a few minutes before start-
ing. This will enable the fuel circuit to
be primed. If the engine does not start,
repeat the procedure.
If the engine does not start after several
attempts, please contact an authorised
dealer.
No modifications what-
soever are permitted on
any part of the fuel supply
system (electronic units,
wiring, fuel circuit, injectors, pro-
tective covers, etc.) as this may be
dangerous (unless undertaken by
qualified Network personnel).
3
Running out of fuel on diesel
versions
Vehicles with key/remote control
– Put the ignition key in “On” posi- tion M (please see the information
on the “Ignition switch” in Section
2) and wait for a few minutes before
starting, to enable the fuel circuit to
be primed;
– turn the key to position D . If the
engine does not start, repeat the pro-
cedure.
– If the engine does not start after sev- eral attempts, please contact an au-
thorised dealer.
Page 241 of 364

3.25
Operating faults
In case of a fault when closing a
window, the system reverts to normal
mode: pull the switch concerned up
as often as necessary to fully close
the window, then hold the switch (still
on the closure side) for approximately
one second, then lower and raise the
window fully to reinitialise the system.
If necessary, contact an approved
Dealer.
ELECTRIC WINDOWS (2/2)Remote control window
closing
(vehicles with 4 one-touch electric win-
dows).
When you lock the doors from the out-
side, press the locking button on the
RENAULTcard twice in quick suc-
cession, or on the driver's door in
hands-free mode, and all the windows
will close automatically (and, depend-
ing on the vehicle, the sunroof).
It is recommended that the user only
operates the system when the vehi-
cle can be seen clearly and no one is
inside.
One-touch mode
This mode works in addition to the ope-
ration of the electric windows described
previously.
Briefly press or pull the window switch
fully: the window is fully lowered or
raised. Pressing the switch again stops
the window moving.
Note: if the window detects resistance
when closing (e.g. tree branch, etc.), it
stops and then lowers again by a few
centimetres.
When closing the windows,
ensure that no part of the
body (arm, hand, etc.) is
protruding from the vehicle.
Risk of serious injury.
Page 293 of 364

5.1
Section 5: Practical advice
Puncture/emergency spare wheel . . . . . . . . . . . . . . . . . . . . . . . . . . . . . . . . . . . . \
. . . . . . . . . . . . . . . 5.2
Tyre inflation kit . . . . . . . . . . . . . . . . . . . . . . . . . . . . . . . . . . . .\
. . . . . . . . . . . . . . . . . . . . . . . . . . . . . 5.5
Tools . . . . . . . . . . . . . . . . . . . . . . . . . . . . . . . . . . . .\
. . . . . . . . . . . . . . . . . . . . . . . . . . . . . . . . . . . . . 5.9
Wheel trim . . . . . . . . . . . . . . . . . . . . . . . . . . . . . . . . . . . . \
. . . . . . . . . . . . . . . . . . . . . . . . . . . . . . . . . 5.11
Changing a wheel . . . . . . . . . . . . . . . . . . . . . . . . . . . . . . . . . . . .\
. . . . . . . . . . . . . . . . . . . . . . . . . . . 5.12
Tyres (tyre and wheel safety, use in winter) . . . . . . . . . . . . . . . . . . . . . . . . . . . . . . . . . . . .\
. . . . . . . 5.14
Headlights (changing bulbs) . . . . . . . . . . . . . . . . . . . . . . . . . . . . . . . . . . . .\
. . . . . . . . . . . . . . . . . . . 5.17
Rear lights (changing bulbs) . . . . . . . . . . . . . . . . . . . . . . . . . . . . . . . . . . . .\
. . . . . . . . . . . . . . . . . . . 5.19
Indicator lights (changing bulbs) . . . . . . . . . . . . . . . . . . . . . . . . . . . . . . . . . . . .\
. . . . . . . . . . . . . . . . 5.23
Interior lighting: changing bulbs . . . . . . . . . . . . . . . . . . . . . . . . . . . . . . . . . . . . \
. . . . . . . . . . . . . . . . . 5.24
Fuses . . . . . . . . . . . . . . . . . . . . . . . . . . . . . . . . . . . . \
. . . . . . . . . . . . . . . . . . . . . . . . . . . . . . . . . . . . . 5.27
Battery: troubleshooting. . . . . . . . . . . . . . . . . . . . . . . . . . . . . . . . . . . . \
. . . . . . . . . . . . . . . . . . . . . . . 5.29
RENAULT card: battery . . . . . . . . . . . . . . . . . . . . . . . . . . . . . . . . . . . . \
. . . . . . . . . . . . . . . . . . . . . . . 5.31
Radio frequency remote control: batteries. . . . . . . . . . . . . . . . . . . . . . . . . . . . . . . . . . . . \
. . . . . . . . . 5.32
Accessories . . . . . . . . . . . . . . . . . . . . . . . . . . . . . . . . . . . . \
. . . . . . . . . . . . . . . . . . . . . . . . . . . . . . . . 5.33
Wipers (replacing blades) . . . . . . . . . . . . . . . . . . . . . . . . . . . . . . . . . . . .\
. . . . . . . . . . . . . . . . . . . . . 5.34
Towing: breakdown . . . . . . . . . . . . . . . . . . . . . . . . . . . . . . . . . . . .\
. . . . . . . . . . . . . . . . . . . . . . . . . . 5.36
Tow eye . . . . . . . . . . . . . . . . . . . . . . . . . . . . . . . . . . . . \
. . . . . . . . . . . . . . . . . . . . . . . . . . . . . . . . . . . 5.37
Operating faults . . . . . . . . . . . . . . . . . . . . . . . . . . . . . . . . . . . . \
. . . . . . . . . . . . . . . . . . . . . . . . . . . . . 5.38
Page 324 of 364

5.32
Operating faults
If the battery is too weak to ensure cor-
rect operation, you can still start and
lock/unlock the vehicle (please refer to
the information on “Locking/unlocking
the opening elements” in Section 1).
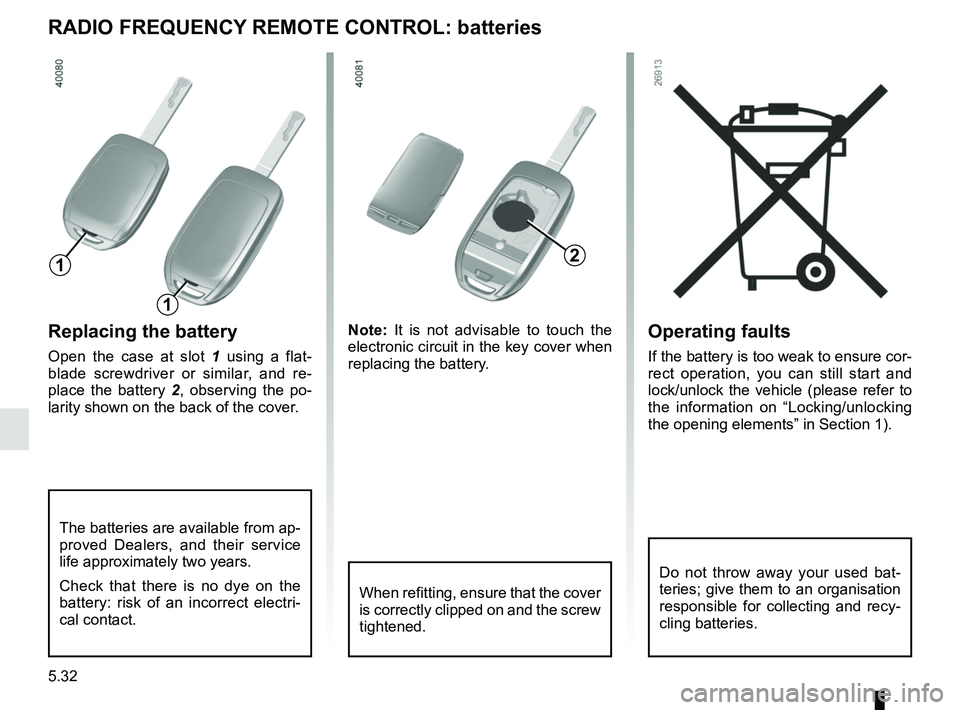
Replacing the battery
Open the case at slot 1 using a flat-
blade screwdriver or similar, and re-
place the battery 2 , observing the po-
larity shown on the back of the cover. Note:
It is not advisable to touch the
electronic circuit in the key cover when
replacing the battery.
RADIO FREQUENCY REMOTE CONTROL: batteries
When refitting, ensure that the cover
is correctly clipped on and the screw
tightened.
The batteries are available from ap-
proved Dealers, and their service
life approximately two years.
Check that there is no dye on the
battery: risk of an incorrect electri-
cal contact.
2
1
1
Do not throw away your used bat-
teries; give them to an organisation
responsible for collecting and recy-
cling batteries.
Page 331 of 364

5.39
The following advice will enable you to carry out quick, temporary repai\
rs. For safety reasons you should always contact
an approved dealer as soon as possible.
Using the remote controlPOSSIBLE CAUSES ACTION REQUIRED
The remote control does not lock or
unlock the doors. The remote control battery is flat.
Use the emergency key.
Use of appliances operating on the same
frequency as the remote control (mobile
phone, etc.). Stop using the devices or use the key.
Vehicle located in a high electromagnetic
radiation zone.
Discharged battery. Replace the battery. You can still lock/
unlock and start your vehicle (refer to the
information on “Locking/unlocking the
doors” in Section 1 and “Starting/Stopping
the engine” in Section 2).
The vehicle is started. With the engine running, the key’s locking/
unlocking device is blocked. Turn off the
ignition.
OPERATING FAULTS (2/7)