2018 RENAULT SCENIC Multimedia
[x] Cancel search: MultimediaPage 207 of 364
2.87
REVERSING CAMERA (1/2)
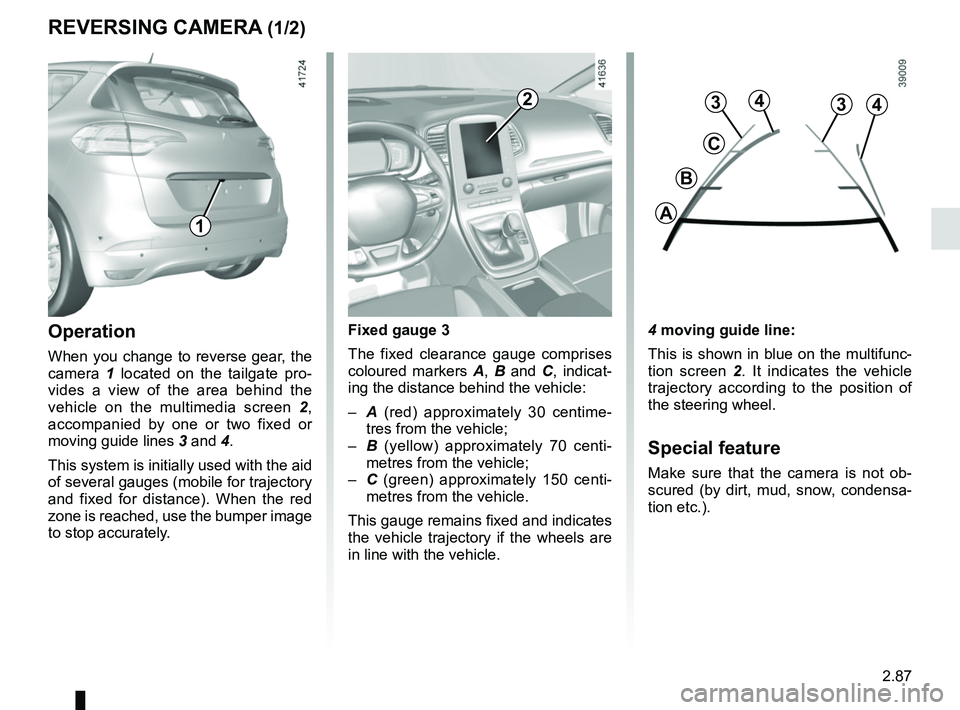
4 moving guide line:
This is shown in blue on the multifunc-
tion screen 2. It indicates the vehicle
trajectory according to the position of
the steering wheel.
Special feature
Make sure that the camera is not ob-
scured (by dirt, mud, snow, condensa-
tion etc.).
Operation
When you change to reverse gear, the
camera 1 located on the tailgate pro-
vides a view of the area behind the
vehicle on the multimedia screen 2,
accompanied by one or two fixed or
moving guide lines 3 and 4.
This system is initially used with the aid
of several gauges (mobile for trajectory
and fixed for distance). When the red
zone is reached, use the bumper image
to stop accurately. Fixed gauge 3
The fixed clearance gauge comprises
coloured markers
A, B and C , indicat-
ing the distance behind the vehicle:
– A (red) approximately 30 centime-
tres from the vehicle;
– B (yellow) approximately 70 centi-
metres from the vehicle;
– C (green) approximately 150 centi-
metres from the vehicle.
This gauge remains fixed and indicates
the vehicle trajectory if the wheels are
in line with the vehicle.
1
4
C
B
A
3342
Page 217 of 364
3.1
Section 3: Your comfort
Multi-Sense . . . . . . . . . . . . . . . . . . . . . . . . . . . . . . . . . . . .\
. . . . . . . . . . . . . . . . . . . . . . . . . . . . . . . . 3.2
Air Vents . . . . . . . . . . . . . . . . . . . . . . . . . . . . . . . . . . . .\
. . . . . . . . . . . . . . . . . . . . . . . . . . . . . . . . . . 3.4
Manual air conditioning/heating system . . . . . . . . . . . . . . . . . . . . . . . . . . . . . . . . . . . .\
. . . . . . . . . . 3.6
Automatic climate control . . . . . . . . . . . . . . . . . . . . . . . . . . . . . . . . . . . .\
. . . . . . . . . . . . . . . . . . . . . 3.9
Air conditioning: information and advice on use . . . . . . . . . . . . . . . . . . . . . . . . . . . . . . . . . . . .\
. . . . 3.19
Outside air quality and deodorisation function. . . . . . . . . . . . . . . . . . . . . . . . . . . . . . . . . . . . \
. . . . . . 3.21
Multimedia equipment . . . . . . . . . . . . . . . . . . . . . . . . . . . . . . . . . . . . \
. . . . . . . . . . . . . . . . . . . . . . . . 3.22
Electric windows . . . . . . . . . . . . . . . . . . . . . . . . . . . . . . . . . . . .\
. . . . . . . . . . . . . . . . . . . . . . . . . . . . 3.24
Fixed glass roof . . . . . . . . . . . . . . . . . . . . . . . . . . . . . . . . . . . . \
. . . . . . . . . . . . . . . . . . . . . . . . . . . . . 3.26
Interior lighting . . . . . . . . . . . . . . . . . . . . . . . . . . . . . . . . . . . . \
. . . . . . . . . . . . . . . . . . . . . . . . . . . . . . 3.27
Sun visor/blinds . . . . . . . . . . . . . . . . . . . . . . . . . . . . . . . . . . . . \
. . . . . . . . . . . . . . . . . . . . . . . . . . . . . 3.29
Passenger compartment storage/fittings . . . . . . . . . . . . . . . . . . . . . . . . . . . . . . . . . . . . \
. . . . . . . . . . 3.30
Accessories socket . . . . . . . . . . . . . . . . . . . . . . . . . . . . . . . . . . . .\
. . . . . . . . . . . . . . . . . . . . . . . . . . 3.38
Ashtray . . . . . . . . . . . . . . . . . . . . . . . . . . . . . . . . . . . .\
. . . . . . . . . . . . . . . . . . . . . . . . . . . . . . . . . . . 3.38
Cigarette lighter . . . . . . . . . . . . . . . . . . . . . . . . . . . . . . . . . . . . \
. . . . . . . . . . . . . . . . . . . . . . . . . . . . . 3.38
Rear headrests . . . . . . . . . . . . . . . . . . . . . . . . . . . . . . . . . . . .\
. . . . . . . . . . . . . . . . . . . . . . . . . . . . . 3.39
Rear seats . . . . . . . . . . . . . . . . . . . . . . . . . . . . . . . . . . . . \
. . . . . . . . . . . . . . . . . . . . . . . . . . . . . . . . . 3.40
Luggage compartment. . . . . . . . . . . . . . . . . . . . . . . . . . . . . . . . . . . . \
. . . . . . . . . . . . . . . . . . . . . . . . 3.46
Rear parcel shelf . . . . . . . . . . . . . . . . . . . . . . . . . . . . . . . . . . . . \
. . . . . . . . . . . . . . . . . . . . . . . . . . . . 3.47
Luggage cover . . . . . . . . . . . . . . . . . . . . . . . . . . . . . . . . . . . . \
. . . . . . . . . . . . . . . . . . . . . . . . . . . . . . 3.48
Luggage compartment storage space and fittings . . . . . . . . . . . . . . . . . . . . . . . . . . . . . . . . . . . .\
. . 3.49
Transporting objects in the luggage compartment . . . . . . . . . . . . . . . . . . . . . . . . . . . . . . . . . . . .\
. . 3.51
Transporting objects: towbar . . . . . . . . . . . . . . . . . . . . . . . . . . . . . . . . . . . . \
. . . . . . . . . . . . . . . . . . . 3.52
Luggage net. . . . . . . . . . . . . . . . . . . . . . . . . . . . . . . . . . . . \
. . . . . . . . . . . . . . . . . . . . . . . . . . . . . . . . 3.53
Roof bars . . . . . . . . . . . . . . . . . . . . . . . . . . . . . . . . . . . . \
. . . . . . . . . . . . . . . . . . . . . . . . . . . . . . . . . . 3.56
Page 222 of 364
3.6
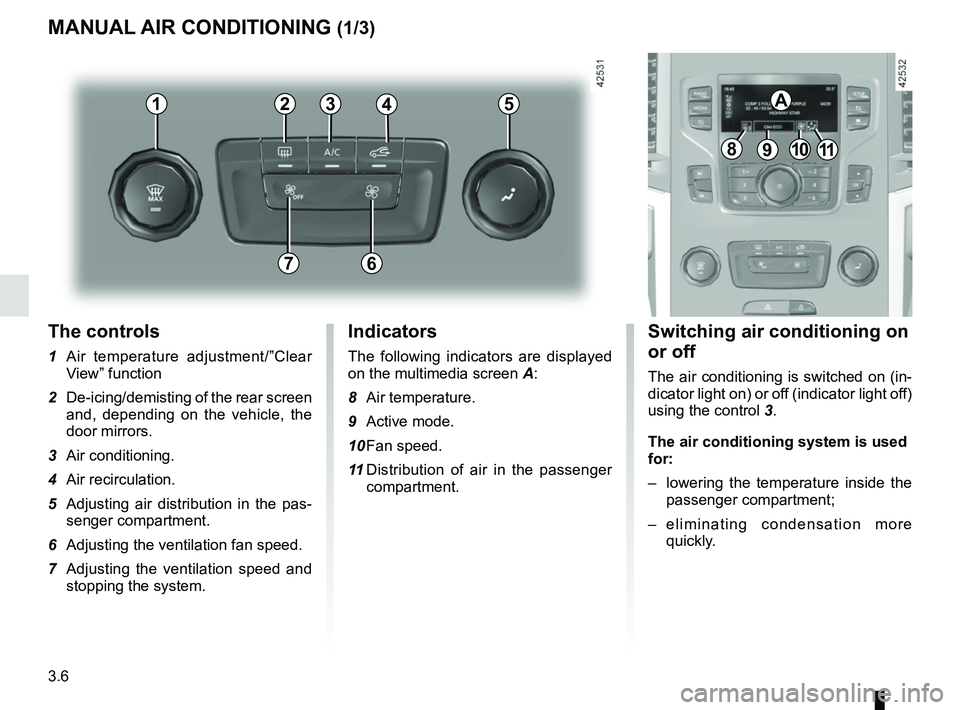
The controls
1 Air temperature adjustment/”Clear View” function
2 De-icing/demisting of the rear screen and, depending on the vehicle, the
door mirrors.
3 Air conditioning.
4 Air recirculation.
5 Adjusting air distribution in the pas- senger compartment.
6 Adjusting the ventilation fan speed.
7 Adjusting the ventilation speed and stopping the system.
MANUAL AIR CONDITIONING (1/3)
Switching air conditioning on
or off
The air conditioning is switched on (in-
dicator light on) or off (indicator light off)
using the control 3.
The air conditioning system is used
for:
– lowering the temperature inside the
passenger compartment;
– eliminating condensation more quickly.
Indicators
The following indicators are displayed
on the multimedia screen A:
8 Air temperature.
9 Active mode.
10 Fan speed.
11 Distribution of air in the passenger
compartment.
21
7
34
891011
A5
6
Page 223 of 364

3.7
MANUAL AIR CONDITIONING (2/3)
Distribution of air in the
passenger compartment
There are five air distribution options.
Turn control 5 to choose the distribution
option.
The air distribution is displayed on the
multimedia screen.
õThe air flow is directed to the
windscreen and the front side
window demisting vents.
÷The air flow is distributed be-
tween all the air vents, the
front side window demisting vents, the
windscreen demisting vents and the
footwells.
óThe air flow is directed mainly
towards the footwells.
GThe air flow is directed towards
the dashboard air vents, the
front footwells and, depending on the
vehicle, the second row footwells.
JAll the air flow is directed to the
dashboard vents.
5
Adjusting the air temperature
Turn control 1 to obtain the desired
temperature. The more bars are dis-
played on the multimedia screen, the
higher the temperature.
When the air conditioning system is
used for long periods, it may begin to
feel cold. To increase the temperature,
turn control 1 to the right.
Rear screen de-icing/
demisting
With the engine running, press the
control 2. The operating tell-tale comes
on.
This function permits rapid demisting/
de-icing of the rear screen and de-icing
of the door mirrors (on equipped vehi-
cles).
To exit this function, press the con-
trol 2 again.
Demisting automatically stops.
21
Page 224 of 364
3.8
4
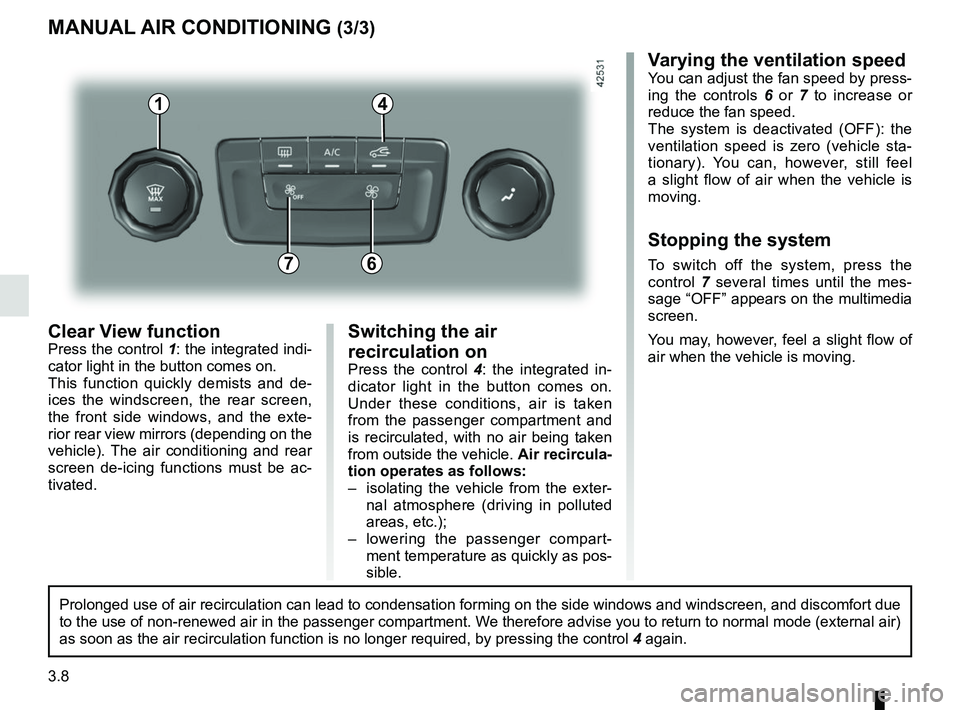
Clear View functionPress the control 1: the integrated indi-
cator light in the button comes on.
This function quickly demists and de-
ices the windscreen, the rear screen,
the front side windows, and the exte-
rior rear view mirrors (depending on the
vehicle). The air conditioning and rear
screen de-icing functions must be ac-
tivated.
MANUAL AIR CONDITIONING (3/3)
Varying the ventilation speedYou can adjust the fan speed by press-
ing the controls 6 or 7 to increase or
reduce the fan speed.
The system is deactivated (OFF): the
ventilation speed is zero (vehicle sta-
tionary). You can, however, still feel
a slight flow of air when the vehicle is
moving.
Stopping the system
To switch off the system, press the
control 7 several times until the mes-
sage “OFF” appears on the multimedia
screen.
You may, however, feel a slight flow of
air when the vehicle is moving.76
Prolonged use of air recirculation can lead to condensation forming on t\
he side windows and windscreen, and discomfort due
to the use of non-renewed air in the passenger compartment. We therefore advise you to return to normal mode (external air)
as soon as the air recirculation function is no longer required, by pres\
sing the control 4 again.
Switching the air
recirculation on
Press the control 4: the integrated in-
dicator light in the button comes on.
Under these conditions, air is taken
from the passenger compartment and
is recirculated, with no air being taken
from outside the vehicle. Air recircula-
tion operates as follows:
– isolating the vehicle from the exter- nal atmosphere (driving in polluted
areas, etc.);
– lowering the passenger compart- ment temperature as quickly as pos-
sible.
1
Page 237 of 364
3.21
OUTSIDE AIR QUALITY AND DEODORISATION FUNCTION
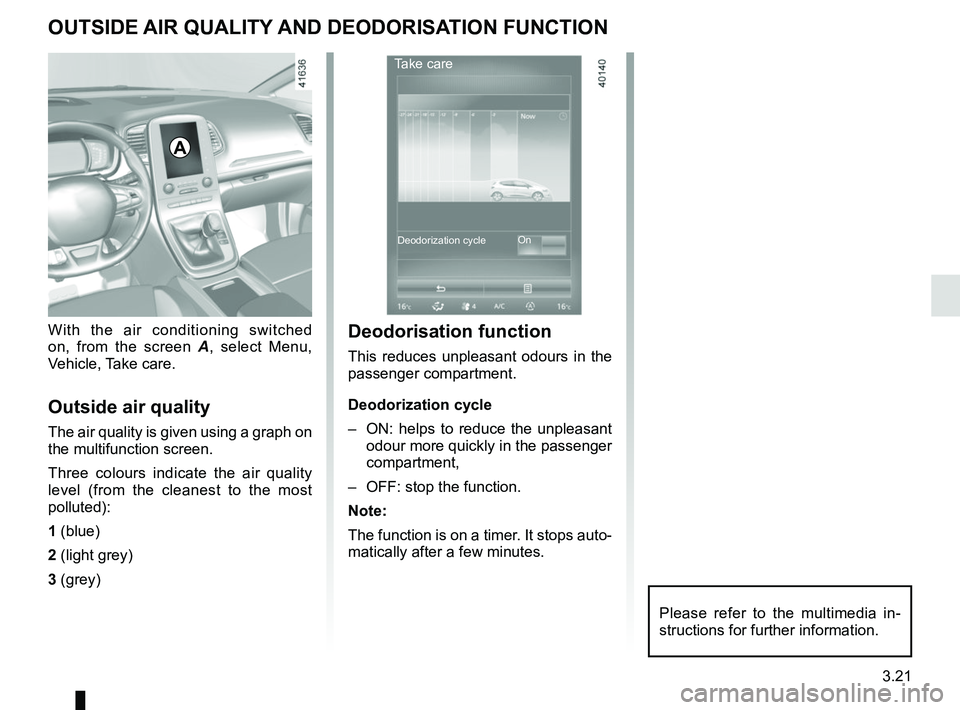
With the air conditioning switched
on, from the screen A, select Menu,
Vehicle, Take care.
Outside air quality
The air quality is given using a graph on
the multifunction screen.
Three colours indicate the air quality
level (from the cleanest to the most
polluted):
1 (blue)
2 (light grey)
3 (grey)
A
Deodorisation function
This reduces unpleasant odours in the
passenger compartment.
Deodorization cycle
– ON: helps to reduce the unpleasant odour more quickly in the passenger
compartment,
– OFF: stop the function.
Note:
The function is on a timer. It stops auto-
matically after a few minutes.
Take care
On
Deodorization cycle
Please refer to the multimedia in-
structions for further information.
Page 238 of 364
3.22
MULTIMEDIA EQUIPMENT (1/2)
Using the telephone
We remind you of the need
to conform to the legislation
in force concerning the use
of such equipment.
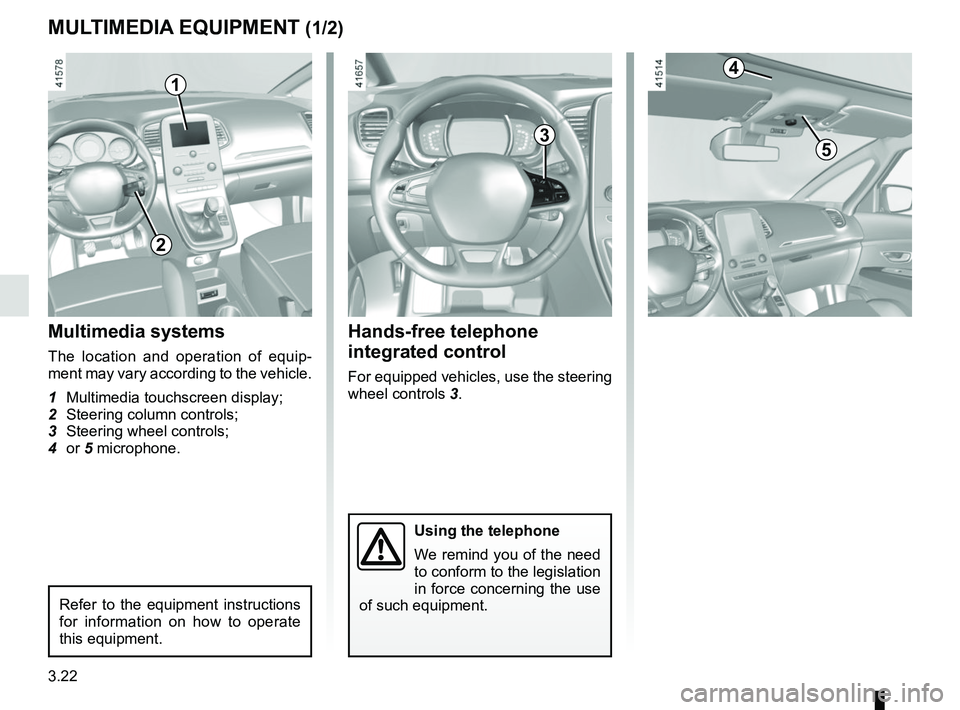
Hands-free telephone
integrated control
For equipped vehicles, use the steering
wheel controls 3.
Multimedia systems
The location and operation of equip-
ment may vary according to the vehicle.
1 Multimedia touchscreen display;
2 Steering column controls;
3 Steering wheel controls;
4 or 5 microphone.
1
3
Refer to the equipment instructions
for information on how to operate
this equipment.
2
4
5
Page 239 of 364
3.23
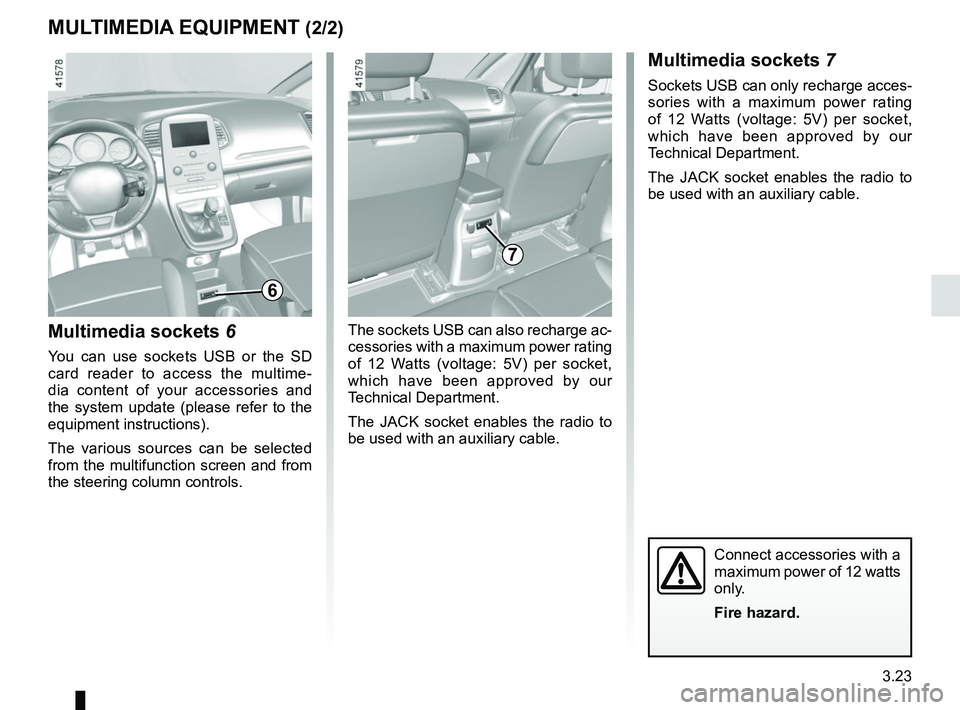
Multimedia sockets 6
You can use sockets USB or the SD
card reader to access the multime-
dia content of your accessories and
the system update (please refer to the
equipment instructions).
The various sources can be selected
from the multifunction screen and from
the steering column controls.
7
MULTIMEDIA EQUIPMENT (2/2)Multimedia sockets 7
Sockets USB can only recharge acces-
sories with a maximum power rating
of 12 Watts (voltage: 5V) per socket,
which have been approved by our
Technical Department.
The JACK socket enables the radio to
be used with an auxiliary cable.
The sockets USB can also recharge ac-
cessories with a maximum power rating
of 12 Watts (voltage: 5V) per socket,
which have been approved by our
Technical Department.
The JACK socket enables the radio to
be used with an auxiliary cable.
Connect accessories with a
maximum power of 12 watts
only.
Fire hazard.
6