Page 265 of 348

4.13
TYRE PRESSURE (1/2)
A
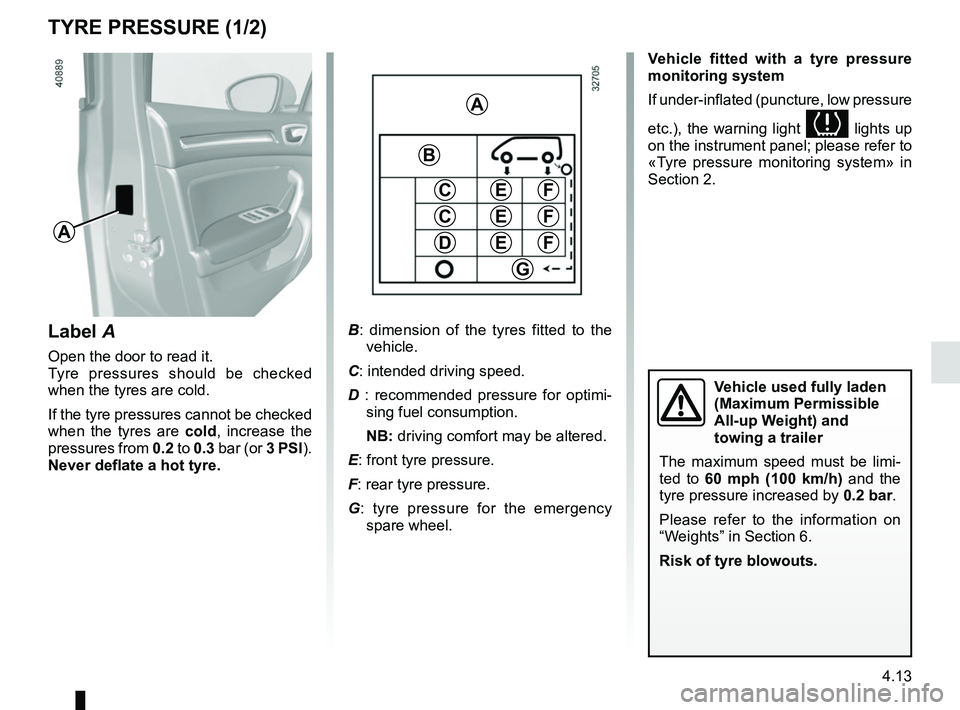
Label A
Open the door to read it.
Tyre pressures should be checked
when the tyres are cold.
If the tyre pressures cannot be checked
when the tyres are cold, increase the
pressures from 0.2 to 0.3 bar (or 3 PSI).
Never deflate a hot tyre. Vehicle fitted with a tyre pressure
monitoring system
If under-inflated (puncture, low pressure
etc.), the warning light
lights up
on the instrument panel; please refer to
«Tyre pressure monitoring system» in
Section 2.
A
C
D
FE
G
B
C
E
E
F
F
B : dimension of the tyres fitted to the
vehicle.
C: intended driving speed.
D : recommended pressure for optimi-
sing fuel consumption.
NB: driving comfort may be altered.
E: front tyre pressure.
F: rear tyre pressure.
G : tyre pressure for the emergency
spare wheel.
Vehicle used fully laden
(Maximum Permissible
All-up Weight) and
towing a trailer
The maximum speed must be limi-
ted to 60 mph (100 km/h) and the
tyre pressure increased by 0.2 bar.
Please refer to the information on
“Weights” in Section 6.
Risk of tyre blowouts.
Page 273 of 348

5.1
Section 5: Practical advice
Puncture/emergency spare wheel . . . . . . . . . . . . . . . . . . . . . . . . . . . . . . . . . . . . \
. . . . . . . . . . . . . . . 5.2
Tyre inflation kit . . . . . . . . . . . . . . . . . . . . . . . . . . . . . . . . . . . .\
. . . . . . . . . . . . . . . . . . . . . . . . . . . . . 5.4
Tools . . . . . . . . . . . . . . . . . . . . . . . . . . . . . . . . . . . .\
. . . . . . . . . . . . . . . . . . . . . . . . . . . . . . . . . . . . . 5.7
Wheel trim . . . . . . . . . . . . . . . . . . . . . . . . . . . . . . . . . . . . \
. . . . . . . . . . . . . . . . . . . . . . . . . . . . . . . . . 5.8
Changing a wheel . . . . . . . . . . . . . . . . . . . . . . . . . . . . . . . . . . . .\
. . . . . . . . . . . . . . . . . . . . . . . . . . . 5.9
Tyres (tyre and wheel safety, use in winter) . . . . . . . . . . . . . . . . . . . . . . . . . . . . . . . . . . . .\
. . . . . . . 5.11
Headlights (changing bulbs) . . . . . . . . . . . . . . . . . . . . . . . . . . . . . . . . . . . .\
. . . . . . . . . . . . . . . . . . . 5.14
Rear lights and side lights (replacing bulbs) . . . . . . . . . . . . . . . . . . . . . . . . . . . . . . . . . . . .\
. . . . . . . 5.16
Interior lighting: changing bulbs . . . . . . . . . . . . . . . . . . . . . . . . . . . . . . . . . . . . \
. . . . . . . . . . . . . . . . . 5.25
Fuses . . . . . . . . . . . . . . . . . . . . . . . . . . . . . . . . . . . . \
. . . . . . . . . . . . . . . . . . . . . . . . . . . . . . . . . . . . . 5.28
Battery . . . . . . . . . . . . . . . . . . . . . . . . . . . . . . . . . . . . \
. . . . . . . . . . . . . . . . . . . . . . . . . . . . . . . . . . . . 5.30
RENAULT card: battery . . . . . . . . . . . . . . . . . . . . . . . . . . . . . . . . . . . . \
. . . . . . . . . . . . . . . . . . . . . . . 5.32
Radio frequency remote control: batteries. . . . . . . . . . . . . . . . . . . . . . . . . . . . . . . . . . . . \
. . . . . . . . . 5.33
Accessories . . . . . . . . . . . . . . . . . . . . . . . . . . . . . . . . . . . . \
. . . . . . . . . . . . . . . . . . . . . . . . . . . . . . . . 5.34
Wipers (replacing blades) . . . . . . . . . . . . . . . . . . . . . . . . . . . . . . . . . . . .\
. . . . . . . . . . . . . . . . . . . . . 5.35
Towing: breakdown . . . . . . . . . . . . . . . . . . . . . . . . . . . . . . . . . . . .\
. . . . . . . . . . . . . . . . . . . . . . . . . . 5.37
Operating faults . . . . . . . . . . . . . . . . . . . . . . . . . . . . . . . . . . . . \
. . . . . . . . . . . . . . . . . . . . . . . . . . . . . 5.39
Page 279 of 348

5.7
TOOLS
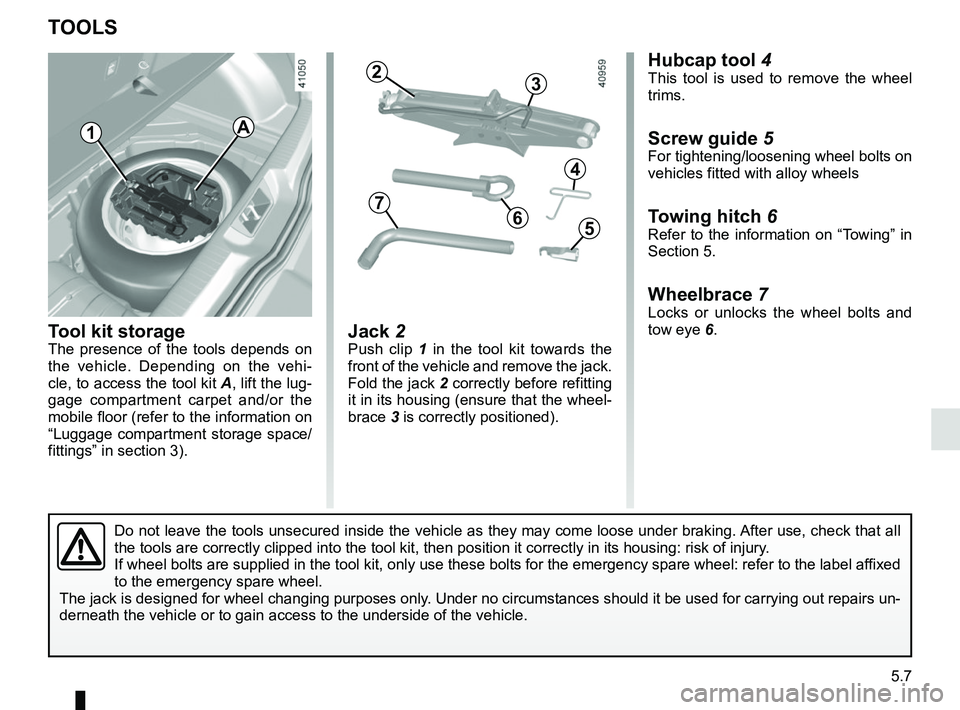
Tool kit storageThe presence of the tools depends on
the vehicle. Depending on the vehi-
cle, to access the tool kit A, lift the lug-
gage compartment carpet and/or the
mobile floor (refer to the information on
“Luggage compartment storage space/
fittings” in section 3).Jack 2Push clip 1 in the tool kit towards the
front of the vehicle and remove the jack.
Fold the jack 2 correctly before refitting
it in its housing (ensure that the wheel-
brace 3 is correctly positioned).
Hubcap tool 4This tool is used to remove the wheel
trims.
Screw guide 5For tightening/loosening wheel bolts on
vehicles fitted with alloy wheels
Towing hitch 6Refer to the information on “Towing” in
Section 5.
Wheelbrace 7Locks or unlocks the wheel bolts and
tow eye 6.
7
4
6
3
5
A1
2
Do not leave the tools unsecured inside the vehicle as they may come loo\
se under braking. After use, check that all
the tools are correctly clipped into the tool kit, then position it corr\
ectly in its housing: risk of injury.
If wheel bolts are supplied in the tool kit, only use these bolts for th\
e emergency spare wheel: refer to the label affixed
to the emergency spare wheel.
The jack is designed for wheel changing purposes only. Under no circumstances should it be used for carrying out repairs un-
derneath the vehicle or to gain access to the underside of the vehicle.