Page 124 of 348

2.12
FUNCTION STOP AND START (3/4)
Conditions preventing the
standby of the engine
Certain conditions prevent the system
from using the engine standby function,
including when:
for vehicles equipped with a
RENAULT card:
– the driver’s door is not closed;
– the driver’s seatbelt is not fastened.
for all vehicles:
– reverse gear is engaged;
– the bonnet is not locked;
– the outdoor temperature is too low or too high (less than around 5°C or
higher than around 35°C);
– the battery is not sufficiently charged;
– the difference between the vehicle interior temperature and the auto-
matic climate control instruction is
too high;
– parking distance control is in opera- tion; – for vehicles with automatic gear-
boxes, the gradient is steeper than
approximately 12%;
– the “Clear View” function is activated (please see “Automatic climate con-
trol” in Section 3);
– the engine temperature is too low;
– the emission control system is being regenerated;
– Multi-Sense Sport mode is activated (depending on the vehicle);
– ...
Warning light
is displayed on the
instrument panel. This notifies you that
engine standby is not available.
Deactivate the Stop and
Start function for any opera-
tion performed in the engine
compartment.
Special case for vehicles with
a RENAULT card
With the engine on standby (traffic jam,
traffic lights, etc.), if the driver unfas-
tens the seat belt and opens the driv-
er’s door, or gets out of the seat, the
ignition is switched off.
The assisted parking brake is applied
automatically.
To restart and reactivate the Stop and
Start system, start the engine (please
refer to the information on "Starting,
stopping the engine" in Section 2).
Special case of vehicles with
a key
With the engine on standby (traffic
jam, traffic lights, etc.), if you get out of
the vehicle, a beep warns you that the
engine is on standby and has not been
stopped.
Page 254 of 348
4.2
BONNET (1/2)Unlocking the bonnet catch
To unlock, push tab 3 at the same time
as opening the bonnet.
Opening the bonnet
Lift the bonnet, guiding it up, and it
will rest in position with the help of two
struts 2.
To open, pull handle
1, located on the
left-hand side of the dashboard.
1
Do not press down on the
bonnet: there is a risk that
the bonnet may accidentally
close.
Before performing any
action in the engine com-
partment, the ignition must
be switched off (please see
the information on “Starting, stop-
ping the engine” in Section 2).
When working in the engine
compartment, ensure that
the windscreen wiper stalk
is in the park position.
Risk of injury.3
2
Please note when work-
ing close to the engine that
it may be hot. In addition,
the engine cooling fan may
come on at any moment. The
warning light in the engine compart-
ment reminds you of this.
Risk of injury.
Page 286 of 348

5.14
Any operation on (or modi-
fication to) the electrical
system must be performed
by an approved dealer
since an incorrect connection might
damage the electrical equipment
(harness, components and in partic-
ular the alternator). In addition, your
Dealer has all the parts required for
fitting these units.
LED dipped beam
headlights 1
Please see an authorised dealer.
LED main beam headlights 2
Please see an authorised dealer.
FRONT HEADLIGHTS: replacing the bulbs (1/2)
Halogen dipped beam
headlight
To change the bulb:
– open the bonnet;
– remove cover B;
– Turn the bulb holder a quarter turn 4;
– remove the bulb.
Bulb type: H7.
Once the bulb has been replaced,
check that it is properly secured.
BA
The bulbs are under pres-
sure and can break when
replaced.
Risk of injury.
1
Please note when work-
ing close to the engine that
it may be hot. In addition,
the engine cooling fan may
start at any moment. The
warning light in the engine compart-
ment reminds you of this.
Risk of injury.
2
Page 287 of 348

5.15
To comply with local legislation, or
as a precaution, you can obtain an
emergency kit containing a set of
spare bulbs and fuses from an ap-
proved dealer.
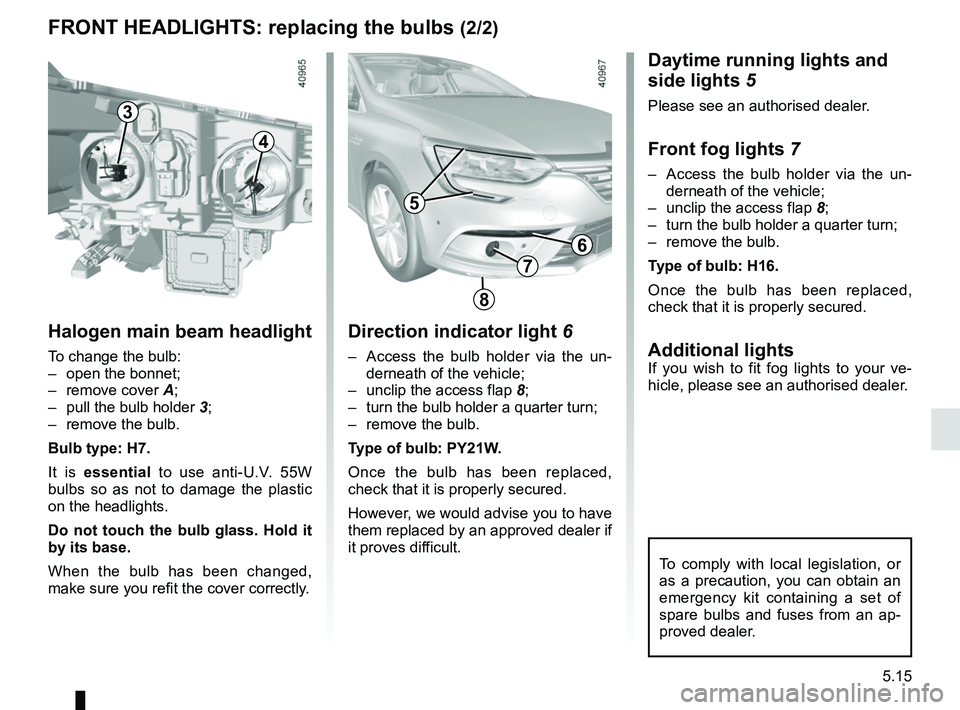
Daytime running lights and
side lights 5
Please see an authorised dealer.
Front fog lights 7
– Access the bulb holder via the un-
derneath of the vehicle;
– unclip the access flap 8;
– turn the bulb holder a quarter turn;
– remove the bulb.
Type of bulb: H16.
Once the bulb has been replaced,
check that it is properly secured.
Additional lightsIf you wish to fit fog lights to your ve-
hicle, please see an authorised dealer.
FRONT HEADLIGHTS: replacing the bulbs (2/2)
Direction indicator light 6
– Access the bulb holder via the un-
derneath of the vehicle;
– unclip the access flap 8;
– turn the bulb holder a quarter turn;
– remove the bulb.
Type of bulb: PY21W.
Once the bulb has been replaced,
check that it is properly secured.
However, we would advise you to have
them replaced by an approved dealer if
it proves difficult.
7
5
6
8
3
4
Halogen main beam headlight
To change the bulb:
– open the bonnet;
– remove cover A;
– pull the bulb holder 3;
– remove the bulb.
Bulb type: H7.
It is essential to use anti-U.V. 55W
bulbs so as not to damage the plastic
on the headlights.
Do not touch the bulb glass. Hold it
by its base.
When the bulb has been changed,
make sure you refit the cover correctly.
6
7
8