2018 RENAULT MEGANE warning lights
[x] Cancel search: warning lightsPage 30 of 348

1.24
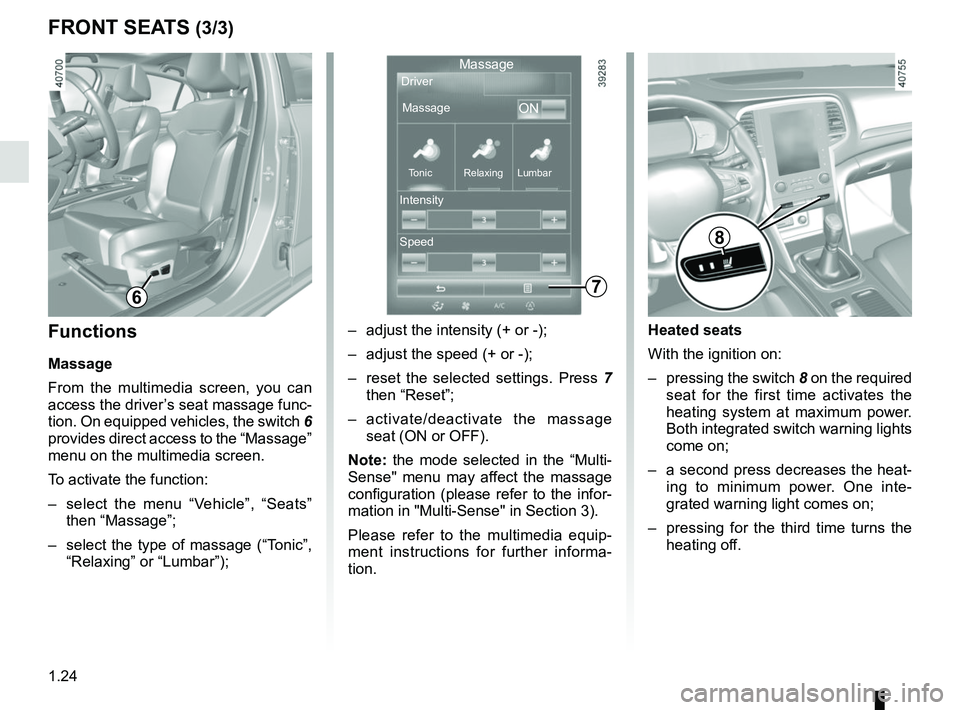
Heated seats
With the ignition on:
– pressing the switch 8 on the required
seat for the first time activates the
heating system at maximum power.
Both integrated switch warning lights
come on;
– a second press decreases the heat- ing to minimum power. One inte-
grated warning light comes on;
– pressing for the third time turns the heating off.
FRONT SEATS (3/3)
7
MassageDriver
Massage
ON
Tonic Relaxing Lumbar
Intensity
Speed
– adjust the intensity (+ or -);
– adjust the speed (+ or -);
– reset the selected settings. Press 7
then “Reset”;
– activate/deactivate the massage seat (ON or OFF).
Note: the mode selected in the “Multi-
Sense" menu may affect the massage
configuration (please refer to the infor-
mation in "Multi-Sense" in Section 3).
Please refer to the multimedia equip-
ment instructions for further informa-
tion.
8
Functions
Massage
From the multimedia screen, you can
access the driver’s seat massage func-
tion. On equipped vehicles, the switch 6
provides direct access to the “Massage”
menu on the multimedia screen.
To activate the function:
– select the menu “Vehicle”, “Seats” then “Massage”;
– select the type of massage (“Tonic”, “Relaxing” or “Lumbar”);
6
Page 31 of 348

1.25
STEERING WHEEL
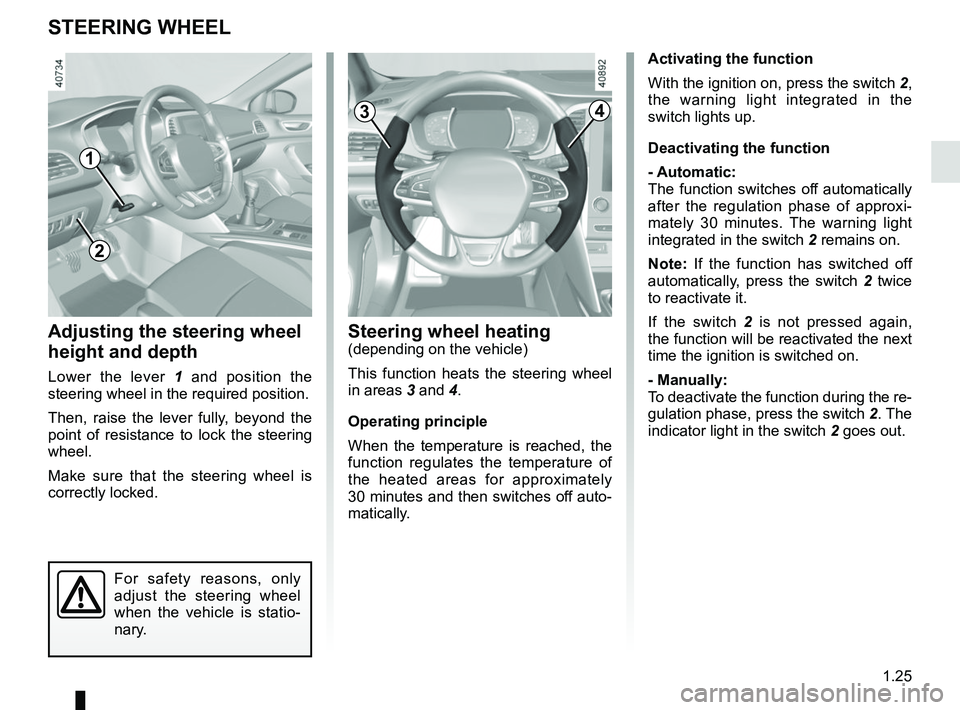
Steering wheel heating(depending on the vehicle)
This function heats the steering wheel
in areas 3 and 4.
Operating principle
When the temperature is reached, the
function regulates the temperature of
the heated areas for approximately
30 minutes and then switches off auto-
matically.Adjusting the steering wheel
height and depth
Lower the lever 1 and position the
steering wheel in the required position.
Then, raise the lever fully, beyond the
point of resistance to lock the steering
wheel.
Make sure that the steering wheel is
correctly locked.
For safety reasons, only
adjust the steering wheel
when the vehicle is statio-
nary.
1
Activating the function
With the ignition on, press the switch 2,
the warning light integrated in the
switch lights up.
Deactivating the function
- Automatic:
The function switches off automatically
after the regulation phase of approxi-
mately 30 minutes. The warning light
integrated in the switch 2 remains on.
Note: If the function has switched off
automatically, press the switch 2 twice
to reactivate it.
If the switch 2 is not pressed again,
the function will be reactivated the next
time the ignition is switched on.
- Manually:
To deactivate the function during the re-
gulation phase, press the switch 2. The
indicator light in the switch 2 goes out.
2
34
Page 33 of 348

1.27
SEAT BELTS (2/4)
Locking
Unwind the belt slowly and smoothly
and ensure that buckle 3 locks into
catch 5 (check that it is locked by pull- ing on buckle 3).
If the belt jams, allow it to return slightly
before attempting to unwind it again.
If your seat belt is completely jammed,
pull slowly, but firmly, so that just over
3 cm unwinds. Allow it to return slightly
before attempting to unwind it again.
If there is still a problem, contact an ap-
proved dealer.
1
5
3
4
5
ßDriver’s seat belt reminder
and, depending on the vehi-
cle, front passenger seat belt re-
minder
This lights up on the central display
when the engine is started. If the driv-
er’s or front passenger’s seat belt (if
this seat is occupied) is not fastened
and the vehicle has reached approxi-
mately 12.4 mph (20 km/h), it flashes
and a bleep sounds for around 120 sec-
onds.
Note: an object placed on the passen-
ger seat base may activate the warning
light in some cases.
Rear seat belt reminder
The warning light
ß lights up on
the central display accompanied, de-
pending on the vehicle, by a message
indicating the number of seat belts
buckled (for approximately 30 seconds)
or the graphic 6.
In all cases, these messages appear
with each:
– starting the vehicle;
– opening a door;
– fastening or unfastening of a rear seat belt (for this case, the informa-
tion is accompanied by a beep last-
ing approximately 30 seconds). Check that the rear passengers are
wearing seat belts and that the number
of seat belts shown as fastened cor-
responds to the number of rear seat
places occupied.
On the graphic 6:
– marker in green: seat belt fastened;
– marker in red: seat belt unfastened.
Unfastening
Press button 4 and the seat belt will be
rewound by the inertia reel. Guide the
belt.
6
6
Page 58 of 348

1.52
Front passenger air bag
deactivation
Yo u must deactivate the passenger
airbag before fitting a child seat on the
front passenger seat.
The front passenger air bag
must only be deactivated or
activated when the vehicle
is stationary.
If it is interfered with when the ve-
hicle is being driven, indicator lights
å and © will come on.
Switch the ignition off then on again
to reset the air bag in accordance
with the lock position.
CHILD SAFETY: deactivating, activating the front passenger air bag (1/3)
To deactivate the air bag: when the
vehicle is stationary, push and turn
lock 1 to the OFF position.
With the ignition on, you must check
that the warning light
¹ is lit on the
display 2.
This light remains permanently lit to
let you know that you can fit a child
seat.
2
1
DANGER
Since operation of the front
passenger airbag is not
compatible with the position
of a rear-facing child seat, NEVER
fit a restraint system for a rear-fac-
ing child in a seat protected by an
ACTIVATED front AIRBAG . This
can cause the CHILD’S DEATH or
SERIOUS INJURY.
Page 60 of 348

1.54
CHILD SAFETY: deactivating, activating the front passenger air bag (3/3)
Operating faults
It is forbidden to fit a rear-facing child
seat to the front passenger seat if the
airbag activation/deactivation system is
faulty.
Allowing any other passenger to sit in
that seat is not recommended.
Contact your approved dealer as soon
as possible.
Activation of the front
passenger air bag
You should reactivate the air bag as
soon as you remove the child seat from
the front passenger seat to ensure the
protection of the front passenger in the
event of an impact.To reactivate the
airbags : with the
vehicle at a standstill, and the igni-
tion off , push and turn lock 1 to the ON
position.
With the ignition switched on, you must
check that the warning light
] is
out and that the warning light
comes on the display 2 after each start-
up for around 60 seconds.
The front passenger seat belt additional
restraint systems are activated.
The front passenger air bag
must only be deactivated or
activated when the vehicle
is stationary.
If it is interfered with when the ve-
hicle is being driven, indicator lights
å and © will come on.
Switch the ignition off then on again
to reset the air bag in accordance
with the lock position.
2
1
Page 61 of 348

1.55
AUDIBLE AND VISUAL SIGNALS
Horn
Press the steering wheel boss A to ac-
tivate the horn.
Headlight flasher
Pull stalk 1 towards you to flash the
headlights.
éHazard warning lights
Press switch 2. This switch ac-
tivates all four direction indicators and
the side indicator lights simultaneously.
It must only be used in an emergency to
warn drivers of other vehicles that you
have had to stop in an area where stop-
ping is prohibited or unexpected or that
you are obliged to drive under special
conditions.
Depending on the vehicle, the hazard
warning lights may come on automati-
cally under heavy deceleration. You can
switch them off by pressing switch 2.
Direction indicators
Move stalk 1 parallel to the steering
wheel and in the direction you are going
to turn it.
One-touch mode
When driving, it is possible that the
steering wheel may not be turned suf-
ficiently to return the stalk automatically
to its starting position.
In this case, briefly turn stalk 1 to the in-
termediate position, then release it: the
stalk returns to its original point and the
indicator light flashes three times.
2
A
1
Page 63 of 348

1.57
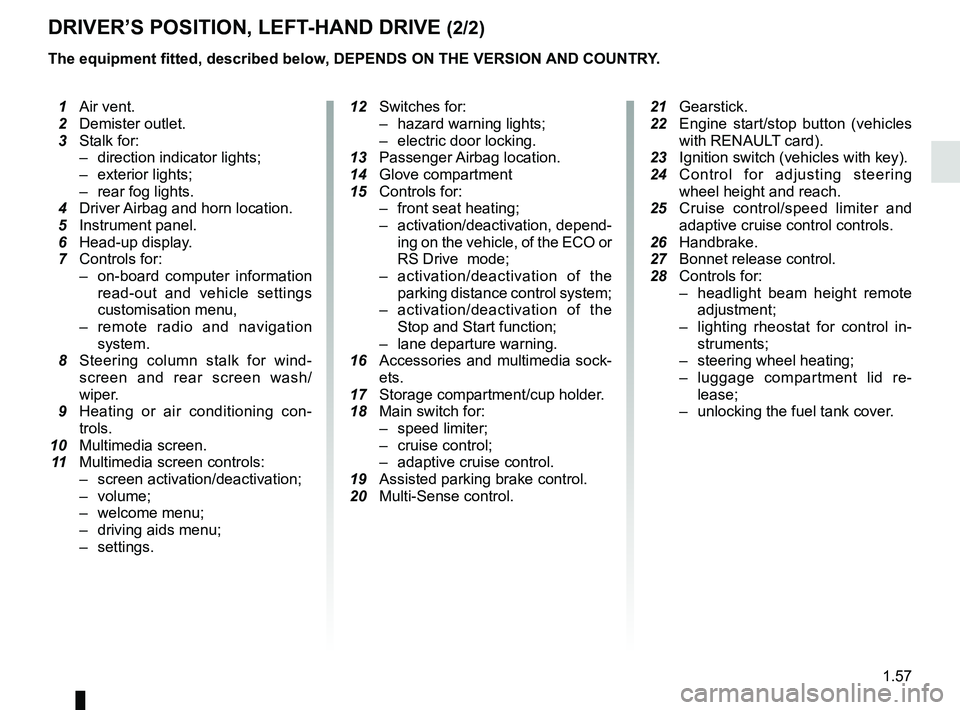
DRIVER’S POSITION, LEFT-HAND DRIVE (2/2)
The equipment fitted, described below, DEPENDS ON THE VERSION AND COUNTRY.
1 Air vent.
2 Demister outlet.
3 Stalk for:
– direction indicator lights;
– exterior lights;
– rear fog lights.
4 Driver Airbag and horn location.
5 Instrument panel.
6 Head-up display.
7 Controls for:
– on-board computer information
read-out and vehicle settings
customisation menu,
– remote radio and navigation
system.
8 Steering column stalk for wind-
screen and rear screen wash/
wiper.
9 Heating or air conditioning con-
trols.
10 Multimedia screen.
11 Multimedia screen controls:
– screen activation/deactivation;
– volume;
– welcome menu;
– driving aids menu;
– settings.
12 Switches for:
– hazard warning lights;
– electric door locking.
13 Passenger Airbag location.
14 Glove compartment
15 Controls for:
– front seat heating;
– activation/deactivation, depend-
ing on the vehicle, of the ECO or
RS Drive mode;
– activation/deactivation of the
parking distance control system;
– activation/deactivation of the
Stop and Start function;
– lane departure warning.
16 Accessories and multimedia sock-
ets.
17 Storage compartment/cup holder.
18 Main switch for:
– speed limiter;
– cruise control;
– adaptive cruise control.
19 Assisted parking brake control.
20 Multi-Sense control.
21
Gearstick.
22 Engine start/stop button (vehicles
with RENAUL
T card).
23 Ignition switch (vehicles with key).
24 Control for adjusting steering
wheel height and reach.
25 Cruise control/speed limiter and
adaptive cruise control controls.
26 Handbrake.
27 Bonnet release control.
28 Controls for:
– headlight beam height remote
adjustment;
– lighting rheostat for control in-
struments;
– steering wheel heating;
– luggage compartment lid re-
lease;
– unlocking the fuel tank cover.
Page 65 of 348

1.59
DRIVING POSITION: RIGHT-HAND DRIVE (2/2)
The equipment fitted, described below, DEPENDS ON THE VERSION AND COUNTRY.
16 Control for adjusting steering
wheel height and reach.
17 Engine start/stop button (vehicles
with RENAULT card).
18 Switches for:
– hazard warning lights;
– electric door locking.
19 Gearstick.
20 Storage compartment/cup holders.
21 Main switch for:
– speed limiter;
– cruise control;
– adaptive cruise control.
22 Assisted parking brake control.
23 Multi-Sense control.
24 Accessories and multimedia sock-
ets.
25 Glove compartment
26 Handbrake.
27 Bonnet release control.
1 Air vent.
2 Demister outlet.
3 Passenger Airbag location.
4 Controls for:
– front seat heating;
– activation/deactivation, depend-
ing on the vehicle, of the ECO or
RS Drive mode;
– activation/deactivation of the
parking distance control system;
– activation/deactivation of the
Stop and Start function;
– lane departure warning.
5 Heating or air conditioning con-
trols.
6 Multimedia screen.
7 Multimedia screen controls:
– screen activation/deactivation;
– volume;
– welcome menu;
– driving aids menu;
– settings.
8 Stalk:
– direction indicator lights;
– exterior lights;
– rear fog lights.
9 Cruise control/speed limiter and
adaptive cruise control controls.
10 Instrument panel.
11 Driver Airbag and horn location.
12 Controls
for:
– on-board computer information
read-out and vehicle settings
customisation menu,
– remote radio and navigation
system.
13 Steering column stalk for wind-
screen and rear screen wash/
wiper.
14 Controls for:
– headlight beam height remote
adjustment;
– lighting rheostat for control in-
struments;
– steering wheel heating;
– luggage compartment lid re-
lease;
– unlocking the fuel tank cover.
15 Ignition switch (vehicles with key).