2018 RENAULT MEGANE boot
[x] Cancel search: bootPage 22 of 348

1.16
LOCKING, UNLOCKING THE DOORS (3/3)
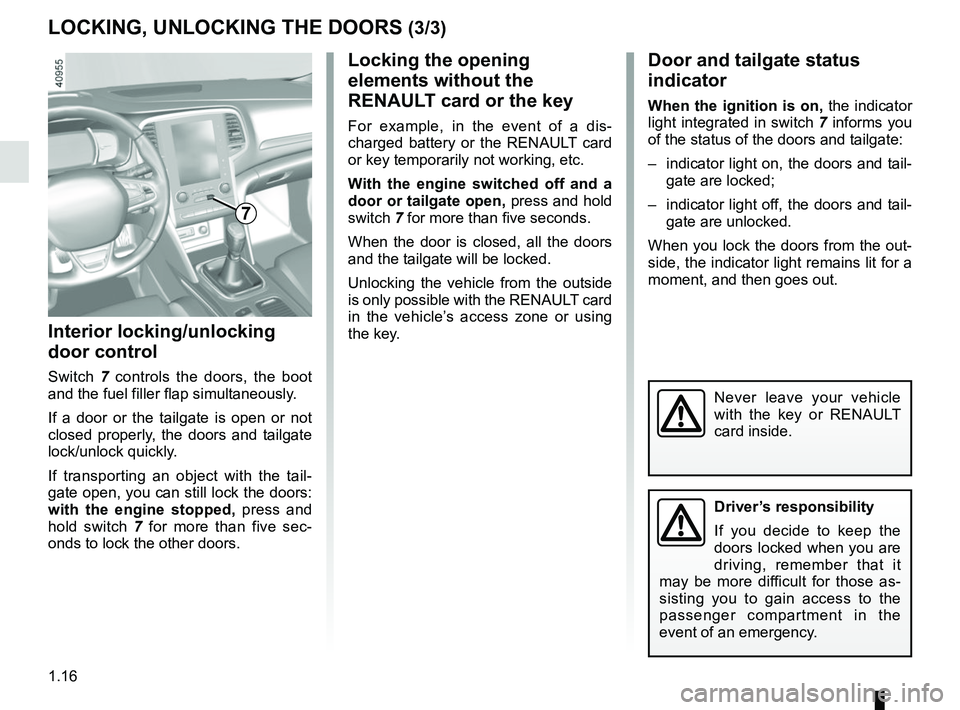
Interior locking/unlocking
door control
Switch 7 controls the doors, the boot
and the fuel filler flap simultaneously.
If a door or the tailgate is open or not
closed properly, the doors and tailgate
lock/unlock quickly.
If transporting an object with the tail-
gate open, you can still lock the doors:
with the engine stopped, press and
hold switch 7 for more than five sec-
onds to lock the other doors.
Locking the opening
elements without the
RENAULT card or the key
For example, in the event of a dis-
charged battery or the RENAULT card
or key temporarily not working, etc.
With the engine switched off and a
door or tailgate open, press and hold
switch 7 for more than five seconds.
When the door is closed, all the doors
and the tailgate will be locked.
Unlocking the vehicle from the outside
is only possible with the RENAULT card
in the vehicle’s access zone or using
the key.
Door and tailgate status
indicator
When the ignition is on, the indicator
light integrated in switch 7 informs you
of the status of the doors and tailgate:
– indicator light on, the doors and tail- gate are locked;
– indicator light off, the doors and tail- gate are unlocked.
When you lock the doors from the out-
side, the indicator light remains lit for a
moment, and then goes out.
Never leave your vehicle
with the key or RENAULT
card inside.
7
Driver’s responsibility
If you decide to keep the
doors locked when you are
driving, remember that it
may be more difficult for those as-
sisting you to gain access to the
passenger compartment in the
event of an emergency.
Page 24 of 348

1.18
OPENING AND CLOSING THE DOORS (2/3)
4
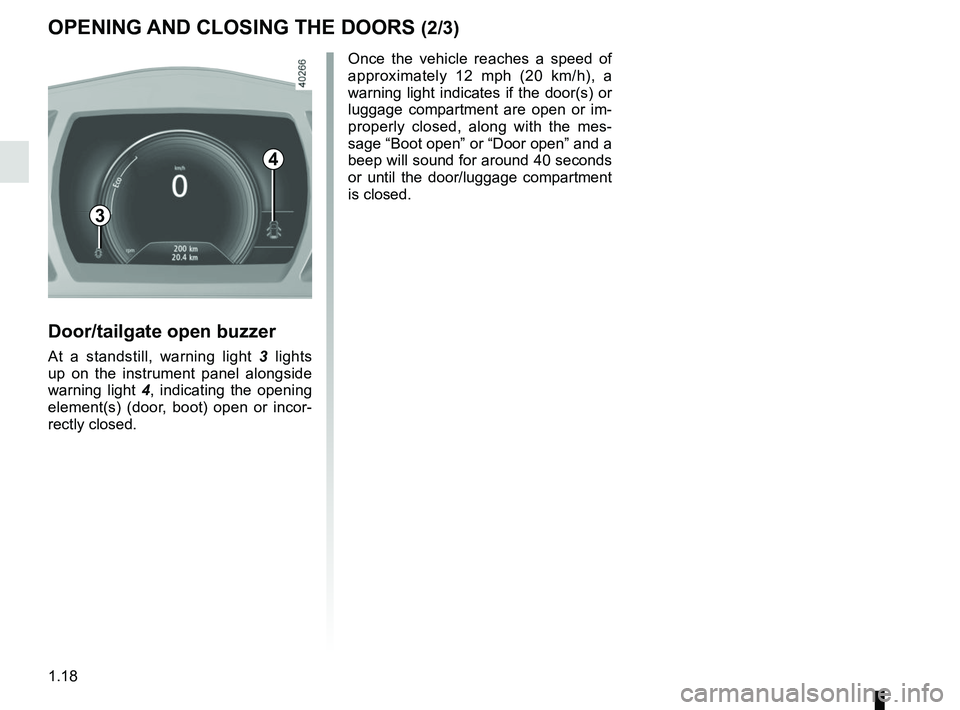
Door/tailgate open buzzer
At a standstill, warning light 3 lights
up on the instrument panel alongside
warning light 4, indicating the opening
element(s) (door, boot) open or incor-
rectly closed. Once the vehicle reaches a speed of
approximately 12 mph (20 km/h), a
warning light indicates if the door(s) or
luggage compartment are open or im-
properly closed, along with the mes-
sage “Boot open” or “Door open” and a
beep will sound for around 40 seconds
or until the door/luggage compartment
is closed.
3
Page 26 of 348

1.20
AUTOMATIC LOCKING WHEN DRIVING
Operating principleAfter the vehicle is started, the system
automatically locks the doors when you
are driving at approximately 6 mph
(10 km/h) and over.
The door can be unlocked:
– by pressing central door unlocking
switch 2.
– at a standstill, by opening a front
door from inside the vehicle.
Note: if a door is opened or closed, it
will automatically lock again when the
vehicle reaches a speed of 6 mph
(10 km/h).
Activating/deactivating the
function
To switch it on: with the vehicle at a
standstill and the engine running, press
switch 2 until a beep sounds.
To deactivate: with the vehicle at a
standstill and the engine running, press
switch 2 until two beeps sound.
You can also activate/deactivate the
function from the menu on the multime-
dia screen 1 (Refer to the information
on the “Vehicle settings customisation
menu” section 1, “Auto door locking
while driving” function).
Operating faults
If you experience an operating fault (no
automatic locking, the indicator light in-
corporated in switch 2 does not light up
when trying to lock the doors and boot,
etc.), make sure that locking has not
been deactivated by mistake and check
that the doors and boot are properly
closed. If they are correctly locked and
the fault is still present, contact an au-
thorised dealer.
2
Driver’s responsibility
If you decide to keep the
doors locked when you are
driving, remember that it
may be more difficult for those as-
sisting you to gain access to the
passenger compartment in the
event of an emergency.
1
Page 117 of 348

2.5
STARTING, STOPPING THE ENGINE: vehicle with RENAULT card (1/3)
Conditions for starting the
engine
The RENAULT card must be inserted in
detection zone 1.
To start:
– vehicles with an automatic gearbox, place the lever in position P, depress
the brake pedal and press button 2;
– vehicles with a manual gearbox, de- press the brake or clutch pedal and
press button 2. If a gear is engaged, the vehicle may only be started by
depressing the clutch pedal.
“Hands-free” starting with
the tailgate open
In this case, the RENAULT card should
not be located in the boot, to avoid any
risk of loss.
2
1
Special features
– If one of starting conditions is not ap- plied, the message “Press brake +
START” or “Press clutch + START”
or “Select P” is displayed on the in-
strument panel;
– in some cases, it will be necessary to move the steering wheel whilst
pressing the start button 2 to help
unlock the steering column; the mes-
sage “Turn steering wheel + START”
will warn you of this;
Driver’s responsibility
when parking or stopping
the vehicle
Never leave an animal,
child or adult who is not self-suffi-
cient alone in your vehicle, even for
a short time.
They may pose a risk to themselves
or to others by starting the engine,
activating equipment such as the
electric windows or locking the
doors, for example.
Also, in hot and/or sunny weather,
please remember that the tempera-
ture inside the passenger compart-
ment increases very quickly.
RISK OF DEATH OR SERIOUS
INJURY.
Page 179 of 348

2.67
ADAPTIVE CRUISE CONTROL (7/7)
Limitation of the system operation
– A vehicle travelling in the opposite direction will not trigger any alert\
or any action on the system operation.
– The sensor area should be kept clean and free of any modifications in or\
der to ensure the proper operation of the
system.
– Fixed obstacles (stationary vehicles, traffic jams, toll booths etc.) or objects travelling at low speed or of a \
small size ( motor-
bikes, bicycles, pedestrians etc.) may not be detected by the system.
– A vehicle entering the same lane will only be detected once it has entere\
d the detection zone. Sudden or late braking may then take place.
– When entering a bend or curve, the sensor may temporarily no longer dete\
ct the vehicle in front, and this may lead to acce- leration.
– When exiting a curve, the detection of the vehicle in front may be affected or delayed. Sudden or late braking may then take place.
– A slower vehicle travelling in an adjacent lane may be detected and cause\
a slowing down if one of the two vehicles is trav- elling too close to the lane of the other.
– The system is deactivated below around 20 mph (40 km/h). Drivers must \
react accordingly.
– Sudden changes in situation are not instantly taken into account by the \
system. Drivers must remain vigilant at all times and
under all circumstances.
Deactivating the function
You must disable the function if:
– the brake lights are not functioning;
– the front of the vehicle has undergone an impact or been damaged;
– the vehicle is being towed (breakdowns);
– traffic is heavy;
– the vehicle is travelling in a tunnel;
– the vehicle is travelling on a windy road;
– the vehicle is travelling on a slippery road or in poor weather conditio\
ns (fog, snow, rain, side winds etc.).
In the event of the system behaving abnormally, deactivate it and consult an authorised dealer.
Page 186 of 348

2.74
4 moving guide line:
This is shown in blue on the multime-
dia screen 2. It indicates the vehicle tra-
jectory according to the position of the
steering wheel.
Activating, deactivating the
reversing camera
From the multimedia screen 2, select
“Vehicle”, “Parking assistance”, “Rear
view camera”. Activate or deactivate
the reversing camera and confirm your
choice.
You can also adjust the camera image
settings (brightness, contrast, etc.)
REVERSING CAMERA (2/2)
C
B
A
43
2
The screen shows a reverse mirror
image.
Objects which appear on the edge
of the screen may be deformed.
In very bright light (snow, vehicle in
sunshine etc.), the camera vision
may be adversely affected.
If the boot is open or poorly closed,
the message “Boot open” appears
and the camera display disappears.
3
4
Fixed clearance gauge 3
The fixed clearance gauge comprises
coloured markers A, B and C , indicat-
ing the distance behind the vehicle:
– A (red) approximately 30 centime-
tres from the vehicle;
– B (yellow) approximately 70 centime-
tres from the vehicle;
– C (green) approximately 150 centi-
metres from the vehicle.
This gauge remains fixed and indicates
the vehicle trajectory if the wheels are
in line with the vehicle.Operation
When reversing, the camera transmits
a view of the surroundings to the rear
of the vehicle to the screen 2 accompa-
nied by one or two clearance gauges 3
et 4 (mobile and fixed). This system
is initially used with the aid of several
gauges (mobile for trajectory and fixed
for distance). When the red zone is
reached, use the bumper image to stop
accurately.
The frames are a representation projected onto flat ground; this informa\
tion must
not be taken into account when superimposed on a vertical object or an o\
bject
on the ground.
Page 189 of 348

2.77
ASSISTED PARKING (3/4)
Your speed should not exceed around
4 mph (7 km/h).
Once in position to exit the space, the
system will notify you of the end of the
manoeuvre.
Once the warning light
on the
instrument panel goes off and a beep
sounds, the manoeuvre has been com-
pleted.
Suspending the manoeuvreThe manoeuvre is suspended in the fol-
lowing circumstances:
– you take control of the wheel;
– a door or the boot is opened;
– the vehicle is at a standstill for too long;
– an obstacle in the direction of move- ment prevents the manoeuvre from
being completed;
– the engine will stop.
Once the warning light
on the
instrument panel goes off and a beep
sounds, the manoeuvre has been sus-
pended. Then to resume the manoeu-
vre, press and hold the system activa-
tion switch. In this case, the reason for suspending
the manoeuvre will be displayed on the
multimedia screen.
Make sure:
– you have released the steering wheel
and;
– that all doors and the boot are closed, and;
– that no obstacles are in the way of the direction of movement, and;
– that the engine is started.
Cancelling the manoeuvre
The manoeuvre can be stopped in the
following cases:
– by pressing the system activation switch;
– the vehicle speed has exceeded 4 mph (7 km/h);
– You have performed more than ten forwards/backwards movements in
one manoeuvre;
– the parking distance control sensors are dirty or blocked;
– the vehicle wheels have skidded.
Once the warning light
on the
instrument panel goes off and a beep
sounds, the manoeuvre has been com-
pleted.
Exiting a parallel parking space
– Select “exit parallel parking space” mode;
– activate the direction indicator on the side you wish to go out of;
– press and hold switch 1 (around
2 seconds).
Warning light
lights up on the in-
strument panel, along with a beep.
– release the steering wheel;
– go forwards and backwards using the parking distance control system
alerts.
1
Page 221 of 348

3.27
Note: for vehicles fitted with a naviga-
tion system, you can use the multime-
dia screen to deactivate/activate the
courtesy lights which come on when
the doors or boot are opened. To do
this, please refer to “Vehicle settings
customisation menu” in Section 1.
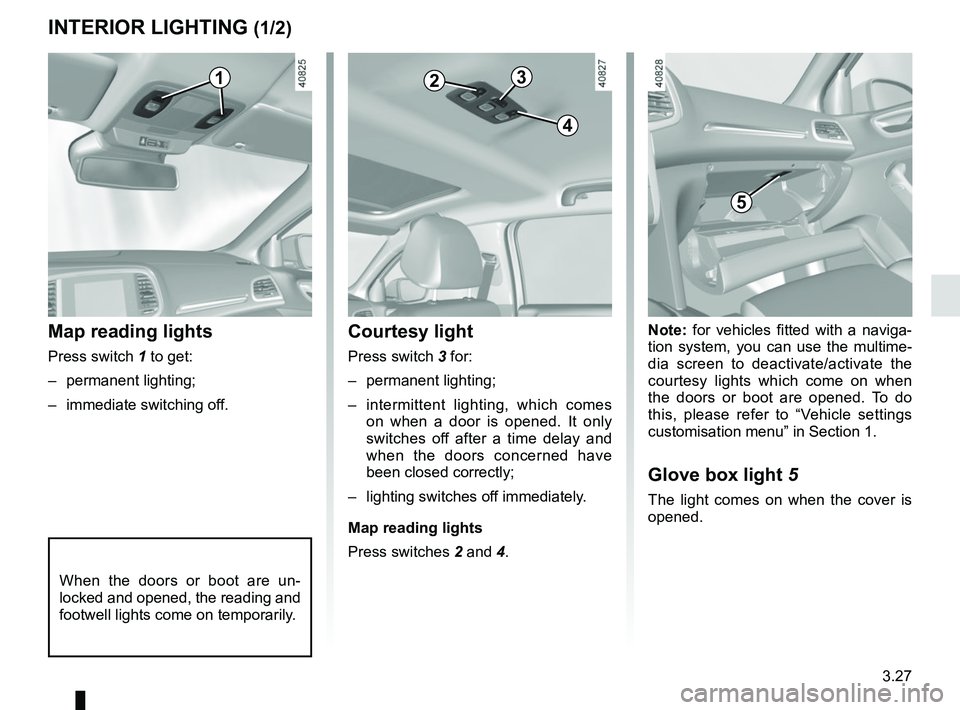
Glove box light 5
The light comes on when the cover is
opened.
Courtesy light
Press switch 3 for:
– permanent lighting;
– intermittent lighting, which comes
on when a door is opened. It only
switches off after a time delay and
when the doors concerned have
been closed correctly;
– lighting switches off immediately.
Map reading lights
Press switches 2 and 4.
Map reading lights
Press switch 1 to get:
– permanent lighting;
– immediate switching off.
When the doors or boot are un-
locked and opened, the reading and
footwell lights come on temporarily.
INTERIOR LIGHTING (1/2)
123
4
5