2018 RENAULT KOLEOS radio
[x] Cancel search: radioPage 111 of 332

2.7
STARTING, STOPPING THE ENGINE: vehicle with RENAULT CARD (3/5)
If the RENAULT card is no longer in the
passenger compartment or if the card
battery is low when you try to switch
the engine off, the message “No key-
card Press and hold” appears on the in-
strument panel: press the button 2 for
longer than two seconds. If the card is
no longer in the passenger compart-
ment, make sure you can retrieve it
before pressing and holding the button.
Without the RENAULT card, you will
not be able to restart the vehicle.
With the engine switched off, any ac-
cessories being used (radio, etc.) will
continue to function for approximately
10 minutes.
When the driver’s door is opened, the
accessories stop working.
Conditions for stopping the
engine
The vehicle must stationary, with the
lever positioned in N or P for vehicles
with an automatic transmission.
With the RENAULT card in the vehicle,
press the 2 button: the engine will stop. The steering column is locked when the
driver’s door is opened or the vehicle
is locked.
When you leave your vehi-
cle, especially if you have
your RENAULT card with
you, check that the engine
is completely switched off.
2
Driver’s responsibility
when parking or stopping
the vehicle
Never leave an animal,
child or adult who is not self-suffi-
cient alone in your vehicle, even for
a short time.
They may pose a risk to themselves
or to others by starting the engine,
activating equipment such as the
electric windows or locking the
doors, for example.
Also, in hot and/or sunny weather,
please remember that the tempera-
ture inside the passenger compart-
ment increases very quickly.
RISK OF DEATH OR SERIOUS
INJURY.
Never switch off the igni-
tion before the vehicle has
stopped completely. Once
the engine has stopped, the
brake servo, power-assisted steer-
ing, etc. and the passive safety de-
vices such as air bags and preten-
sioners will no longer operate.
Page 246 of 332

3.50
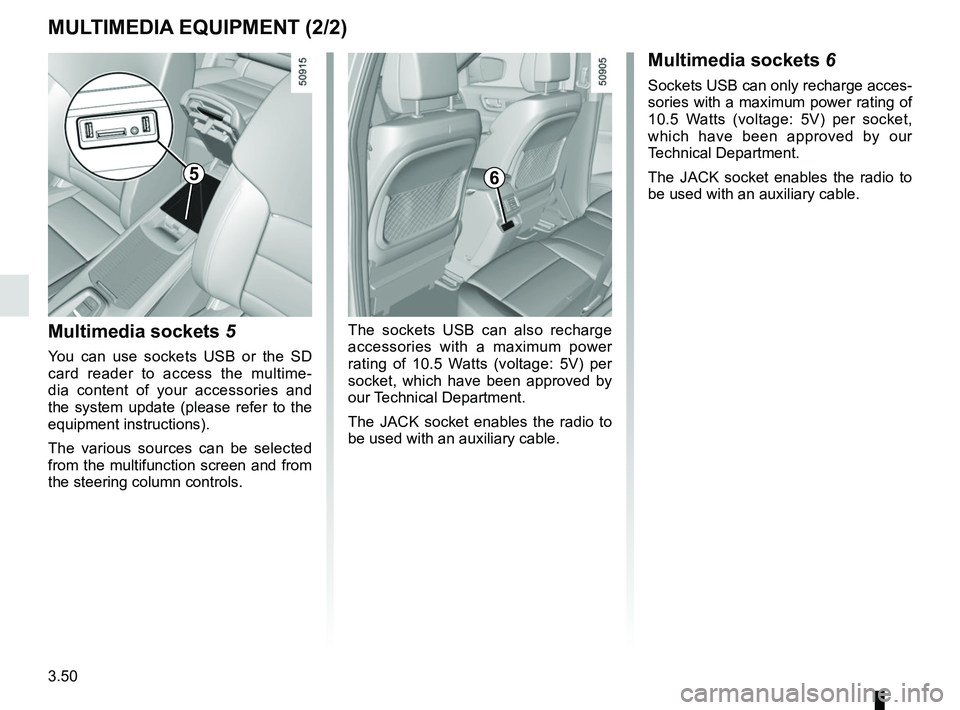
MULTIMEDIA EQUIPMENT (2/2)
Multimedia sockets 5
You can use sockets USB or the SD
card reader to access the multime-
dia content of your accessories and
the system update (please refer to the
equipment instructions).
The various sources can be selected
from the multifunction screen and from
the steering column controls.
Multimedia sockets 6
Sockets USB can only recharge acces-
sories with a maximum power rating of
10.5 Watts (voltage: 5V) per socket,
which have been approved by our
Technical Department.
The JACK socket enables the radio to
be used with an auxiliary cable.
The sockets USB can also recharge
accessories with a maximum power
rating of 10.5 Watts (voltage: 5V) per
socket, which have been approved by
our Technical Department.
The JACK socket enables the radio to
be used with an auxiliary cable.
56
Page 259 of 332

4.13
BATTERY (1/2)
1
Battery 1 does not require any mainte-
nance. You should not open it or add
any fluid.
Handle the battery with care
as it contains sulphuric acid
which must not come into
contact with the eyes or
skin. If it does, wash the affected
area with plenty of cold water. If
necessary, consult a doctor.
Ensure that naked flames, red hot
objects and sparks do not come into
contact with the battery as there is a
risk of explosion.
Depending on the vehicle, a system
continuously checks the battery charge
status. If this decreases, the message
“Battery low start engine” is displayed
on the instrument panel. In this case,
start the engine. The message will go
off.
The charge status of your battery can
decrease especially if you use your ve-
hicle:
– for short journeys;
– for driving in town;
– when the temperature drops;
– after extended use of energy-con- suming devices (radio, etc.) with the
engine switched off.
The engine may be hot
during operations in close
proximity. In addition, the
engine cooling fan may
start at any moment.
Risk of injury.
Before performing any
action in the engine com-
partment, the ignition must
be switched off by pressing
the engine stop button (please see
the information on “Starting, stop-
ping the engine” in Section 2).
Page 262 of 332

4.16
Respect local regulations about wash-
ing vehicles (e.g. do not wash your ve-
hicle on a public highway).
Observe the vehicle stopping distances
when driving on gravelled surfaces to
prevent paint damage.
Repair, or have repaired quickly, areas
where the paint has been damaged, to
prevent corrosion spreading.
Remember to visit the body shop pe-
riodically in order to maintain your
anti-corrosion warranty. Refer to the
Maintenance Document.
If it is necessary to clean mechani-
cal components, hinges, etc., spray
them with products approved by our
Technical Department to protect them
after they have been cleaned.
BODYWORK MAINTENANCE (2/2)
We have selected special products
to care for your vehicle and you can
obtain these from the manufactur-
er’s accessory outlets.
Using a roller type car wash
Return the windscreen wiper stalk to
the Park position (refer to the informa-
tion on the “Windscreen washer, wiper”
in Section 1). Check the mounting of
external accessories, additional lights
and mirrors, and ensure that the wiper
blades are secured with adhesive tape.
Remove the radio aerial mast if your
vehicle is fitted with this equipment.
Remember to remove the tape and refit
the antenna after washing.
Cleaning the headlights
As the headlights are made of plastic
“glass”, use a soft cloth or cotton wool
to clean them. If this does not clean
them properly, moisten the cloth with
soapy water, then wipe clean with a soft
damp cloth or cotton wool.
Finally, carefully dry off with a soft dry
cloth.
Cleaning products containing alco-
hol must not be used.
Vehicles with a matte paint
finish
This type of paint requires certain pre-
cautions.
Do not do the following
– use wax-based products (polishing);
– rub hard;
– wash the vehicle in a roller-type car
wash;
– wash the vehicle using a high-pres-
sure device;
– attach stickers to the paintwork (risk
of leaving marks).
You should do the following
Wash the vehicle by hand using plenty
of water, using a soft cloth or a gentle
sponge.
Page 263 of 332

4.17
Glass instrument panel(e.g.: instrument panel, clock, exterior
temperature display, radio display, mul-
timedia or multifunction display etc.)
Use a soft cloth (or cotton wool).
If this does not clean them properly,
use a soft cloth (or cotton wool) slightly
moistened with soapy water and then
wipe clean with another soft damp cloth
or cotton wool.
Finally, carefully dry off with a soft dry
cloth.
Do not use products containing alco-
hol and/or spray fluids on the area.
Seat belts
These must be kept clean.
Use products selected by our Technical
Department (Approved outlets) or
warm, soapy water and a sponge and
wipe with a dry cloth.
Detergents or dyes must not be used
under any circumstances.
INTERIOR TRIM MAINTENANCE (1/2)
Textiles (seats, door trim, etc)
Vacuum-clean the textiles regularly.
Liquid stain
Use soapy water.
Dab lightly (never rub) with a soft cloth,
rinse and remove the excess.
Solid or pasty stain
Carefully remove the excess solid or
pasty material immediately with a
spatula (working from the edges to the
centre to avoid spreading the stain).
Clean as for a liquid stain.
Special instructions for sweets or
chewing gum
Put an ice cube on the stain to solidify
it, then proceed as for a solid stain.
A well-maintained vehicle will last
longer. It is therefore recommended to
maintain the interior of the vehicle regu-
larly.
A stain should always be dealt with
swiftly.
Whatever type of stain is on the trim,
use
cold (or warm) soapy water with
natural soap.
Detergents (washing-up liquid, pow-
dered products, alcohol-based prod-
ucts) should not be used.
Use a soft cloth.
Rinse and soak up the excess.
For further recommendations for
maintaining the interior, and/or for
any unsatisfactory results, please
see an authorised dealer.
Page 265 of 332

5.1
Section 5: Practical advice
Puncture, emergency spare wheel . . . . . . . . . . . . . . . . . . . . . . . . . . . . . . . . . . . .\
. . . . . . . . . . . . . . 5.2
Tyre inflation kit . . . . . . . . . . . . . . . . . . . . . . . . . . . . . . . . . . . .\
. . . . . . . . . . . . . . . . . . . . . . . . . . . . . 5.4
Tools . . . . . . . . . . . . . . . . . . . . . . . . . . . . . . . . . . . .\
. . . . . . . . . . . . . . . . . . . . . . . . . . . . . . . . . . . . . 5.7
Changing a wheel . . . . . . . . . . . . . . . . . . . . . . . . . . . . . . . . . . . .\
. . . . . . . . . . . . . . . . . . . . . . . . . . . 5.8
Tyres (tyre and wheel safety, use in winter) . . . . . . . . . . . . . . . . . . . . . . . . . . . . . . . . . . . .\
. . . . . . . 5.10
Headlights (changing bulbs) . . . . . . . . . . . . . . . . . . . . . . . . . . . . . . . . . . . .\
. . . . . . . . . . . . . . . . . . . 5.13
Rear lights and side lights (changing bulbs) . . . . . . . . . . . . . . . . . . . . . . . . . . . . . . . . . . . .\
. . . . . . . 5.16
Interior lighting (changing bulbs) . . . . . . . . . . . . . . . . . . . . . . . . . . . . . . . . . . . . \
. . . . . . . . . . . . . . . . 5.19
RENAULT card: battery . . . . . . . . . . . . . . . . . . . . . . . . . . . . . . . . . . . . \
. . . . . . . . . . . . . . . . . . . . . . . 5.21
Radio frequency remote control unit: batteries . . . . . . . . . . . . . . . . . . . . . . . . . . . . . . . . . . . .\
. . . . . 5.22
Fuses . . . . . . . . . . . . . . . . . . . . . . . . . . . . . . . . . . . . \
. . . . . . . . . . . . . . . . . . . . . . . . . . . . . . . . . . . . . 5.23
Battery . . . . . . . . . . . . . . . . . . . . . . . . . . . . . . . . . . . . \
. . . . . . . . . . . . . . . . . . . . . . . . . . . . . . . . . . . . 5.26
Accessories . . . . . . . . . . . . . . . . . . . . . . . . . . . . . . . . . . . . \
. . . . . . . . . . . . . . . . . . . . . . . . . . . . . . . . 5.28
Wipers (replacing blades) . . . . . . . . . . . . . . . . . . . . . . . . . . . . . . . . . . . .\
. . . . . . . . . . . . . . . . . . . . . 5.29
Towing . . . . . . . . . . . . . . . . . . . . . . . . . . . . . . . . . . . . \
. . . . . . . . . . . . . . . . . . . . . . . . . . . . . . . . . . . . 5.31
Operating faults . . . . . . . . . . . . . . . . . . . . . . . . . . . . . . . . . . . . \
. . . . . . . . . . . . . . . . . . . . . . . . . . . . . 5.35
Page 286 of 332

5.22
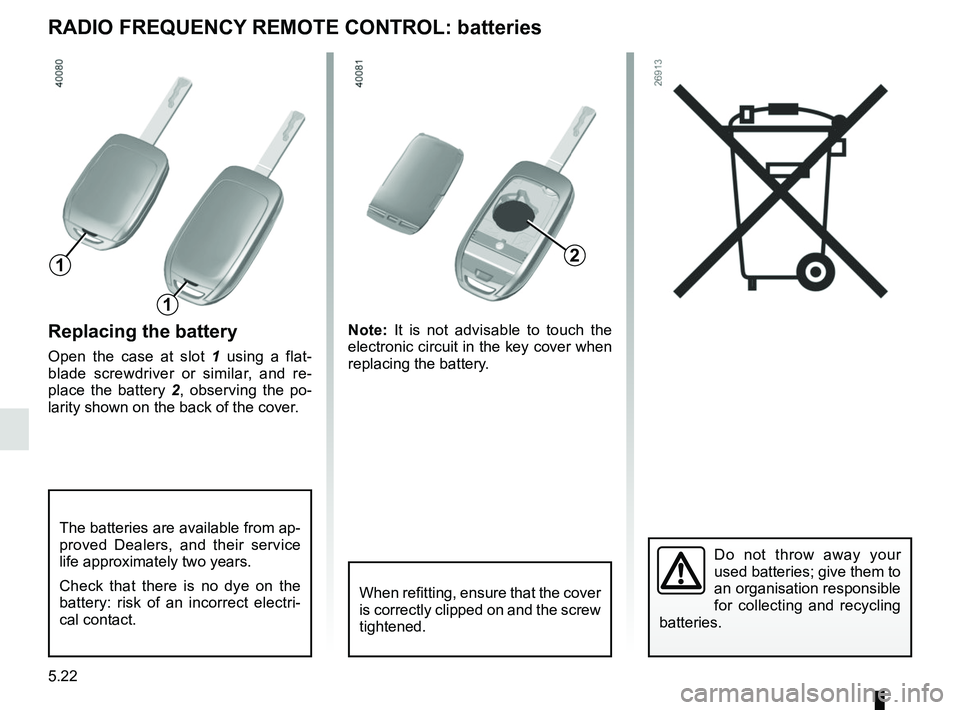
Replacing the battery
Open the case at slot 1 using a flat-
blade screwdriver or similar, and re-
place the battery 2 , observing the po-
larity shown on the back of the cover. Note:
It is not advisable to touch the
electronic circuit in the key cover when
replacing the battery.
Do not throw away your
used batteries; give them to
an organisation responsible
for collecting and recycling
batteries.
RADIO FREQUENCY REMOTE CONTROL: batteries
When refitting, ensure that the cover
is correctly clipped on and the screw
tightened.
The batteries are available from ap-
proved Dealers, and their service
life approximately two years.
Check that there is no dye on the
battery: risk of an incorrect electri-
cal contact.
2
1
1
Page 289 of 332

5.25
FUSES (3/3)
Allocation of fuses
(the presence of certain fuses depends on the vehicle equipment level)\
Symbol Allocation Symbol AllocationSymbol Allocation
BLOWER Ventilation VDCVehicle dynamic
control H/MIRR Heated door mirrors
TURN
HAZARD Hazard lamp
STOP LAMP Stop lamp HEATER
SEAT Heater seat
2ND
POWER
SOCKET 2nd power socket
POWER
DR LOCK2 Power door lock EC AUTO
ACC Air conditioner control
unit
REAR
WIPER Rear wiper CIGAR
LIGHTER Cigar lighter REAR
VIEW Rear view mirror
POWER
DR LOCK Power door lock HEAT
STEER
WHEEL Heat steering wheel
WASH
MTR Washer motor
ELEC B, B2 Electrical equipment RR DEFElectrically defrosted
rear window GEAR BOX
OIL PUMP Gear box oil pump
IMOB Immobilizer BOSE Bose amp BCM Body control module
AUDIO Audio ACC RADIOAccessory socket,
radio POWER
WINDOW Power window
ABS/EPS Anti lock brake system JUNCTION
MODULE Junction module SEAT BELT
WARNING Seat belt warning
module
MEDIA Multimedia equipment AIR CON Air condition control
unitSTRG
WHEEL ANGLE Steering wheel angle
sensor