2018 Ram ProMaster City manual radio set
[x] Cancel search: manual radio setPage 33 of 180

•UP Arrow Button
Push and release the uparrow button to
scroll upward through the main menu and
submenus.
• DOWN Arrow Button
Push and release the downarrow button to
scroll downward through the main menu
and submenus.
NOTE:
If equipped with a Uconnect system, some of
the menu items will be present in the radio
head unit. Refer to “Uconnect Settings” in
“Multimedia” in the Owner’s Manual at
www.mopar.com/en-us/care/owners-manual.html
(U.S. Residents) or www.owners.mopar.ca
(Canadian Residents) for further information.
Dimmer:
With headlights on and without entering in
the menu, push the upordown arrow button
to increase or decrease the brightness of the
instrument panel, graphics and command
buttons. Selecting An Option Of The Main Menu With
Submenu:
1. Briefly push and release the
MENUbutton
to display the first submenu option.
2. Push and release the upordown arrow
button (by single pushes) to scroll through
all the submenu options.
3. Briefly push and release the MENUbutton
to select the displayed submenu option
and to open the relevant setup menu.
4. Push and release the upordown arrow
button (by single pushes) to select the
new setting for this submenu option.
5. Briefly push and release the MENUbutton
to store the new setting and go back to the
previously selected submenu option.
6. Push and hold the MENUbutton to return
to the main menu (short hold) or the main
screen (longer hold).
WARNING LIGHTS AND MESSAGES
Red Warning Lights
— Air Bag Warning Light
This light will turn on for four to eight seconds
as a bulb check when the ignition is placed in
the ON/RUN or MAR/ON/RUN position. If the
light is either not on during startup, stays on,
or turns on while driving, have the system
inspected at an authorized dealer as soon as
possible. This light will illuminate with a
single chime when a fault with the Air Bag
Warning Light has been detected, it will stay
on until the fault is cleared. If the light comes
on intermittently or remains on while driving,
have an authorized dealer service the vehicle
immediately.
— Brake Warning Light
This light monitors various brake functions,
including brake fluid level and parking brake
application. If the brake light turns on it may
indicate that the parking brake is applied,
that the brake fluid level is low, or that there
is a problem with the anti-lock brake system
reservoir.
31
Page 149 of 180

Seek Up/Down Buttons
• Push the up or down button to seek throughradio stations in AM, FM or SXM bands.
• Hold either button to bypass stations with- out stopping.
Store Radio Presets Manually
The Radio stores up to 12 presets in each of
the Radio modes. There are four visible pre-
sets at the top of the radio screen. Pressing
the “All” button on the touchscreen will dis-
play all of the preset stations for that mode.
To store a radio preset manually, follow the
steps below:
1. Tune to the desired station.
2. Press and hold the desired numbered but- ton on the touchscreen for more than two
seconds, or until you hear a confirmation
beep.USB/Audio Jack (AUX)/Bluetooth
Operation
USB/iPod
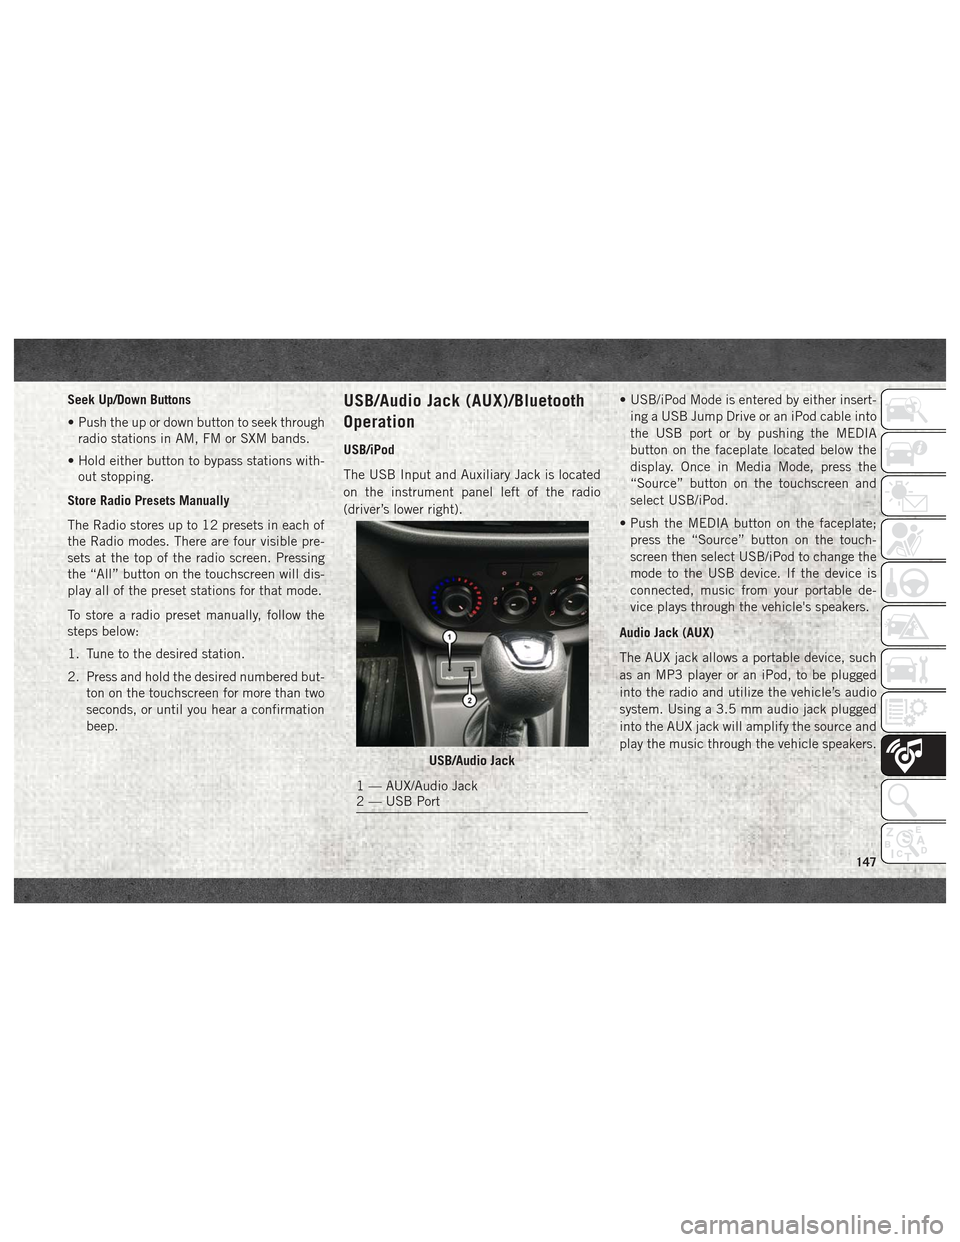
The USB Input and Auxiliary Jack is located
on the instrument panel left of the radio
(driver’s lower right). • USB/iPod Mode is entered by either insert-
ing a USB Jump Drive or an iPod cable into
the USB port or by pushing the MEDIA
button on the faceplate located below the
display. Once in Media Mode, press the
“Source” button on the touchscreen and
select USB/iPod.
• Push the MEDIA button on the faceplate; press the “Source” button on the touch-
screen then select USB/iPod to change the
mode to the USB device. If the device is
connected, music from your portable de-
vice plays through the vehicle's speakers.
Audio Jack (AUX)
The AUX jack allows a portable device, such
as an MP3 player or an iPod, to be plugged
into the radio and utilize the vehicle’s audio
system. Using a 3.5 mm audio jack plugged
into the AUX jack will amplify the source and
play the music through the vehicle speakers.
USB/Audio Jack
1 — AUX/Audio Jack
2 — USB Port
147
Page 150 of 180

• Push the MEDIA button on the faceplate;press the “Source” button on the touch-
screen then select AUX to change the mode
to the AUX device. If the device is con-
nected in play mode, music from your por-
table device will play through the vehicle's
speakers.
• The functions of the portable device are controlled using the device. However, the
volume may be controlled using the radio or
portable device.
Bluetooth
If using a Bluetooth - equipped device, you
may also be able to stream music through
your vehicle's sound system.
• Push the MEDIA button on the faceplate, press the “Source” button on the touch-
screen then select Bluetooth to change the
mode to Bluetooth. If the device is paired,
music from your portable device plays
through the vehicle's speakers. Uconnect 3/3 NAV Available Media Hubs
Uconnect 3/3 NAV
Media Hub (USB,
AUX Ports)
S
S = Standard Equipment
Navigation
If your vehicle is equipped with Navigation,
there will be a NAV button on the faceplate in
place of the COMPASS button on the face-
plate. See your Uconnect Owner’s Manual
Supplement manual or
www.mopar.com/en-us/
care/owners-manual.html for U.S. residents or
www.owners.mopar.ca for Canadian residents for
additional information.
UCONNECT SETTINGS
The Uconnect system allows you to access
Customer Programmable feature settings
such as Display, Clock & Date, Safety/
Assistance, Lights, Doors & Locks, Audio,
Phone/Bluetooth, SiriusXM Setup, Restore
Default Settings and Clear Personal Data
through buttons on the touchscreen.
To change a setting:
1. Push the SETTINGS
button located
on the right side of the display.
2. Select a programmable feature you would like to adjust.
3. Make your selection highlighting the button.
MULTIMEDIA
148
Page 151 of 180

Depending on the vehicles options, the following feature settings are available:
• Language• Doors & Locks
• Display • Engine Options
• Units (If Equipped) • Audio
• Voice • Phone (If Equipped)
• Clock • SiriusXM Setup (If Equipped)
• Brakes • Radio Setup
• Safety & Driving Assistance (If Equipped) • Restore Settings
• Lights • Clear Personal Data
Refer to “Uconnect Settings” in “Multime-
dia” in your Owner’s Manual on
www.mopar.com/en-us/care/owners-manual.html
(U.S. Residents) or www.owners.mopar.ca
(Canadian Residents) for further information.
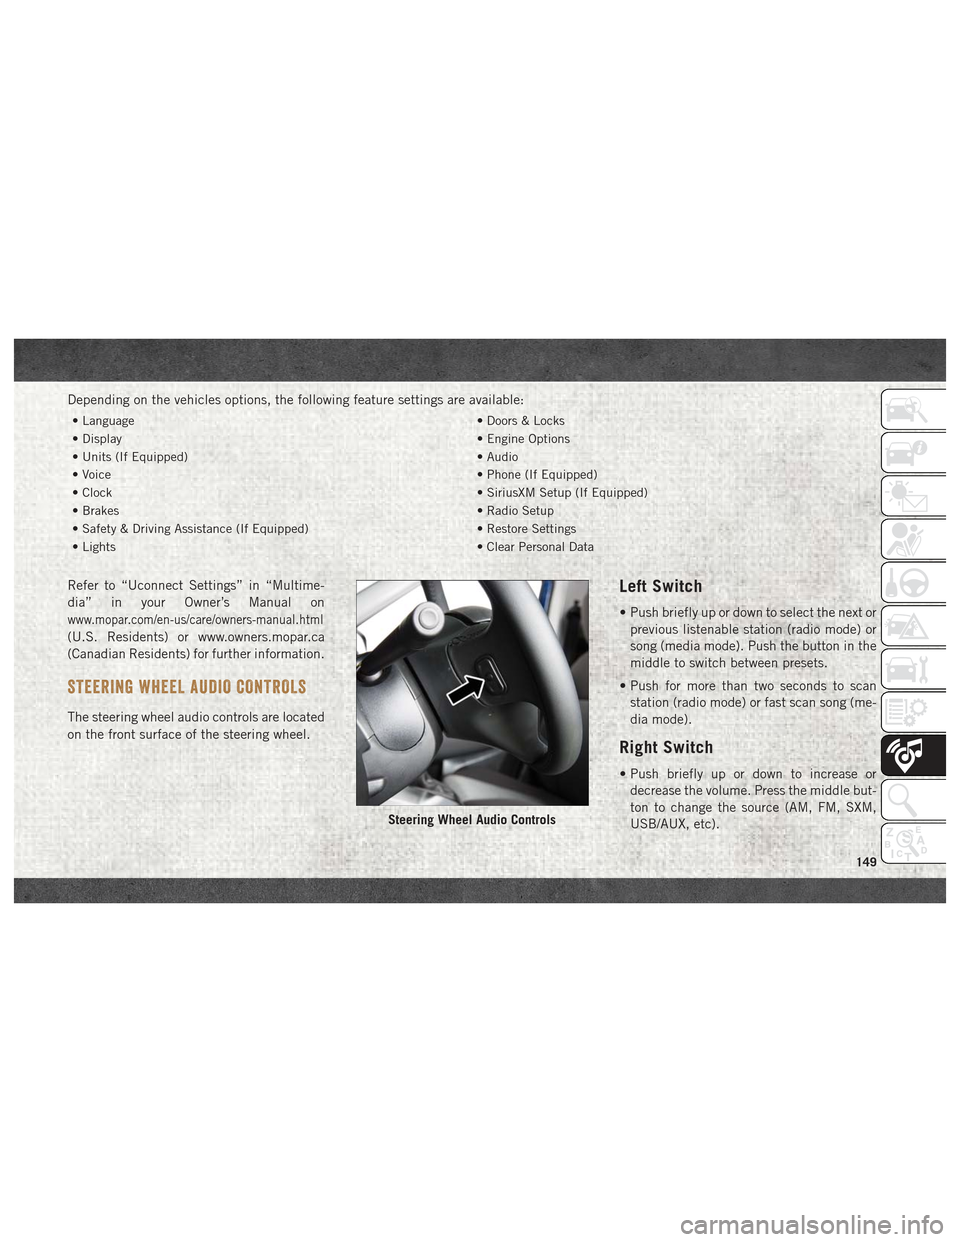
STEERING WHEEL AUDIO CONTROLS
The steering wheel audio controls are located
on the front surface of the steering wheel.
Left Switch
• Push briefly up or down to select the next or
previous listenable station (radio mode) or
song (media mode). Push the button in the
middle to switch between presets.
• Push for more than two seconds to scan station (radio mode) or fast scan song (me-
dia mode).
Right Switch
• Push briefly up or down to increase ordecrease the volume. Press the middle but-
ton to change the source (AM, FM, SXM,
USB/AUX, etc).
Steering Wheel Audio Controls
149
Page 153 of 180

The Uconnect Phone feature enables you to
place and receive hands-free mobile phone
calls. Drivers can also place mobile phone
calls using their voice or by using the buttons
on the touchscreen (see Voice Command sec-
tion).
The hands-free calling feature is made pos-
sible through Bluetooth technology — the
global standard that enables different elec-
tronic devices to connect to each other wire-
lessly.
If the Uconnect Phone Button
exists on
your steering wheel, you then have the
Uconnect Phone features.
Refer to the “Uconnect 3/3 NAV Voice Rec-
ognition Quick Tips” in “Multimedia” in the
Owner's Manual at
www.mopar.com/en-us/
care/owners-manual.html
(U.S. Residents) or
www.owners.mopar.ca (Canadian Residents)
for further information.
NOTE:
• The Uconnect Phone requires a mobile phone equipped with the Bluetooth Hands-
Free Profile, Version 1.0 or higher. • Most mobile phones/devices are compat-
ible with the Uconnect system, however
some mobile phones/devices may not be
equipped with all of the required features to
utilize all of the Uconnect system features.
• For Uconnect Customer Care:
• U.S. residents visit UconnectPhone.com or call 1-877-855-8400.
•
Canadian Residents visitUconnectPhone.com
or call, 1-800-465-2001 (English) or
1-800-387-9983 (French).
Pairing (Wirelessly Connecting)
Your Mobile Phone To The
Uconnect System
Mobile phone pairing is the process of estab-
lishing a wireless connection between a cel-
lular phone and the Uconnect system.
NOTE:
• To use the Uconnect Phone feature, you first must determine if your mobile phone
and software are compatible with the
Uconnect system. Please visit
UconnectPhone.com for complete mobile
phone compatibility information. • Mobile phone pairing is not available while
the vehicle is in motion.
• A maximum of ten mobile phones can be paired to the Uconnect system.
Start Pairing Procedure On The Radio
Uconnect 3/3 NAV:
1. Place the ignition in the ACC or ON position.
2. Press the “Phone” button.
3. Select “Settings.”
Uconnect 3/3 NAV
151
Page 159 of 180

Helpful Tips And Common
Questions To Improve Bluetooth
Performance With Your Uconnect
System
Mobile Phone won’t reconnect to system after
pairing:
• Set mobile phone to auto-connect ortrusted device in mobile phone Bluetooth
settings (Blackberry devices).
• Perform a factory reset on your mobile phone. Refer to your mobile phone manu-
facturer or cellular provider for instruc-
tions.
• Many mobile phones do not automatically reconnect after being restarted (hard re-
boot). Your mobile phone can still be con-
nected manually. Close all applications that
may be operating (refer to mobile phone
manufacturer’s instructions), and follow
“Pairing (Wirelessly Connecting) Your Mo-
bile Phone To The Uconnect System”. Mobile Phone won’t pair to system:
• Perform a hard reset in the mobile phone by
removing the battery (if removable — see
your mobile phone’s owner manual).
• Delete pairing history in mobile phone and Uconnect system; usually found in phone’s
Bluetooth connection settings.
• Verify you are selecting “Uconnect” in the discovered Bluetooth devices on your mo-
bile phone.
• If your vehicle system generates a pin code the default is 0000.
Mobile Phonebook didn’t download:
• Check “Do not ask again,” then accept the “phonebook download” request on your
mobile phone.
Can’t make a conference call:
• CDMA (Code-Division Multiple Access) car- riers do not support conference calling.
Refer to your mobile phone user’s manual
for further information. Making calls while connected to AUX:
• Plugging in your mobile phone to AUX while
connected to Bluetooth will disable Hands-
Free Calling. Do not make calls while your
mobile phone is plugged into the AUX jack.Regulatory And Safety Information
USA/CANADA
Exposure to Radio Frequency Radiation
The radiated output power of the internal
wireless radio is far below the FCC and IC
radio frequency exposure limits. Neverthe-
less, the wireless radio will be used in such a
manner that the radio is 20 cm or further
from the human body.
The internal wireless radio operates within
guidelines found in radio frequency safety
standards and recommendations, which re-
flect the consensus of the scientific commu-
nity. The radio manufacturer believes the
internal wireless radio is safe for use by
consumers. The level of energy emitted is far
less than the electromagnetic energy emitted
by wireless devices such as mobile phones.
However, the use of wireless radios may be
restricted in some situations or environ-
157
Page 172 of 180

Radio..................143, 160
Presets ..................146
Radio Frequency General Information ...........11
Radio Operation ...............146
Radio (Sound Systems) ..........160
Rear Camera ..................82
Rear ParkSense System ...........82
Rear Seat, Folding ..............11
Recreational Towing .............85
Release, Hood .................25
Reminder, Seat Belt .............46
Replacement Bulbs ..............88
Replacement Tires .............126
Reporting Safety Defects .........166
Restraint, Head ................13
Restraints, Child ...............61
Safety Checks Inside Vehicle ........76
Safety Checks Outside Vehicle .......78
Safety Defects, Reporting .........166
Safety, Exhaust Gas .............75
Safety Information, Tire ..........115
Safety Tips ...................75
Schedule, Maintenance ..........110Seat Belt
Adjustable Upper Shoulder Belt
Anchorage .................49
Lap/Shoulder Belt Operation ......49
Lap/Shoulder Belts ............47
Lap/Shoulder Belt Untwisting .....49
Pregnant Women .............50
Seat Belt Reminder ...........46
Seat Belt Reminder ..............46
Seat Belts .................46, 76
Adjustable Shoulder Belt ........49
Adjustable Upper Shoulder
Anchorage .................49
Child Restraint ..............61
Front Seat ............46, 47, 49
Inspection .................76
Operating Instructions .........49
Pregnant Women .............50
Rear Seat .................47
Reminder .................34
Untwisting Procedure ..........49
Seats ......................11
Adjustment ................11
Easy Entry .................11
Heated ...................
11
Memory ..................11
Rear Folding ...............11 Seatback Release
............11
Tilting ...................11
Vented ...................11
Ventilated .................11
Selection Of Coolant (Antifreeze) .....137
Service Assistance .............164
Service Contract ...............165
Service Manuals ...............166
Shift Lever Override .............105
Shoulder Belts .................47
Signals, Turn ...............37, 78
Snow Tires ..................128
Spare Tire ............128, 129, 130
Spark Plugs .................137
Specifications Fuel (Gasoline) .............137
Oil .....................137
Speed Control Accel/Decel ................82
Cancel ...................82
Speed Control (Cruise Control) .......80
Steering .....................16
Tilt Column ................16
Wheel, Tilt .................16
Steering Wheel Audio Controls ......149
Storage, Vehicle ................24
INDEX
170