2018 PEUGEOT EXPERT instrument panel
[x] Cancel search: instrument panelPage 230 of 416
228
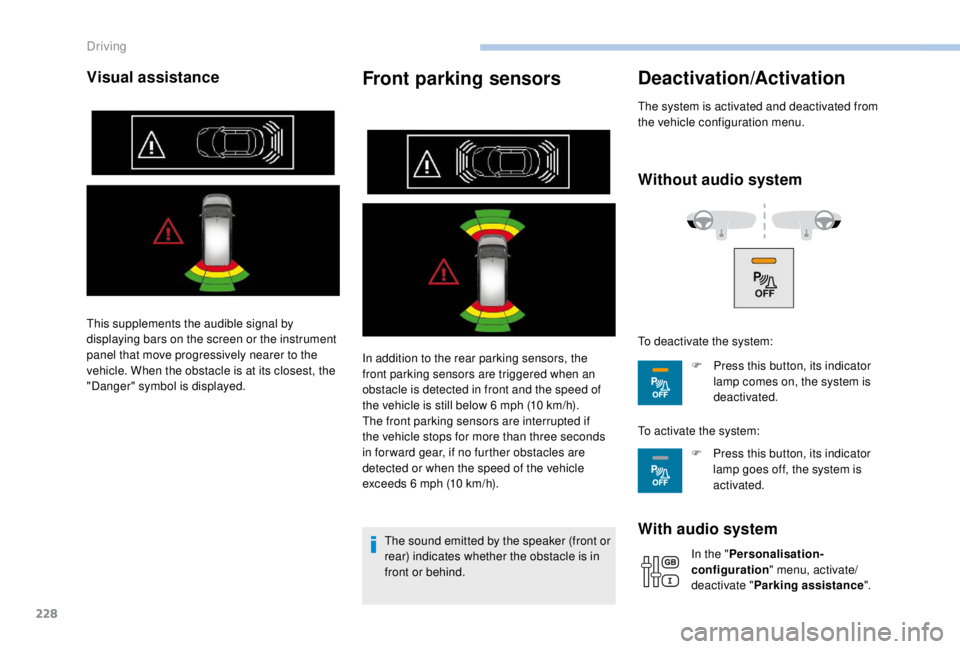
Visual assistanceFront parking sensors
In addition to the rear parking sensors, the
front parking sensors are triggered when an
obstacle is detected in front and the speed of
the vehicle is still below 6 mph (10 km/h).
The front parking sensors are interrupted if
the vehicle stops for more than three seconds
in for ward gear, if no further obstacles are
detected or when the speed of the vehicle
exceeds 6
mph (10 km/h).
The sound emitted by the speaker (front or
rear) indicates whether the obstacle is in
front or behind.
Deactivation/Activation
The system is activated and deactivated from
the vehicle configuration menu.
Without audio system
With audio system
In the " Personalisation-
configuration " menu, activate/
deactivate " Parking assistance ".
This supplements the audible signal by
displaying bars on the screen or the instrument
panel that move progressively nearer to the
vehicle. When the obstacle is at its closest, the
"Danger" symbol is displayed.
To deactivate the system:
F
P
ress this button, its indicator
lamp comes on, the system is
deactivated.
To activate the system: F
P
ress this button, its indicator
lamp goes off, the system is
activated.
Driving
Page 240 of 416
238
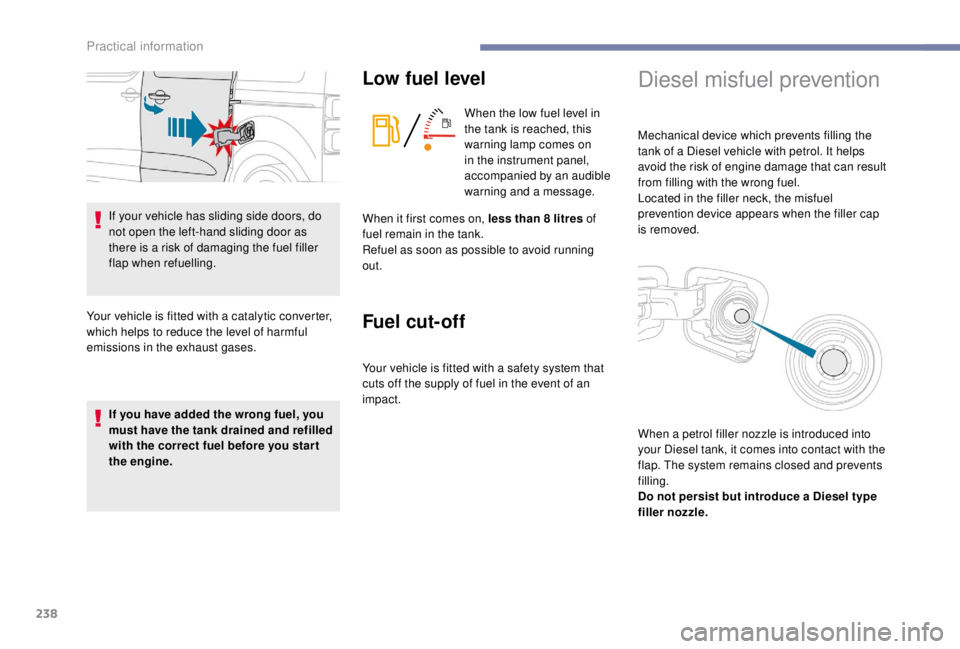
If your vehicle has sliding side doors, do
not open the left-hand sliding door as
there is a risk of damaging the fuel filler
flap when refuelling.
Your vehicle is fitted with a catalytic converter,
which helps to reduce the level of harmful
emissions in the exhaust gases.
If you have added the wrong fuel, you
must have the tank drained and refilled
with the correct fuel before you star t
the engine.
Low fuel level
When the low fuel level in
the tank is reached, this
warning lamp comes on
in the instrument panel,
accompanied by an audible
warning and a message.
Fuel cut- of f
Your vehicle is fitted with a safety system that
cuts off the supply of fuel in the event of an
impact.
Diesel misfuel prevention
Mechanical device which prevents filling the
tank of a Diesel vehicle with petrol. It helps
avoid the risk of engine damage that can result
from filling with the wrong fuel.
Located in the filler neck, the misfuel
prevention device appears when the filler cap
is removed.
When it first comes on, less than 8
litres of
fuel remain in the tank.
Refuel as soon as possible to avoid running
out.
When a petrol filler nozzle is introduced into
your Diesel tank, it comes into contact with the
flap. The system remains closed and prevents
filling.
Do not persist but introduce a Diesel type
filler nozzle.
Practical information
Page 244 of 416

242
Towing a trailer
We recommend the use of genuine
PEUGEOT towbars and their harnesses
that have been tested and approved from
the design stage of your vehicle, and that
the fitting of the towbar is entrusted to a
PEUGEOT dealer or a qualified workshop.
If the towbar is not fitted by a PEUGEOT
dealer, it must still be fitted in accordance
with the vehicle manufacturer's
instructions.
Driving with a trailer places greater
demands on the towing vehicle and the
driver must take particular care.Please respect the maximum authorised
towable weights, indicated on the
registration certificate or in your vehicle’s
technical data.
For more information on Driving advice
,
particularly when towing, refer to the
corresponding section.
Energy economy mode
System which manages the duration of use of
certain functions to conser ve a sufficient level
of charge in the battery.
After the engine has stopped, you can still use
functions such as the audio and telematics
system, windscreen wipers, dipped beam
headlamps, courtesy lamps, etc. for a
maximum combined duration of about forty
minutes.
Switching to this mode
A message appears in the instrument panel
screen indicating that the vehicle has switched
to economy mode and the active functions are
put on standby.
If a telephone call is being made at this
time, it will be maintained for around
10
minutes with the hands-free kit of your
audio system.
Your vehicle is primarily designed for
transporting people and luggage, but it may
also be used for towing a trailer.
Practical information
Page 250 of 416
248
Do not discard used oil or fluids into
sewers or onto the ground.
Take used oil to a PEUGEOT dealer
or a qualified workshop and dispose
of it in the containers reser ved for this
purpose.
Engine oil level
The check is carried out either when
the ignition is switched on using the
oil level indicator in the instrument
panel for vehicles equipped with an
electric gauge, or using the dipstick.
To ensure that the reading is correct, your
vehicle must be parked on a level sur face
with the engine stopped for more than
30
minutes.
It is normal to top up the oil level between
two ser vices (or oil changes). PEUGEOT
recommends that you check the level, and top
up if necessary, every 3,000
miles (5,000 km).
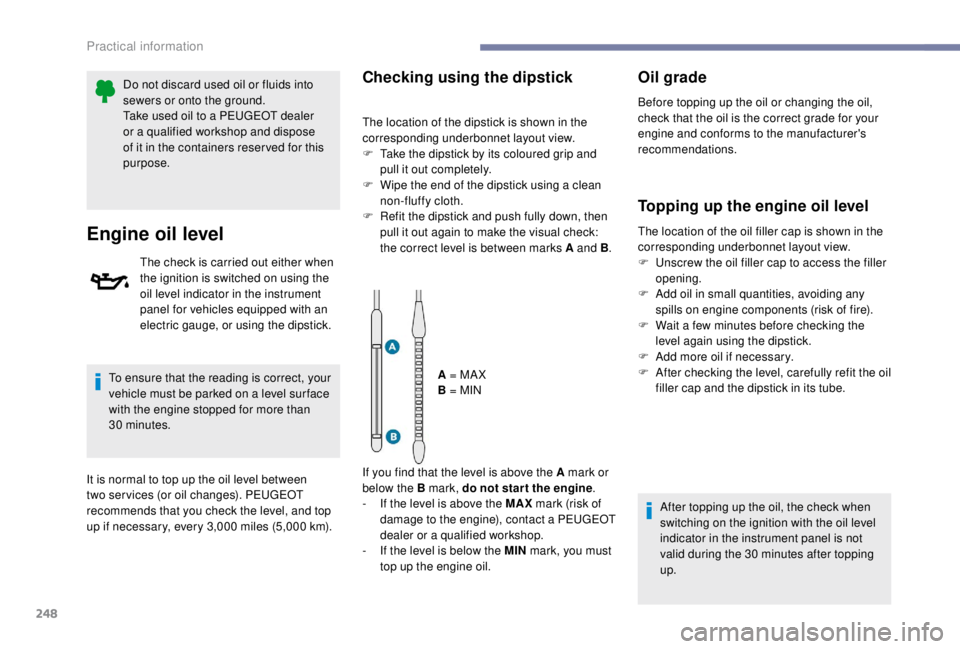
Checking using the dipstick
The location of the dipstick is shown in the
corresponding underbonnet layout view.
F
T
ake the dipstick by its coloured grip and
pull it out completely.
F
W
ipe the end of the dipstick using a clean
non-fluffy cloth.
F
R
efit the dipstick and push fully down, then
pull it out again to make the visual check:
the correct level is between marks A and B .
A = MA X
B = MIN
If you find that the level is above the A mark or
below the B mark, do not star t the engine .
-
I
f the level is above the MAX mark (risk of
damage to the engine), contact a PEUGEOT
dealer or a qualified workshop.
-
I
f the level is below the MIN mark, you must
top up the engine oil.
Oil grade
Before topping up the oil or changing the oil,
check that the oil is the correct grade for your
engine and conforms to the manufacturer's
recommendations.
Topping up the engine oil level
The location of the oil filler cap is shown in the
corresponding underbonnet layout view.
F
U
nscrew the oil filler cap to access the filler
opening.
F
A
dd oil in small quantities, avoiding any
spills on engine components (risk of fire).
F
W
ait a few minutes before checking the
level again using the dipstick.
F
A
dd more oil if necessary.
F
A
fter checking the level, carefully refit the oil
filler cap and the dipstick in its tube.
After topping up the oil, the check when
switching on the ignition with the oil level
indicator in the instrument panel is not
valid during the 30
minutes after topping
up.
Practical information
Page 252 of 416
250
Diesel fuel additive level
(Diesel with particle filter)
A low additive level is indicated by
illumination of this warning lamp,
accompanied by an audible warning
and a message in the instrument
panel screen.
To p p i n g u p
The reser voir must be topped up without delay
by a PEUGEOT dealer or a qualified workshop.
Checks
Unless otherwise indicated, check these
components in accordance with the
manufacturer's service schedule and according
to your engine.
Other wise, have them checked by a PEUGEOT
dealer or a qualified workshop.
12 V battery
The battery does not require any
maintenance.
However, check regularly that the
terminals are correctly tightened
(versions without quick release terminals)
and that the connections are clean.
For more information on the precautions
to take before starting work on the 12 V
battery , refer to the corresponding
section.
Air filter
Refer to the manufacturer's
ser vice schedule for details of
the replacement inter val for this
component. Depending on the environment (e.g. dusty
atmosphere) and the use of the vehicle (e.g.
city driving), replace it twice as often if
necessary
.
Passenger compartment
filter
Refer to the manufacturer's
ser vice schedule for details of
the replacement inter val for this
component.
Depending on the environment (e.g. dusty
atmosphere) and the use of the vehicle (e.g.
city driving), replace it twice as often if
necessary .
Oil filter
Change the oil filter each time the
engine oil is changed.
Refer to the manufacturer’s
ser vice schedule for details of
the replacement inter val for this
component.
A clogged passenger compartment
filter may have an adverse effect on
the per formance of the air conditioning
system and generate undesirable odours.
Practical information
Page 271 of 416
269
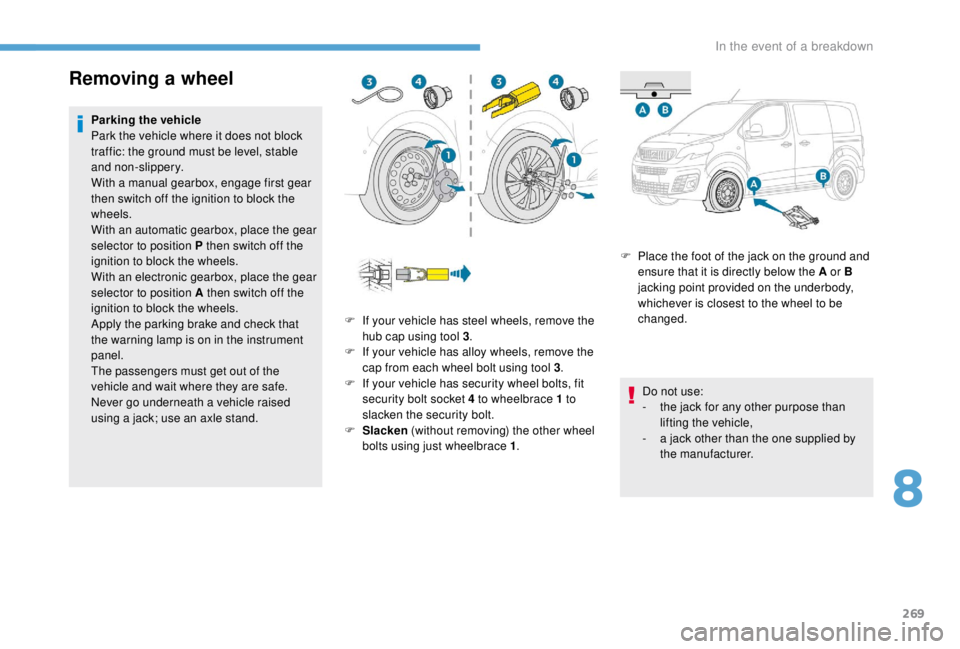
Removing a wheel
Parking the vehicle
Park the vehicle where it does not block
traffic: the ground must be level, stable
and non-slippery.
With a manual gearbox, engage first gear
then switch off the ignition to block the
wheels.
With an automatic gearbox, place the gear
selector to position P then switch off the
ignition to block the wheels.
With an electronic gearbox, place the gear
selector to position A then switch off the
ignition to block the wheels.
Apply the parking brake and check that
the warning lamp is on in the instrument
panel.
The passengers must get out of the
vehicle and wait where they are safe.
Never go underneath a vehicle raised
using a jack; use an axle stand.F
P
lace the foot of the jack on the ground and
ensure that it is directly below the A or B
jacking point provided on the underbody,
whichever is closest to the wheel to be
changed.
Do not use:
-
t
he jack for any other purpose than
lifting the vehicle,
-
a j
ack other than the one supplied by
the manufacturer.
F
I
f your vehicle has steel wheels, remove the
hub cap using tool 3 .
F
I
f your vehicle has alloy wheels, remove the
cap from each wheel bolt using tool 3 .
F
I
f your vehicle has security wheel bolts, fit
security bolt socket 4
to wheelbrace 1 to
slacken the security bolt.
F
S
lacken (without removing) the other wheel
bolts using just wheelbrace 1 .
8
In the event of a breakdown
Page 287 of 416
285
FuseN° Rating
(A) Functions
F1 10Electric power steering, clutch switch.
F4 15Horn.
F5 20Front/rear screenwash pump.
F6 20Front/rear screenwash pump.
F7 10Rear 12
V accessory socket.
F8 20Single or double rear wipers.
F10/F11 30Internal/external locks, front and rear.
F13 10Front air conditioning controls, audio system controls, gear lever,
head-up display.
F14 5Alarm, emergency and assistance calls.
F17 5Instrument panel.
F19 3Steering mounted controls.
F21 3
K
eyless Entry and Starting or anti-theft system.
F22 3Rain and sunshine sensor, multifunction detection camera.
F23 5Seat belt unfastened or not fastened display screen.
F24 5Touch screen, reversing camera and parking sensors.
F25 5Airbags.
F29 20Audio system, touch screen, CD player, navigation.
F31 15Audio system (+ battery).
F32 15Front 12
V accessory socket.
F34 5Blind spot monitoring system, door mirror electric controls.
F35 5Heated washer jets, headlamp beam height control.
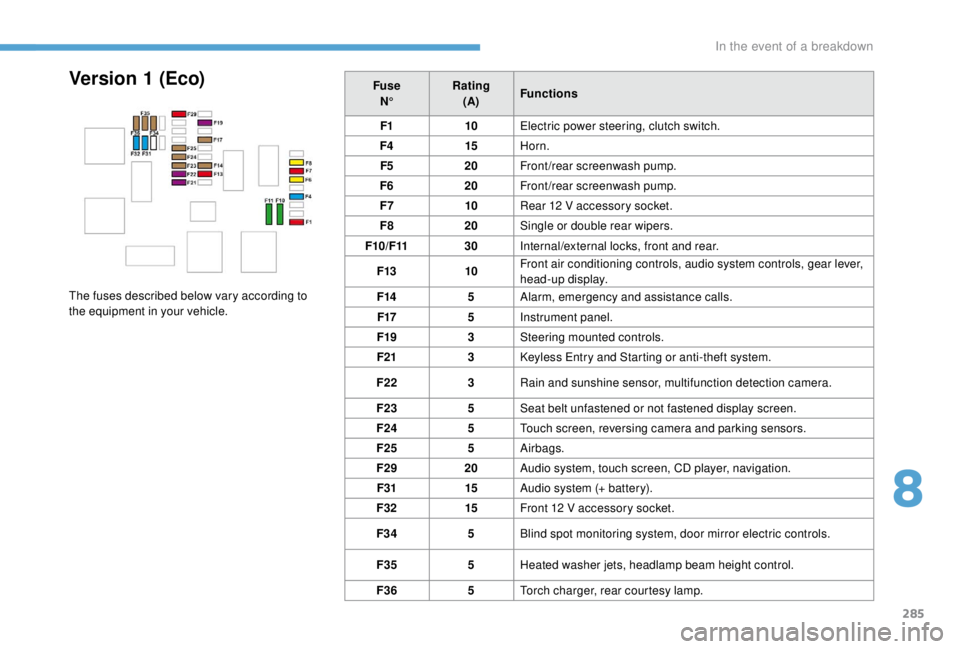
F36 5Torch charger, rear courtesy lamp.Version 1 (Eco)
The fuses described below vary according to
the equipment in your vehicle.
8
In the event of a breakdown
Page 288 of 416
286
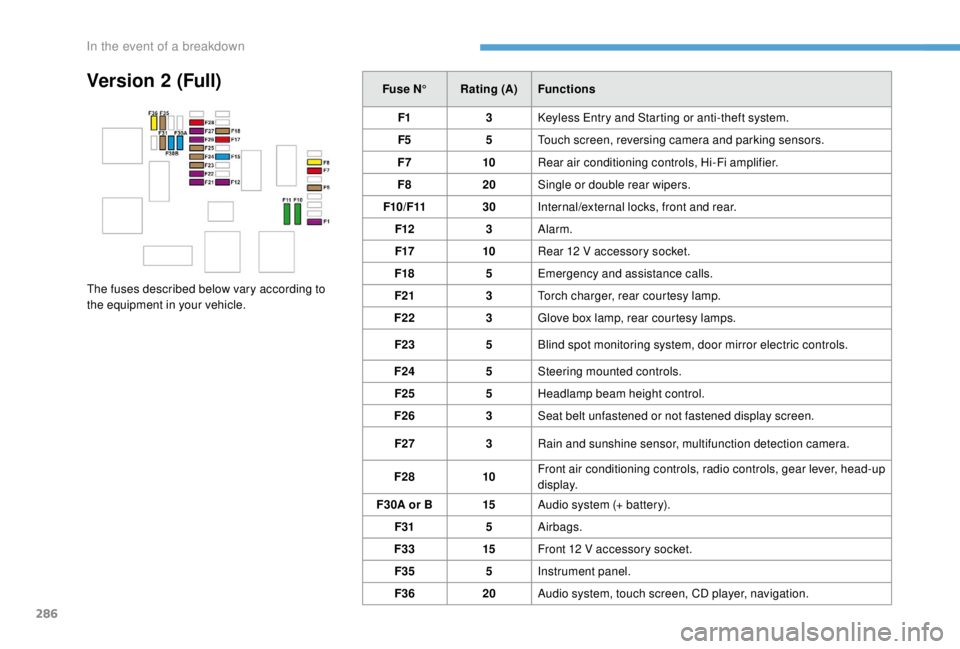
Version 2 (Full)Fuse N°Rating (A) Functions
F1 3
K
eyless Entry and Starting or anti-theft system.
F5 5Touch screen, reversing camera and parking sensors.
F7 10Rear air conditioning controls, Hi-Fi amplifier.
F8 20Single or double rear wipers.
F10/F11 30Internal/external locks, front and rear.
F12 3Alarm.
F17 10Rear 12
V accessory socket.
F18 5Emergency and assistance calls.
F21 3Torch charger, rear courtesy lamp.
F22 3Glove box lamp, rear courtesy lamps.
F23 5Blind spot monitoring system, door mirror electric controls.
F24 5Steering mounted controls.
F25 5Headlamp beam height control.
F26 3Seat belt unfastened or not fastened display screen.
F27 3Rain and sunshine sensor, multifunction detection camera.
F28 10Front air conditioning controls, radio controls, gear lever, head-up
display.
F30A or B 15Audio system (+ battery).
F31 5Airbags.
F33 15Front 12
V accessory socket.
F35 5Instrument panel.
F36 20Audio system, touch screen, CD player, navigation.
The fuses described below vary according to
the equipment in your vehicle.
In the event of a breakdown