Page 260 of 416
258
F Operate the priming pump repeatedly until resistance is felt (there may be resistance at
the first press).
F
O
perate the starter to start the engine (if the
engine does not start at the first attempt,
wait around 15
seconds before trying
again).
F
I
f the engine does not start after a few
attempts, operate the priming pump again
then start the engine.
F
P
ut the cover in place and clip it in.
F
C
lose the bonnet.
Tool box
Access
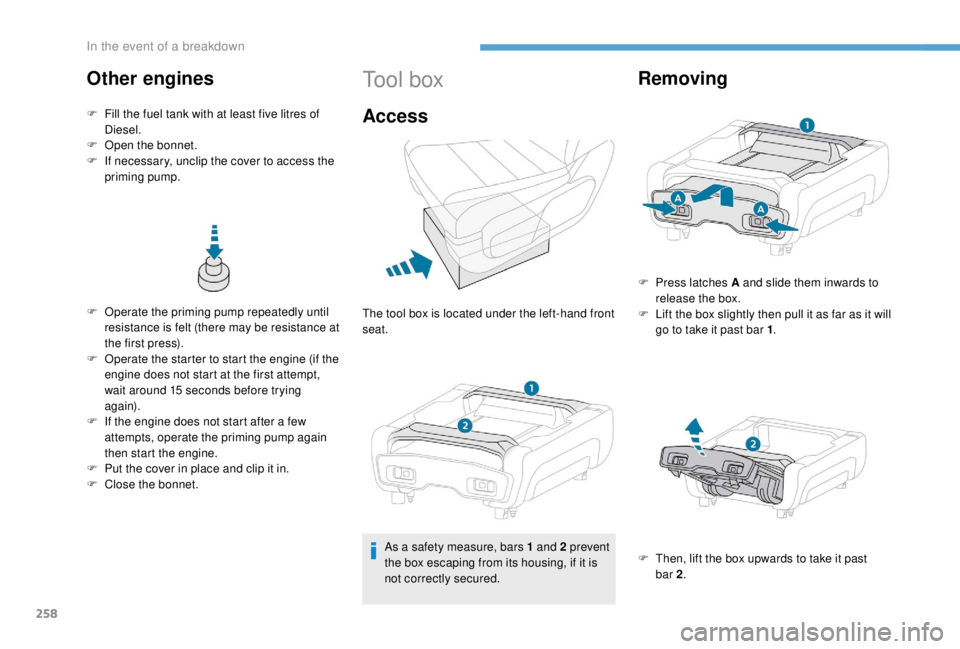
The tool box is located under the left-hand front
seat.
As a safety measure, bars 1
and 2 prevent
the box escaping from its housing, if it is
not correctly secured.
Removing
Other engines
F Fill the fuel tank with at least five litres of
Diesel.
F
O
pen the bonnet.
F
I
f necessary, unclip the cover to access the
priming pump.
F
P
ress latches A and slide them inwards to
release the box.
F
L
ift the box slightly then pull it as far as it will
go to take it past bar 1 .
F
T
hen, lift the box upwards to take it past
bar 2 .
In the event of a breakdown
Page 261 of 416
259
Opening
Storage
F Refit the cover on the box and clip fixings B.
F
P
osition the box with the front inclined
upwards.
F
T
o take it past bar 2, push the box in and
down.
F
T
o take it past bar 1 , raise the box slightly
then push it fully in. F
O
nce the box is fully home
in its housing,
push it against the floor carpet then slide
latches A outwards to secure it.
Pull on the box to check that it is secure in
its housing.
With a temporary puncture
repair kit
F Unclip fixings B on the cover, then open it for access to the tools.
1.12
V compressor.
Contains a sealant cartridge for the
temporary repair of a tyre and can also
be used for adjusting tyre pressures.
2. Towing eye.
8
In the event of a breakdown
Page 266 of 416
264
Removing the pipe and
cartridge
Take care of fluid discharge.
The expiry date of the fluid is indicated on
the cartridge.
The sealant cartridge is designed for
single use; it must be replaced even if only
partly used.
After use, do not discard the cartridge into
the environment, take it to an authorised
waste disposal site or a PEUGEOT dealer.
Do not forget to obtain a new sealant
cartridge, available from PEUGEOT
dealers or from a qualified workshop.
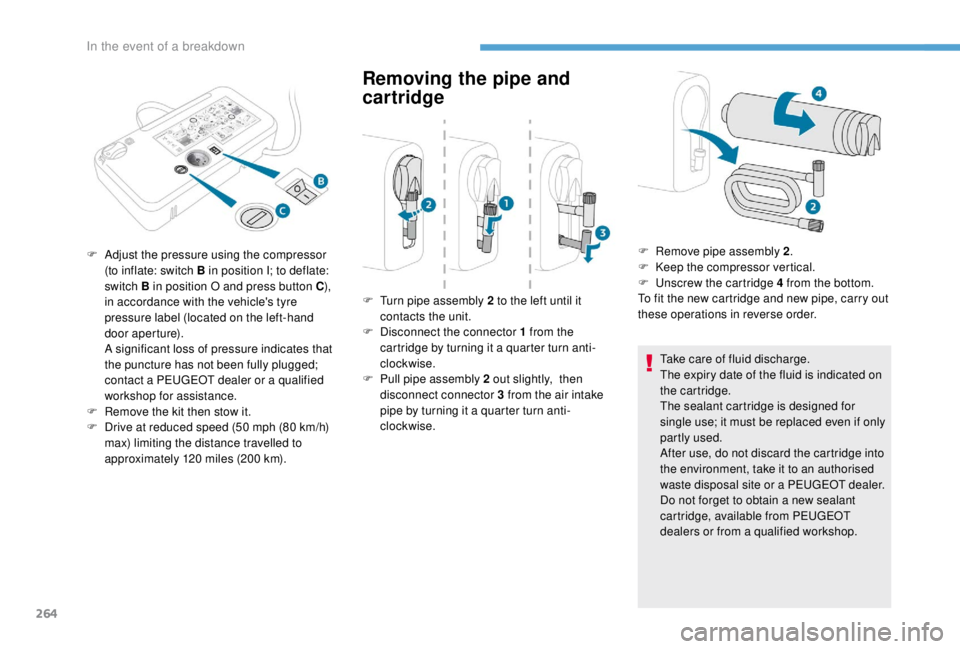
F
T
urn pipe assembly 2
to the left until it
contacts the unit.
F
D
isconnect the connector 1
from the
cartridge by turning it a quarter turn anti-
clockwise.
F
P
ull pipe assembly 2 out slightly, then
disconnect connector 3
from the air intake
pipe by turning it a quarter turn anti-
clockwise.
F
A
djust the pressure using the compressor
(to inflate: switch B in position I; to deflate:
switch B in position O and press button C ),
in accordance with the vehicle's tyre
pressure label (located on the left-hand
door aperture). A s
ignificant loss of pressure indicates that
the puncture has not been fully plugged;
contact a PEUGEOT dealer or a qualified
workshop for assistance.
F
R
emove the kit then stow it.
F
D
rive at reduced speed (50
mph (80 km/h)
max) limiting the distance travelled to
approximately 120
miles (200
km). F
R
emove pipe assembly 2
.
F
K
eep the compressor vertical.
F
U
nscrew the cartridge 4 from the bottom.
To fit the new cartridge and new pipe, carry out
these operations in reverse order.
In the event of a breakdown
Page 275 of 416
273
Halogen bulbs must be replaced with
the headlamps having been off for a few
minutes (risk of severe burns). Do not
touch the bulb directly, use a lint-free
cloth.
Ty p e E
When each operation has been
completed, check the operation of the
lighting.
Front lamps
Halogen headlamps
Xenon bulb: xenon bulbs must be changed by
a PEUGEOT dealer or a qualified workshop as
there is a risk of electrocution.For more information on Changing a bulb
and in particular the types of bulb, refer to the
corresponding section.
For H7 type bulbs withlugs, take care to
obser ve their correct installation so as to
ensure the best lighting performance.
Xenon headlamps
For more information on Changing a bulb
and in particular the types of bulb, refer to the
corresponding section.
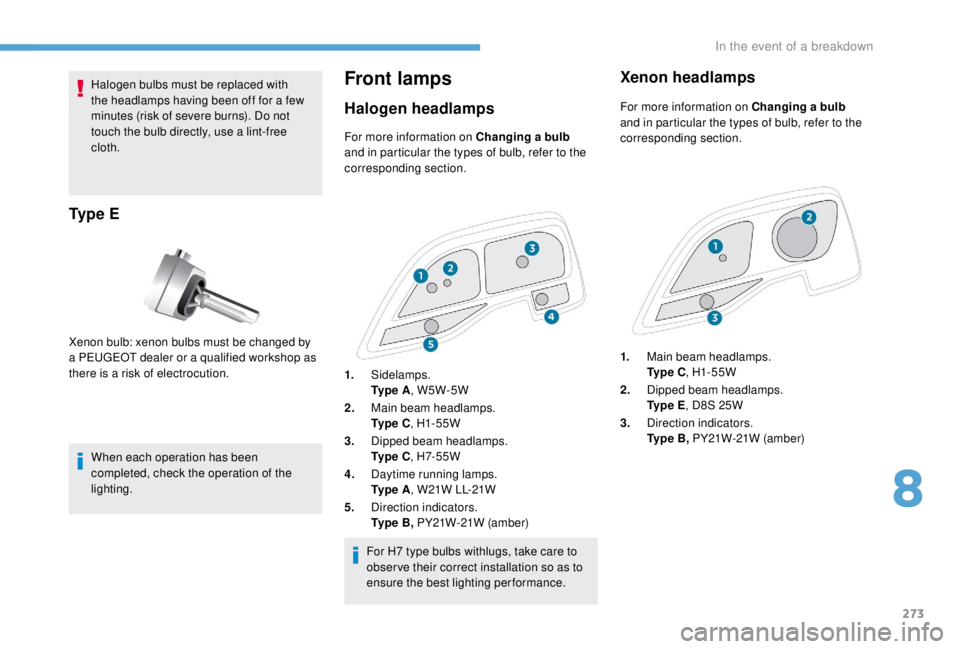
1. Main beam headlamps.
Ty p e C , H1- 55W
2. Dipped beam headlamps.
Ty p e E , D8S 25W
3. Direction indicators.
Ty p e B , PY21W-21W (amber)
1.
Sidelamps.
Ty p e A , W5W-5W
2. Main beam headlamps.
Ty p e C , H1- 55W
3. Dipped beam headlamps.
Ty p e C , H7- 5 5 W
4. Daytime running lamps.
Ty p e A , W21W LL-21W
5. Direction indicators.
Ty p e B , PY21W-21W (amber)
8
In the event of a breakdown
Page 276 of 416
274
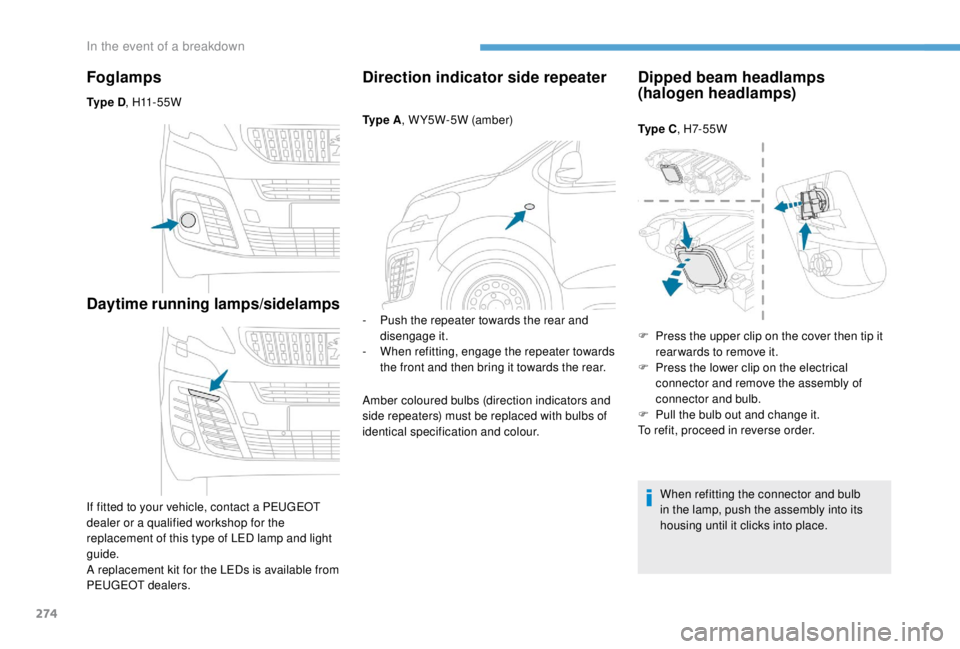
Foglamps
Ty p e D, H11 - 5 5 W
Daytime running lamps/sidelamps
If fitted to your vehicle, contact a PEUGEOT
dealer or a qualified workshop for the
replacement of this type of LED lamp and light
guide.
A replacement kit for the LEDs is available from
PEUGEOT dealers.
Direction indicator side repeater
Ty p e A , W Y5W-5W (amber)
-
P
ush the repeater towards the rear and
disengage it.
-
W
hen refitting, engage the repeater towards
the front and then bring it towards the rear.
Amber coloured bulbs (direction indicators and
side repeaters) must be replaced with bulbs of
identical specification and colour.
Dipped beam headlamps
(halogen headlamps)
Ty p e C , H7- 5 5 W
When refitting the connector and bulb
in the lamp, push the assembly into its
housing until it clicks into place.
F
P
ress the upper clip on the cover then tip it
rear wards to remove it.
F
P
ress the lower clip on the electrical
connector and remove the assembly of
connector and bulb.
F
P
ull the bulb out and change it.
To refit, proceed in reverse order.
In the event of a breakdown
Page 280 of 416
278
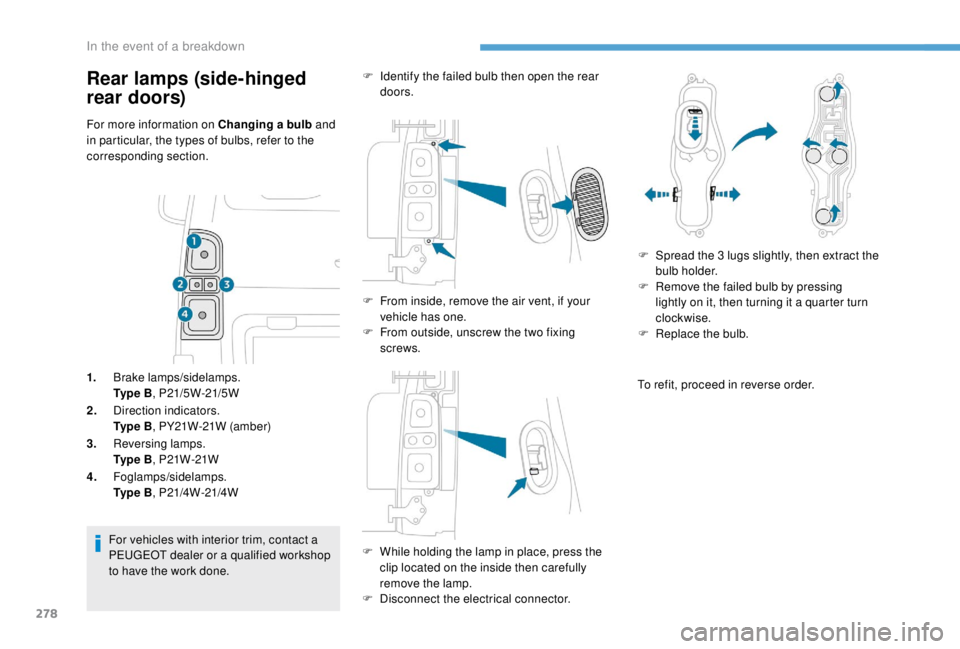
For more information on Changing a bulb and
in particular, the types of bulbs, refer to the
corresponding section.
1. Brake lamps/sidelamps.
Ty p e B , P21/5W-21/5W
2. Direction indicators.
Ty p e B , PY21W-21W (amber)
3. Reversing lamps.
Ty p e B , P21W-21W
4. Foglamps/sidelamps.
Ty p e B , P21/4W-21/4W
For vehicles with interior trim, contact a
PEUGEOT dealer or a qualified workshop
to have the work done. F
I
dentify the failed bulb then open the rear
doors.
F
F
rom inside, remove the air vent, if your
vehicle has one.
F
F
rom outside, unscrew the two fixing
screws.
F
W
hile holding the lamp in place, press the
clip located on the inside then carefully
remove the lamp.
F
D
isconnect the electrical connector.F
S
pread the 3 lugs slightly, then extract the
bulb holder.
F
R
emove the failed bulb by pressing
lightly on it, then turning it a quarter turn
clockwise.
F
R
eplace the bulb.
To refit, proceed in reverse order.
Rear lamps (side-hinged
rear doors)
In the event of a breakdown
Page 282 of 416
280
Rear lamps (tailgate)
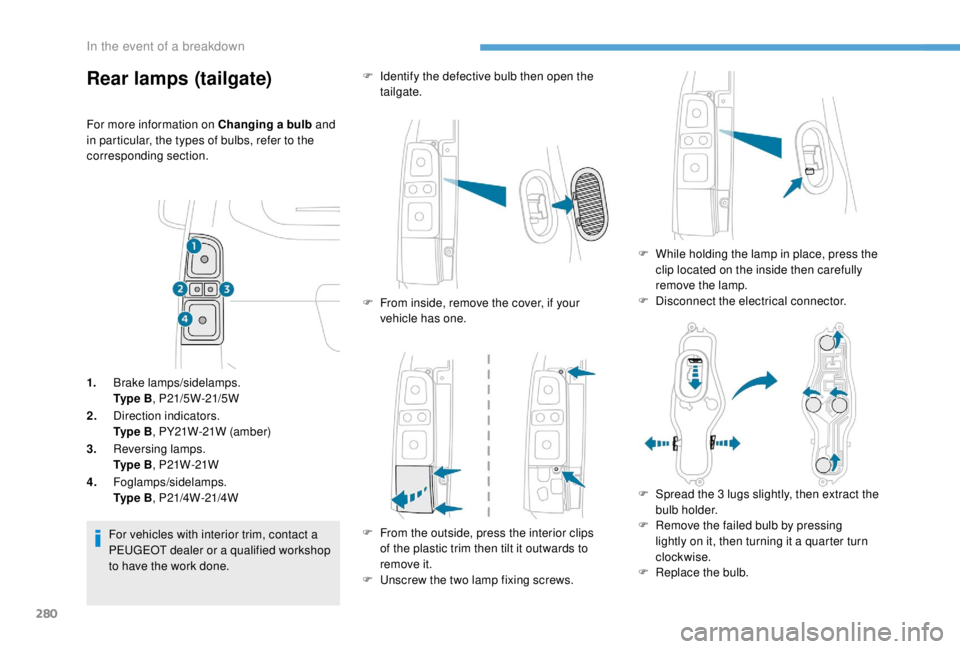
For more information on Changing a bulb and
in particular, the types of bulbs, refer to the
corresponding section.
1. Brake lamps/sidelamps.
Ty p e B , P21/5W-21/5W
2. Direction indicators.
Ty p e B , PY21W-21W (amber)
3. Reversing lamps.
Ty p e B , P21W-21W
4. Foglamps/sidelamps.
Ty p e B , P21/4W-21/4W
For vehicles with interior trim, contact a
PEUGEOT dealer or a qualified workshop
to have the work done. F
I
dentify the defective bulb then open the
tailgate.
F
F
rom inside, remove the cover, if your
vehicle has one.
F
F
rom the outside, press the interior clips
of the plastic trim then tilt it outwards to
remove it.
F
U
nscrew the two lamp fixing screws.F
W
hile holding the lamp in place, press the
clip located on the inside then carefully
remove the lamp.
F
D
isconnect the electrical connector.
F
S
pread the 3 lugs slightly, then extract the
bulb holder.
F
R
emove the failed bulb by pressing
lightly on it, then turning it a quarter turn
clockwise.
F
R
eplace the bulb.
In the event of a breakdown
Page 284 of 416
282
For the replacement of this type of LED lamp
and light guides, contact a PEUGEOT dealer or
a qualified workshop.
A replacement kit for the LEDs is available from
PEUGEOT dealers.
Cab floor
Rear lamps
For more information on Changing a bulb and
in particular, the types of bulbs, refer to the
corresponding section.
1. Direction indicators.
Ty p e B , P21W-21W
2. Brake lamps.
Ty p e B , P21W-21W
3. Sidelamps.
Ty p e B , R10W-10W
4. Reversing lamps.
Ty p e B , P21W-21W
5. Foglamps.
Ty p e B , P21W-21W F
I
dentify the defective bulb.
F
R
emove the four lamp unit fixing screws.
F
P
ull the lamp unit out towards you.
F
R
emove the failed bulb by pressing
lightly on it, then turning it a quarter turn
clockwise.
F
C
hange the bulb.
To refit, proceed in reverse order.
Courtesy lamps (front and
rear)
In the event of a breakdown