Page 72 of 416
70
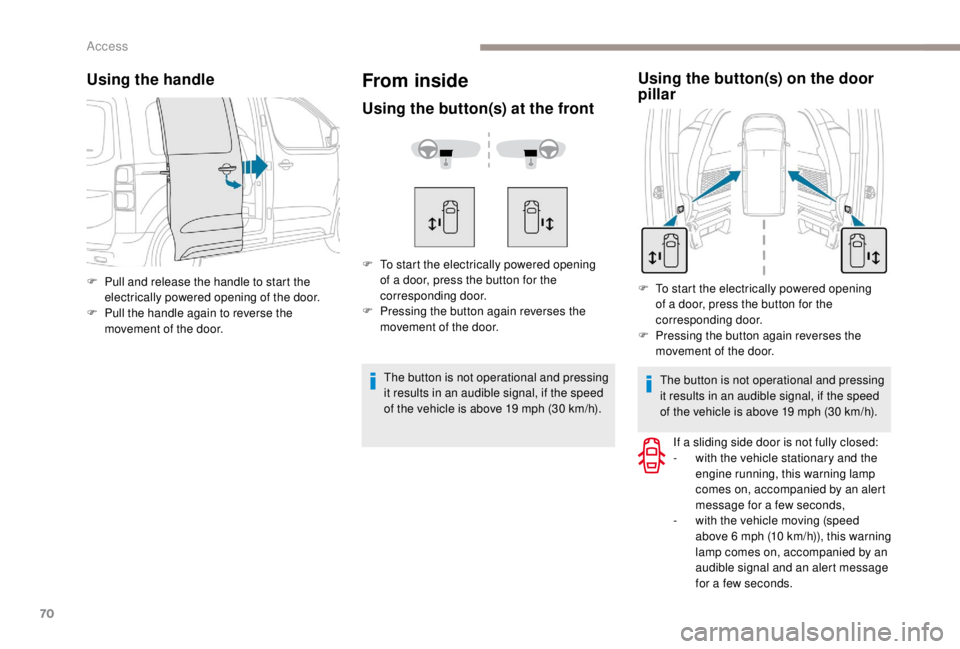
Using the handle
F Pull and release the handle to start the electrically powered opening of the door.
F
P
ull the handle again to reverse the
movement of the door.
The button is not operational and pressing
it results in an audible signal, if the speed
of the vehicle is above 19
mph (30 km/h).The button is not operational and pressing
it results in an audible signal, if the speed
of the vehicle is above 19
mph (30 km/h).
If a sliding side door is not fully closed:
-
w
ith the vehicle stationary and the
engine running, this warning lamp
comes on, accompanied by an alert
message for a few seconds,
-
w
ith the vehicle moving (speed
above 6
mph (10 km/h)), this warning
lamp comes on, accompanied by an
audible signal and an alert message
for a few seconds.
Using the button(s) on the door
pillar
F To start the electrically powered opening of a door, press the button for the
corresponding door.
F
P
ressing the button again reverses the
movement of the door.
From inside
Using the button(s) at the front
F To start the electrically powered opening of a door, press the button for the
corresponding door.
F
P
ressing the button again reverses the
movement of the door.
Access
Page 73 of 416
71
Manual or electric sliding
side door(s)
General recommendations
The doors must only be operated when
the vehicle is stationary.
For your safety and for that of your
passengers, as well as for correct
operation of the doors, you are strongly
advised not to drive with a door open.
Always check that it is safe to operate the
door and in particular, be sure not to leave
children or animals near the door controls
without supervision.
The audible warning, illumination of
the "door open" warning lamp and the
message in the multifunction screen are
there to remind you. Contact a PEUGEOT
dealer or a qualified workshop to
deactivate these warnings.
Lock your vehicle when using an
automatic car wash.Before opening or closing or per forming
any movement of the doors, ensure that
no person, animal or object is in the door
frame or can block the desired movement,
inside or outside the vehicle.
If this advice is not followed, injuries or
damage may occur if a person or an
object is trapped or caught.
The doors cannot be opened electrically
above 2
mph (3 km/h):
-
B
ut if the doors remained open when
starting, the speed must fall below
19
mph (30 km/h) before they can be
closed.
-
A
ny attempt to open a door electrically
using the interior handle while driving
results in it only being possible to open
the door manually.
-
T
his situation is accompanied by the
audible warning, illumination of the
"door open" warning lamp and the
message in the multifunction screen.
To release the door and be able to
operate it again, it is necessary to stop
the vehicle. The electric controls are inhibited in the
event of an impact. Manual opening and
closing remain possible.
While starting the engine, the movement
of a door is interrupted and restored once
the engine is running.
Depending on the engine, in Stop
mode of Stop & Start, if the door
is closed and you initiate opening
of the door, the door opens
partially and stops. When the
engine changes automatically to
Start mode, the door continues its
movement.
2
Access
Page 80 of 416
78
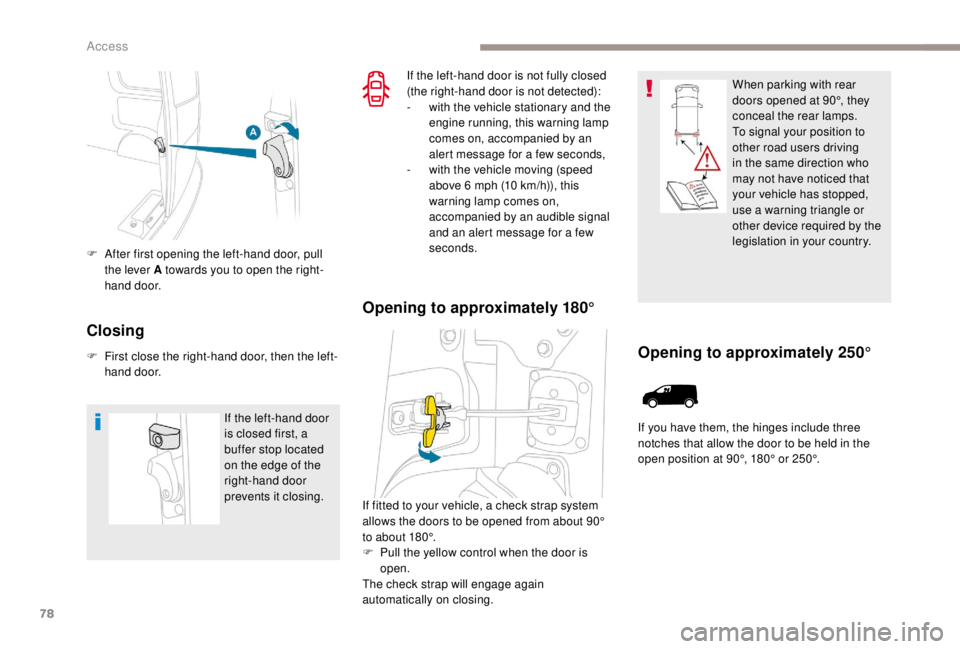
F After first opening the left-hand door, pull the lever A towards you to open the right-
hand door.
Closing
F First close the right-hand door, then the left-hand door.
If the left-hand door
is closed first, a
buffer stop located
on the edge of the
right-hand door
prevents it closing. If the left-hand door is not fully closed
(the right-hand door is not detected):
-
w
ith the vehicle stationary and the
engine running, this warning lamp
comes on, accompanied by an
alert message for a few seconds,
-
w
ith the vehicle moving (speed
above 6 mph (10 km/h)), this
warning lamp comes on,
accompanied by an audible signal
and an alert message for a few
seconds.
Opening to approximately 180°
If fitted to your vehicle, a check strap system
allows the doors to be opened from about 90°
to about 180°.
F
P
ull the yellow control when the door is
open.
The check strap will engage again
automatically on closing. When parking with rear
doors opened at 90°, they
conceal the rear lamps.
To signal your position to
other road users driving
in the same direction who
may not have noticed that
your vehicle has stopped,
use a warning triangle or
other device required by the
legislation in your country.
Opening to approximately 250°
If you have them, the hinges include three
notches that allow the door to be held in the
open position at 90°, 180° or 250°.
Access
Page 82 of 416
80
Tailgate
Opening
For more information on the Key, Remote
control or K eyless Entr y and Star ting ,
and in particular unlocking the vehicle,
refer to the corresponding section.
Closing
If the tailgate is not fully closed:
- with the vehicle stationary and the engine running, this warning lamp comes on, accompanied by an
alert message for a few seconds,
-
w
ith the vehicle moving (speed above 6 mph
(10
km/h)), this warning lamp comes on,
accompanied by an audible signal and an alert
message for a few seconds.
For more information on the Key, Remote
control or K eyless Entr y and Star ting ,
and in particular locking the vehicle, refer
to the corresponding section.
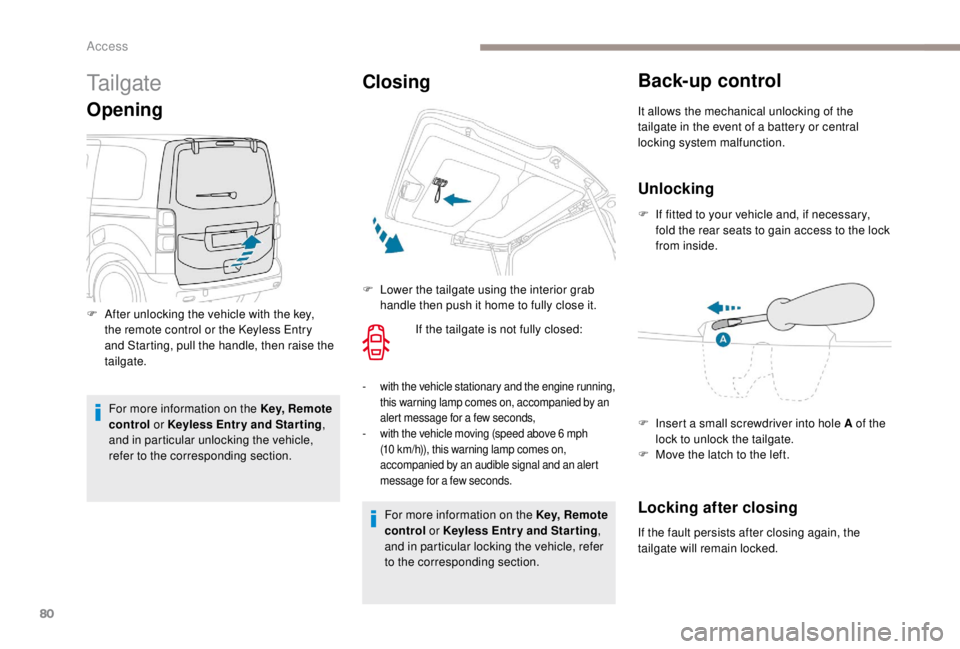
Back-up control
F After unlocking the vehicle with the key, the remote control or the K eyless Entry
and Starting, pull the handle, then raise the
tailgate. F
L
ower the tailgate using the interior grab
handle then push it home to fully close it. It allows the mechanical unlocking of the
tailgate in the event of a battery or central
locking system malfunction.
Unlocking
F If fitted to your vehicle and, if necessary,
fold the rear seats to gain access to the lock
from inside.
Locking after closing
If the fault persists after closing again, the
tailgate will remain locked. F
I
nsert a small screwdriver into hole A of the
lock to unlock the tailgate.
F
M
ove the latch to the left.
Access
Page 91 of 416
89
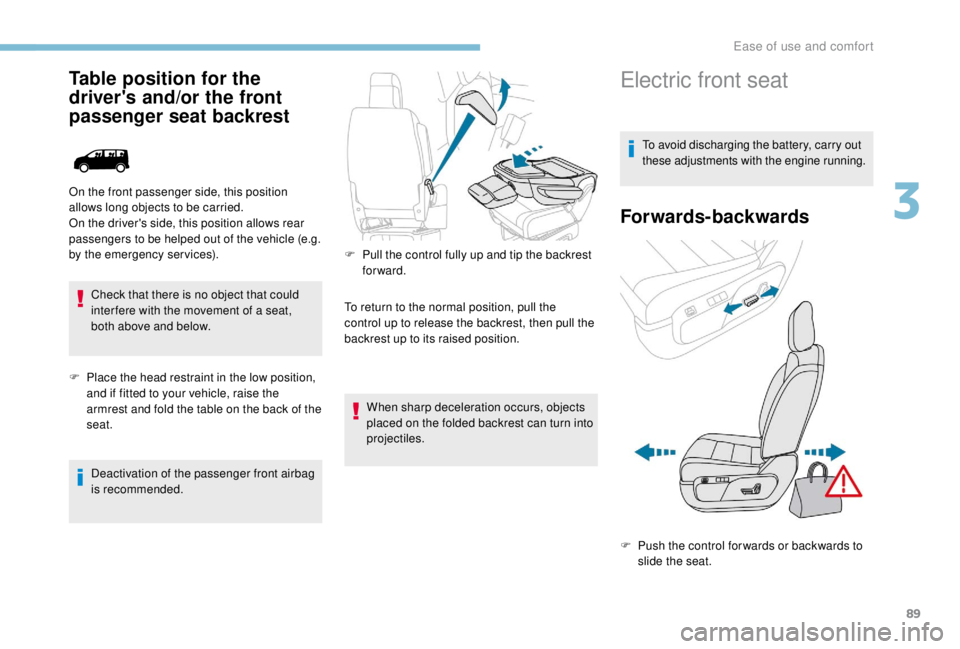
Table position for the
driver's and/or the front
passenger seat backrest
Check that there is no object that could
inter fere with the movement of a seat,
both above and below.
F
P
lace the head restraint in the low position,
and if fitted to your vehicle, raise the
armrest and fold the table on the back of the
seat.
Deactivation of the passenger front airbag
is recommended.
On the front passenger side, this position
allows long objects to be carried.
On the driver's side, this position allows rear
passengers to be helped out of the vehicle (e.g.
by the emergency services).
F
P
ull the control fully up and tip the backrest
forward.
To return to the normal position, pull the
control up to release the backrest, then pull the
backrest up to its raised position.
When sharp deceleration occurs, objects
placed on the folded backrest can turn into
projectiles.
Electric front seat
To avoid discharging the battery, carry out
these adjustments with the engine running.
Forwards-backwards
F Push the control for wards or backwards to slide the seat.
3
Ease of use and comfort
Page 93 of 416
91
Additional adjustments
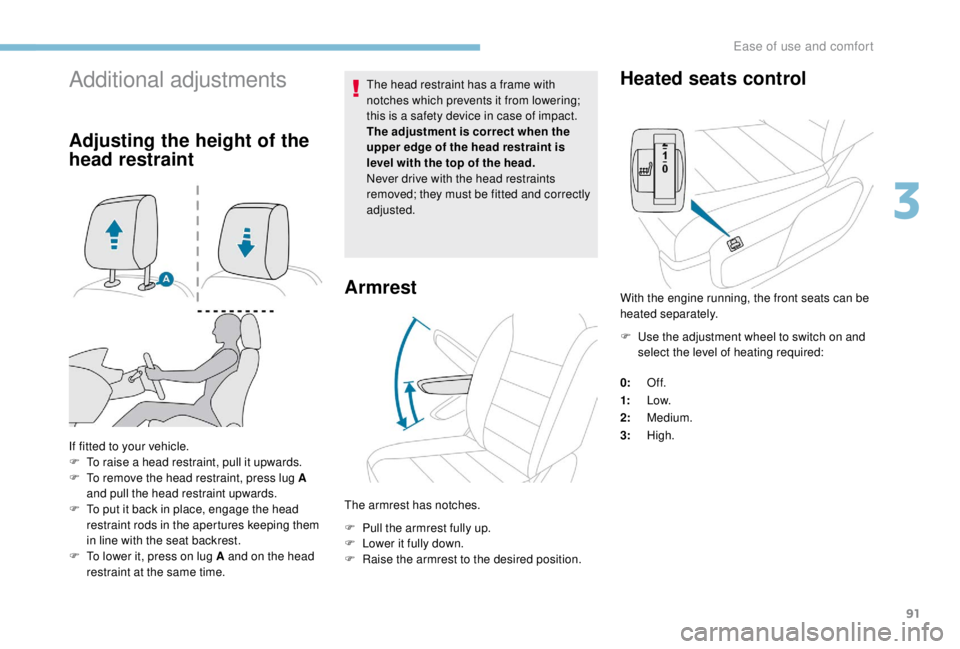
Adjusting the height of the
head restraint
If fitted to your vehicle.
F T o raise a head restraint, pull it upwards.
F
T
o remove the head restraint, press lug A
and pull the head restraint upwards.
F
T
o put it back in place, engage the head
restraint rods in the apertures keeping them
in line with the seat backrest.
F
T
o lower it, press on lug A and on the head
restraint at the same time. The head restraint has a frame with
notches which prevents it from lowering;
this is a safety device in case of impact.
The adjustment is correct when the
upper edge of the head restraint is
level with the top of the head.
Never drive with the head restraints
removed; they must be fitted and correctly
adjusted.
Armrest
The armrest has notches.
F
P
ull the armrest fully up.
F
L
ower it fully down.
F
R
aise the armrest to the desired position.
Heated seats control
With the engine running, the front seats can be
heated separately.
F
U
se the adjustment wheel to switch on and
select the level of heating required:
0: Of f.
1: Low.
2: Medium.
3: High.
3
Ease of use and comfort
Page 95 of 416
93
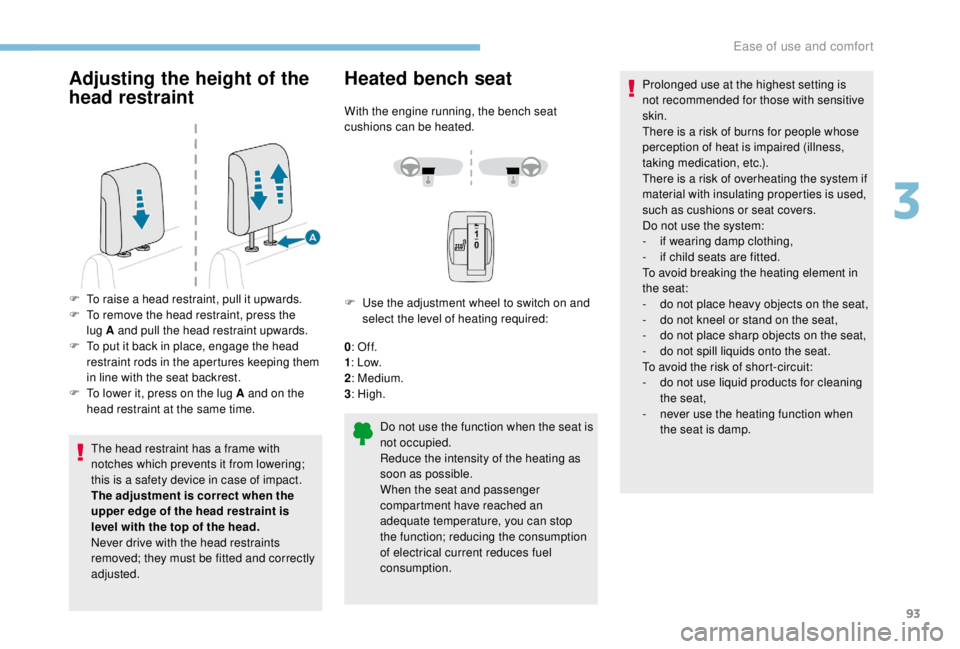
Adjusting the height of the
head restraint
The head restraint has a frame with
notches which prevents it from lowering;
this is a safety device in case of impact.
The adjustment is correct when the
upper edge of the head restraint is
level with the top of the head.
Never drive with the head restraints
removed; they must be fitted and correctly
adjusted.
Heated bench seat
With the engine running, the bench seat
cushions can be heated.
F
U
se the adjustment wheel to switch on and
select the level of heating required:
0 : Of f.
1 : Low.
2 : Medium.
3 : High.
F
T
o raise a head restraint, pull it upwards.
F
T
o remove the head restraint, press the
lug A and pull the head restraint upwards.
F
T
o put it back in place, engage the head
restraint rods in the apertures keeping them
in line with the seat backrest.
F
T
o lower it, press on the lug A and on the
head restraint at the same time.
Do not use the function when the seat is
not occupied.
Reduce the intensity of the heating as
soon as possible.
When the seat and passenger
compartment have reached an
adequate temperature, you can stop
the function; reducing the consumption
of electrical current reduces fuel
consumption.Prolonged use at the highest setting is
not recommended for those with sensitive
skin.
There is a risk of burns for people whose
perception of heat is impaired (illness,
taking medication, etc.).
There is a risk of overheating the system if
material with insulating properties is used,
such as cushions or seat covers.
Do not use the system:
-
i
f wearing damp clothing,
-
i
f child seats are fitted.
To avoid breaking the heating element in
the seat:
-
d
o not place heavy objects on the seat,
-
d
o not kneel or stand on the seat,
-
d
o not place sharp objects on the seat,
-
d
o not spill liquids onto the seat.
To avoid the risk of short-circuit:
-
d
o not use liquid products for cleaning
the seat,
-
n
ever use the heating function when
the seat is damp.
3
Ease of use and comfort
Page 117 of 416
115
Heating
Manual air conditioning
The air conditioning system only operates with the engine running.
1.A ir f low.
2. Recirculation of interior air.
3. Air distribution: windscreen and side
windows. 4.
Air distribution: centre and side air vents.
5. Air distribution: footwells.
6. Temperature.
7. Air conditioning on/off.
Air flow
F Turn the thumb wheel to
obtain a comfortable air
f low.
If you place the air flow control to position 0
(off), the temperature in the vehicle will
no longer be controlled. A slight air flow
can still be felt however, resulting from the
for ward movement of the vehicle.
Temperature
F Turn the knob from " LO"
(cold) to " HI" (hot) to
adjust the temperature to
your requirements.
1.
A ir f low.
2. Recirculation of interior air.
3. Air distribution: windscreen and side
windows. 4.
Air distribution: centre and side air vents.
5. Air distribution: footwells.
6. Temperature.
3
Ease of use and comfort