Page 260 of 416

258
F Operate the priming pump repeatedly until resistance is felt (there may be resistance at
the first press).
F
O
perate the starter to start the engine (if the
engine does not start at the first attempt,
wait around 15
seconds before trying
again).
F
I
f the engine does not start after a few
attempts, operate the priming pump again
then start the engine.
F
P
ut the cover in place and clip it in.
F
C
lose the bonnet.
Tool box
Access
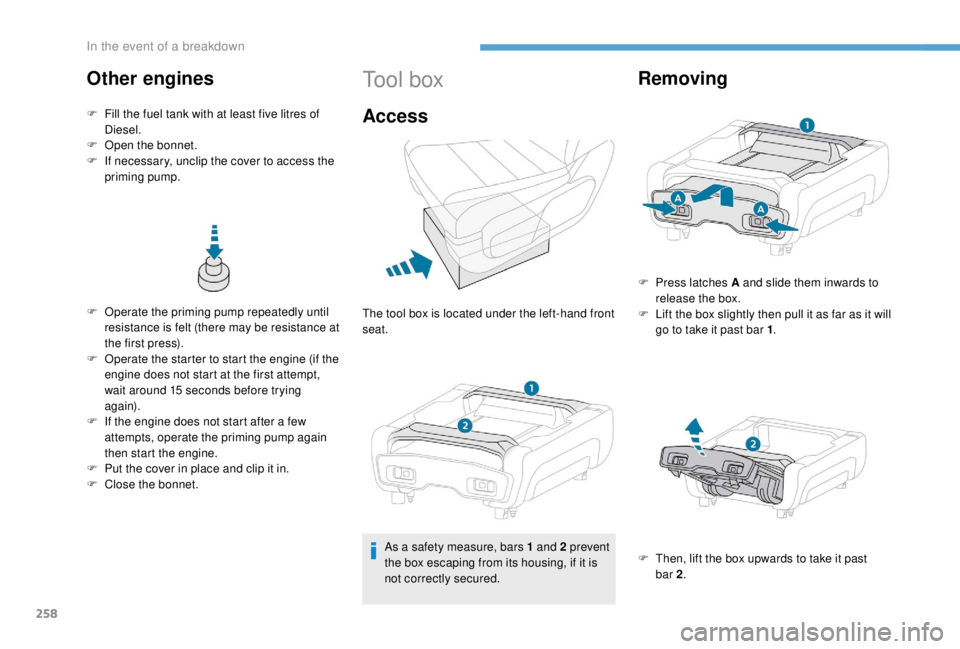
The tool box is located under the left-hand front
seat.
As a safety measure, bars 1
and 2 prevent
the box escaping from its housing, if it is
not correctly secured.
Removing
Other engines
F Fill the fuel tank with at least five litres of
Diesel.
F
O
pen the bonnet.
F
I
f necessary, unclip the cover to access the
priming pump.
F
P
ress latches A and slide them inwards to
release the box.
F
L
ift the box slightly then pull it as far as it will
go to take it past bar 1 .
F
T
hen, lift the box upwards to take it past
bar 2 .
In the event of a breakdown
Page 264 of 416

262
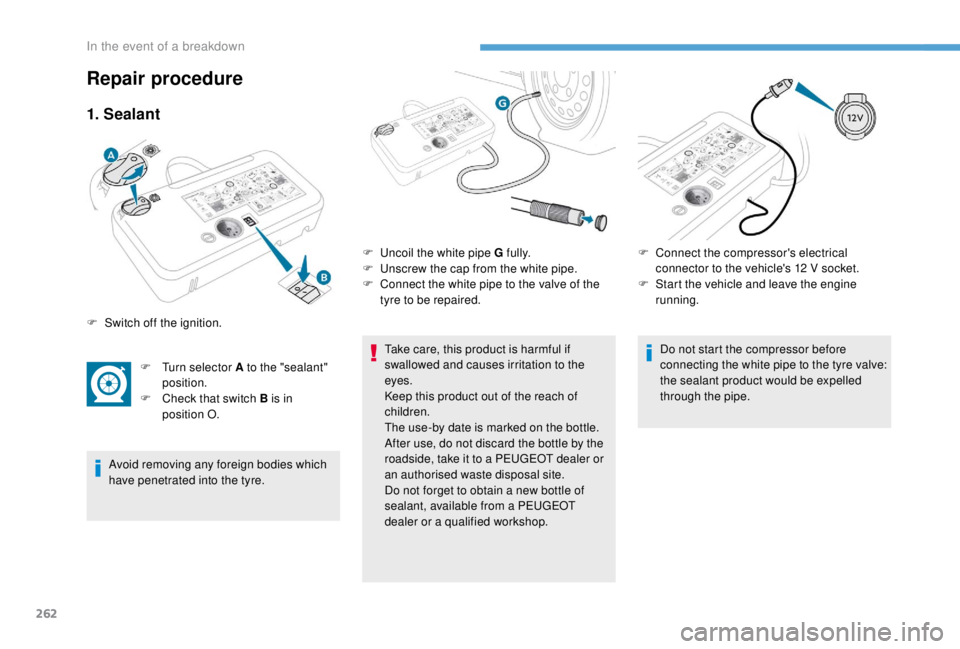
1. Sealant
F Turn selector A to the "sealant" position.
F
C
heck that switch B is in
position O.
Avoid removing any foreign bodies which
have penetrated into the tyre. Take care, this product is harmful if
swallowed and causes irritation to the
eyes.
Keep this product out of the reach of
children.
The use-by date is marked on the bottle.
After use, do not discard the bottle by the
roadside, take it to a PEUGEOT dealer or
an authorised waste disposal site.
Do not forget to obtain a new bottle of
sealant, available from a PEUGEOT
dealer or a qualified workshop.Do not start the compressor before
connecting the white pipe to the tyre valve:
the sealant product would be expelled
through the pipe.
Repair procedure
F Switch off the ignition.
F
U
ncoil the white pipe G fully.
F
U
nscrew the cap from the white pipe.
F
C
onnect the white pipe to the valve of the
tyre to be repaired. F
C
onnect the compressor's electrical
connector to the vehicle's 12 V socket.
F
S
tart the vehicle and leave the engine
running.
In the event of a breakdown
Page 265 of 416

263
If after around five to seven minutes this
pressure is not reached, this indicates
that the tyre is not repairable; contact a
PEUGEOT dealer or a qualified workshop
for assistance.
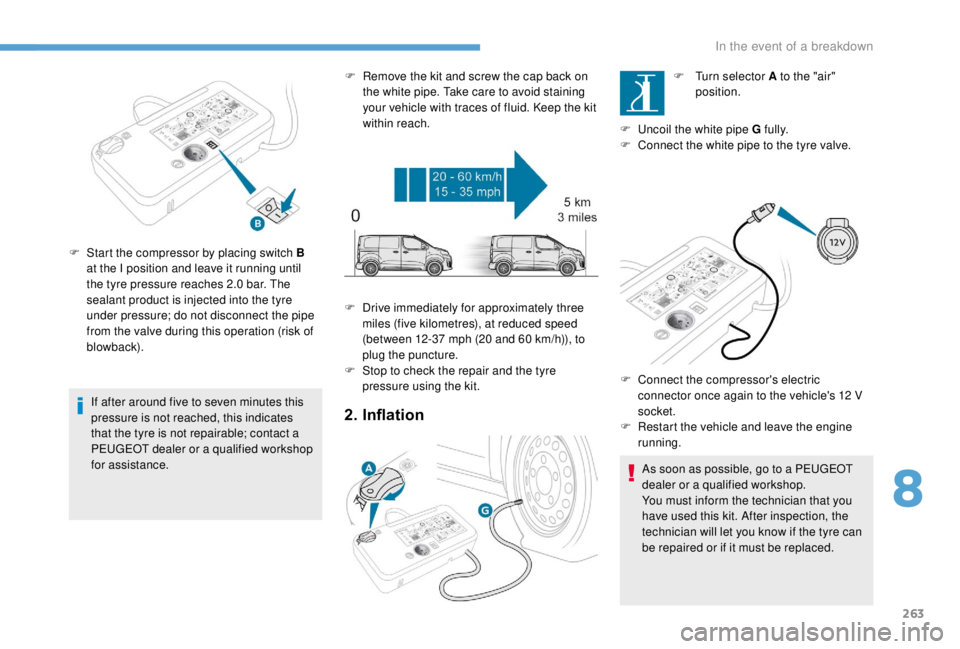
F
S
tart the compressor by placing switch B
at the I position and leave it running until
the tyre pressure reaches 2.0 bar. The
sealant product is injected into the tyre
under pressure; do not disconnect the pipe
from the valve during this operation (risk of
blowback). F
R
emove the kit and screw the cap back on
the white pipe. Take care to avoid staining
your vehicle with traces of fluid. Keep the kit
within reach.2. Inflation
F Turn selector A to the "air" position.
F
U
ncoil the white pipe G fully.
F
C
onnect the white pipe to the tyre valve.
As soon as possible, go to a PEUGEOT
dealer or a qualified workshop.
You must inform the technician that you
have used this kit. After inspection, the
technician will let you know if the tyre can
be repaired or if it must be replaced.
F
C
onnect the compressor's electric
connector once again to the vehicle's 12
V
socket.
F
R
estart the vehicle and leave the engine
running.
F
D
rive immediately for approximately three
miles (five kilometres), at reduced speed
(between 12-37 mph (20
and 60
km/h)), to
plug the puncture.
F
S
top to check the repair and the tyre
pressure using the kit.
8
In the event of a breakdown
Page 267 of 416
265
Checking/adjusting tyre
pressures
F Turn selector A to the "air" position.
F
U
ncoil the white pipe G fully.
F
C
onnect the pipe to the tyre
valve.
You can also use the compressor, without
injecting sealant, to check and, if necessary,
adjust the tyre pressures.
F
C
onnect the compressor's electrical
connector to the vehicle's 12 V socket.
F
S
tart the vehicle and leave the engine
running.
F
A
djust the pressure using the compressor
(to inflate: switch B in position I; to deflate:
switch B in position O and press button C ),
according to the vehicle's tyre pressure
label.
F R emove the kit then stow it. Should the pressure of one or more tyres
be adjusted, it is necessary to reinitialise
the under-inflation detection system.
For more information on Under-inflation
detection
, refer to the corresponding
section.
8
In the event of a breakdown
Page 289 of 416
287
Engine compartment fuses
The fusebox is placed in the engine
compartment near the battery.
Access to the fuses
The fuses described hereafter vary according
to the equipment in your vehicle.
F
R
elease the two latches A .
F
R
emove the cover.
F
C
hange the fuse.
F
W
hen you have finished, close the cover
carefully then engage the two latches A , to
ensure correct sealing of the fusebox. Fuse
No. Rating
(A) Functions
F12 5Heated washer jets.
F14 25Front and rear screenwash pump.
F15 5Emergency braking front radar, electric power steering.
F17 10Built-in systems inter face.
F19 30Front wiper motor.
F20 15Front and rear screenwash pump.
F21 20Headlamp wash pump.
F22 15Horn.
F23 15Right-hand main beam headlamp.
F24 15Left-hand main beam headlamp.
8
In the event of a breakdown
Page 290 of 416

288
12 V battery
Procedure for starting the engine using another
battery or charging a discharged battery.
Lead-acid starter batteries Access to the battery
The battery is located under the bonnet.
F
O pen the bonnet using the interior release
lever, then the exterior safety catch.
F
S
ecure the bonnet stay.
For more information on the Bonnet
and Engine , refer to the corresponding
section.
Starting using another
battery
When your vehicle's battery is discharged, the
engine can be started using a back-up battery
(external or from another vehicle) and jump
leads or a battery booster.
Never try to start the engine by connecting
a battery charger.
Never use a 24
V or higher battery
b o o s t e r.
Check beforehand that the back-up
battery has a nominal voltage of 12 V and
a capacity at least equal to that of the
discharged battery.
The two vehicles must not be in contact
with each other.
Switch off all the electrical consumers
on both vehicles (audio system, wipers,
lighting, etc.).
Make sure that the jump leads are not
close to moving parts of the engine (fan,
belts, etc.).
Do not disconnect the (+) terminal while
the engine is running.
F
R
emove the plastic cover to access the (+)
terminal, if your vehicle has one.
The battery (-) terminal is not accessible.
A remote earth point is provided at the front of
the vehicle.
Batteries contain harmful substances
such as sulphuric acid and lead.
They must be disposed of in
accordance with regulations and must
not, in any circumstances, be discarded
with household waste.
Take used remote control batteries and
vehicle batteries to a special collection
point.
Protect your eyes and face before
handling the battery.
All operations on the battery must be
carried out in a well ventilated area and
away from naked flames and sources of
sparks, so as to avoid the risk of explosion
or fire.
Wash your hands afterwards.
In the event of a breakdown
Page 291 of 416

289
F Start the engine of the vehicle with the good battery and leave it running for a few
minutes.
F
O
perate the starter on the broken down
vehicle and let the engine run.
If the engine does not start straight away,
switch off the ignition and wait a few moments
before trying again. F
W
ait for it to return to idle.
F
D
isconnect the jump lead cables in reverse
o r d e r.
F
R
efit the plastic cover to the (+) terminal, if
your vehicle has one.
F
A
llow the engine to run for at least
30 minutes, by driving or with the vehicle
stationary, so that the battery reaches an
adequate state of charge.
To disconnect, proceed in reverse order.
Some functions, including Stop & Start,
are not available if the battery is not
sufficiently charged.
Charging the battery using
a battery charger
For optimum ser vice life of the battery, it is
essential to maintain an adequate state of
charge.
In some circumstances it may be necessary to
charge the battery:
-
i
f you only use your vehicle for short
journeys,
-
i
f the vehicle is to be taken off the road for
several weeks.
Contact a PEUGEOT dealer or a qualified
workshop.
If you wish to charge your vehicle's battery
yourself, use only a charger compatible
with lead-acid batteries with a nominal
voltage of 12 V.
F
L
ift the plastic cover on the (+) terminal, if
your vehicle has one.
F
C
onnect the red cable to the positive
terminal (+) of flat battery A (at the metal
elbow) then to the positive terminal (+) of
back-up battery B or the booster.
F
C
onnect one end of the green or black
cable to the negative terminal (-) of back-up
battery B or the booster (or an earth point
on the other vehicle).
F
C
onnect the other end of the green or black
cable to earth point C on the broken down
vehicle.
Follow the instructions provided by the
manufacturer of the charger.
Never reverse polarities.
It is not necessary to disconnect the
battery.
8
In the event of a breakdown
Page 292 of 416

290
Never try to charge a frozen battery – risk
of explosion!
If the battery has frozen, have it checked
by a PEUGEOT dealer or by a qualified
workshop who will check that the internal
components have not been damaged and
that the container has not cracked, which
would mean a risk of toxic and corrosive
acid leaking.
Disconnecting the battery
In order to maintain an adequate state
of charge for starting the engine, it is
recommended that the battery be disconnected
if the vehicle is taken out of ser vice for a long
period.
Before disconnecting the battery:
F
c
lose the windows and the doors before
disconnecting the battery,
F
s
witch off all electrical consumers (audio
system, wipers, lighting, etc.),
F
s
witch off the ignition and wait for four
minutes.
At the battery, detach the (+) terminal only.
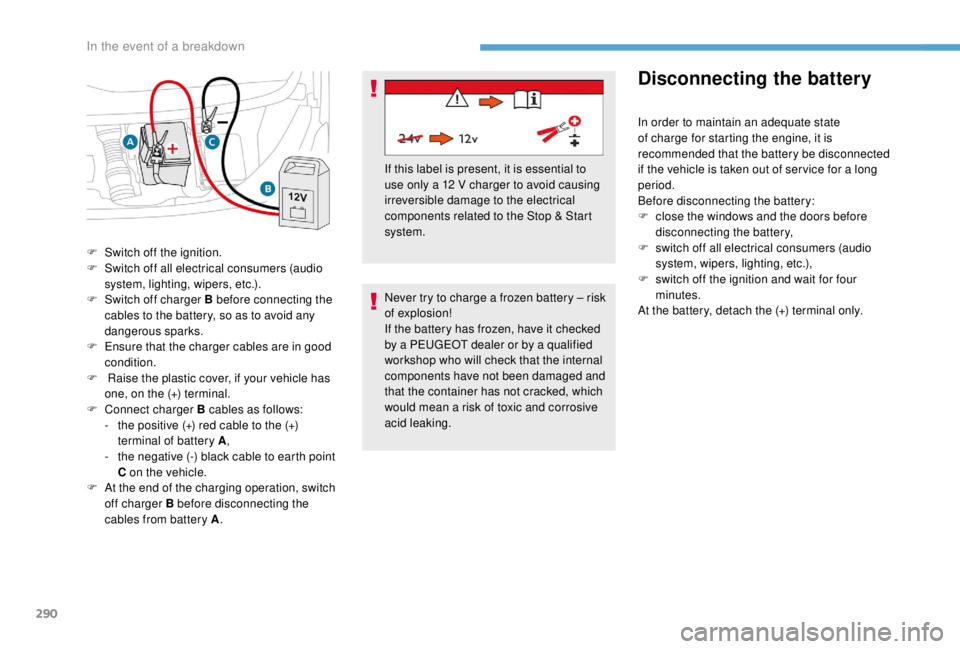
F
S
witch off the ignition.
F
S
witch off all electrical consumers (audio
system, lighting, wipers, etc.).
F
S
witch off charger B before connecting the
cables to the battery, so as to avoid any
dangerous sparks.
F
E
nsure that the charger cables are in good
condition.
F
R
aise the plastic cover, if your vehicle has
one, on the (+) terminal.
F
C
onnect charger B cables as follows:
-
t
he positive (+) red cable to the (+)
terminal of battery A ,
-
t
he negative (-) black cable to earth point
C on the vehicle.
F
A
t the end of the charging operation, switch
off charger B before disconnecting the
cables from battery A . If this label is present, it is essential to
use only a 12
V charger to avoid causing
irreversible damage to the electrical
components related to the Stop & Start
system.
In the event of a breakdown