2018 PEUGEOT EXPERT heating
[x] Cancel search: heatingPage 4 of 416

2
.
.
Instrument panel 10
Warning and indicator lamps 1 3
Indicators
2
7
Lighting dimmer
3
4
Trip computer
3
5
Date and time adjustment
3
7
Key
39
Key, remote control
3
9
Keyless Entry and Starting
4
6
Locking/unlocking from inside
6
1
Front doors
6
3
Manual sliding side door(s)
6
4
Electric sliding side door(s)
6
6
Hands-free sliding side door(s)
7
4
Side-hinged rear doors
7
7
Tailgate
80
Alarm
81
Electric windows
8
3Steering wheel adjustment
8
5
Mirrors 85
Front seats
87
A
dditional adjustments
9
1
2-seat front bench seat
9
2
Moduwork
9
4
Fixed one-piece bench seat
9
9
Fixed rear seat and bench seat 1 02
Precautions for the seats and
bench seats 1 05
Fixed crew cab
1
06
Folding crew cab
1
07
Interior fittings
1
08
Loading area fittings
1
12
Seating area fittings
1
13
Heating
115
Manual air conditioning
1
15
Dual-zone automatic air conditioning
1
17
Recirculation of the interior air
1
20
Front demist – defrost
1
20
Door mirrors demist – defrost
1
21
Rear screen demist – defrost
1
22
Rear Heating – Air conditioning
1
24
Programmable Heating/Ventilation
1
25
Courtesy lamp(s)
1
28Lighting control stalk
1
30
Daytime running lamps
1
32
Automatic illumination of headlamps
1
32
Cornering lighting
1
34
Automatic headlamp dipping
1
35
Headlamp beam height
adjustment
137
Wiper control stalk
1
37
General safety recommendations
1
42
Hazard warning lamps
1
43
Emergency or assistance call
1
43
Hor n
14
5
Electronic stability control (ESC)
1
45
Grip control
1
48
Seat belts
1
50
Airbags
154
Child seats
1
57
Deactivating the passenger front airbag
1
59
ISOFIX mountings and child seats
1
66
Manual child lock
1
74
Electric child lock
1
74
Child lock on rear windows
1
75
Over view
Instruments
Access Ease of use and comfort
Safety
Lighting and visibility
Eco-driving
Instruments and controls 4
L abels 7
Eco-driving
8
Contents
Page 8 of 416

6
Reinitialisation of the tyre under-
inflation detection
Deactivation of Stop & Start
Deactivation of the DSC/ASR
system
Side control bar
Parking sensors
Grip control
Head-up display Programmable Heating/
Ventilation
Deactivation of the interior
volumetric and anti-tilt monitoring
Manual headlamp beam height
adjustment
Lane departure warning system
Blind spot monitoring system
Automatic headlamp dipping
Central switch panel
Locking/unlocking from inside
Hazard warning lamps
Electric sliding side door(s)
Cabin and loading area selectivity
Electric child lock
Over view
Page 20 of 416

18
Warning/indicator lampStateCause Action/Observations
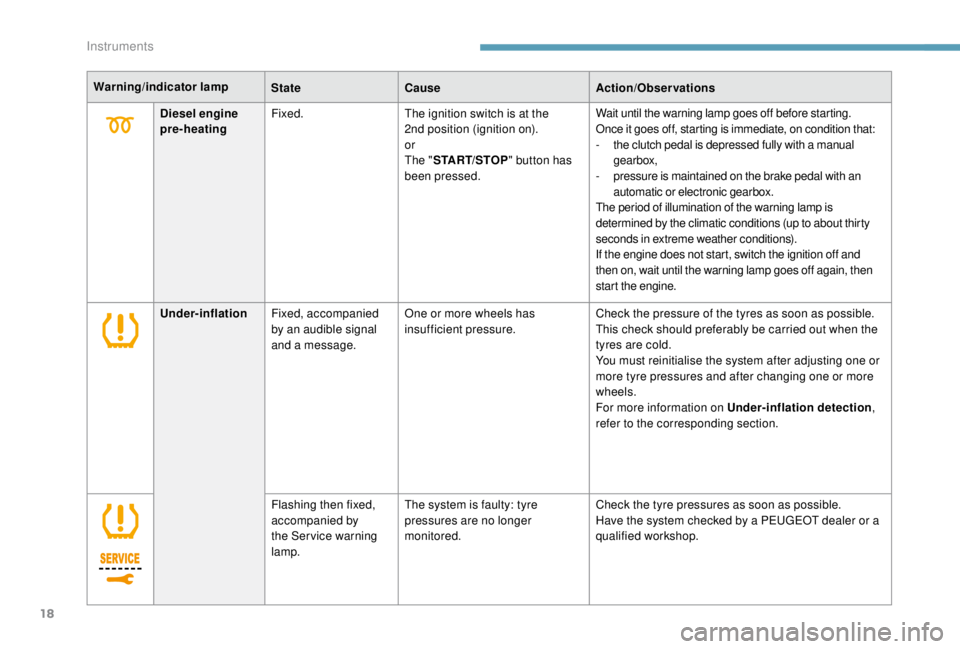
Under-inflation Fixed, accompanied
by an audible signal
and a message. One or more wheels has
insufficient pressure.
Check the pressure of the tyres as soon as possible.
This check should preferably be carried out when the
tyres are cold.
You must reinitialise the system after adjusting one or
more tyre pressures and after changing one or more
wheels.
For more information on Under-inflation detection
,
refer to the corresponding section.
Flashing then fixed,
accompanied by
the Ser vice warning
lamp. The system is faulty: tyre
pressures are no longer
monitored.
Check the tyre pressures as soon as possible.
Have the system checked by a PEUGEOT dealer or a
qualified workshop.
Diesel engine
pre-heating
Fixed.
The ignition switch is at the
2nd position (ignition on).
or
The "START/STOP " button has
been pressed. Wait until the warning lamp goes off before starting.
Once it goes off, starting is immediate, on condition that:
-
t
he clutch pedal is depressed fully with a manual
gearbox,
-
p
ressure is maintained on the brake pedal with an
automatic or electronic gearbox.
The period of illumination of the warning lamp is
determined by the climatic conditions (up to about thirty
seconds in extreme weather conditions).
If the engine does not start, switch the ignition off and
then on, wait until the warning lamp goes off again, then
start the engine.
Instruments
Page 83 of 416

81
Alarm
This system protects and provides a deterrent
against theft and break-ins.Self-protection function
The system checks for the disconnection
of any of its components.
The alarm is triggered if the battery,
button or siren wiring is disconnected or
damaged.
For all work on the alarm system, contact
a PEUGEOT dealer or a qualified
workshop.
Exterior perimeter
The system checks whether the vehicle is
opened.
The alarm is triggered if anyone tries to open
one of the doors, the tailgate or the bonnet.
Volumetric
The system only checks the variation in volume
inside the cab .
The alarm is triggered if anyone breaks a
window or enters the cab .
It will not be activated if someone enters the
loading area .
The system checks for any variation in the
volume of the passenger compartment.
The alarm is triggered if anyone breaks a
window, enters the passenger compartment or
moves inside the vehicle. If your vehicle is fitted with Programmable
Heating/Ventilation, volumetric monitoring
is not compatible with this system.
For more information on Programmable
Heating/Ventilation , refer to the
corresponding section.
Total protection
Activation
F Switch off the ignition and get out of the vehicle.
F
L
ock the vehicle using the
remote control.
Or
F
L
ock the vehicle using the Keyless Entry
and Starting system.
The monitoring system is active: the indicator
lamp flashes once per second and the direction
indicators come on for about 2
seconds.
Following a command to lock the vehicle
using the remote control or the Keyless Entry
and Starting system, the exterior perimeter
monitoring is activated after 5
seconds, the
interior volumetric monitoring after 45
seconds.
If an opening element (door, tailgate or side-
hinged doors, bonnet, etc.) is not closed fully
after locking with the "remote control", the
vehicle is not locked but monitoring will be
activated after 45
seconds.
2
Access
Page 93 of 416

91
Additional adjustments
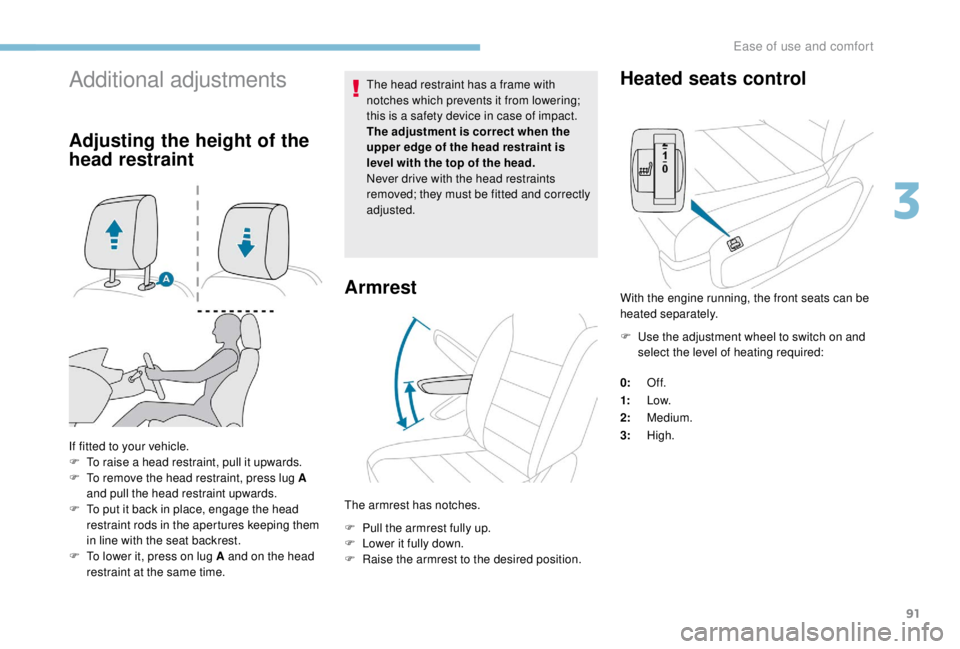
Adjusting the height of the
head restraint
If fitted to your vehicle.
F T o raise a head restraint, pull it upwards.
F
T
o remove the head restraint, press lug A
and pull the head restraint upwards.
F
T
o put it back in place, engage the head
restraint rods in the apertures keeping them
in line with the seat backrest.
F
T
o lower it, press on lug A and on the head
restraint at the same time. The head restraint has a frame with
notches which prevents it from lowering;
this is a safety device in case of impact.
The adjustment is correct when the
upper edge of the head restraint is
level with the top of the head.
Never drive with the head restraints
removed; they must be fitted and correctly
adjusted.
Armrest
The armrest has notches.
F
P
ull the armrest fully up.
F
L
ower it fully down.
F
R
aise the armrest to the desired position.
Heated seats control
With the engine running, the front seats can be
heated separately.
F
U
se the adjustment wheel to switch on and
select the level of heating required:
0: Of f.
1: Low.
2: Medium.
3: High.
3
Ease of use and comfort
Page 94 of 416

92
2-seat front bench seat
If applicable, it is fixed and has a seat belt
integral with the backrest for the seat next to
the driver seat.For more information on the Seat belts ,
refer to the corresponding section.
Do not use the function when the seat
is not occupied.
Reduce the intensity of the heating as
soon as possible.
When the seat and passenger
compartment have reached an
adequate temperature, you can stop
the function; reducing the consumption
of electrical current reduces fuel
consumption.
Prolonged use at the highest setting is
not recommended for those with sensitive
skin.
There is a risk of burns for people whose
perception of heat is impaired (illness,
taking medication, etc.).
There is a risk of overheating the system if
material with insulating properties is used,
such as cushions or seat covers.
Do not use the system:
-
i
f wearing damp clothing,
-
i
f child seats are fitted.
To avoid breaking the heating element in
the seat:
-
d
o not place heavy objects on the seat,
-
d
o not kneel or stand on the seat,
-
d
o not place sharp objects on the seat,
-
d
o not spill liquids onto the seat.
To avoid the risk of short-circuit:
-
d
o not use liquid products for cleaning
the seat,
-
n
ever use the heating function when
the seat is damp.
Ease of use and comfort
Page 95 of 416

93
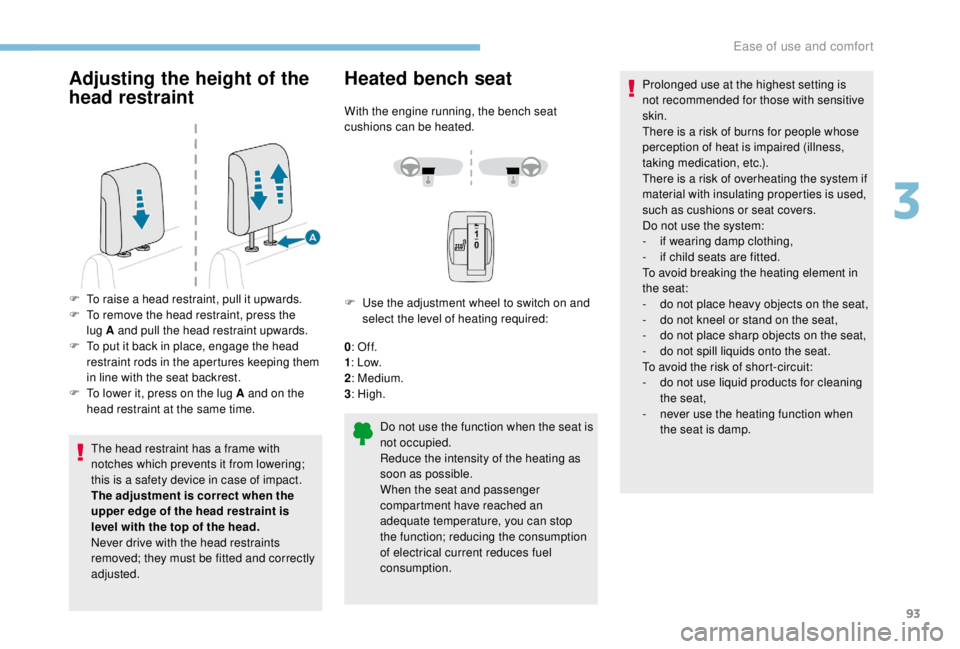
Adjusting the height of the
head restraint
The head restraint has a frame with
notches which prevents it from lowering;
this is a safety device in case of impact.
The adjustment is correct when the
upper edge of the head restraint is
level with the top of the head.
Never drive with the head restraints
removed; they must be fitted and correctly
adjusted.
Heated bench seat
With the engine running, the bench seat
cushions can be heated.
F
U
se the adjustment wheel to switch on and
select the level of heating required:
0 : Of f.
1 : Low.
2 : Medium.
3 : High.
F
T
o raise a head restraint, pull it upwards.
F
T
o remove the head restraint, press the
lug A and pull the head restraint upwards.
F
T
o put it back in place, engage the head
restraint rods in the apertures keeping them
in line with the seat backrest.
F
T
o lower it, press on the lug A and on the
head restraint at the same time.
Do not use the function when the seat is
not occupied.
Reduce the intensity of the heating as
soon as possible.
When the seat and passenger
compartment have reached an
adequate temperature, you can stop
the function; reducing the consumption
of electrical current reduces fuel
consumption.Prolonged use at the highest setting is
not recommended for those with sensitive
skin.
There is a risk of burns for people whose
perception of heat is impaired (illness,
taking medication, etc.).
There is a risk of overheating the system if
material with insulating properties is used,
such as cushions or seat covers.
Do not use the system:
-
i
f wearing damp clothing,
-
i
f child seats are fitted.
To avoid breaking the heating element in
the seat:
-
d
o not place heavy objects on the seat,
-
d
o not kneel or stand on the seat,
-
d
o not place sharp objects on the seat,
-
d
o not spill liquids onto the seat.
To avoid the risk of short-circuit:
-
d
o not use liquid products for cleaning
the seat,
-
n
ever use the heating function when
the seat is damp.
3
Ease of use and comfort
Page 116 of 416

114
Fitting the net
Unclip the upper fixing covers and secure the
lower fixings (as previously described).
F
F
old (table position) or remove the seats
and bench seats in rows 2
and 3 (depending
on equipment).
F
C
lose the rear heating and air conditioning
vents (depending on equipment).
F
U
nroll the high load retaining net.
F
P
osition the upper net fixings in the
corresponding anchorages in the roof (first
one side, then the other).
F
F
ully extend the straps.
F
O
n each side, attach the bottom fixings of
the net to the lower anchorages (behind
row 1) or in the stowing rings (behind row 2).
F
T
ension the straps to extend the net.
F
C
heck that the net is attached securely and
properly extended.
Never use the ISOFIX ring for the strap
fixing point of a child seat with Top Tether.
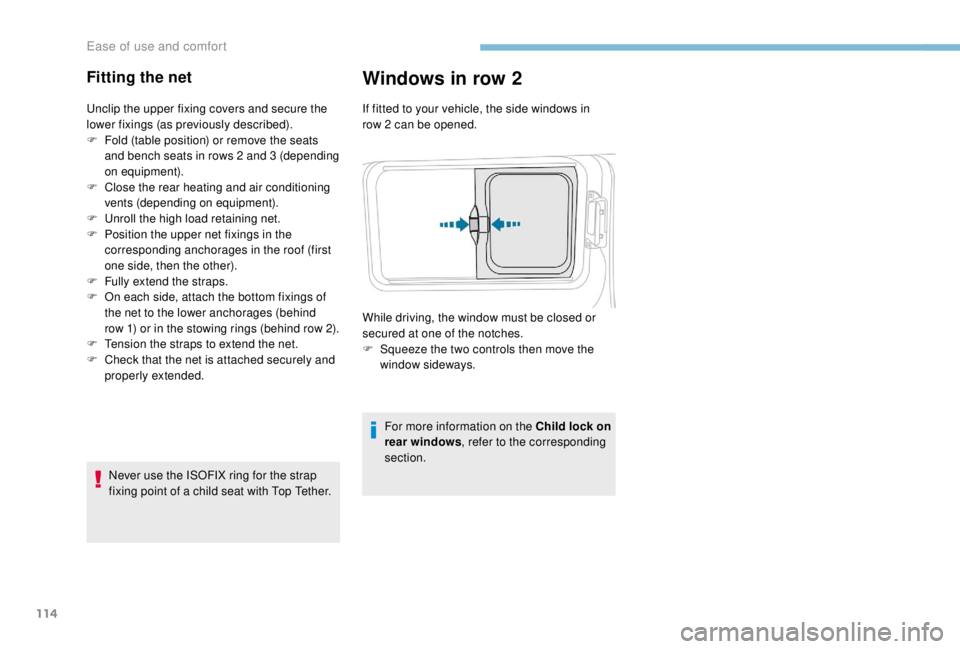
Windows in row 2
If fitted to your vehicle, the side windows in
row 2 can be opened.
For more information on the Child lock on
rear windows , refer to the corresponding
section.
While driving, the window must be closed or
secured at one of the notches.
F
S
queeze the two controls then move the
window sideways.
Ease of use and comfort