2018 PEUGEOT 5008 belt
[x] Cancel search: beltPage 4 of 364
2
.
.
Head-up digital screen 8
W arning and indicator lamps 1 1
Indicators
29
Manual test
3
5
Distance recorders
3
5
Lighting dimmer
3
6
Ambient lighting
3
6
Trip computer
3
7
Monochrome screen C
3
8
Touch screen
4
0
Remote control
4
6
K
eyless Entry and Starting
4
8
Back-up procedures
5
2
Central locking
5
5
Anti-intrusion security
5
6
Alarm
56
Doors
58
Boot
59
Hands-free tailgate
6
0
Electric windows
6
3
Panoramic opening sunroof
6
4Driving position
6
8
Front seats
6
9
Steering wheel adjustment
7
4
M i r r o r s
74
Second row seats
7
6
Third row seats
7
9
Seat modularity
8
2
i- Cockpit Amplify function 8 3
Heating and Ventilation 8 4
Manual air conditioning
8
6
Semi-automatic mono-zone
air conditioning
87
A
utomatic dual-zone air conditioning
8
9
Recirculation of the interior air
9
2
Front demist – defrost
9
3
Heated windscreen
9
3
Rear screen demist – defrost
9
4
Programmable heating
9
4
Front fittings
9
9
Courtesy lamps
1
04
Interior ambient lighting
1
05
Rear fittings
1
06
Boot fittings
1
08Exterior lighting control stalk
1
11
Direction indicators
1
13
Headlamp adjustment
1
14
Automatic illumination of headlamps
1
14
Automatic headlamp dipping
1
16
Cornering lighting
1
18
Wiper control stalk
1
19
Automatic windscreen wipers 1 21
General safety recommendations
1
22
Hazard warning lamps
1
23
H or n
123
Emergency or assistance call
1
23
Electronic stability control (ESC)
1
25
Advanced Grip Control
1
28
Hill Assist Descent Control
1
29
Seat belts
1
30
Airbags
1
34
Child seats
1
38
Deactivating the front passenger airbag
1
39
ISOFIX mountings and child seats
1
46
i-Size child seats
1
50
Child lock
1
53
Over view
Instruments Ease of use and comfort
Safety
Access Lighting and visibility
Eco-driving
Instruments and controls 4
Contents
Page 6 of 364
4
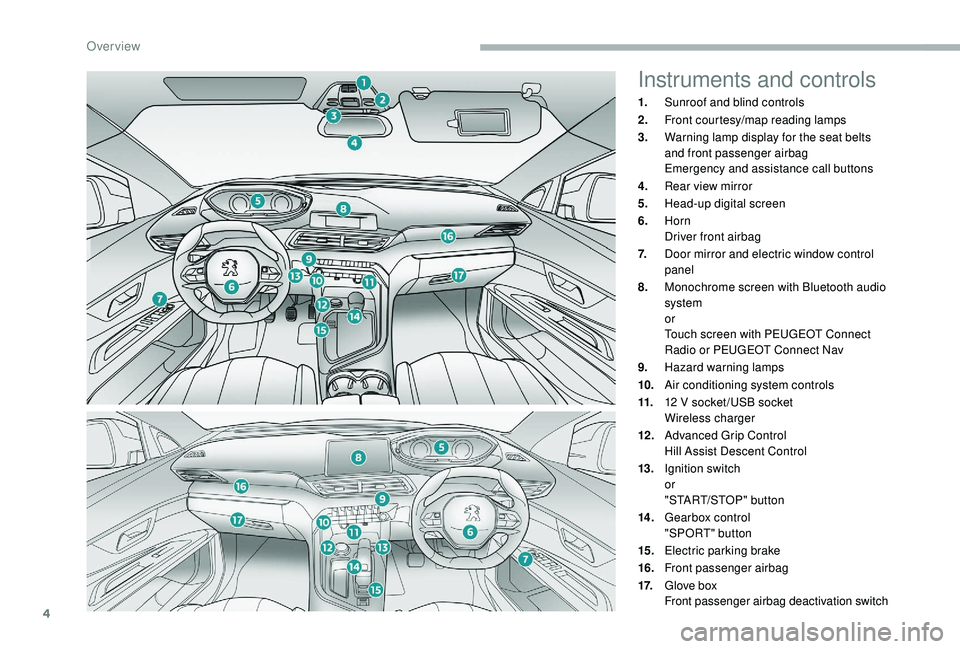
Instruments and controls
1.Sunroof and blind controls
2. Front courtesy/map reading lamps
3. Warning lamp display for the seat belts
and front passenger airbag
Emergency and assistance call buttons
4. Rear view mirror
5. Head-up digital screen
6. Horn
Driver front airbag
7. Door mirror and electric window control
panel
8. Monochrome screen with Bluetooth audio
system
or
Touch screen with PEUGEOT Connect
Radio or PEUGEOT Connect Nav
9. Hazard warning lamps
10. Air conditioning system controls
11. 12
V socket /USB socket
Wireless charger
12 . Advanced Grip Control
Hill Assist Descent Control
13. Ignition switch
or
"START/STOP" button
14 . Gearbox control
"SPORT" button
15. Electric parking brake
16. Front passenger airbag
17. Glove box
Front passenger airbag deactivation switch
Over view
Page 15 of 364
13
Warning/indicator lampStateCause Action/Observations
Battery charge * Fixed. The battery charging circuit has
a
fault (dirty or loose terminals,
slack or cut alternator belt, etc.). The warning lamp should go off when the engine is
started.
If it does not go off, contact a
PEUGEOT dealer or
a
qualified workshop.
The battery charging level requires the vehicle to be
stopped immediately, as soon as road and safety
conditions permit.
If the electric parking brake does not work, immobilise
the vehicle:
F
W
ith a
manual gearbox, engage a
gear.
F
W
ith an automatic gearbox, put the chocks against
one of the wheels.
*
D
epending on the country of sale. Door(s) open
Fixed, associated with
a
message identifying
the door. Speed below 6
mph (10 km/h), a
door or the boot is not properly
closed. Close the door or boot.
Fixed, associated with
a
message identifying
the door, together with an
audible signal. Speed above 6
mph (10 km/h), a
door or the boot is not properly
closed.
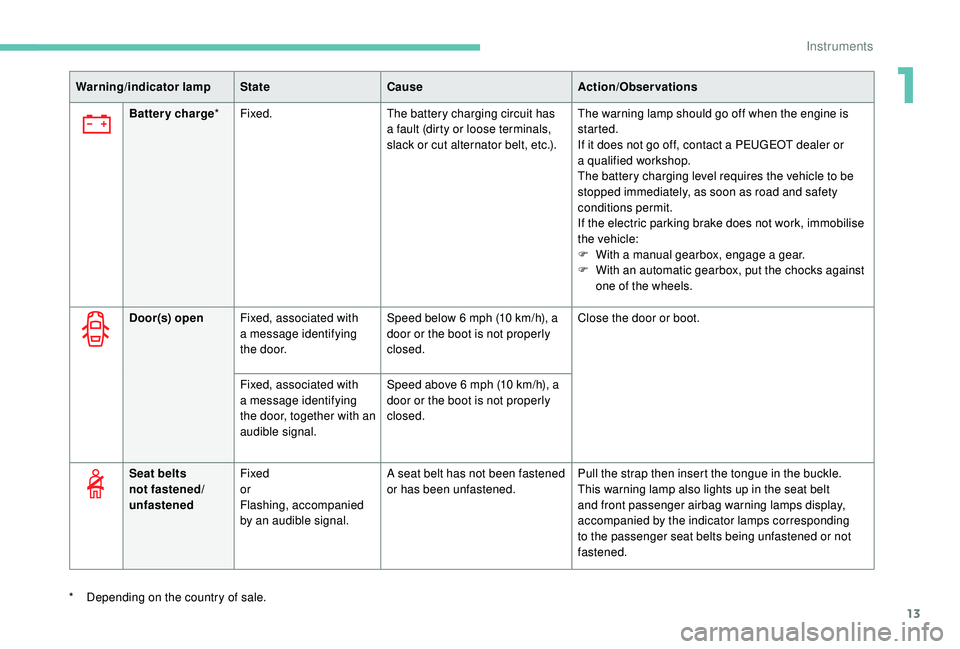
Seat belts
not fastened/
unfastened Fixed
or
Flashing, accompanied
by an audible signal. A seat belt has not been fastened
or has been unfastened.
Pull the strap then insert the tongue in the buckle.
This warning lamp also lights up in the seat belt
and front passenger airbag warning lamps display,
accompanied by the indicator lamps corresponding
to the passenger seat belts being unfastened or not
fastened.
1
Instruments
Page 20 of 364

18
Warning/indicator lampStateCause Action/Observations
+ Flashing then fixed,
accompanied by the
Service warning lamp.
The tyre pressure monitoring
system is faulty.
Under-inflation detection is no longer assured.
Have the system checked by a
PEUGEOT dealer or
a
qualified workshop.
Airbags Temporarily on. This warning lamp comes on for
a
few seconds when you turn on
the ignition, then goes off.
This warning lamp should go off when the engine is started.
If it does not go off, contact a PEUGEOT dealer or
a
qualified workshop.
Fixed. Either the airbag or the
pyrotechnic seat belt pretensioner
system has a
fault.Have them checked by a
PEUGEOT dealer or
a qualified workshop.
Front passenger
airbag Fixed, in the seat belt
and front passenger
airbag warning lamps
display. The control switch, located in
the glove box, is set to the "
OFF"
position.
The front passenger airbag is
deactivated.
You can install a
rearward facing
child seat, unless there is a
fault
with the airbags (airbag warning
lamp on). Set the control to the "
ON" position to activate the
front passenger airbag. In this case, do not install
a
rear ward facing child seat on this seat.
Instruments
Page 21 of 364

19
Warning/indicator lampStateCause Action/Observations
Front passenger
airbag Fixed, in the seat belt
and front passenger
airbag warning lamps
display. The control switch, located in the
glove box, has been placed in the
ON
position.
The front passenger airbag is
activated. In this case, do not install a
rear ward facing child seat
on this seat.
Move the control switch to the OFF position to
deactivate the front passenger airbag. In this case,
you may install a
rear ward facing child seat, unless
there is a
fault with the airbags (airbag warning lamp
o n).
Low fuel level Fixed, with reser ve level
shown in red, with the
display of a
message and
an audible signal. When it first comes on there
remains approximately 6
litres
of fuel in the tank. You must refuel as soon as possible to avoid running
out of fuel.
This warning lamp will come on every time the ignition
is switched on, accompanied by a
message and an
audible signal, until a
sufficient addition of fuel is
made.
This audible signal and message are repeated with
increasing frequency as the fuel level drops and
approaches " 0".
Fuel tank capacity: approximately 56
litres.
Never continue to drive until you run out of fuel as
this could damage the emission control and injection
systems.
Engine
diagnostic
system Flashing.
The engine management system
has a
fault.There is a
risk that the catalytic converter will be
destroyed.
Have it checked by a
PEUGEOT dealer or a qualified
workshop.
Fixed. The emission control system has
a
fault.The warning lamp should go off when the engine is
started.
If it does not go off, contact a
PEUGEOT dealer or
a
qualified workshop without delay.
1
Instruments
Page 71 of 364
69
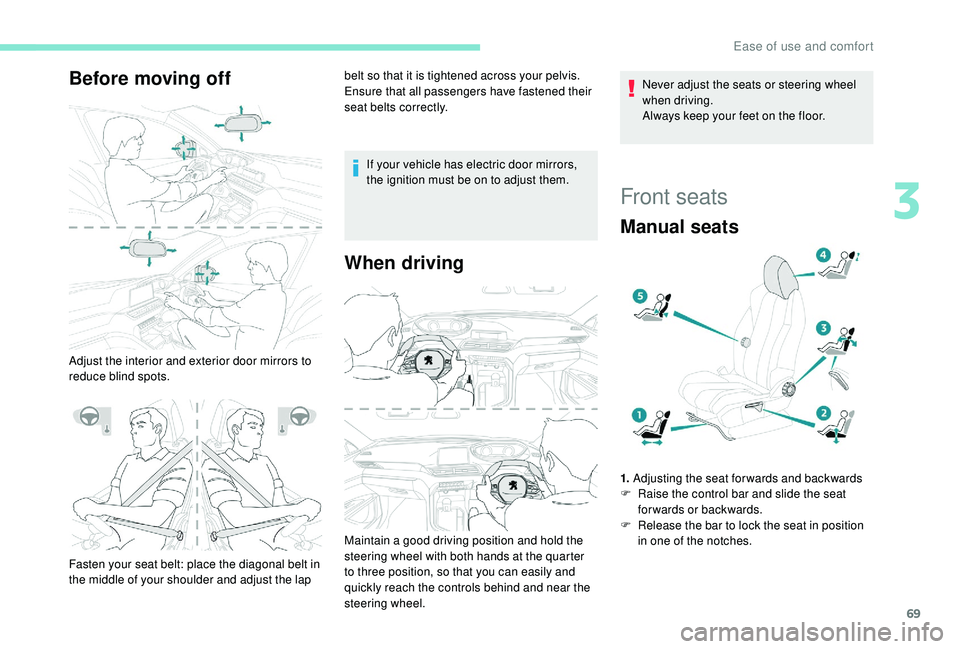
Before moving off
Adjust the interior and exterior door mirrors to
reduce blind spots.belt so that it is tightened across your pelvis.
Ensure that all passengers have fastened their
seat belts correctly.
If your vehicle has electric door mirrors,
the ignition must be on to adjust them.
When driving
Fasten your seat belt: place the diagonal belt in
the middle of your shoulder and adjust the lap Maintain a
good driving position and hold the
steering wheel with both hands at the quarter
to three position, so that you can easily and
quickly reach the controls behind and near the
steering wheel. Never adjust the seats or steering wheel
when driving.
Always keep your feet on the floor.
Front seats
Manual seats
1.
Adjusting the seat forwards and backwards
F R aise the control bar and slide the seat
forwards or backwards.
F
R
elease the bar to lock the seat in position
in one of the notches.
3
Ease of use and comfort
Page 72 of 364
70
2. Adjusting the height of the seat cushion
F R aise or lower the control as many times as
needed to obtain the desired seat height.
3. Adjusting the seat backrest angle
F
T
urn the knob for wards or backwards to
recline the backrest to the desired angle.
or
F
F
or a passenger seat that can be placed in
the table position, pull the handle and guide
the backrest for wards or backwards.
4. Adjusting the height of the head restraint
Refer to the corresponding section.
5. Adjusting the lumbar support
(only on the driver's seat)
F
T
urn the knob for wards or backwards to
increase or decrease the level of lumbar
support.
Before moving the seat backwards,
ensure that there is nothing that might
prevent the full travel of the seat.
There is a
risk of trapping or pinching
passengers if present in the rear seats
or jamming the seat if large objects are
placed on the floor behind the seat." AGR " certified seats
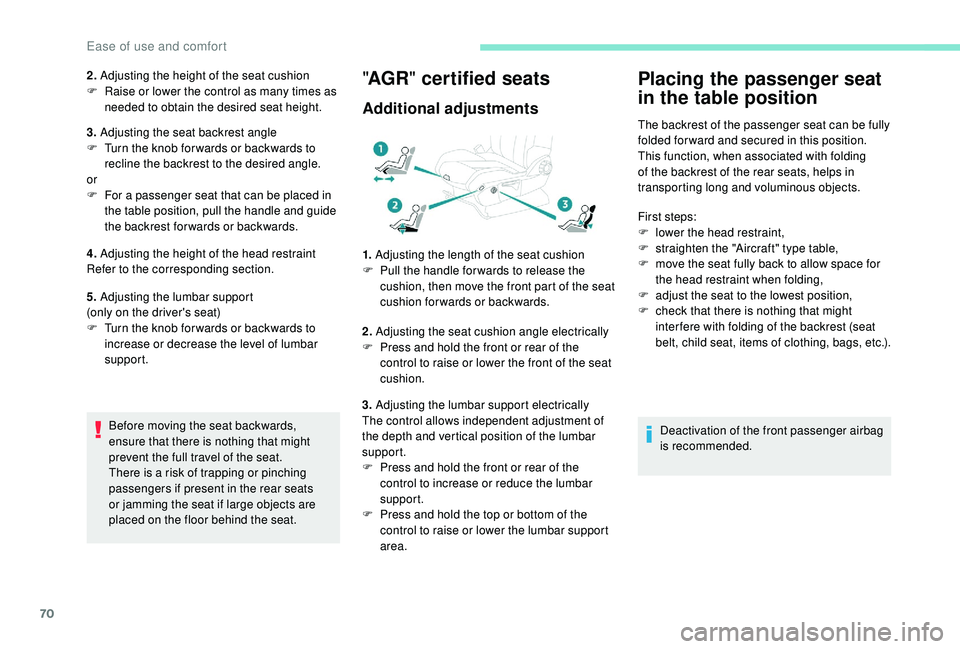
Additional adjustments
1. Adjusting the length of the seat cushion
F P ull the handle for wards to release the
cushion, then move the front part of the seat
cushion forwards or backwards.
2. Adjusting the seat cushion angle electrically
F
P
ress and hold the front or rear of the
control to raise or lower the front of the seat
cushion.
3. Adjusting the lumbar support electrically
The control allows independent adjustment of
the depth and vertical position of the lumbar
support.
F
P
ress and hold the front or rear of the
control to increase or reduce the lumbar
support.
F
P
ress and hold the top or bottom of the
control to raise or lower the lumbar support
area.
Placing the passenger seat
in the table position
The backrest of the passenger seat can be fully
folded for ward and secured in this position.
This function, when associated with folding
of the backrest of the rear seats, helps in
transporting long and voluminous objects.
First steps:
F
l
ower the head restraint,
F
s
traighten the "Aircraft" type table,
F
m
ove the seat fully back to allow space for
the head restraint when folding,
F
a
djust the seat to the lowest position,
F
c
heck that there is nothing that might
inter fere with folding of the backrest (seat
belt, child seat, items of clothing, bags, etc.).
Deactivation of the front passenger airbag
is recommended.
Ease of use and comfort
Page 80 of 364
78
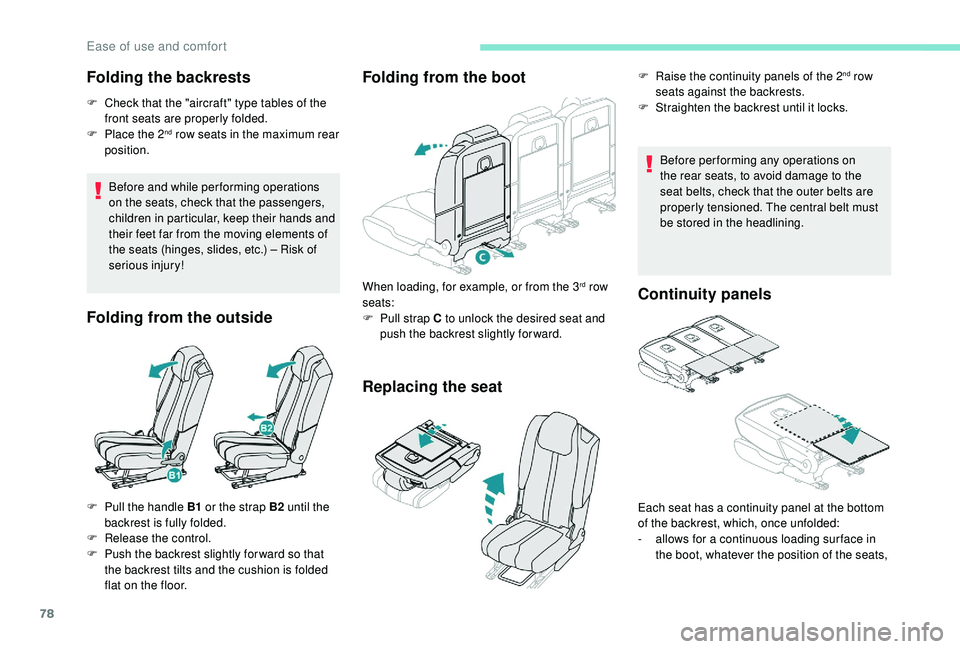
Folding the backrests
F Check that the "aircraft" type tables of the front seats are properly folded.
F
P
lace the 2
nd row seats in the maximum rear
position.
Before and while per forming operations
on the seats, check that the passengers,
children in particular, keep their hands and
their feet far from the moving elements of
the seats (hinges, slides, etc.) – Risk of
serious injury!
Folding from the outside Folding from the boot
Replacing the seat
Before performing any operations on
the rear seats, to avoid damage to the
seat belts, check that the outer belts are
properly tensioned. The central belt must
be stored in the headlining.
Continuity panels
F Pull the handle B1
or the strap B2 until the
backrest is fully folded.
F
R
elease the control.
F
P
ush the backrest slightly for ward so that
the backrest tilts and the cushion is folded
flat on the floor. When loading, for example, or from the 3
rd row
seats:
F
P
ull strap C to unlock the desired seat and
push the backrest slightly for ward. F
R
aise the continuity panels of the 2
nd row
seats against the backrests.
F
S
traighten the backrest until it locks.
Each seat has a
continuity panel at the bottom
of the backrest, which, once unfolded:
-
a
llows for a
continuous loading sur face in
the boot, whatever the position of the seats,
Ease of use and comfort