2018 PEUGEOT 5008 gearbox
[x] Cancel search: gearboxPage 188 of 364
186
Pause
The adaptive cruise control can be paused
manually by:
-
a
ction by the driver:
•
O
n button 4 (Pause).
•
O
n the brake pedal.
•
O
n the electric parking brake control.
•
B
y changing from mode D to N with an
automatic gearbox.
When the cruise control is paused, it
can only be reactivated when all of the
safety conditions are met. The message
"Activation not possible, conditions
unsuitable" is displayed while reactivation is
not possible.
To reactivate the function, the driver
must accelerate to reach at least 19
mph
(30
km/h), then press one of the
buttons 2 ,
3 or 4.
As a safety measure, wait until the current
speed reaches the speed setting to
reactivate the function by pressing button 4 .
Versions fitted with an automatic
gearbox
Following braking of the vehicle bringing it
to a
complete stop, the system holds the
vehicle stationary; the cruise control is
paused.
The driver should press the accelerator
pedal to move off, then reactivate the
system above 19
mph (30 km/h) by
pressing button 2 , 3
or 4.
If the driver takes no action following
this immobilisation, the electric parking
brake is applied automatically after a
few
minutes.
Modification of the speed
setting
Modification from the current
speed
F By successive short presses on button 2 or
3 , to raise or lower the setting in steps of
1
mph (km/h).
F
B
y a maintained press on button 2 or 3, to
raise or lower the setting in steps of 5
mph
(km/h).
Take care: the maintained press on button
2
or 3 will cause a very quick change in
the speed of your vehicle.
Modification from the speed limit
sign recognition system
F The suggested speed is displayed in the instrument panel.
Engine running and cruise control on (green),
you can modify the speed setting.
F
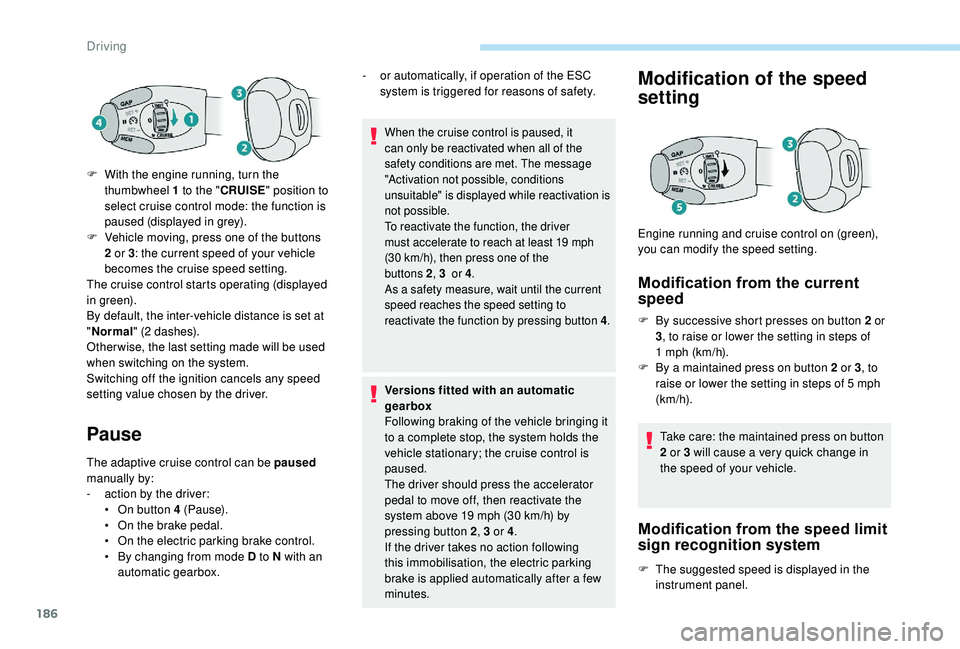
W
ith the engine running, turn the
thumbwheel 1
to the "
CRUISE " position to
select cruise control mode: the function is
paused (displayed in grey).
F
V
ehicle moving, press one of the buttons
2
or 3
: the current speed of your vehicle
becomes the cruise speed setting.
The cruise control starts operating (displayed
in green).
By default, the inter-vehicle distance is set at
" Normal " (2
dashes).
Other wise, the last setting made will be used
when switching on the system.
Switching off the ignition cancels any speed
setting value chosen by the driver. -
o
r automatically, if operation of the ESC
system is triggered for reasons of safety.
Driving
Page 192 of 364
190
Following braking of the vehicle bringing it to a complete stop, the system holds the vehicle stationary; the cruise control is paused.
T he driver must press the accelerator pedal to move off again, then reactivate the system above 19 mph (30 km/h), by pressing button 2, 3
or 4. If the
driver takes no action following the immobilisation, the electric parking brake is applied automatically after a
few minutes.
Versions fitted with an automatic gearbox
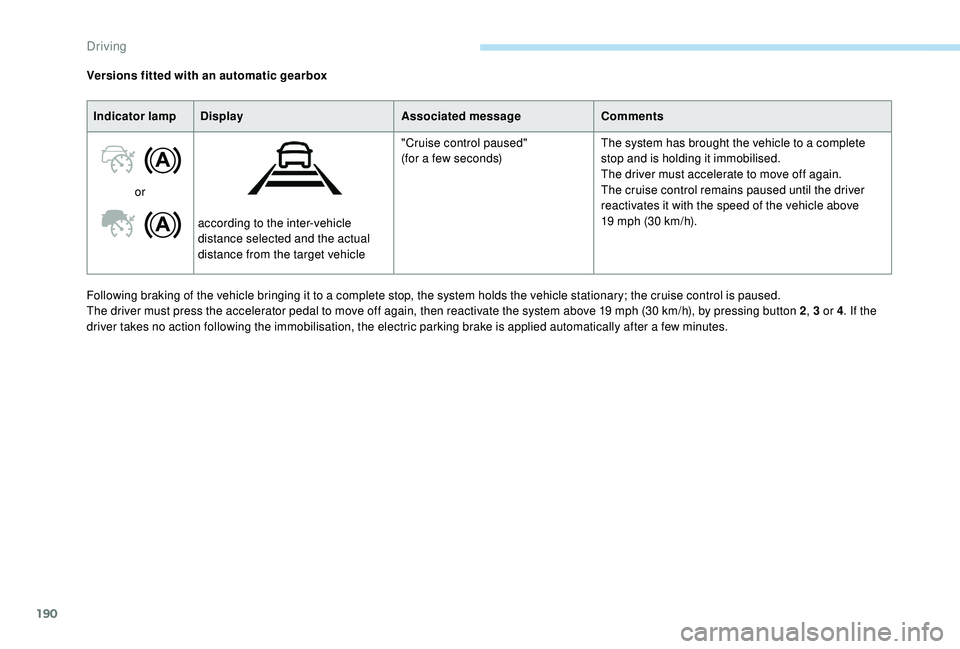
Indicator lamp Display Associated messageComments
or according to the inter-vehicle
distance selected and the actual
distance from the target vehicle "Cruise control paused"
(for a few seconds)
The system has brought the vehicle to a complete
stop and is holding it immobilised.
The driver must accelerate to move off again.
The cruise control remains paused until the driver
reactivates it with the speed of the vehicle above
19 mph (30 km/h).
Driving
Page 197 of 364
195
The driver can take back control of the vehicle
at any time by sharply turning the steering
wheel and/or pressing the accelerator pedal.The point at which braking is triggered
may be adjusted depending on the driving
actions of the driver, such as movement
of the steering wheel or actions at the
accelerator pedal.
Operation of the function may be felt by
slight vibration in the brake pedal.
If the vehicle comes to a
complete stop,
the automatic braking is maintained for
1
to 2 seconds.
With a
manual gearbox, in the event of
automatic emergency braking until the
vehicle comes to a
complete stop, the
engine may stall.
With an automatic gearbox, in the event
of automatic emergency braking until the
vehicle comes to a
complete stop, keep
the brake pedal pressed down to prevent
the vehicle from starting off again. After an impact, the function automatically
stops operating. Consult a
PEUGEOT
dealer or a
qualified workshop to have the
system checked.
Deactivation/Activation
By default, the system is automatically
activated at every engine start.
The system can be deactivated or activated via
the vehicle settings menu. Deactivation of the system is
signalled by the illumination of this
indicator lamp, accompanied by the
display of a
message.
The camera may be disrupted or not work
in the following situations:
-
p
oor visibility (inadequate street
lighting, falling snow, heavy rain, dense
f o g , e t c .),
-
d
azzle (headlamps of an oncoming
vehicle, low sun, reflections on a damp
road, leaving a tunnel, alternating
shade and light, etc.),
-
c
amera or radar obstructed (mud, frost,
snow, condensation, etc.).
On versions with camera alone, this
message indicates to you that the camera
is obstructed: " Driving aids camera:
visibility limited, see user guide ".
In these situations, detection performance
may be reduced.
Specific conditions for operation
The vehicle's speed must be between 3 mph
a nd 53 mph (5 km/h and 85 km/h) (versions
with camera alone) or 87
mph (140 km/h)
(versions with camera and radar) when
a
moving vehicle is detected.
The vehicle's speed must not exceed 50
mph
(80 km/h) when a
s
tationary vehicle is detected.
The vehicle's speed must not exceed 37
mph
(60
km/h) when a pedestrian is detected.
The ESC system must not be faulty.
The DSC system must not be deactivated.
All passenger seat belts must be fastened.
Driving at a
steady speed on roads with few
bends is required.
6
Driving
Page 212 of 364
210
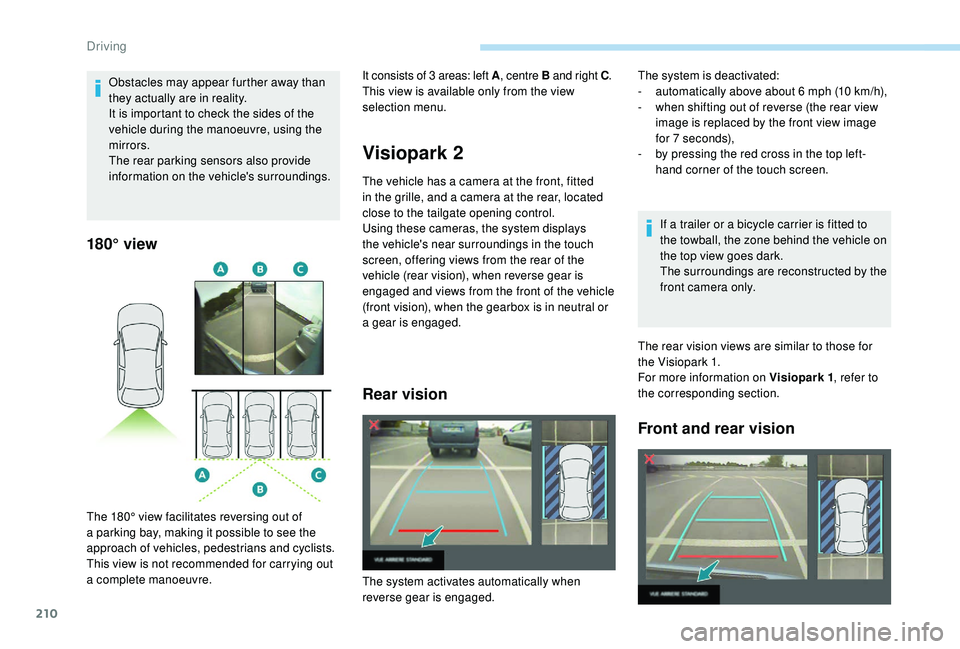
180° view
Visiopark 2
The vehicle has a camera at the front, fitted
i n the grille, and a camera at the rear, located
close to the tailgate opening control.
Using these cameras, the system displays
the vehicle's near surroundings in the touch
screen, offering views from the rear of the
vehicle (rear vision), when reverse gear is
engaged and views from the front of the vehicle
(front vision), when the gearbox is in neutral or
a
gear is engaged.
Rear vision
If a trailer or a bicycle carrier is fitted to
t he towball, the zone behind the vehicle on
the top view goes dark.
The surroundings are reconstructed by the
front camera only.
The rear vision views are similar to those for
the Visiopark 1.
For more information on Visiopark 1 , refer to
the corresponding section.
Front and rear vision
Obstacles may appear further away than
they actually are in reality.
It is important to check the sides of the
vehicle during the manoeuvre, using the
mirrors.
The rear parking sensors also provide
information on the vehicle's surroundings.
The 180° view facilitates reversing out of
a
parking bay, making it possible to see the
approach of vehicles, pedestrians and cyclists.
This view is not recommended for carrying out
a
complete manoeuvre. It consists of 3
areas: left A
, centre B and right C .
This view is available only from the view
selection menu. The system is deactivated:
-
a utomatically above about 6 mph (10 km/h),
-
w
hen shifting out of reverse (the rear view
image is replaced by the front view image
for 7
seconds),
-
b
y pressing the red cross in the top left-
hand corner of the touch screen.
The system activates automatically when
reverse gear is engaged.
Driving
Page 213 of 364
211
With the engine running and the
speed below 12 mph (20 km/h), the
system is activated via the Vehicle/
Driving menu of the touch screen:
The system is deactivated:
-
a
utomatically above about 19 mph (30 km/h)
(the image disappears temporarily from
12
mph (20 km/h)),
-
b
y pressing the red cross in the top left-
hand corner of the touch screen.
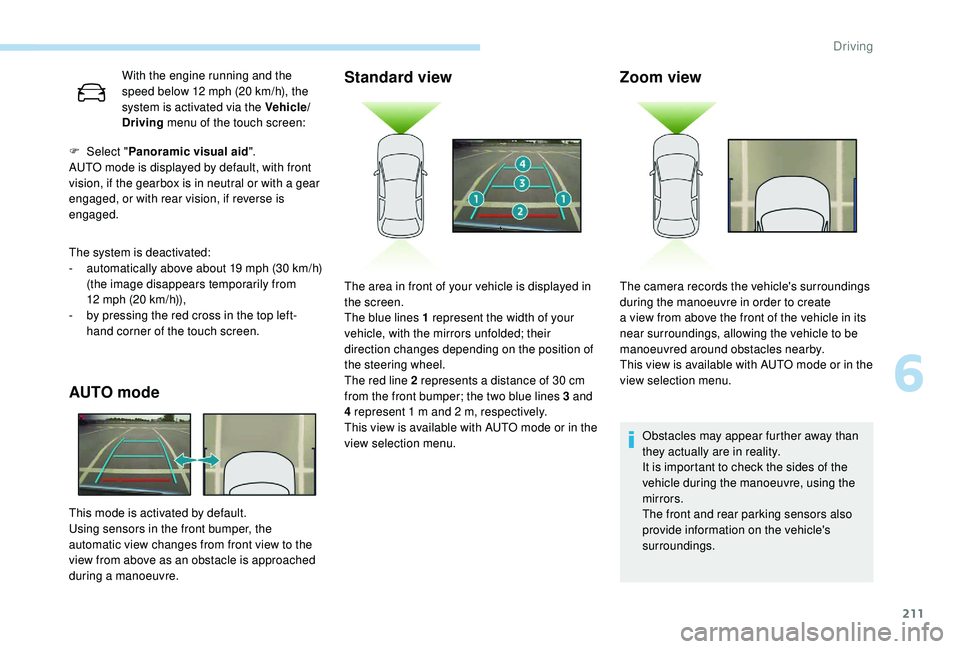
AUTO mode Standard view
F Select "
Panoramic visual aid ".
AUTO mode is displayed by default, with front
vision, if the gearbox is in neutral or with a
gear
engaged, or with rear vision, if reverse is
engaged.
This mode is activated by default.
Using sensors in the front bumper, the
automatic view changes from front view to the
view from above as an obstacle is approached
during a
manoeuvre.
Zoom view
Obstacles may appear further away than
they actually are in reality.
It is important to check the sides of the
vehicle during the manoeuvre, using the
mirrors.
The front and rear parking sensors also
provide information on the vehicle's
surroundings.
The area in front of your vehicle is displayed in
the screen.
The blue lines 1
represent the width of your
vehicle, with the mirrors unfolded; their
direction changes depending on the position of
the steering wheel.
The red line 2
represents a
distance of 30
cm
from the front bumper; the two blue lines 3
and
4
represent 1
m and 2
m, respectively.
This view is available with AUTO mode or in the
view selection menu. The camera records the vehicle's surroundings
during the manoeuvre in order to create
a
view from above the front of the vehicle in its
near surroundings, allowing the vehicle to be
manoeuvred around obstacles nearby.
This view is available with AUTO mode or in the
view selection menu.
6
Driving
Page 214 of 364
212
180° viewPark Assist
This system provides active assistance with
parking: it detects a parking space then
operates the steering system to park in this
space.
With a
manual gearbox , the driver manages
the accelerator, brakes, gears and clutch.
With an automatic gearbox (EAT6/EAT8) , the
driver manages the accelerator, brakes and
gears.
During phases of entry into and exit from
a
parking space, the system provides visual
and audible information to the driver in order
to make the manoeuvres safe. It may be
necessary to move for wards and backwards
more than once.
The driver can take control at any time by
gripping the steering wheel.
This manoeuvring assistance system
cannot, in any circumstances, replace the
need for vigilance on the part of the driver.
The driver must remain in control of their
vehicle ensuring that the space remains
clear throughout the manoeuvre.
In some circumstances, the sensors may
not detect small obstacles located in their
blind spots. The Park Assist system cannot work with
the engine off.
A. Entry into a
parallel parking space.
B. Exit from a
parallel parking space.
C. Bay parking.
During manoeuvring phases, the steering
wheel per forms rapid turns: do not hold
the steering wheel, do not put your hands
between the spokes of the steering wheel.
Watch out for any object that could block
the manoeuvre (loose clothing, scar ves,
ties, etc.) - Injury risk!
When the Park Assist is active, it prevents
the Stop & Start going into STOP mode.
In STOP mode, activating Park Assist
restarts the engine.
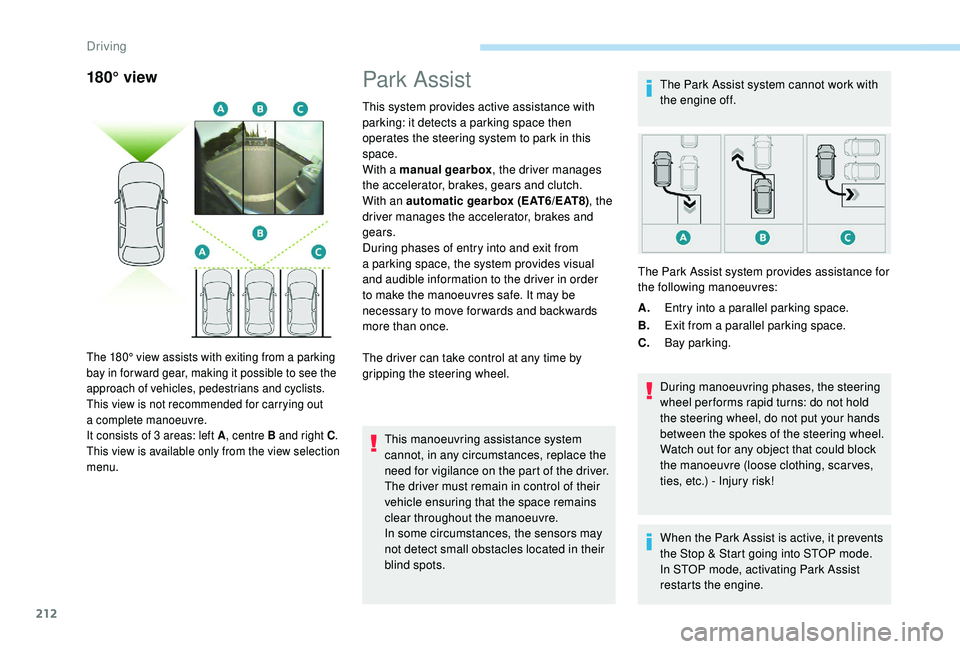
The 180° view assists with exiting from a parking
b ay in for ward gear, making it possible to see the
approach of vehicles, pedestrians and cyclists.
This view is not recommended for carrying out
a
complete manoeuvre.
It consists of 3
areas: left A, centre B and right C .
This view is available only from the view selection
menu.
The Park Assist system provides assistance for
the following manoeuvres:
Driving
Page 238 of 364
236
On a new vehicle, the first particle
f ilter regeneration operations may be
accompanied by a "burning" smell, which
is per fectly normal.
Following prolonged operation of the
vehicle at very low speed or at idle,
you may, in exceptional circumstances,
notice the emission of water vapour at the
exhaust on acceleration. This does not
affect the behaviour of the vehicle or the
environment.
Manual gearbox
The gearbox does not require any
maintenance (no oil change).
Automatic gearbox
The gearbox does not require any
maintenance (no oil change).
Brake pads
Brake wear depends on the style
of driving, particularly in the case
of vehicles used in town, over short
distances. It may be necessary to
have the condition of the brakes
checked, even between vehicle
services.
Unless there is a
leak in the circuit, a drop in
the brake fluid level indicates that the brake
pads are worn.
Brake disc wear
For information on checking brake
disc wear, contact a PEUGEOT
dealer or a
qualified workshop.
Electric parking brake
This system does not require any
routine servicing. However, in the
event of a problem, have the system
checked by a
PEUGEOT dealer or
a
qualified workshop. For more information on the Electric
parking brake
, refer to the corresponding
section.
Wheels and tyres
The pressure must be checked on
all tyres, including the spare wheel,
when the tyres are "cold", at least
once a
month and before a long
j o u r n ey.
The pressures given on the tyre pressure label
are valid for "cold" tyres. If you have driven for
more than 10
minutes or more than 6 miles
(10
kilometres) at more than 31 mph (50 km/h),
0.3
bar (30 kPa) should be added to the values
given on the label.
Under-inflation increases fuel consumption.
Non-compliant tyre pressure causes premature
wear on tyres and has an adverse effect on the
vehicle's road holding – Risk of an accident!
Driving with worn or damaged tyres reduces
braking efficiency and control of the vehicle's
steering. Regular inspections of the condition
of tyres (tread and sides) and rims are
recommended as well as making sure that
valves are fitted.
Practical information
Page 251 of 364
249
Removing a wheel
Wheel with wheel trim
When removing the wheel, first remove
the wheel trim by pulling at the valve
aperture using the wheelbrace.
When refitting the wheel , after tightening
the wheel bolts, refit the wheel trim,
starting by placing its aperture in line with
the valve and then pushing it into place all
round its edge with the palm of your hand. Parking the vehicle
Immobilise the vehicle where it does not
block traffic: the ground must be level,
stable and non-slippery.
Apply the parking brake, unless it is
programmed to be in automatic mode;
switch off the ignition and with a
manual
gearbox, engage first gear so as to lock
the wheels.
Apply the parking brake, unless it is
programmed to be in automatic mode;
switch off the ignition and with an
automatic gearbox, select mode P so as to
lock the wheels.
Check that the parking brake warning
lamps in the instrument panel are on fixed
(not flashing).
The occupants must get out of the vehicle
and wait where they are safe.
If necessary, place a
chock under the
wheel diagonally opposite the wheel to be
changed.
Never go underneath a
vehicle raised
using a
jack; use an axle stand.
F
T
ighten it fully. When the cable is
completely reeled in, turning the nut no
longer encounters resistance.
F
C
heck that the wheel is properly flattened
against the floor.
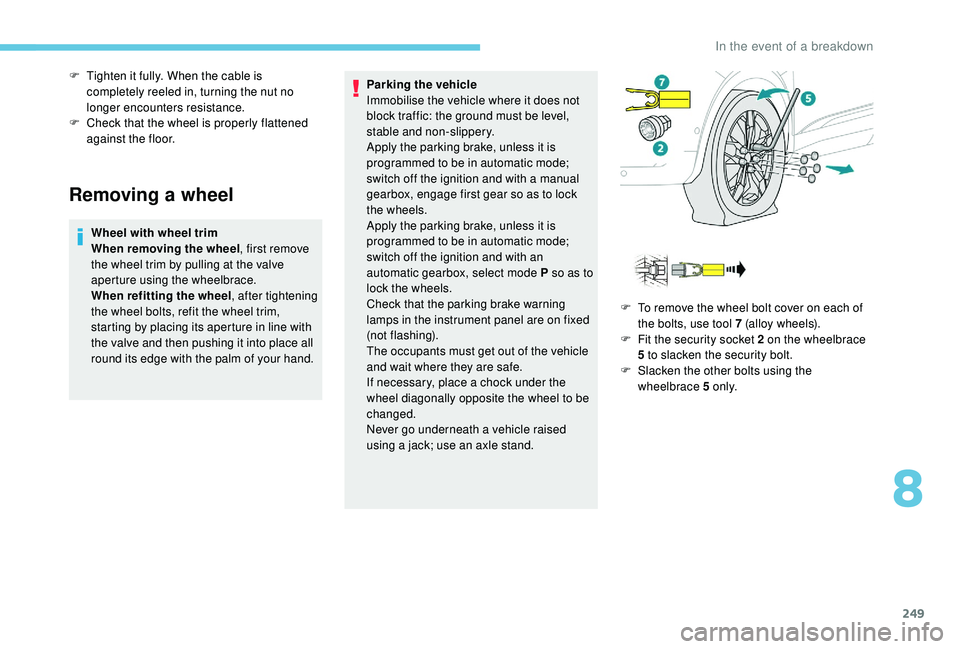
F
T
o remove the wheel bolt cover on each of
the bolts, use tool 7 (alloy wheels).
F
F
it the security socket 2 on the wheelbrace
5
to slacken the security bolt.
F
S
lacken the other bolts using the
wheelbrace 5
o n l y.
8
In the event of a breakdown