2018 Peugeot 308 driver seat adjustment
[x] Cancel search: driver seat adjustmentPage 72 of 360
70
Driving position
Adopting a good driving position helps improve
your comfort and protection.
It also optimises interior and exterior visibility
as well as access to controls.
Sitting comfortably
Whether or not your vehicle has certain seat
adjustments described in this section depends
on the trim level and country of sale.
Driver's side
As a safety precaution, adjust the seats
only when the vehicle is stationary.If your vehicle has electric seats, the
ignition must be on to adjust them.
Passenger's side
Sit fully back in the seat with your pelvis, back
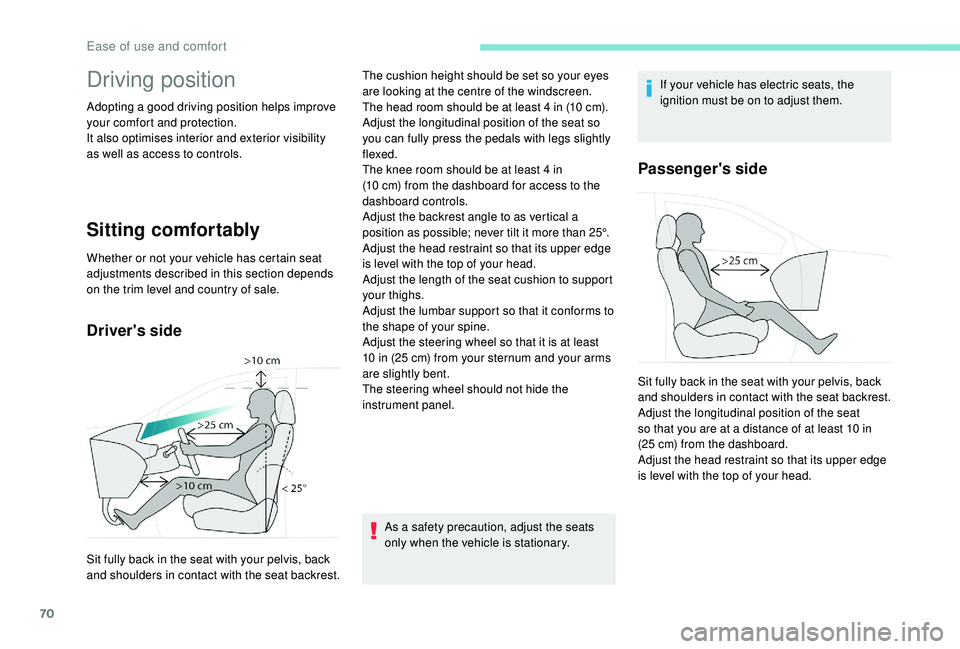
and shoulders in contact with the seat backrest.The cushion height should be set so your eyes
are looking at the centre of the windscreen.
The head room should be at least 4
in (10 cm).
Adjust the longitudinal position of the seat so
you can fully press the pedals with legs slightly
flexed.
The knee room should be at least 4 in
(10 cm) from the dashboard for access to the
dashboard controls.
Adjust the backrest angle to as vertical a
position as possible; never tilt it more than 25°.
Adjust the head restraint so that its upper edge
is level with the top of your head.
Adjust the length of the seat cushion to support
your thighs.
Adjust the lumbar support so that it conforms to
the shape of your spine.
Adjust the steering wheel so that it is at least
10 in (25 cm) from your sternum and your arms
are slightly bent.
The steering wheel should not hide the
instrument panel. Sit fully back in the seat with your pelvis, back
and shoulders in contact with the seat backrest.
Adjust the longitudinal position of the seat
so that you are at a distance of at least 10 in
(25 cm) from the dashboard.
Adjust the head restraint so that its upper edge
is level with the top of your head.
Ease of use and comfort
Page 74 of 360
72
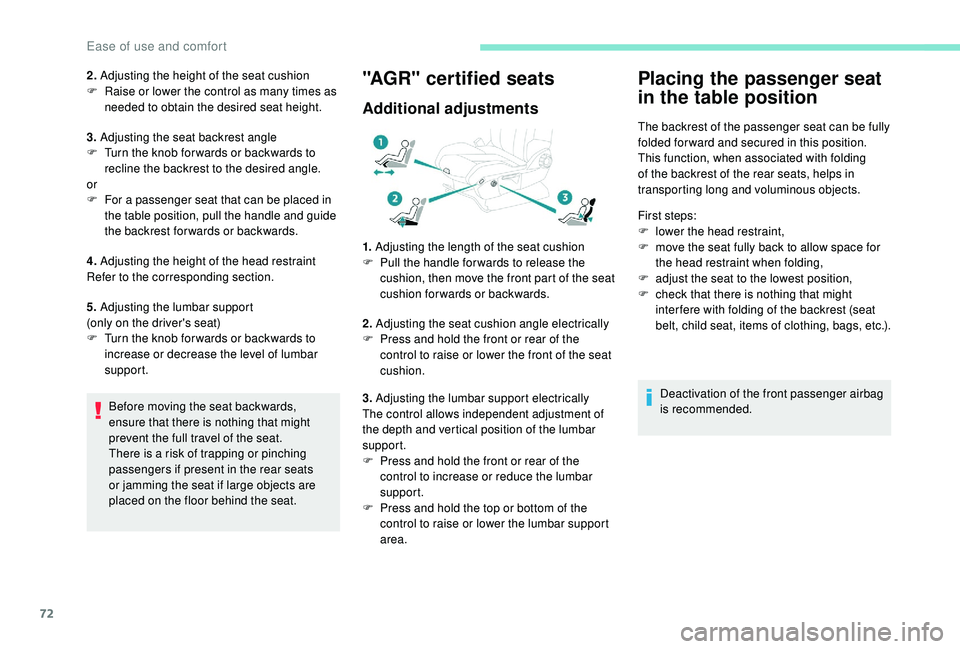
2. Adjusting the height of the seat cushion
F R aise or lower the control as many times as
needed to obtain the desired seat height.
3. Adjusting the seat backrest angle
F
T
urn the knob for wards or backwards to
recline the backrest to the desired angle.
or
F
F
or a passenger seat that can be placed in
the table position, pull the handle and guide
the backrest for wards or backwards.
4. Adjusting the height of the head restraint
Refer to the corresponding section.
5. Adjusting the lumbar support
(only on the driver's seat)
F
T
urn the knob for wards or backwards to
increase or decrease the level of lumbar
support.
Before moving the seat backwards,
ensure that there is nothing that might
prevent the full travel of the seat.
There is a risk of trapping or pinching
passengers if present in the rear seats
or jamming the seat if large objects are
placed on the floor behind the seat."AGR" certified seats
Additional adjustments
1. Adjusting the length of the seat cushion
F P ull the handle for wards to release the
cushion, then move the front part of the seat
cushion forwards or backwards.
2. Adjusting the seat cushion angle electrically
F
P
ress and hold the front or rear of the
control to raise or lower the front of the seat
cushion.
3. Adjusting the lumbar support electrically
The control allows independent adjustment of
the depth and vertical position of the lumbar
support.
F
P
ress and hold the front or rear of the
control to increase or reduce the lumbar
support.
F
P
ress and hold the top or bottom of the
control to raise or lower the lumbar support
area.
Placing the passenger seat
in the table position
The backrest of the passenger seat can be fully
folded for ward and secured in this position.
This function, when associated with folding
of the backrest of the rear seats, helps in
transporting long and voluminous objects.
First steps:
F
l
ower the head restraint,
F
m
ove the seat fully back to allow space for
the head restraint when folding,
F
a
djust the seat to the lowest position,
F
c
heck that there is nothing that might
inter fere with folding of the backrest (seat
belt, child seat, items of clothing, bags, etc.).
Deactivation of the front passenger airbag
is recommended.
Ease of use and comfort
Page 75 of 360
73
Folding the backrest
In this position, the backrest can support
a maximum load of 30 kg.
When sharp deceleration occurs, objects
placed on the folded backrest can turn
into projectiles.
Returning the backrest to the
normal position
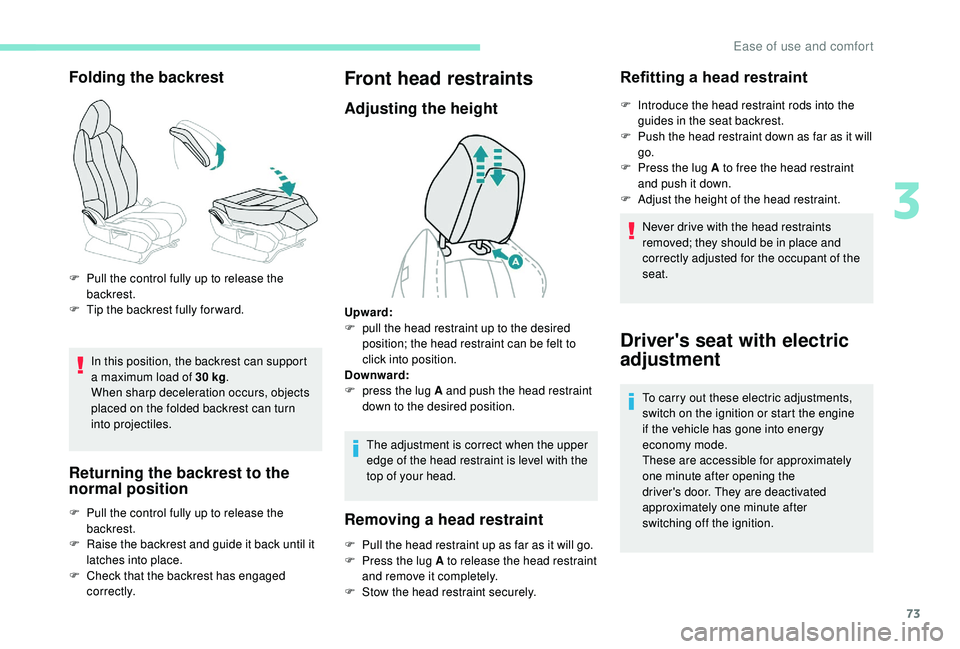
F Pull the control fully up to release the backrest.
F
T
ip the backrest fully for ward.
F
P
ull the control fully up to release the
backrest.
F
R
aise the backrest and guide it back until it
latches into place.
F
C
heck that the backrest has engaged
c o r r e c t l y.
Front head restraints
Adjusting the height
The adjustment is correct when the upper
edge of the head restraint is level with the
top of your head.
Removing a head restraint
F Pull the head restraint up as far as it will go.
F P ress the lug A to release the head restraint
and remove it completely.
F
S
tow the head restraint securely.
Refitting a head restraint
F Introduce the head restraint rods into the guides in the seat backrest.
F
P
ush the head restraint down as far as it will
go.
F
P
ress the lug A to free the head restraint
and push it down.
F
A
djust the height of the head restraint.
Never drive with the head restraints
removed; they should be in place and
correctly adjusted for the occupant of the
seat.
Upward:
F
p
ull the head restraint up to the desired
position; the head restraint can be felt to
click into position.
Downward:
F
p
ress the lug A and push the head restraint
down to the desired position.
Driver's seat with electric
adjustment
To carry out these electric adjustments,
switch on the ignition or start the engine
if the vehicle has gone into energy
economy mode.
These are accessible for approximately
one minute after opening the
driver's door. They are deactivated
approximately one minute after
switching off the ignition.
3
Ease of use and comfort
Page 76 of 360
74
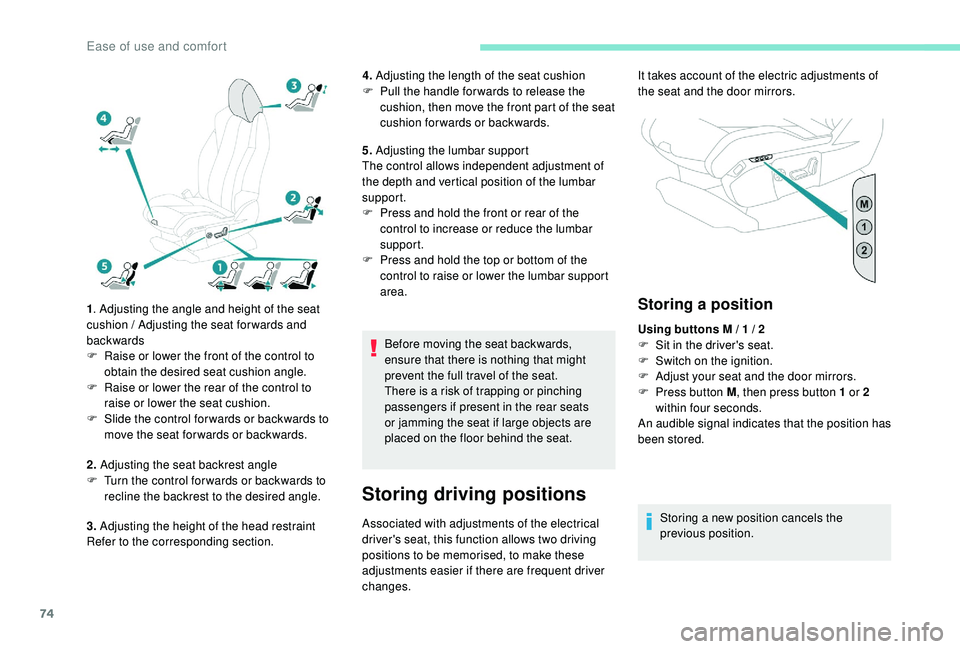
1. Adjusting the angle and height of the seat
cushion / Adjusting the seat forwards and
backwards
F
R
aise or lower the front of the control to
obtain the desired seat cushion angle.
F
R
aise or lower the rear of the control to
raise or lower the seat cushion.
F
S
lide the control for wards or backwards to
move the seat for wards or backwards.
2. Adjusting the seat backrest angle
F
T
urn the control for wards or backwards to
recline the backrest to the desired angle.
3. Adjusting the height of the head restraint
Refer to the corresponding section. 4.
Adjusting the length of the seat cushion
F
P
ull the handle for wards to release the
cushion, then move the front part of the seat
cushion forwards or backwards.
5. Adjusting the lumbar support
The control allows independent adjustment of
the depth and vertical position of the lumbar
support.
F
P
ress and hold the front or rear of the
control to increase or reduce the lumbar
support.
F
P
ress and hold the top or bottom of the
control to raise or lower the lumbar support
area.
Before moving the seat backwards,
ensure that there is nothing that might
prevent the full travel of the seat.
There is a risk of trapping or pinching
passengers if present in the rear seats
or jamming the seat if large objects are
placed on the floor behind the seat.
Storing driving positions
Associated with adjustments of the electrical
driver's seat, this function allows two driving
positions to be memorised, to make these
adjustments easier if there are frequent driver
changes.
Storing a position
Using buttons M / 1 / 2
F S it in the driver's seat.
F
S
witch on the ignition.
F
A
djust your seat and the door mirrors.
F
P
ress button M , then press button 1 or 2
within four seconds.
An audible signal indicates that the position has
been stored.
Storing a new position cancels the
previous position.
It takes account of the electric adjustments of
the seat and the door mirrors.
Ease of use and comfort
Page 89 of 360
87
�$�8�7�2
�)�$�6�7
�$�8�7�2
�1�2�5�0�$�/
�6�2�)�7
�$�8�7�2
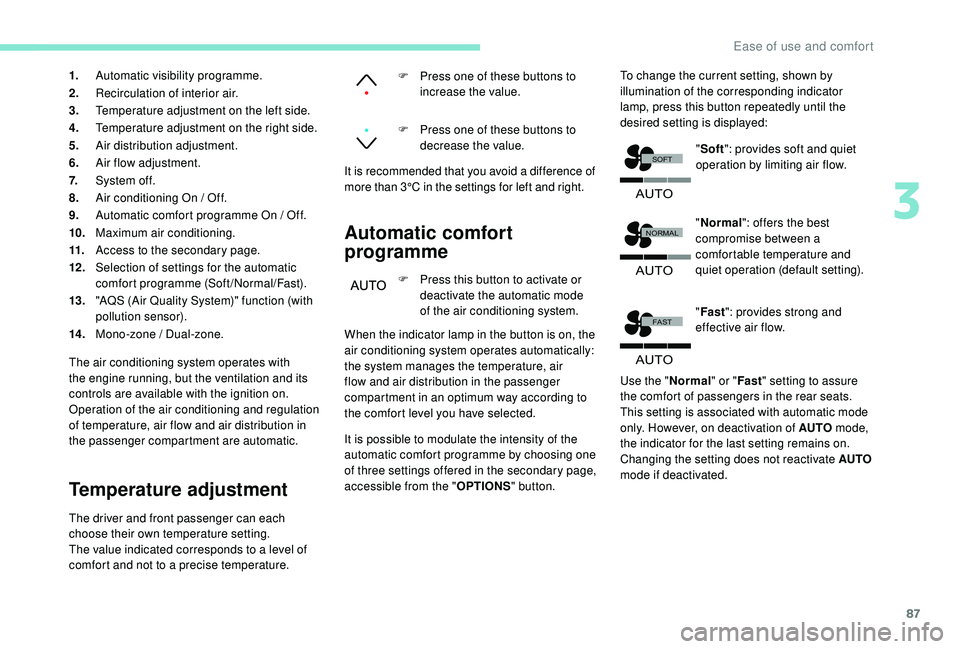
1.Automatic visibility programme.
2. Recirculation of interior air.
3. Temperature adjustment on the left side.
4. Temperature adjustment on the right side.
5. Air distribution adjustment.
6. Air flow adjustment.
7. System of f.
8. Air conditioning On / Off.
9. Automatic comfort programme On / Off.
10. Maximum air conditioning.
11. Access to the secondary page.
12 . Selection of settings for the automatic
comfort programme (Soft/Normal/Fast).
13. "AQS (Air Quality System)" function (with
pollution sensor).
14 . Mono-zone / Dual-zone.
The air conditioning system operates with
the engine running, but the ventilation and its
controls are available with the ignition on.
Operation of the air conditioning and regulation
of temperature, air flow and air distribution in
the passenger compartment are automatic.
Temperature adjustment
The driver and front passenger can each
choose their own temperature setting.
The value indicated corresponds to a level of
comfort and not to a precise temperature.
Automatic comfort
programme
F Press this button to activate or deactivate the automatic mode
of the air conditioning system.
F
P
ress one of these buttons to
increase the value.
F
P
ress one of these buttons to
decrease the value.
It is recommended that you avoid a difference of
more than 3°C in the settings for left and right.
When the indicator lamp in the button is on, the
air conditioning system operates automatically:
the system manages the temperature, air
flow and air distribution in the passenger
compartment in an optimum way according to
the comfort level you have selected.
It is possible to modulate the intensity of the
automatic comfort programme by choosing one
of three settings offered in the secondary page,
accessible from the " OPTIONS" button. To change the current setting, shown by
illumination of the corresponding indicator
lamp, press this button repeatedly until the
desired setting is displayed:
"Normal ": offers the best
compromise between a
comfortable temperature and
quiet operation (default setting).
" Fast ": provides strong and
effective air flow.
Use the " Normal" or "Fast" setting to assure
the comfort of passengers in the rear seats.
This setting is associated with automatic mode
only. However, on deactivation of AUTO mode,
the indicator for the last setting remains on.
Changing the setting does not reactivate AUTO
mode if deactivated. "
Soft ": provides soft and quiet
operation by limiting air flow.
3
Ease of use and comfort
Page 134 of 360
132
Advice
The driver must ensure that passengers
use the seat belts correctly and that they
are all fastened before setting off.
Wherever you are seated in the vehicle,
always fasten your seat belt, even for short
journeys.
Do not interchange the seat belt buckles as
they will not fulfil their role fully.
The seat belts are fitted with an inertia reel
permitting automatic adjustment of the
length of the strap to your size. The seat
belt is stowed automatically when not in
use.
Before and after use, ensure that the seat
belt is reeled in correctly.
The lower part of the strap must be
positioned as low as possible on the pelvis.
The upper part must be positioned in the
hollow of the shoulder.
The inertia reels have an automatic locking
device at the time of a collision, during
sudden braking or if the vehicle turns over.
You can release the device by pulling the
strap firmly and then releasing it so that it
reels in slightly.In order to be effective, a seat belt must:
-
b e tightened as close to the body as
possible,
-
b
e pulled in front of you with a smooth
movement, checking that it does not twist,
-
b
e used to restrain only one person,
-
n
ot show any signs of cuts or fraying,
-
n
ot be converted or modified to avoid
affecting its performance.
In accordance with current safety regulations,
for all repairs on your vehicle's seat belts, go
to a qualified workshop with the skills and
equipment needed, which a PEUGEOT dealer
is able to provide.
Have your seat belts checked regularly by a
PEUGEOT dealer or a qualified workshop,
particularly if the straps show signs of
damage.
Clean the seat belt straps with soapy water or
a textile cleaning product, sold by PEUGEOT
dealers.
After folding or moving a seat or rear bench
seat, ensure that the seat belt is positioned
and reeled in correctly. Recommendations for children
Use a suitable child seat if the passenger is
less than 12
years old or shorter than one and
a half metres.
Never use the same seat belt to secure more
than one person.
Never allow a child to travel on your lap.
For more information on Child seats , refer to
the corresponding section.
In the event of an impact
Depending on the nature and seriousness
of the impact , the pyrotechnic device may
be deployed before and independently of the
airbags. Deployment of the pretensioners is
accompanied by a slight discharge of harmless
smoke and a noise, due to the activation of
the pyrotechnic cartridge incorporated in the
system.
In all cases, the airbag warning lamp comes
on.
Following an impact, have the seat belts
system checked and, if necessary, replaced, by
a PEUGEOT dealer or a qualified workshop.
Safety
Page 144 of 360
142
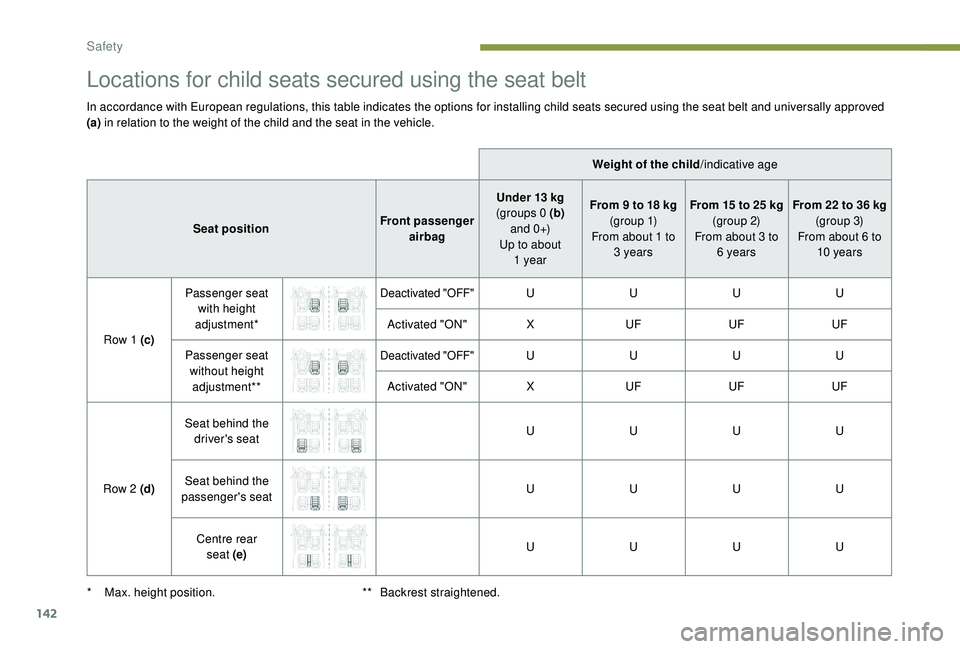
Locations for child seats secured using the seat belt
In accordance with European regulations, this table indicates the options for installing child seats secured using the seat belt and universally approved
(a) in relation to the weight of the child and the seat in the vehicle.
Weight of the child/indicative age
Seat position Front passenger
airbag Under 13
kg
(groups 0 (b)
a n d
0 +)
Up to about 1
yearFrom 9 to 18
kg
(g r o u p 1)
From about 1 to 3
yearsFrom 15 to 25
kg
(group 2)
From about 3 to 6
yearsFrom 22 to 36 kg
(group 3)
From about 6 to 10
years
Row 1 (c) Passenger seat
with height
adjustment*
Deactivated "OFF"U UUU
Activated "ON" XUF UFUF
Passenger seat without height adjustment**
Deactivated "OFF"U UUU
Activated "ON" XUF UFUF
Row 2 (d) Seat behind the
driver's seat U
UUU
Seat behind the
passenger's seat U
UUU
Centre rear seat
(e) U
UUU
*
M
ax. height position. **
B
ackrest straightened.
Safety
Page 147 of 360
145
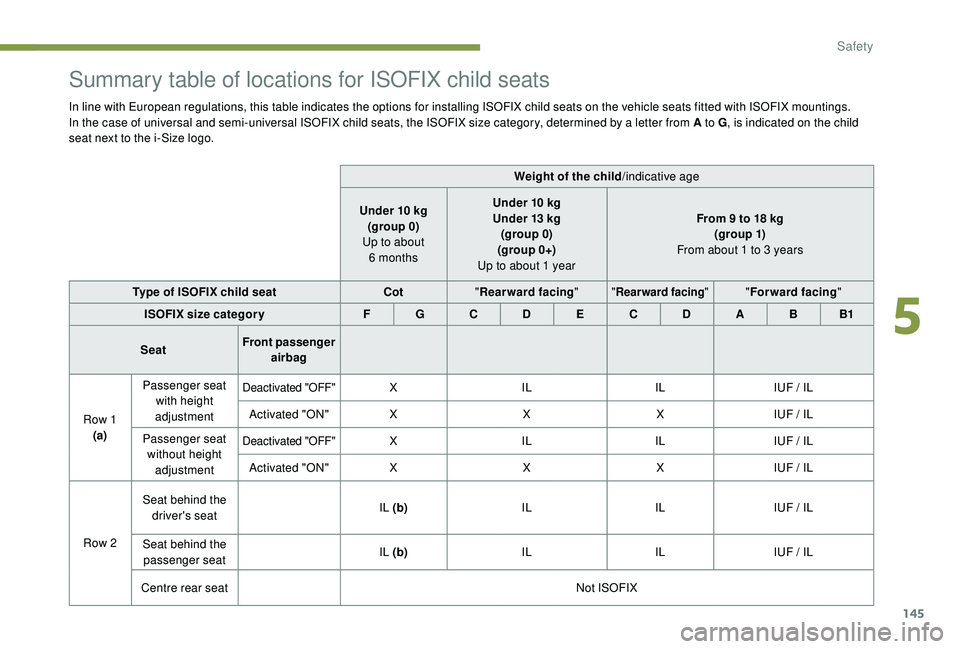
Summary table of locations for ISOFIX child seats
In line with European regulations, this table indicates the options for installing ISOFIX child seats on the vehicle seats fitted with ISOFIX mountings.
In the case of universal and semi-universal ISOFIX child seats, the ISOFIX size category, determined by a letter from A to G, is indicated on the child
seat next to the i-Size logo.
Weight of the child/indicative age
Under 10
kg
(group 0)
Up to about 6
monthsUnder 10
kg
Under 13
kg
(group 0)
(group 0+)
Up to about 1
yearFrom 9 to 18 kg
(g ro up 1)
From about 1 to 3
years
Type of ISOFIX child seat Cot"Rearward facing "
"Rearward facing ""Forward facing "
ISOFIX size categor y F G C D E C D A B B1
Seat Front passenger
airbag
Row 1
(a) Passenger seat
with height
adjustment
Deactivated "OFF"X IL ILIUF / IL
Activated "ON" XXXIUF / IL
Passenger seat without height adjustment
Deactivated "OFF"X IL ILIUF / IL
Activated "ON" XXXIUF / IL
Row 2 Seat behind the
driver's seat IL (b)
ILILIUF / IL
Seat behind the passenger seat IL (b)
ILILIUF / IL
Centre rear seat Not ISOFIX
5
Safety