2018 Peugeot 308 boot
[x] Cancel search: bootPage 81 of 360
79
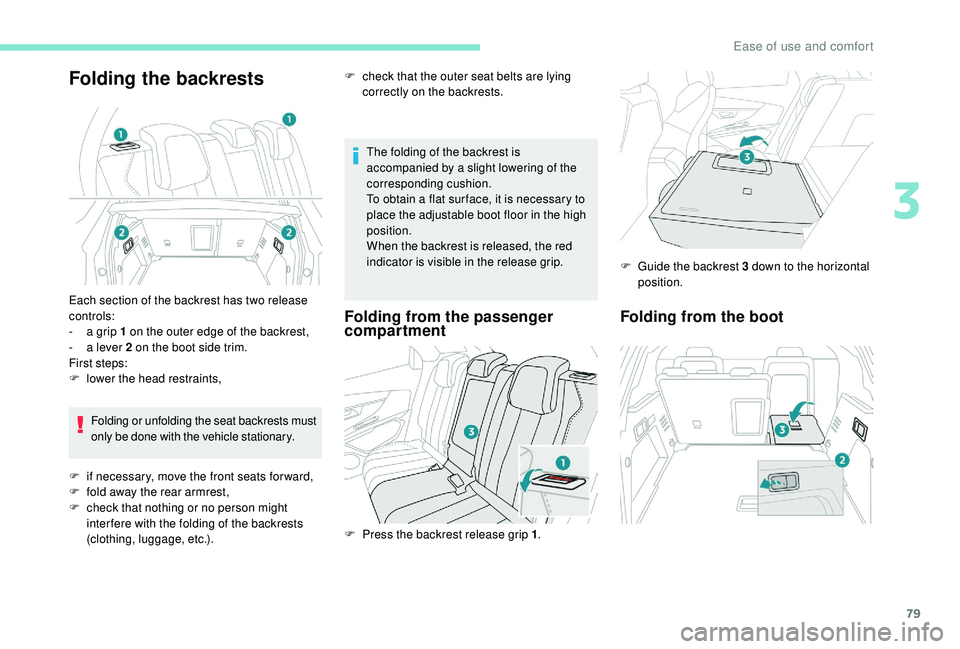
Folding the backrests
The folding of the backrest is
accompanied by a slight lowering of the
corresponding cushion.
To obtain a flat sur face, it is necessary to
place the adjustable boot floor in the high
position.
When the backrest is released, the red
indicator is visible in the release grip.
Folding from the passenger
compartmentFolding from the boot
Each section of the backrest has two release
controls:
-
a g
rip 1 on the outer edge of the backrest,
-
a l
ever 2 on the boot side trim.
First steps:
F
l
ower the head restraints,Folding or unfolding the seat backrests must
only be done with the vehicle stationary.
F
i
f necessary, move the front seats for ward,
F
f
old away the rear armrest,
F
c
heck that nothing or no person might
inter fere with the folding of the backrests
(clothing, luggage, etc.). F
P
ress the backrest release grip 1.F
G
uide the backrest 3 down to the horizontal
position.
F
c
heck that the outer seat belts are lying
correctly on the backrests.
3
Ease of use and comfort
Page 82 of 360
80
Please note: an incorrectly latched
backrest compromises the safety of
passengers in the event of sudden
braking or an impact.
The contents of the boot may be thrown
forward – Risk of serious injury!
i-Cockpit Amplify function
This function allows the driving ambiences to
be managed.
Specific system settings are offered for each
ambience.
These ambiences can be personalised in the
touch screen.
Content of an ambience
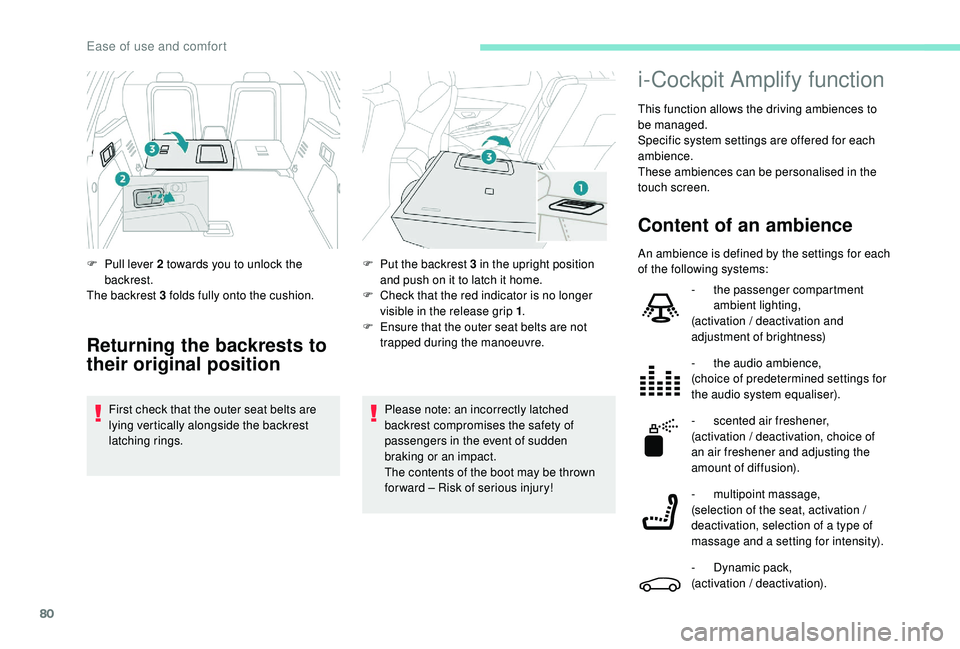
F Pull lever 2 towards you to unlock the backrest.
The backrest 3 folds fully onto the cushion.
Returning the backrests to
their original position
First check that the outer seat belts are
lying vertically alongside the backrest
latching rings. F
P
ut the backrest 3 in the upright position
and push on it to latch it home.
F
C
heck that the red indicator is no longer
visible in the release grip 1 .
F
E
nsure that the outer seat belts are not
trapped during the manoeuvre. An ambience is defined by the settings for each
of the following systems:
-
t
he passenger compartment
ambient lighting,
(activation / deactivation and
adjustment of brightness)
-
t
he audio ambience,
(choice of predetermined settings for
the audio system equaliser).
- s cented air freshener,
(activation / deactivation, choice of
an air freshener and adjusting the
amount of diffusion).
-
m
ultipoint massage,
(selection of the seat, activation /
deactivation, selection of a type of
massage and a setting for intensity).
-
D
ynamic pack,
(activation / deactivation).
Ease of use and comfort
Page 85 of 360
83
Recommendations for ventilation and
air conditioning
In order for these systems to be fully
effective, follow the operation and
maintenance guidelines below:
F
T
o ensure that the air is distributed
evenly, keep the external air intake
grilles at the base of the windscreen,
the nozzles, the vents, the air outlets
and the air extractor in the boot free
from obstructions.
F
D
o not cover the sunshine sensor,
located on the dashboard; this is used
for regulation of the automatic air
conditioning system.
F
O
perate the air conditioning system for
at least 5 to 10
minutes once or twice
a month to keep it in per fect working
o r d e r.
F
E
nsure that the passenger
compartment filter is in good condition
and have the filter elements replaced
regularly. We recommend the use of
a combined passenger compartment
filter. Thanks to its special active
additive, it contributes to the purification
of the air breathed by the occupants
and the cleanliness of the passenger
compartment (reduction of allergic
symptoms, bad odours and greasy
deposits). If after an extended stop in sunshine,
the interior temperature is very high,
first air the passenger compartment for
a few moments.
Put the air flow control at a setting high
enough to quickly change the air in the
passenger compartment.
The condensation created by the air
conditioning results in a discharge of
water under the vehicle which is per fectly
normal.
Stop & Star t
The heating and air conditioning systems
only work when the engine is running.
To maintain a comfortable temperature
in the passenger compartment, you may
temporarily deactivate the Stop & Start
system.
For more information on Stop & Star t ,
refer to the corresponding section.
F
T o ensure correct operation of the
air conditioning system, you are also
advised to have it checked regularly
as recommended in the Warranty and
Maintenance Record.
F
I
f the system does not produce cold air,
switch it off and contact a PEUGEOT
dealer or a qualified workshop.
When towing the maximum load on a steep
gradient in high temperatures, switching off
the air conditioning increases the available
engine power and so improves the towing
ability.
3
Ease of use and comfort
Page 107 of 360
105
The connection of an electrical device
not approved by PEUGEOT, such as a
USB charger, may adversely affect the
operation of vehicle electrical systems,
causing faults such as poor radio
reception or inter ference with displays
in the screens.
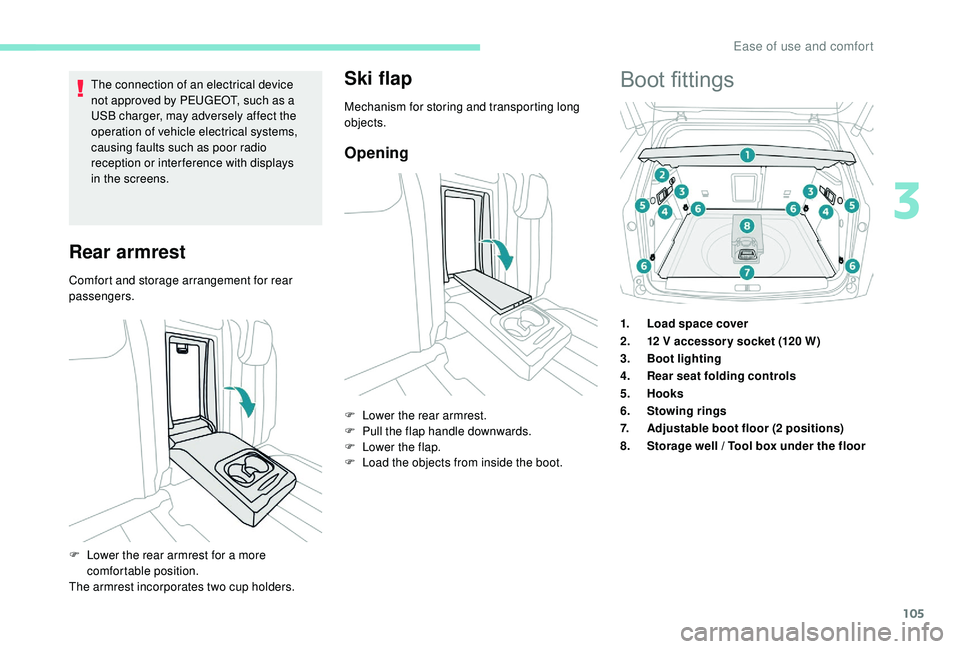
Rear armrest
Comfort and storage arrangement for rear
passengers.
Ski flap
Mechanism for storing and transporting long
objects.
Opening
F Lower the rear armrest for a more comfortable position.
The armrest incorporates two cup holders. F
L
ower the rear armrest.
F
P
ull the flap handle downwards.
F
L
ower the flap.
F
L
oad the objects from inside the boot.
Boot fittings
1.
Load space cover
2. 12
V accessor y socket (120 W)
3. Boot lighting
4. Rear seat folding controls
5. Hooks
6. Stowing rings
7. Adjustable boot floor (2
positions)
8. Storage well / Tool box under the floor
3
Ease of use and comfort
Page 108 of 360
106
The stowing rings are designed to
secure luggage using different types of
retaining nets.
Such nets are available as an option or
as an accessory.
For more information, contact a
PEUGEOT dealer.
For the installation of a high load
retaining net, refer to the corresponding
section.
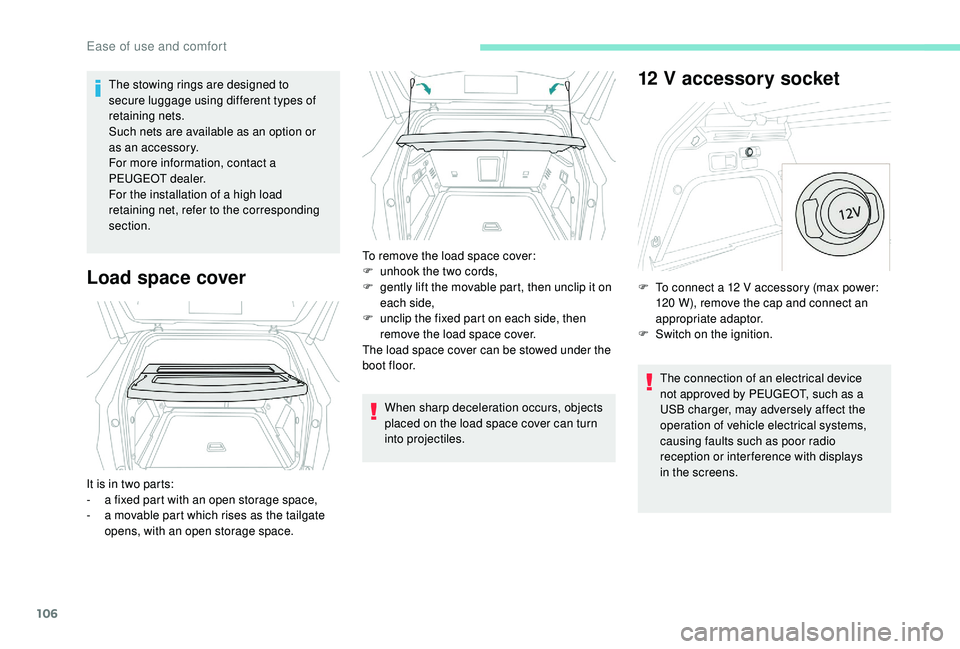
Load space cover
When sharp deceleration occurs, objects
placed on the load space cover can turn
into projectiles.
12 V accessory socket
The connection of an electrical device
not approved by PEUGEOT, such as a
USB charger, may adversely affect the
operation of vehicle electrical systems,
causing faults such as poor radio
reception or inter ference with displays
in the screens.
It is in two parts:
-
a f
ixed part with an open storage space,
-
a m
ovable part which rises as the tailgate
opens, with an open storage space. To remove the load space cover:
F
u
nhook the two cords,
F
g
ently lift the movable part, then unclip it on
each side,
F
u
nclip the fixed part on each side, then
remove the load space cover.
The load space cover can be stowed under the
boot floor. F
T
o connect a 12 V accessory (max power:
120 W), remove the cap and connect an
appropriate adaptor.
F
S
witch on the ignition.
Ease of use and comfort
Page 109 of 360
107
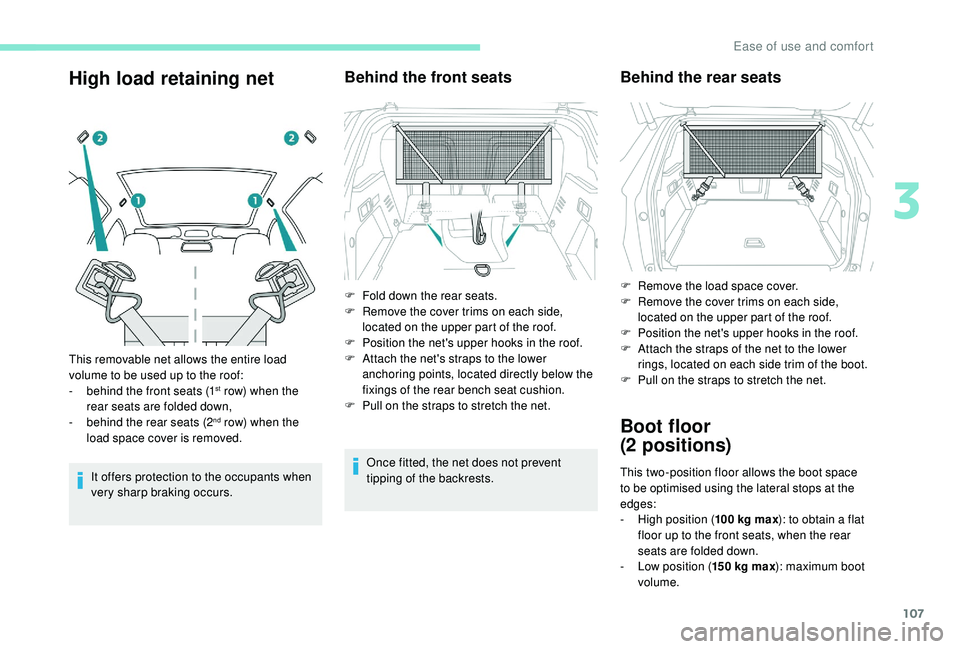
High load retaining net
It offers protection to the occupants when
very sharp braking occurs.
Behind the front seats
Once fitted, the net does not prevent
tipping of the backrests.
This removable net allows the entire load
volume to be used up to the roof:
-
b
ehind the front seats (1
st row) when the
rear seats are folded down,
-
b
ehind the rear seats (2
nd row) when the
load space cover is removed. F
F
old down the rear seats.
F
R
emove the cover trims on each side,
located on the upper part of the roof.
F
P
osition the net's upper hooks in the roof.
F
A
ttach the net's straps to the lower
anchoring points, located directly below the
fixings of the rear bench seat cushion.
F
P
ull on the straps to stretch the net.
Behind the rear seats
Boot floor
(2
positions)
This two-position floor allows the boot space
to be optimised using the lateral stops at the
edges:
-
Hig
h position ( 100
kg max): to obtain a flat
floor up to the front seats, when the rear
seats are folded down.
-
L
ow position ( 150
kg max): maximum boot
volume.
F
R
emove the load space cover.
F
R
emove the cover trims on each side,
located on the upper part of the roof.
F
P
osition the net's upper hooks in the roof.
F
A
ttach the straps of the net to the lower
rings, located on each side trim of the boot.
F
P
ull on the straps to stretch the net.
3
Ease of use and comfort
Page 110 of 360
108
On certain versions, the adjustable boot
floor cannot be fitted in the low position.
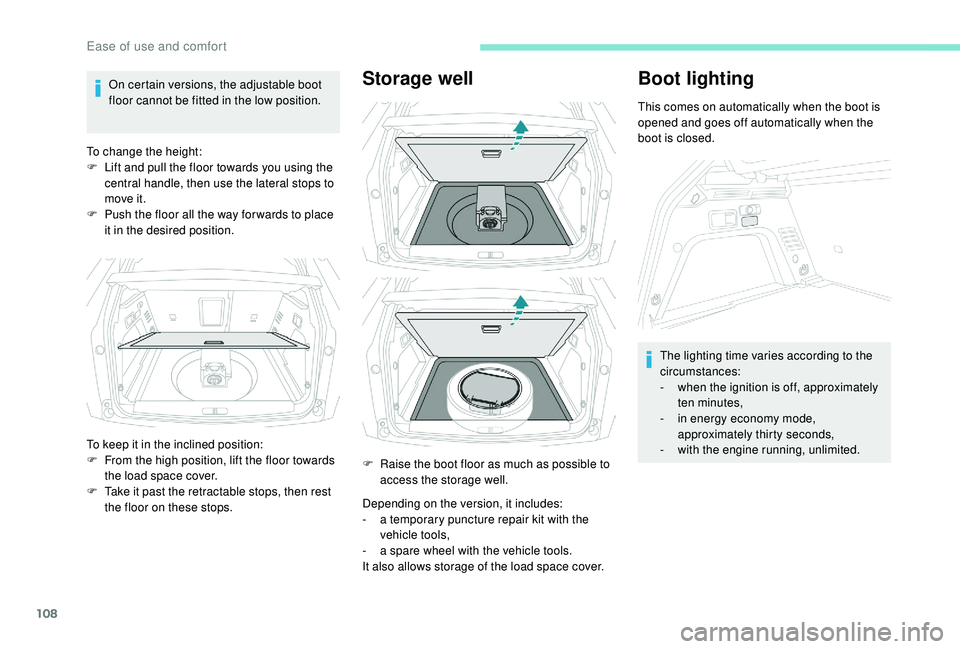
To change the height:
F
L
ift and pull the floor towards you using the
central handle, then use the lateral stops to
move it.
F
P
ush the floor all the way for wards to place
it in the desired position.Storage well
Depending on the version, it includes:
- a t emporary puncture repair kit with the
vehicle tools,
-
a s
pare wheel with the vehicle tools.
It also allows storage of the load space cover.
Boot lighting
This comes on automatically when the boot is
opened and goes off automatically when the
boot is closed.
The lighting time varies according to the
circumstances:
-
w
hen the ignition is off, approximately
ten minutes,
-
i
n energy economy mode,
approximately thirty seconds,
-
w
ith the engine running, unlimited.
To keep it in the inclined position:
F
F
rom the high position, lift the floor towards
the load space cover.
F
T
ake it past the retractable stops, then rest
the floor on these stops. F
R
aise the boot floor as much as possible to
access the storage well.
Ease of use and comfort
Page 114 of 360
112
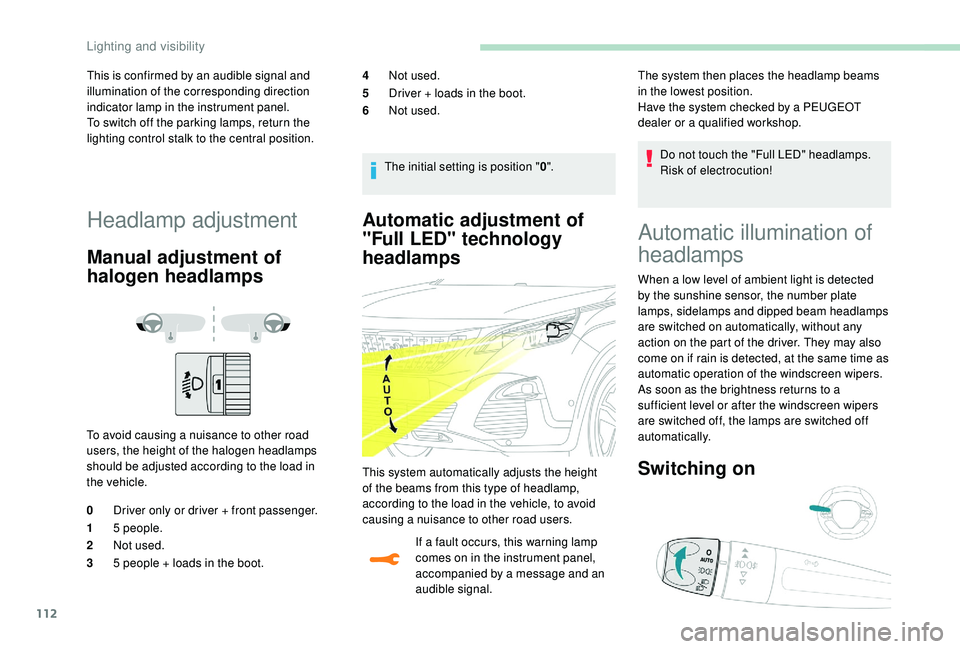
Automatic adjustment of
"Full LED" technology
headlamps
If a fault occurs, this warning lamp
comes on in the instrument panel,
accompanied by a message and an
audible signal.Do not touch the "Full LED" headlamps.
Risk of electrocution!
The system then places the headlamp beams
in the lowest position.
Have the system checked by a PEUGEOT
dealer or a qualified workshop.
Automatic illumination of
headlamps
This is confirmed by an audible signal and
illumination of the corresponding direction
indicator lamp in the instrument panel.
To switch off the parking lamps, return the
lighting control stalk to the central position.
Headlamp adjustment
Manual adjustment of
halogen headlamps
To avoid causing a nuisance to other road
users, the height of the halogen headlamps
should be adjusted according to the load in
the vehicle.
0
Driver only or driver + front passenger.
1 5
people.
2 Not used.
3 5
people + loads in the boot. 4
Not used.
5 Driver + loads in the boot.
6 Not used.
The initial setting is position " 0".
This system automatically adjusts the height
of the beams from this type of headlamp,
according to the load in the vehicle, to avoid
causing a nuisance to other road users. When a low level of ambient light is detected
by the sunshine sensor, the number plate
lamps,
sidelamps and dipped beam headlamps
are switched on automatically, without any
action on the part of the driver. They may also
come on if rain is detected, at the same time as
automatic operation of the windscreen wipers.
As soon as the brightness returns to a
sufficient level or after the windscreen wipers
are switched off, the lamps are switched off
automatically.
Switching on
Lighting and visibility