2018 Peugeot 308 ad blue
[x] Cancel search: ad bluePage 127 of 324
125
Starting the vehicle
From mode P:
F P ress the brake pedal down fully.
F
S
tart the engine.
F
M
aintaining pressure on the brake pedal,
press the Unlock button.
F
P
ush once or twice rear ward to select the
automatic mode D , or for ward to engage
reverse R .
From neutral N :
F
P
ress the brake pedal down fully.
F
S
tart the engine.
F
M
aintaining pressure on the brake pedal,
push rear ward to select the automatic
mode D , or for ward, while pressing the
Unlock
button to engage reverse R .
Then, from D or R :
F
R
elease the brake pedal.
F
A
ccelerate progressively to automatically
release the electric parking brake.
F
W
ith the parking brake released, the vehicle
then moves off.
In severe wintry conditions (temperature
below -23°C), it is recommended that the
engine be allowed to run for a few minutes
before moving off, to ensure the correct
operation and durability of the engine and
gearbox. If your vehicle has an automatic gearbox,
never try to start the engine by pushing
the vehicle.
Stopping the vehicle
Whatever the state of the gearbox when the
ignition is switched off, mode P is engaged
automatically, with the exception of mode N
,
in which case mode P will be engaged after
a delay of 5
seconds (allowing the change to
free-wheel).
Check that mode P has been engaged and that
the electric parking brake has been applied
automatically; if not, apply it manually.
The corresponding indicator lamps for
the selector and the electric parking
brake control lever must be on, as well
as the ones in the instrument panel.
SPORT/ECO control
Driver Sport Pack
With the engine running, when the Driver
Spor t Pack is activated, the gearbox delays
changing up for a more dynamic driving style.
The programme is automatically deactivated
when the ignition is switched off.Eco mode
Activating this mode reduces fuel consumption
by optimising the operation of the heating and
air conditioning and, depending on version, the
pedals, the automatic gearbox and the gear
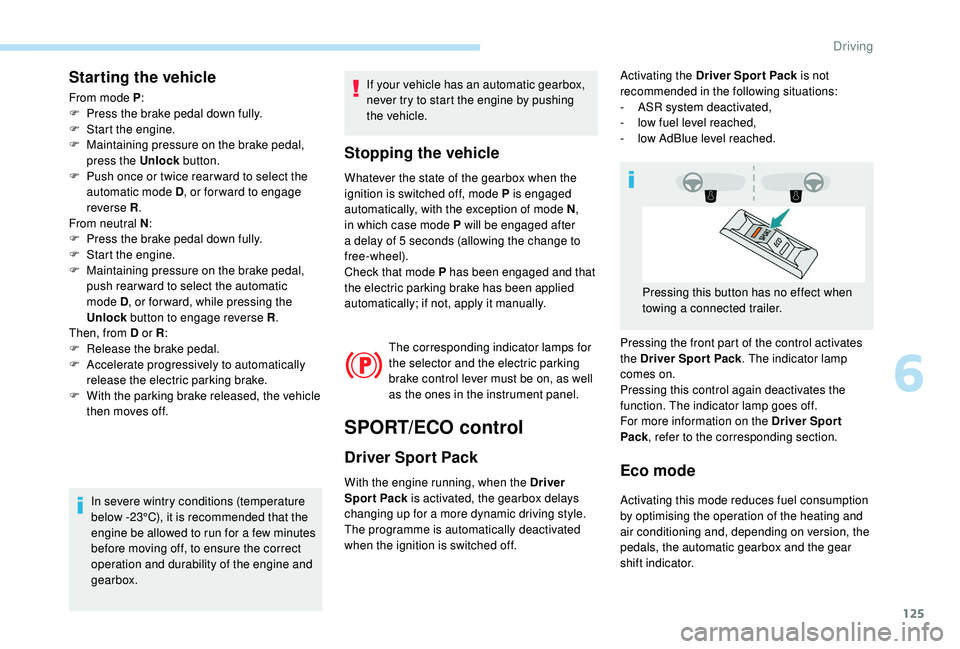
shift indicator. Activating the Driver Spor t Pack is not
recommended in the following situations:
-
A
SR system deactivated,
-
l
ow fuel level reached,
-
l
ow AdBlue level reached.
Pressing the front part of the control activates
the Driver Spor t Pack . The indicator lamp
comes on.
Pressing this control again deactivates the
function. The indicator lamp goes off.
For more information on the Driver Spor t
Pack , refer to the corresponding section.
Pressing this button has no effect when
towing a connected trailer.
6
Driving
Page 130 of 324

128
Stop & Start
The Stop & Start system puts the engine
t emporarily into standby – STOP mode – during
stops in traffic (red lights, traffic jams, etc.). The
engine restarts automatically – START mode –
as soon as you want to move off.
The restart takes place instantly, quickly and
silently.
Per fect for urban use, the Stop & Start system
reduces fuel consumption and exhaust
emissions as well as the noise level when
stationary.
Operation
Going into engine STOP mode
This indicator lamp comes on in the
instrument panel and the engine goes
into standby automatically: -
W
ith a manual gearbox
, at speeds below
2 mph (3 km/h) (with BlueHDi 130 S&S
engine) or with the vehicle stationary (other
engines), when you place the gear selector
in neutral and release the clutch pedal.
- With an automatic gearbox , vehicle
stationary, when you press the brake pedal
or place the gear selector lever in position N .
Stop & Star t time counter
(minutes/seconds or hours/
minutes)
A time counter calculates the time spent in STOP
mode during a journey.
It resets to zero every time the ignition is switched on.
For your comfort, during parking
manoeuvres, STOP mode is not available
for a few seconds after coming out of
reverse gear.
The Stop & Start system does not modify
the vehicle's functions, such as, for
example, braking, power steering, etc.
A slight delay between the vehicle
stopping and the engine cutting out may
be noticed.
Never refuel with the engine in STOP
mode; you must switch off the ignition.
Special cases: STOP mode not
available
STOP mode does not activate, mainly when:
-
t he vehicle is on a steep slope (rising or
falling),
-
t
he driver's door is open,
-
t
he driver's seat belt is not fastened,
-
t
he vehicle has not exceeded 6 mph
(10
km/h) since the last engine start by the
driver,
-
t
he electric parking brake is applied or being
applied,
-
t
he engine is needed to maintain a
comfortable temperature in the passenger
compartment,
-
d
emisting is active,
-
s
ome temporary conditions (battery charge,
engine temperature, braking assistance,
exterior temperature, etc.) make this
necessary to ensure control of a system.
In this case, this indicator lamp flashes
for a few seconds then goes off.
This operation is perfectly normal.
Going into engine START mode
This indicator lamp goes off and the
engine restarts automatically:
The system adapts its gear shift
recommendation according to the driving
conditions (slope, load, etc.) and the
driver’s requirements (power, acceleration,
b r a k i n g , e t c .) .
The system never suggests:
-
e
ngaging first gear,
-
enga
ging reverse gear.
Driving
Page 140 of 324
138
Adaptive cruise control
This system provides the following
functions:
-
A
utomatically maintains the vehicle
at the speed set by the driver.
-
A
utomatic adjustment of the
distance between your vehicle and
the one in front.
With the EAT8 automatic gearbox or with the
BlueHDi 150 S&S EAT6 engine, automatic
adjustment can cause your vehicle to come to a
complete stop.
It manages the acceleration and deceleration
of the vehicle by automatically acting on the
engine and the braking system.
Principle of operation
The system automatically adapts the speed of
your vehicle to that of the vehicle in front, to
maintain a constant distance.
If the vehicle in front is driving more slowly, the
system slows, or even stops your vehicle (with
the EAT8 automatic gearbox or the BlueHDi
150 S&S EAT6 engine), using engine braking
and the braking system.
If the vehicle in front accelerates or changes
lane, the cruise control progressively
accelerates your vehicle to return to the
programmed speed.
If the driver operates a direction indicator to
overtake a slower vehicle, the cruise control
allows your vehicle to temporarily approach
the vehicle in front to assist the overtaking
manoeuvre, though never exceeding the
programmed speed.
The brake lamps illuminate as soon as
the braking system is activated with
deceleration of the vehicle. This system is a driving aid that cannot,
in any circumstances, replace the need to
obser ve speed limits and safety distances,
nor the need for vigilance on the part of
the driver.
Some vehicles present on the road may
not be properly seen or may be poorly
interpreted by the camera and/or radar
(e.g. a lorry), which may lead to a poor
assessment of the distances and lead to
the vehicle inappropriately accelerating or
braking.
The driver must be ready at all times
to retake control of their vehicle by
permanently holding both hands on the
steering wheel and keeping their feet near
the brake and accelerator pedals.
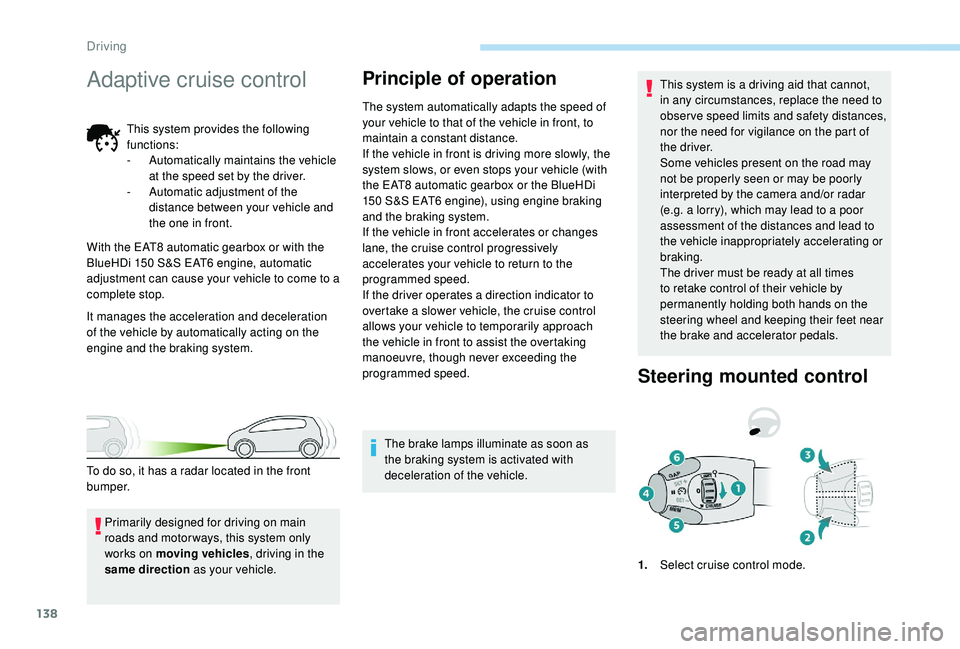
Steering mounted control
1.
Select cruise control mode.
Primarily designed for driving on main
roads and motor ways, this system only
works on moving vehicles
, driving in the
same direction as your vehicle.
To do so, it has a radar located in the front
b u m p e r.
Driving
Page 142 of 324
140
When the cruise control is paused, it
can only be reactivated when all of the
safety conditions are met. The "Activation
denied, conditions unsuitable" message is
displayed if reactivation is not possible.
Reactivating the function
With a manual gearbox
To reactivate the function, the driver must
accelerate to reach at least 19 mph (30 km/h),
then press one of the buttons 2 , 3 or 4.
With the EAT8 gearbox or with the BlueHDi
150 S&S EAT6 engine
Following braking of the vehicle bringing it to
a complete stop, the system holds the vehicle
stationary; the cruise control is paused.
The driver should press the accelerator pedal
to move off, then reactivate the system above
19
mph (30 km/h) by pressing button 2 , 3 or 4.
If the driver takes no action following this
immobilisation, the electric parking brake is
applied automatically after a while (approx. five
minutes).
As a safety measure, wait until the current
speed approaches the speed setting to
reactivate the function by pressing button 4 .
Modification of the speed
setting
With the engine running and cruise control on
(green), you can modify the speed setting.
Modification from the current
speed
F By successive short presses on button 2
or 3 , to lower or raise the setting in steps of
1
mph (km/h),
F
B
y a maintained press on button 2 or 3 , to
lower or raise the setting in steps of 5
mph
(km/h).
Take care: pressing and holding button 2
or 3
results in a rapid change in the speed
of your vehicle.
Modification from the speed Limit
recognition and recommendation
system
F The suggested speed is displayed in the instrument panel.
F
M
ake an initial press on button 5 ; a
message is displayed to confirm the
memorisation request.
F
P
ress button 5 again to save the suggested
speed.
The speed displays immediately in the
instrument panel as the new speed setting. For more information on the Speed Limit
recognition and recommendation
, refer to
the corresponding section.
As a precaution, it is recommended
that you select a cruise speed close to
the current speed of your vehicle, so
as to avoid any sudden acceleration or
deceleration of the vehicle.
Modification of the programmed
inter-vehicle distance
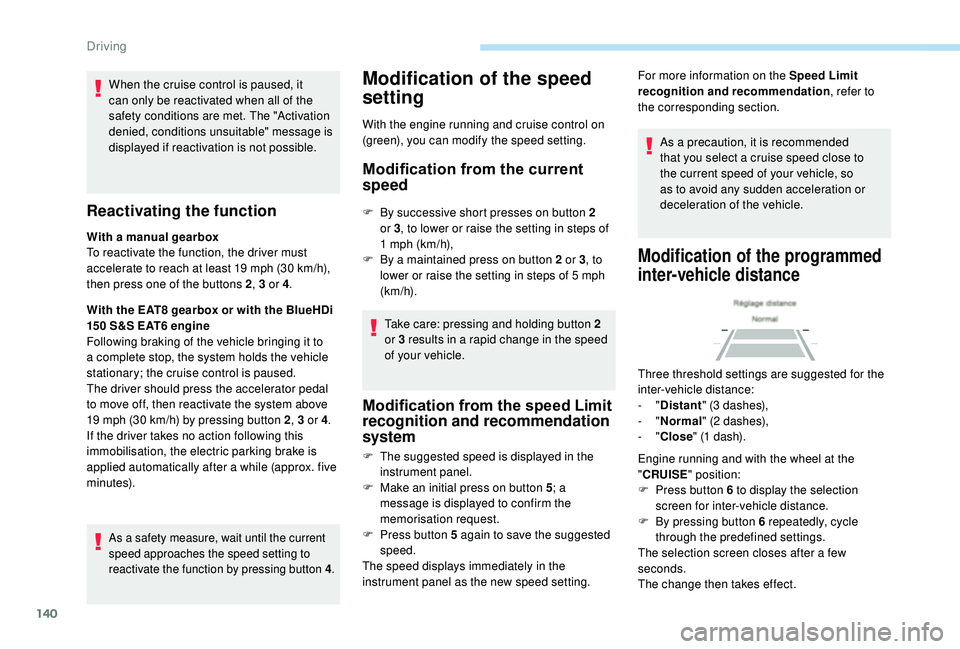
Three threshold settings are suggested for the
inter-vehicle distance:
- "Distant " (3 dashes),
-
"Normal " (2 dashes),
-
"Close " (1 dash).
Engine running and with the wheel at the
" CRUISE " position:
F
P
ress button 6 to display the selection
screen for inter-vehicle distance.
F
B
y pressing button 6 repeatedly, cycle
through the predefined settings.
The selection screen closes after a few
seconds.
The change then takes effect.
Driving
Page 145 of 324
143
70
70
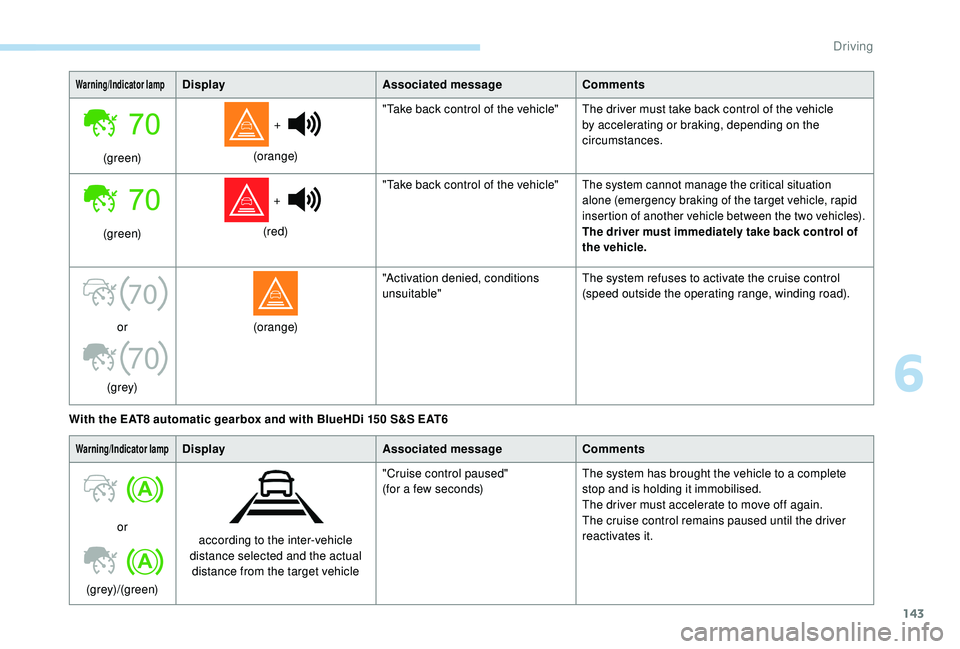
Warning/Indicator lampDisplayAssociated messageComments
(green) +
(orange) "Take back control of the vehicle" The driver must take back control of the vehicle
by accelerating or braking, depending on the
circumstances.
(green) +
(red) "Take back control of the vehicle"
The system cannot manage the critical situation
alone (emergency braking of the target vehicle, rapid
insertion of another vehicle between the two vehicles).
The driver must immediately take back control of
the vehicle.
or
(grey) (orange)
"Activation denied, conditions
unsuitable"
The system refuses to activate the cruise control
(speed outside the operating range, winding road).
With the EAT8 automatic gearbox and with BlueHDi 150 S&S EAT6
Warning/Indicator lampDisplay Associated messageComments
or
(grey)/(green) according to the inter-vehicle
distance selected and the actual distance from the target vehicle "Cruise control paused"
(for a few seconds)
The system has brought the vehicle to a complete
stop and is holding it immobilised.
The driver must accelerate to move off again.
The cruise control remains paused until the driver
reactivates it.
6
Driving
Page 160 of 324
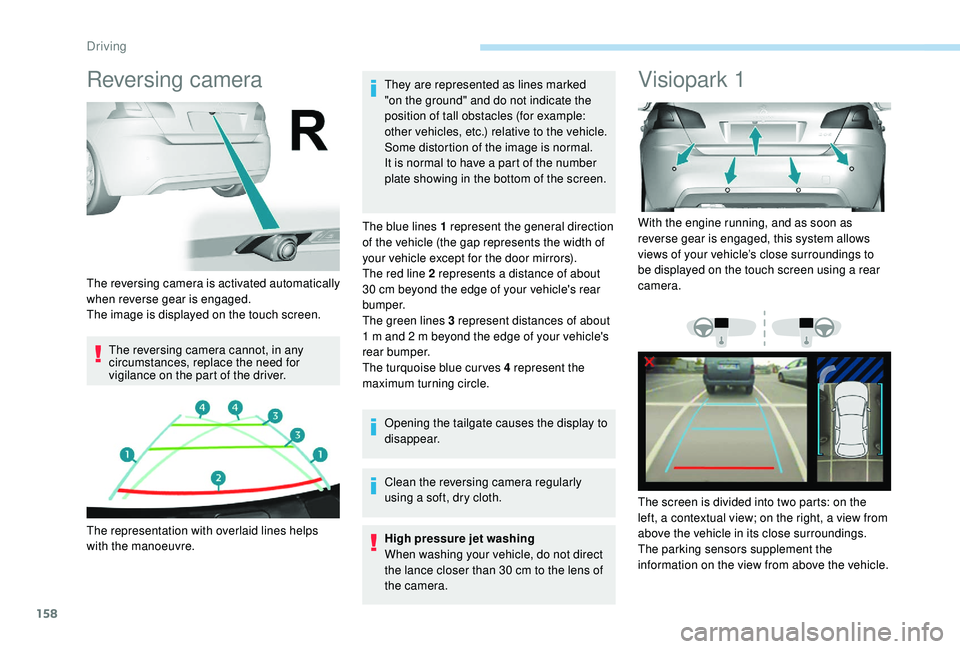
158
Reversing camera
The reversing camera cannot, in any
circumstances, replace the need for
vigilance on the part of the driver.They are represented as lines marked
"on the ground" and do not indicate the
position of tall obstacles (for example:
other vehicles, etc.) relative to the vehicle.
Some distortion of the image is normal.
It is normal to have a part of the number
plate showing in the bottom of the screen.
The blue lines 1 represent the general direction
of the vehicle (the gap represents the width of
your vehicle except for the door mirrors).
The red line 2 represents a distance of about
30 cm beyond the edge of your vehicle's rear
b u m p e r.
The green lines 3 represent distances of about
1 m and 2 m beyond the edge of your vehicle's
rear bumper.
The turquoise blue curves 4 represent the
maximum turning circle.
Opening the tailgate causes the display to
disappear.
Clean the reversing camera regularly
using a soft, dry cloth.
High pressure jet washing
When washing your vehicle, do not direct
the lance closer than 30
cm to the lens of
the camera.
Visiopark 1
The reversing camera is activated automatically
when reverse gear is engaged.
The image is displayed on the touch screen.
The representation with overlaid lines helps
with the manoeuvre. With the engine running, and as soon as
reverse gear is engaged, this system allows
views of your vehicle’s close surroundings to
be displayed on the touch screen using a rear
camera.
The screen is divided into two parts: on the
left, a contextual view; on the right, a view from
above the vehicle in its close surroundings.
The parking sensors supplement the
information on the view from above the vehicle.
Driving
Page 161 of 324

159
Different contextual views can be displayed in
the left-hand part:
-
s
tandard view,
-
1
80° view,
-
z
oom view.
The blue lines 1 represent the width of your
vehicle, with the mirrors unfolded; their
direction changes depending on the position of
the steering wheel.
The red line 2 represents a distance of 30
cm
from the bumper; the two blue lines 3 and 4
represent 1
m and 2 m, respectively.
AUTO mode is activated by default.
In this mode, the system chooses the best view
to display (standard or zoom) according to the
information from the parking sensors.
You can change the type of view at any time
during a manoeuvre.
The state of the system is not kept in memory
when the ignition is switched off.Principle of operation
Using the rear camera, the vehicle's
surroundings are recorded during manoeuvres
at low speed.
An image from above your vehicle in its close
surroundings is created in real time, as the
vehicle manoeuvre progresses.
This representation facilitates the alignment of
your vehicle when parking and allows obstacles
close to the vehicle to be seen.
This image is automatically deleted if the
vehicle remains stationary for too long.
This system is a visual aid that cannot in
any circumstances replace the need for
vigilance on the part of the driver. The images provided by the camera may
be distorted by the relief.
In the presence of areas in shade, or in
conditions of bright sunlight or inadequate
lighting, the image may be darkened and
with lower contrast.
Activation
Activation is automatic on engaging reverse at
a speed lower than 6
mph (10 km/h).
You can choose the display mode at any time
by pressing on this area.
When the sub-menu is displayed, select one of
the four views: "Standard view".
"180° view".
6
Driving
Page 162 of 324

160
The function will be deactivated:
- I f a trailer is attached or a bicycle
carrier is fitted on a towbar (vehicle
fitted with a towbar installed in line with
the manufacturer's recommendations).
-
A
bove about 6 mph (10 km/h).
-
O
n opening the tailgate.
-
W
hen shifting out of reverse (the image
remains displayed for 7
seconds).
-
B
y pressing the red cross in the top
left-hand corner of the touch screen.
Check the cleanliness of the camera lens
regularly.
Clean the reversing camera regularly
using a soft, dry cloth.
AUTO mode
Standard view Zoom view"Zoom view".
"AUTO m o de".
This mode is activated by default.
Using sensors in the rear bumper, the
automatic view changes from a rear view
(standard) to a view from above (zoom), as an
obstacle is approached at the level of the red
line (less than 30
cm) during a manoeuvre.The blue lines 1 represent the width of your
vehicle, with the mirrors unfolded; the direction
changes depending on the position of the
steering wheel.
The red line 2 represents a distance of 30
cm
from the rear bumper; the two blue lines 3 and
4 represent 1
m and 2 m, respectively.
This view is available with AUTO mode or in the
view selection menu.
The area behind the vehicle is displayed on the
screen. The camera records the vehicle's surroundings
during the manoeuvre in order to create a
view from above the rear of the vehicle in its
near surroundings, allowing the vehicle to be
manoeuvred around obstacles nearby.
This view is available with AUTO mode or in the
view selection menu.
Driving