2018 Peugeot 308 battery
[x] Cancel search: batteryPage 49 of 324

47
Closing
If a door or the boot is not closed
correctly with the engine running or the
vehicle moving (speed above 6 mph
(10
km/h)), a message appears for a
few seconds.
Boot
Opening
F With the vehicle unlocked or with the electronic key of the K eyless Entry and
Starting system in the recognition zone,
press the central tailgate control.
F
L
ift the tailgate.
For more information on the Remote control
or
K
eyless Entr y and Star ting , refer to the
corresponding section.
In the event of a fault or difficulties
encountered in manoeuvring the tailgate
when opening or closing it, have it
quickly checked by a PEUGEOT dealer
or a qualified workshop to stop this issue
getting worse and so as to not cause the
tailgate to drop, and serious injuries.
Closing
F Lower the tailgate using one of the interior grab handles.
If the tailgate is not closed correctly (the lock
has two positions): with the engine running or
when moving (speed above 6
mph (10 km/h),
a message appears for a few seconds.
In the event of a fault or difficulties felt in
manoeuvring the tailgate when opening
or closing it, have it quickly checked by a
PEUGEOT dealer or a qualified workshop
to stop this issue getting worse and so
as to not cause the tailgate to drop, and
serious injuries.
Back-up release
System allowing the mechanical unlocking
of the boot in the event of a battery or central
locking system malfunction.
Unlocking Locking after closing
If the fault persists after closing again, the boot
will remain locked. F
F
old the rear seats to gain access to the
lock from inside the boot.
F
I
nsert a small screwdriver into hole A of the
lock to unlock the boot.
F
M
ove the latch to the right.
Bicycle/accessory carrier
Do not fit an accessory carrier to the
tailgate.
2
Access
Page 50 of 324

48
For vehicles that are fitted with it, interior
volumetric monitoring is incompatible with
programmed thermal preconditioning.
Anti-tilt monitoring
(On GT and GTi versions)
The system checks for any change in the
attitude of the vehicle.Self-protection function
The system checks for the putting out of
ser vice of its components.
The alarm is triggered if the siren's
battery, button or wiring is disconnected or
damaged.
For all work on the alarm system, contact
a PEUGEOT dealer or a qualified
workshop.
Locking the vehicle with full
alarm system
Activation
F Switch off the ignition and get out of the vehicle.
F Lock the vehicle using the remote
control.
or
F
L
ock the vehicle using the "
K
eyless Entry
and Starting" system. interior volumetric monitoring after 45
seconds.
If an access (door, boot, bonnet, etc.) is not
properly closed, the vehicle is not locked but
monitoring will be activated after 45 seconds.
Deactivation
F Press this unlocking button on the
remote control.
or
F
U
nlock the vehicle using the "
K
eyless Entry
and Starting" system.
The monitoring system is deactivated: the
indicator lamp in the button goes off and the
direction indicators flash for about 2
seconds.
Where the vehicle locks itself again
automatically (occurs 30
seconds after
unlocking, if a door or the boot is not
opened), the monitoring system is not
reactivated automatically.
To reactivate it, the vehicle must be
unlocked and locked again, using the
remote control key or the "
K
eyless Entry
and Starting" system.
Alarm
This system protects and provides a deterrent
against theft and break-ins.
It provides the following types of monitoring:
Exterior perimeter
The system checks for opening of the vehicle.
The alarm is triggered if anyone tries to open a
door, the boot or the bonnet.
Interior volumetric
The system checks for any variation in the
volume of the passenger compartment.
The alarm is triggered if anyone breaks a
window, enters the passenger compartment or
moves inside the vehicle.
The monitoring system is active: the indicator
lamp in this button flashes once per second
and the direction indicators come on for about
2
seconds.
After an instruction to lock the vehicle using
the remote control or the "
K
eyless Entry
and Starting" system, the exterior perimeter
monitoring is activated after 5
seconds, the
The alarm is triggered if the vehicle is lifted,
moved or knocked.
Access
Page 52 of 324
50
Electric windows
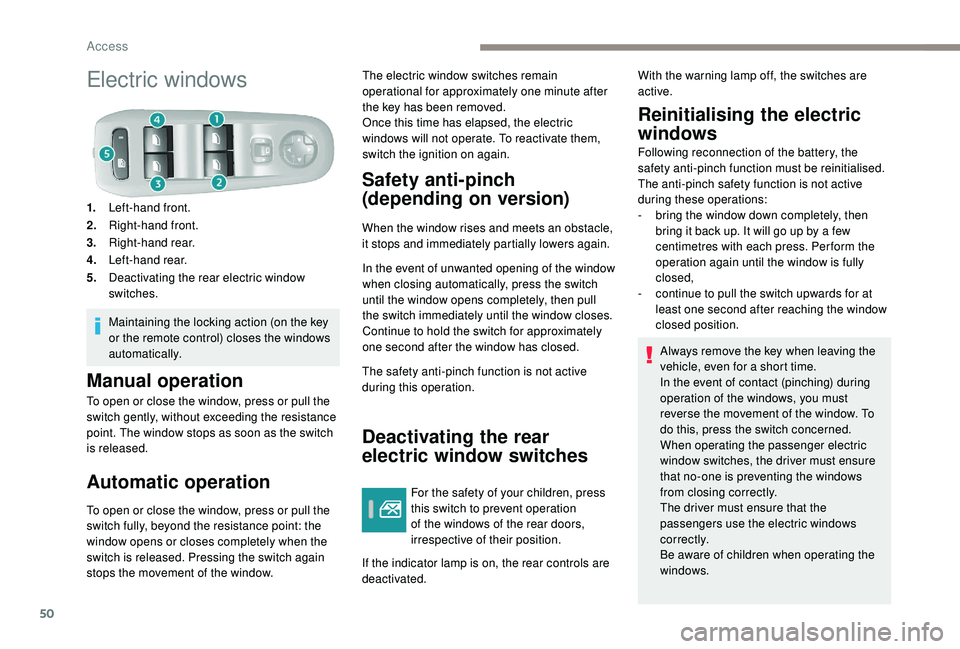
1.Left-hand front.
2. Right-hand front.
3. Right-hand rear.
4. Left-hand rear.
5. Deactivating the rear electric window
switches.
Maintaining the locking action (on the key
or the remote control) closes the windows
automatically.
Manual operation
To open or close the window, press or pull the
switch gently, without exceeding the resistance
point. The window stops as soon as the switch
is released.
Automatic operation
To open or close the window, press or pull the
switch fully, beyond the resistance point: the
window opens or closes completely when the
switch is released. Pressing the switch again
stops the movement of the window. The electric window switches remain
operational for approximately one minute after
the key has been removed.
Once this time has elapsed, the electric
windows will not operate. To reactivate them,
switch the ignition on again.
Safety anti-pinch
(depending on version)
When the window rises and meets an obstacle,
it stops and immediately partially lowers again.
In the event of unwanted opening of the window
when closing automatically, press the switch
until the window opens completely, then pull
the switch immediately until the window closes.
Continue to hold the switch for approximately
one second after the window has closed.
The safety anti-pinch function is not active
during this operation.
Deactivating the rear
electric window switches
For the safety of your children, press
this switch to prevent operation
of the windows of the rear doors,
irrespective of their position.
If the indicator lamp is on, the rear controls are
deactivated.
Reinitialising the electric
windows
Following reconnection of the battery, the
safety anti-pinch function must be reinitialised.
The anti-pinch safety function is not active
during these operations:
-
b
ring the window down completely, then
bring it back up. It will go up by a few
centimetres with each press. Per form the
operation again until the window is fully
closed,
-
c
ontinue to pull the switch upwards for at
least one second after reaching the window
closed position.
Always remove the key when leaving the
vehicle, even for a short time.
In the event of contact (pinching) during
operation of the windows, you must
reverse the movement of the window. To
do this, press the switch concerned.
When operating the passenger electric
window switches, the driver must ensure
that no-one is preventing the windows
from closing correctly.
The driver must ensure that the
passengers use the electric windows
c o r r e c t l y.
Be aware of children when operating the
windows.
With the warning lamp off, the switches are
active.
Access
Page 54 of 324
52
Before moving the seat backwards,
ensure that there is nothing that might
prevent the full travel of the seat.
There is a risk of trapping or pinching
passengers if present in the rear seats
or jamming the seat if large objects are
placed on the floor behind the seat.
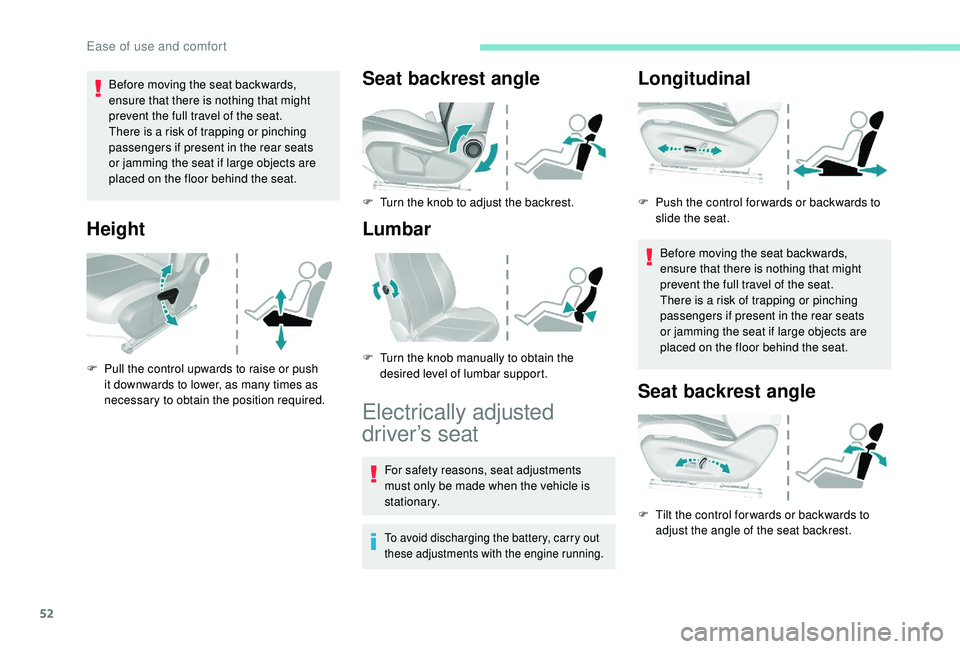
Height
F Pull the control upwards to raise or push it downwards to lower, as many times as
necessary to obtain the position required.
Seat backrest angle
F Turn the knob to adjust the backrest.
Lumbar
Electrically adjusted
driver’s seat
For safety reasons, seat adjustments
must only be made when the vehicle is
stationary.
To avoid discharging the battery, carry out
these adjustments with the engine running.
Longitudinal
Before moving the seat backwards,
ensure that there is nothing that might
prevent the full travel of the seat.
There is a risk of trapping or pinching
passengers if present in the rear seats
or jamming the seat if large objects are
placed on the floor behind the seat.
Seat backrest angle
F Tilt the control for wards or backwards to adjust the angle of the seat backrest.
F
P
ush the control for wards or backwards to
slide the seat.
F
T
urn the knob manually to obtain the
desired level of lumbar support.
Ease of use and comfort
Page 71 of 324

69
F Press the AUTO button again to activate the automatic comfort
programme again.
Air flow adjustment
F Press one of the buttons 2 to increase or decrease the speed of the fan.
The air flow symbol (a fan) is filled in
progressively as the speed of the fan is
increased.
By reducing the air flow to minimum, you are
stopping ventilation.
" OFF " is displayed alongside the fan.
Avoid driving for too long with the
ventilation off (risk of misting and
deterioration of air quality).
Air distribution adjustment
You can modulate the distribution of air in the
passenger compartment using these three buttons.
Windscreen.
Central and side air vents.
Footwells. Each press on a button activates or deactivates
the function. The indicator lamp is on when the
button is activated. For a uniform distribution in
the passenger compartment, all three buttons
can be pressed simultaneously.
In AUTO mode, the indicator lamps in all three
buttons are off.
Air conditioning on/off
The air conditioning is designed to operate
effectively in all seasons, with the windows
closed.
It enables you to:
-
l
ower the temperature, in summer,
-
i
ncrease the effectiveness of the demisting
in winter, above 3°C.
F
P
ress button 4 to activate/deactivate the air
conditioning system.
When the indicator lamp under the button is on,
the air conditioning function is activated.
The air conditioning does not operate when the
air flow adjustment is set to off.
Ventilation function with the
ignition on
When the ignition is switched on, you can use
the ventilation system to adjust the air flow
and air distribution settings in the passenger
compartment for a duration that depends on
the battery charge. This function does not operate the air
conditioning.
"Mono" function
The comfort setting for the passenger's side
can be indexed to the driver's comfort setting
(mono-zone).
From the secondary page of the "
Air
conditioning " menu:
F
P
ress this button to activate/
deactivate the "Mono" function.
The indicator lamp in the button
is on when the function is
activated.
The function is deactivated automatically when
the passenger uses their temperature setting
buttons.
Recirculation of interior air
The intake of exterior air prevents the formation
of mist on the windscreen and side windows.
3
Ease of use and comfort
Page 77 of 324
75
Front and rear foglamps
When the lighting is switched off automatically
(version with AUTO lighting), the foglamp goes
of f.
F
T
o switch it off, turn the ring rear wards.
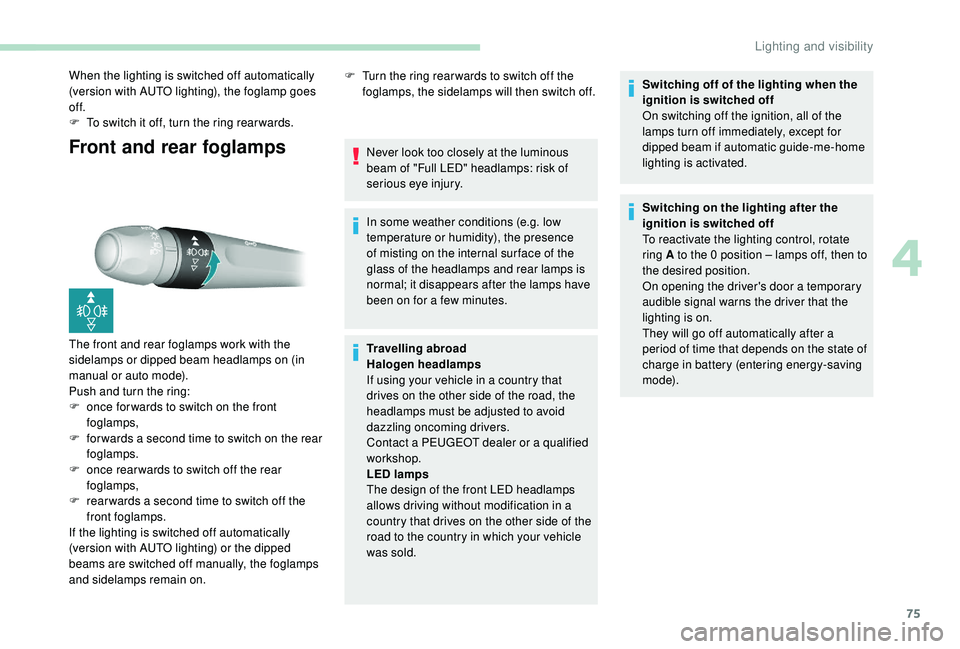
The front and rear foglamps work with the
sidelamps or dipped beam headlamps on (in
manual or auto mode).
Push and turn the ring:
F
o
nce for wards to switch on the front
foglamps,
F
f
or wards a second time to switch on the rear
foglamps.
F
o
nce rear wards to switch off the rear
foglamps,
F
r
ear wards a second time to switch off the
front foglamps.
If the lighting is switched off automatically
(version with AUTO lighting) or the dipped
beams are switched off manually, the foglamps
and sidelamps remain on. F
T urn the ring rear wards to switch off the
foglamps, the sidelamps will then switch off.
Never look too closely at the luminous
beam of "Full LED" headlamps: risk of
serious eye injury.
In some weather conditions (e.g. low
temperature or humidity), the presence
of misting on the internal sur face of the
glass of the headlamps and rear lamps is
normal; it disappears after the lamps have
been on for a few minutes.
Travelling abroad
Halogen headlamps
If using your vehicle in a country that
drives on the other side of the road, the
headlamps must be adjusted to avoid
dazzling oncoming drivers.
Contact a PEUGEOT dealer or a qualified
workshop.
LED lamps
The design of the front LED headlamps
allows driving without modification in a
country that drives on the other side of the
road to the country in which your vehicle
was sold. Switching off of the lighting when the
ignition is switched off
On switching off the ignition, all of the
lamps turn off immediately, except for
dipped beam if automatic guide-me-home
lighting is activated.
Switching on the lighting after the
ignition is switched off
To reactivate the lighting control, rotate
ring A to the 0 position – lamps off, then to
the desired position.
On opening the driver's door a temporary
audible signal warns the driver that the
lighting is on.
They will go off automatically after a
period of time that depends on the state of
charge in battery (entering energy-saving
m o d e).
4
Lighting and visibility
Page 87 of 324
85
Automatic operation of
hazard warning lamps
When braking in an emergency, depending on
the rate of deceleration, as well as when the
ABS function is invoked or in the event of an
impact, the hazard warning lamps come on
automatically.
They switch off automatically once you
accelerate.
F
Y
ou can also switch them off by pressing
the button.
Emergency or assistance
call
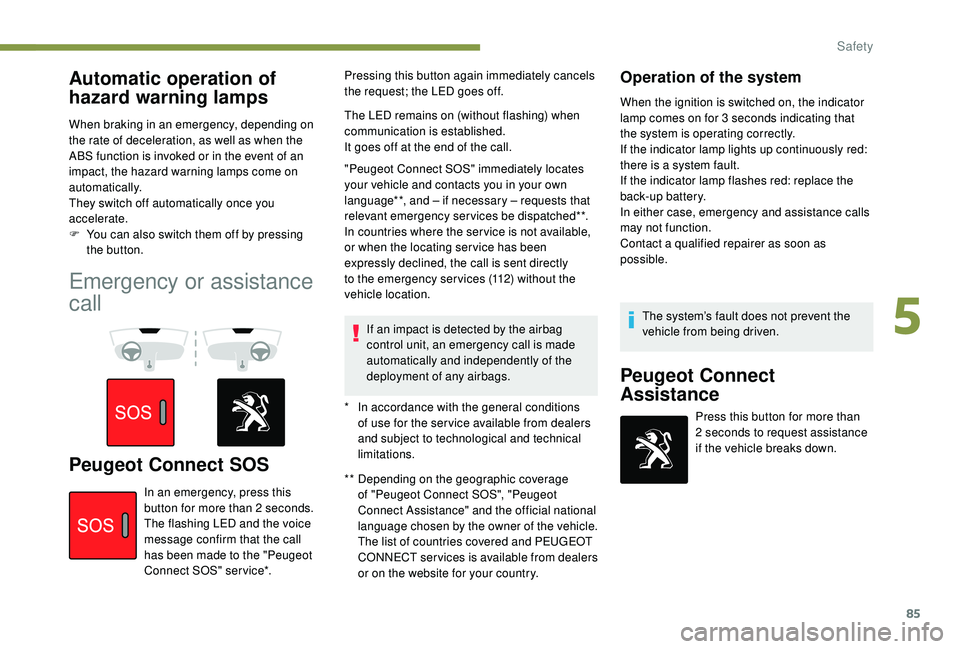
Peugeot Connect SOS** Depending on the geographic coverage of "Peugeot Connect SOS", "Peugeot
Connect Assistance" and the official national
language chosen by the owner of the vehicle.
The list of countries covered and PEUGEOT
CONNECT services is available from dealers
or on the website for your country.
In an emergency, press this
button for more than 2
seconds.
The flashing LED and the voice
message confirm that the call
has been made to the "Peugeot
Connect SOS" ser vice*. Pressing this button again immediately cancels
the request; the LED goes off.
The LED remains on (without flashing) when
communication is established.
It goes off at the end of the call.
"Peugeot Connect SOS" immediately locates
your vehicle and contacts you in your own
language**, and – if necessary – requests that
relevant emergency services be dispatched**.
In countries where the ser vice is not available,
or when the locating ser vice has been
expressly declined, the call is sent directly
to the emergency services (112) without the
vehicle location.
If an impact is detected by the airbag
control unit, an emergency call is made
automatically and independently of the
deployment of any airbags.
Operation of the system
When the ignition is switched on, the indicator
lamp comes on for 3 seconds indicating that
the system is operating correctly.
If the indicator lamp lights up continuously red:
there is a system fault.
If the indicator lamp flashes red: replace the
back-up battery.
In either case, emergency and assistance calls
may not function.
Contact a qualified repairer as soon as
possible.
*
I
n accordance with the general conditions
of use for the ser vice available from dealers
and subject to technological and technical
limitations. The system’s fault does not prevent the
vehicle from being driven.
Peugeot Connect
Assistance
Press this button for more than
2
seconds to request assistance
if the vehicle breaks down.
5
Safety
Page 115 of 324
113
Switching off
F Immobilise the vehicle.
F W ith the electronic key inside the vehicle,
press the " START/STOP " button.
The engine stops and the steering column
locks.
If the vehicle is not immobilised, the
engine will not stop.
Switching the ignition on
(without starting)
With the Keyless Entry and Starting electronic
key inside the vehicle, pressing the " S TA R T/
STOP " button, without pressing any of the
pedals , allows the ignition to be switched on.
This also allows the accessories to be used (for
example: audio system, lighting, etc.).
F
P
ress the " START/STOP " button, the
instrument panel comes on but the engine
does not start.
F
P
ress the button again to switch off the
ignition and allow the vehicle to be locked.
With the ignition on, the system
automatically goes into energy economy
mode to maintain an adequate state of
charge in the battery.
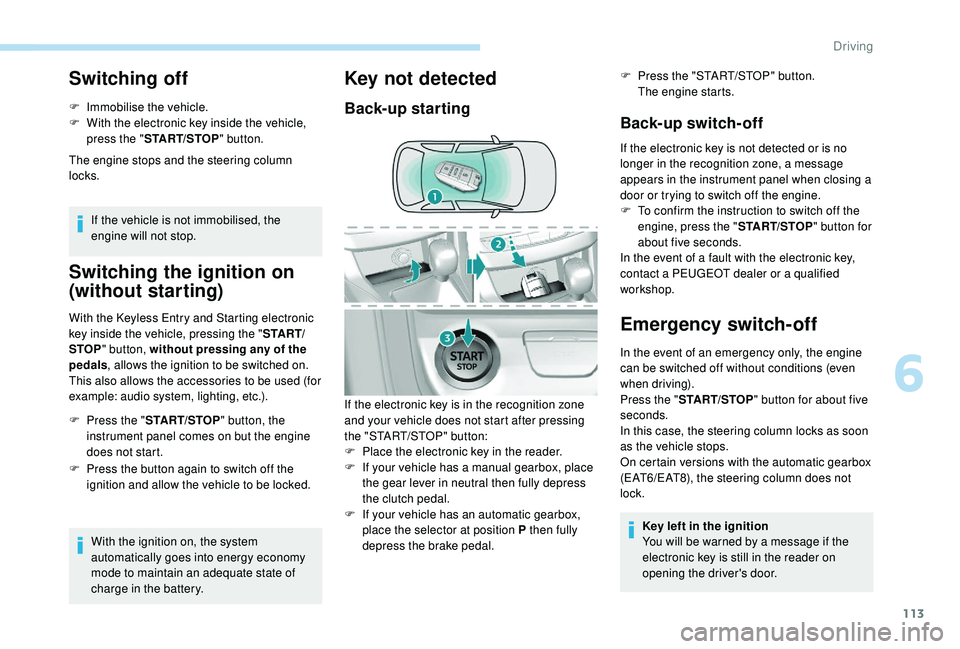
Key not detected
Back-up starting Back-up switch-off
If the electronic key is not detected or is no
longer in the recognition zone, a message
appears in the instrument panel when closing a
door or trying to switch off the engine.
F
T
o confirm the instruction to switch off the
engine, press the " START/STOP" button for
about five seconds.
In the event of a fault with the electronic key,
contact a PEUGEOT dealer or a qualified
workshop.
Emergency switch-off
In the event of an emergency only, the engine
can be switched off without conditions (even
when driving).
Press the " START/STOP " button for about five
seconds.
In this case, the steering column locks as soon
as the vehicle stops.
On certain versions with the automatic gearbox
(EAT6/EAT8), the steering column does not
lock.
Key left in the ignition
You will be warned by a message if the
electronic key is still in the reader on
opening the driver's door.
If the electronic key is in the recognition zone
and your vehicle does not start after pressing
the "START/STOP" button:
F
P
lace the electronic key in the reader.
F
I
f your vehicle has a manual gearbox, place
the gear lever in neutral then fully depress
the clutch pedal.
F
I
f your vehicle has an automatic gearbox,
place the selector at position P then fully
depress the brake pedal. F
P
ress the "START/STOP" button.
The engine starts.
6
Driving