2018 PEUGEOT 3008 car Battery
[x] Cancel search: car BatteryPage 33 of 360

31
Resetting the service indicator
The ser vice indicator must be reset after each
service.
If you have carried out the ser vice on your
vehicle yourself:
F
s
witch off the ignition,
If you have to disconnect the battery
following this operation, lock the vehicle
and wait at least 5
minutes for the reset to
be registered.
Retrieving the service information
You can access the ser vice information at any
time.
F
p
ress and hold the trip distance recorder
reset button,
F
s
witch on the ignition; the distance recorder
display begins a countdown,
F
r
elease the button when " =0" is displayed;
the spanner disappears. F
P
ress the trip distance recorder reset
button.
The ser vice information is displayed for a few
seconds, then disappears.
Engine oil level indicator
(Depending on version.)
On versions fitted with an electric oil level
indicator, the state of the engine oil level is
displayed in the instrument panel for a few
seconds, after the servicing information. The level read will only be correct if the
vehicle is on level ground and the engine
has been off for more than 30
minutes.
Oil level correct
Oil level incorrect
This is indicated by the display of the message
"Oil level incorrect" in the instrument panel
screen, accompanied by the Ser vice warning
lamp and an audible signal.
1
Instruments
Page 60 of 360
58
Anti-intrusion security
This system allows automatic simultaneous
locking of the doors and boot as soon as the
speed of the vehicle exceeds 6 mph (10 km/h).
Operation
If one of the doors or the boot is open, the
automatic central locking does not take place.
Carrying long or voluminous objects
If you want to drive with the boot open, you
should press the central locking button
to lock the doors. Other wise, every time
the speed of the vehicle exceeds 6
mph
(10
km/h), the locks will rebound and the
alerts mentioned above will appear.
Pressing the central locking button
unlocks the vehicle.
Above 6
mph (10 km/h), this unlocking is
te m p o r a r y.
Activation / Deactivation
Driving with the doors locked may render
access for the emergency services
difficult in an emergency.
Alarm
(Depending on version)
System which protects and provides a deterrent
against theft and break-ins. It provides the
following types of monitoring:
- perimeter monitoring
The system checks for opening of the vehicle.
The alarm is triggered if anyone tries to open a
door, the boot, the bonnet, etc.
- volumetric monitoring
The system checks for any variation in the
volume in the passenger compartment.
The alarm is triggered if anyone breaks a
window, enters the passenger compartment or
moves inside the vehicle.
- anti-tilt monitoring
The system checks for any change in the
attitude of the vehicle.
The alarm is triggered if the vehicle is lifted,
moved or knocked.
Self-protection function
The system checks for the putting out of
ser vice of its components.
The alarm is triggered if the battery, the central
control or the siren wiring are put out of ser vice
or damaged.
For all work on the alarm system, contact
a PEUGEOT dealer or a qualified
workshop.
This is signalled by the sound of
the locks rebounding, accompanied
by illumination of this symbol in the
instrument panel, an audible signal and
the display of an alert message.
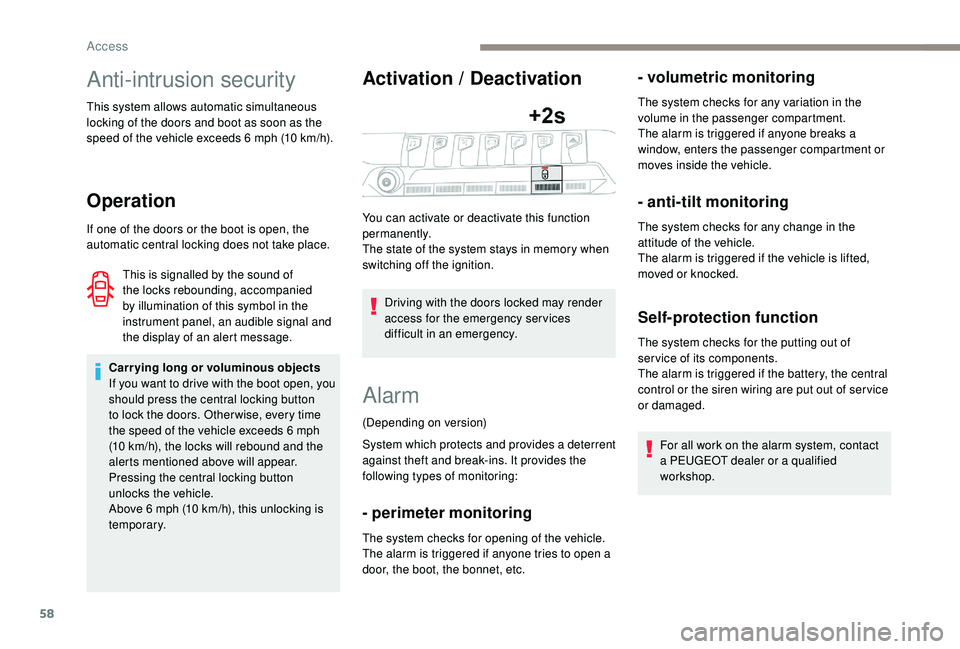
You can activate or deactivate this function
permanently.
The state of the system stays in memory when
switching off the ignition.
Access
Page 67 of 360
65
Reinitialising the
motorised tailgate
This operation is necessary where there is no
movement – after detection of an obstacle,
connecting or recharging the battery, etc.
F
O
pen the tailgate manually, if necessary.
F
F
ully close the tailgate manually.
If the problem persists, contact a PEUGEOT
dealer or a qualified workshop.
Precautions in use
In wintry conditions
In the event of an accumulation of snow
on the tailgate, clear the snow before
commanding a motorised opening of the
tailgate.
The formation of ice can block the tailgate
and prevent its opening: wait until the ice
melts with the heating of the passenger
compartment.
When washing
When washing the vehicle in an automatic
car wash, do not forget to lock your vehicle
to avoid the risk of unexpected opening.
Recommendations related
to the "Hands-Free Tailgate
Access" function
If several kicking movements to operate the
tailgate have no effect, wait a few seconds
before trying again.
The function automatically deactivates in heavy
rain or following a build-up of snow.
If it does not work, check that the electronic key
is not exposed to a source of electromagnetic
pollution (smartphone, etc.).
The function may not work correctly with a
prosthetic leg.
The function may not work correctly if your
vehicle is fitted with a towbar. -
y
our vehicle is being serviced,
-
y
ou are accessing the spare wheel
(depending on version).
To avoid such operating problems, keep the
electronic key away from the recognition
zone or deactivate the "Hands-Free Tailgate
Access" function.
In some circumstances, the tailgate may open
or close by itself, particularly if:
-
y
ou hitch or unhitch a trailer,
-
y
ou fit or remove a bicycle carrier,
-
y
ou load or unload bicycles from a bicycle
c a r r i e r,
-
y
ou place or lift something behind the
vehicle,
-
an
animal approaches the rear bumper,
-
y
ou are washing your vehicle,
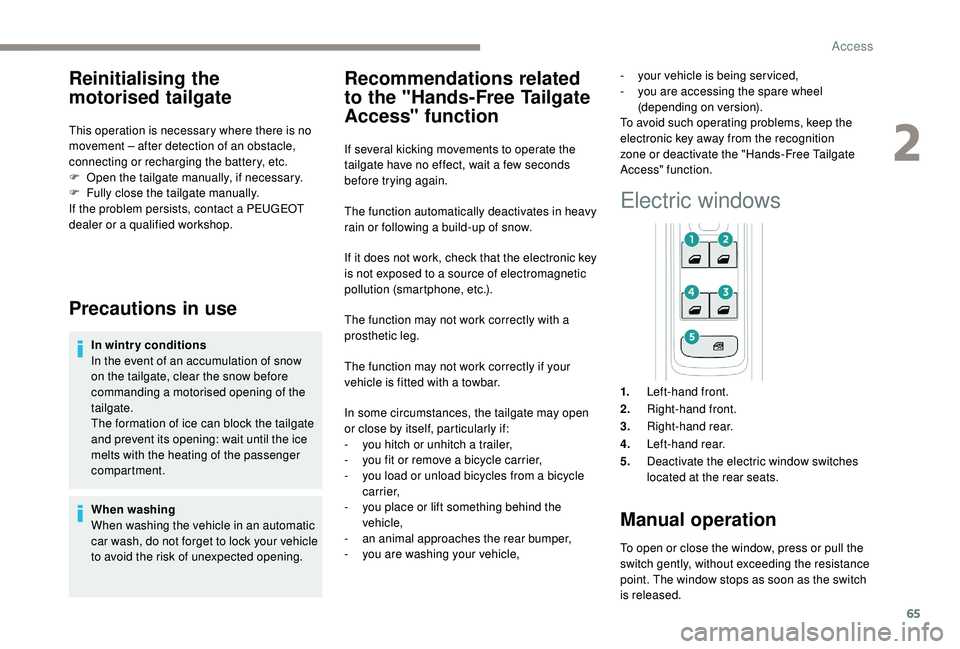
Electric windows
1. Left-hand front.
2. Right-hand front.
3. Right-hand rear.
4. Left-hand rear.
5. Deactivate the electric window switches
located at the rear seats.
Manual operation
To open or close the window, press or pull the
switch gently, without exceeding the resistance
point. The window stops as soon as the switch
is released.
2
Access
Page 69 of 360
67
Panoramic opening
sunroof
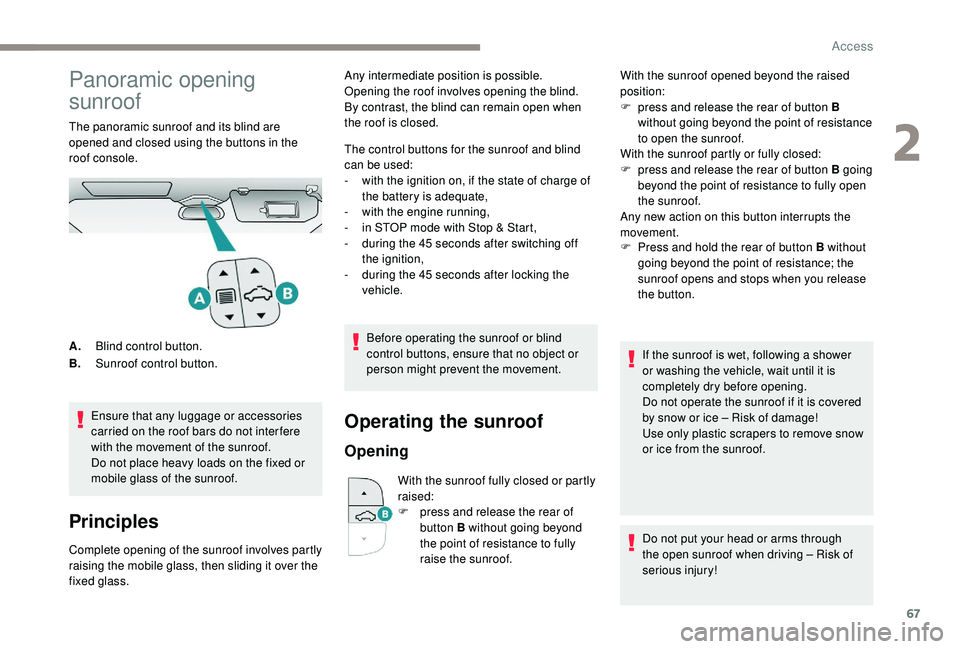
The panoramic sunroof and its blind are
opened and closed using the buttons in the
roof console.Ensure that any luggage or accessories
carried on the roof bars do not inter fere
with the movement of the sunroof.
Do not place heavy loads on the fixed or
mobile glass of the sunroof.
Principles
Complete opening of the sunroof involves partly
raising the mobile glass, then sliding it over the
fixed glass. The control buttons for the sunroof and blind
can be used:
-
w
ith the ignition on, if the state of charge of
the battery is adequate,
-
w
ith the engine running,
-
i
n STOP mode with Stop & Start,
-
d
uring the 45 seconds after switching off
the ignition,
-
d
uring the 45 seconds after locking the
vehicle.
Before operating the sunroof or blind
control buttons, ensure that no object or
person might prevent the movement.
Operating the sunroof
Opening
With the sunroof fully closed or partly
raised:
F
p
ress and release the rear of
button B without going beyond
the point of resistance to fully
raise the sunroof. F
P
ress and hold the rear of button B without
going beyond the point of resistance; the
sunroof opens and stops when you release
the button.
A. Blind control button.
B. Sunroof control button. Any intermediate position is possible.
Opening the roof involves opening the blind.
By contrast, the blind can remain open when
the roof is closed.
With the sunroof opened beyond the raised
position:
F
p
ress and release the rear of button B
without going beyond the point of resistance
to open the sunroof.
With the sunroof partly or fully closed:
F
p
ress and release the rear of button B going
beyond the point of resistance to fully open
the sunroof.
Any new action on this button interrupts the
movement.
If the sunroof is wet, following a shower
or washing the vehicle, wait until it is
completely dry before opening.
Do not operate the sunroof if it is covered
by snow or ice – Risk of damage!
Use only plastic scrapers to remove snow
or ice from the sunroof.
Do not put your head or arms through
the open sunroof when driving – Risk of
serious injury!
2
Access
Page 70 of 360

68
Closing
With the sunroof partially or fully
open:
F
p
ress and release the front of
button B going beyond the point
of resistance to fully close the
sunroof.
Any new action on this button
interrupts the movement.
F
p
ress and hold the front of button B without
going beyond the point of resistance; the
sunroof closes and stops when you release
the button.
Never leave the vehicle with the sunroof
open.
Anti-pinch system
If the sunroof encounters an obstacle when
closing, the movement is automatically
reversed.
The anti-pinch system is designed to be
effective at speeds of up to 75 mph (120 km/h).
Reinitialisation
Following reconnection of the battery or in
the event of a fault or jerky movement of
the sunroof, the opening sunroof must be
reinitialised:
F
p
ress the rear of button B until the sunroof
is fully open,
F
p
ress and hold the rear of button B again for
at least 3
seconds.
Check the condition of the sunroof seals
regularly (presence of dust or deposits,
dead leaves, etc.).
If using a car wash, check that the roof
is correctly closed in advance and keep
the tip of the high-pressure lance at least
30
centimetres from the seals.
Operating the sunroof blind
The closing movement of the blind is limited by
the position of the opening sunroof: the blind
cannot be further for ward than the front of the
mobile glass.
Opening
F Press the rear of button A going beyond the point of resistance to
fully open the blind.
Any new action on this button
interrupts the movement.
Closing
F Press the front of button A , going
beyond the point of resistance to
fully close the blind.
Any new action on this button
interrupts the movement.
Anti-pinch system
If the blind encounters an obstacle when
closing, the movement is automatically
reversed.
With the sunroof partially or fully open:
F
p
ress and release the front of button B
without going beyond the point of resistance
to close the sunroof to its raised position.
F
p
ress and release the front of button B
again to fully close the sunroof.
With the sunroof fully or partly raised:
F
p
ress and release the front of button B
without going beyond the point of resistance
to fully close the sunroof. F
P
ress and hold the rear of button A
, without
going beyond the point of resistance; the
blind opens and stops when you release the
button.
F
P
ress and hold the front of button A
, without
going beyond the point of resistance; the
blind closes and stops when you release the
button.
Access
Page 98 of 360
96
Changing the battery
The remote control is powered by a 6V-28L
battery, which is provided.
Information on the screen indicates when this
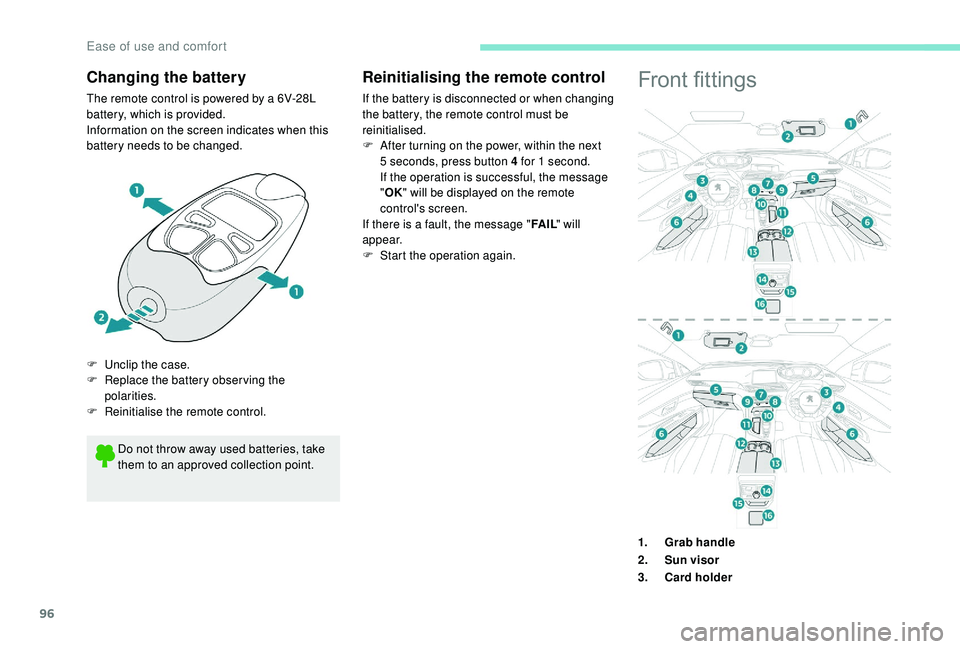
battery needs to be changed.Front fittings
Do not throw away used batteries, take
them to an approved collection point.
F
U
nclip the case.
F
R
eplace the battery observing the
polarities.
F
R
einitialise the remote control.
Reinitialising the remote control
If the battery is disconnected or when changing
the battery, the remote control must be
reinitialised.
F
A
fter turning on the power, within the next
5
seconds, press button 4 for 1 second.
If the operation is successful, the message
" OK " will be displayed on the remote
control's screen.
If there is a fault, the message " FA I L" will
appear.
F
St
art the operation again.
1.Grab handle
2. Sun visor
3. Card holder
Ease of use and comfort
Page 155 of 360
153
Once the state of charge of the battery drops
to the reser ve level, the system switches to
energy economy mode: the power supply is
cut off automatically to preser ve the remaining
battery charge.Switching off the engine leads to a loss of
braking assistance.
Avoid attaching heavy objects to the key
or the remote control, which would weigh
down on its blade in the ignition switch
and could cause a malfunction.Starting the engine
Parking brake applied:
F W ith a manual gearbox , place the gear
lever in neutral then depress the clutch
pedal fully.
F
W
ith an automatic gearbox , place the
gear selector in mode N or P then depress
the brake pedal fully.
F
I
nsert the key into the ignition switch; the
system recognises the code.
F
U
nlock the steering column by
simultaneously turning the steering and
t h e key.
In certain cases, you may have to apply
significant force to move the steering
wheel (wheels on full lock, for example). F
W
ith a petrol engine
, operate the starter
motor by turning the key to position 3
without pressing the accelerator pedal,
until the engine starts. Once the engine is
running, release the key.
With petrol engines , after a cold start,
preheating the catalytic converter can
cause clearly-felt engine vibrations when
stationary, with the engine running, for
anything up to two minutes (accelerated
idle speed).
F
W
ith a Diesel engine, turn the key to
position 2 , ignition on, to operate the engine
pre-heating system.
Wait until this warning lamp goes off
in the instrument panel then operate
the starter motor by turning the key
to position 3 without pressing the
accelerator pedal, until the engine
starts. Once the engine is running,
release the key.
In wintry conditions, the warning lamp
can stay on for a longer period. When the
engine is hot, the warning lamp does not
come on. If the engine does not start straight
away, switch off the ignition. Wait a few
moments before operating the starter
motor again. If the engine does not start
after several attempts, do not keep trying:
you risk damaging the starter motor or
the engine. Contact a PEUGEOT dealer
or a qualified workshop.
In temperate conditions, do not let the
engine idle to warm up but move off
straight away and drive at moderate
speed.
Never leave the engine running in
an enclosed area without adequate
ventilation: internal combustion engines
emit toxic exhaust gases, such as carbon
monoxide. There is a risk of poisoning
and death!
In very extreme wintry conditions
(temperature below -23°C), to guarantee
correct operation and the longevity of
the mechanical elements of your vehicle,
engine and gearbox, the engine must be
left running for 4
minutes before starting
the vehicle.
6
Driving
Page 172 of 360
170
The Stop & Start system requires a
12 V battery of specific technology and
specification.
All work on this type of battery must be
carried out only by a PEUGEOT dealer or
a qualified workshop.
For more information on the 12
V batter y,
refer to the corresponding section.
Under-inflation detection
System which automatically checks the
pressures of the tyres while driving.
The system monitors the pressures in the four
tyres, once the vehicle is moving.
It compares the information given by the wheel
speed sensors with reference values, which
must be reinitialised ever y time the tyre
pressures are adjusted or a wheel changed .
The system triggers an alert as soon as it
detects a drop in the inflation pressure of one
or more tyres. The under-inflation detection system does
not replace the need for vigilance on the
part of the driver.
This system does not avoid the need to
check the tyre pressures (including the
spare wheel) every month as well as
before a long journey.
Driving with under-inflated tyres worsens
road-holding, lengthens braking distances,
causes premature wear of the tyres,
particularly in adverse conditions (heavy
loads, high speeds, long journeys).
Driving with under-inflated tyres
increases fuel consumption.
The inflation pressures defined for your
vehicle can be found on the tyre pressure
label.
For more information on the
Identification markings , refer to the
corresponding section. Checking tyre pressures
This check should be done when the tyres
are "cold" (vehicle stopped for 1
hour or
after a journey of less than 6 miles (10 km)
at moderate speeds).
Other wise, add 0.3 bar to the pressures
shown on the label.
Snow chains
The system does not have to be
reinitialised after fitting or removing snow
chains.
Under-inflation alert
This warning is indicated by
continuous illumination of this lamp,
an audible signal and, depending on
the equipment installed, a message
displayed on the screen.
F
R
educe speed immediately, avoid excessive
steering movements and sudden braking.
F
S
top the vehicle as soon as it is safe to do
so.
The loss of pressure detected does not
always cause visible bulging of the tyre.
Do not satisfy yourself with just a visual
check.
Driving