2018 PEUGEOT 3008 Screen brightness
[x] Cancel search: Screen brightnessPage 38 of 360

36
Distance recorders
The total and trip distances are displayed for
thirty seconds when the ignition is switched off,
when the driver's door is opened and when the
vehicle is locked or unlocked.When travelling abroad, you may have to
change the distance unit: the display of
road speed must be in the official units
(miles or km) for the country.
The change of units is done via the
screen configuration menu, with the
vehicle stationary.
Total distance recorder
It measures the total distance travelled by the
vehicle since its first registration.
Trip recorder
It measures the distance travelled since it was
reset by the driver.
Resetting the trip recorder
F
W
ith the ignition on, press the button until
zeroes appear.
Instrument panel lighting
dimmer
Version with monochrome screen
Only works when the vehicle lighting is on
("night" mode).
It allows the brightness of the instruments and
controls to be adjusted.
F
P
ress this button to adjust the
brightness.
F
W
hen the lighting reaches the
minimum setting, release the
button, then press it again to
increase brightness. or
F
W
hen the lighting reaches the maximum
setting, release the button, then press it
again to decrease brightness.
F
R
elease the button once the desired level of
brightness is reached.
Instrument panel ambient
lighting
Version with touch screen
It allows the instrument panel ambient lighting
to be switched on or off.
The brightness of the instrument panel ambient
lighting is adjusted in the touch screen. F
P
ress this button.
Instruments
Page 39 of 360

37
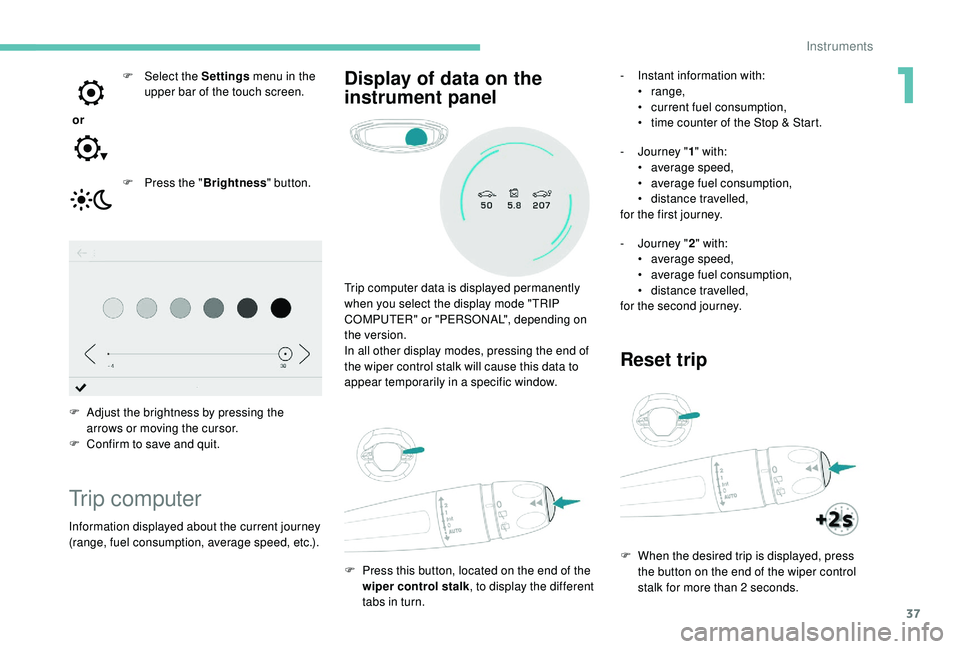
or F
Sel
ect the Settings
menu in the
upper bar of the touch screen.
F
P
ress the "Brightness " button.
F
A
djust the brightness by pressing the
arrows or moving the cursor.
F
C
onfirm to save and quit.
Trip computer
Information displayed about the current journey
(range, fuel consumption, average speed, etc.). Trip computer data is displayed permanently
when you select the display mode "TRIP
COMPUTER" or "PERSONAL", depending on
the version.
In all other display modes, pressing the end of
the wiper control stalk will cause this data to
appear temporarily in a specific window.
F
P
ress this button, located on the end of the
wiper control stalk , to display the different
tabs in turn.
Display of data on the
instrument panel- Instant information with: • range,
•
c
urrent fuel consumption,
•
t
ime counter of the Stop & Start.
-
J
ourney " 1" with:
•
a
verage speed,
•
a
verage fuel consumption,
•
d
istance travelled,
for the first journey.
-
J
ourney " 2" with:
•
a
verage speed,
•
a
verage fuel consumption,
•
d
istance travelled,
for the second journey.
Reset trip
F When the desired trip is displayed, press the button on the end of the wiper control
stalk for more than 2
seconds.
1
Instruments
Page 42 of 360

40
Touch screen
Define the vehicle parameters
This menu allows the activation or deactivation
of the following equipment, depending on
version:
-
"
Access to the vehicle" :
•
"
Remote control action".
For more information on the Remote control
and driver door selective unlocking in
particular, refer to the "Access" section.
-
"
Comfort" :
•
"
Rear wipe in reverse gear".
For more information on the Wipers ,
refer to the "Lighting and visibility"
section.
•
"
Parking assistance".
For more information on Parking
assistance , refer to the "Driving"
section.
•
"
Fatigue Detection System".
For more information on the Fatigue
detection system , refer to the "Driving"
section.
-
"
Driving assistance" :
•
"
Auto. emergency braking".
For more information on the Active
Safety Brake , refer to the "Driving"
section.
•
"
Speed recommendation".
For more information on Speed limit
recognition , refer to the "Driving"
section. •
"
Tyre inflation".
For more information on Under-
inflation detection and reinitialisation in
particular, refer to the "Driving" section.
Choice of language
This menu allows selection of the language
used by the screen and the instrument panel.
Display configuration
This menu gives access to the following
settings:
-
"
Choice of units",
-
"
Date and time adjustment",
-
"
Display parameters",
-
"Brightness".
Adjusting the date and time
F
P
ress the " 7" or " 8" button to display the
"Display configuration" menu, then press
OK.
F
P
ress the " 5" or " 6" button to select the
"Date and time adjustment" button, then
press OK.
F
P
ress the " 7" or " 8" button to select the
setting to modify. Confirm by pressing OK,
then modify the setting and confirm again to
save the modification.
F
A
djust the settings one by one, confirming
with the OK button. F
P
ress the "
5" or " 6" button, then the OK
button to select the OK box and confirm or
the Back button to cancel.
As a safety measure, the driver must only
carry out operations that require sustained
attention when stationary.
This system gives access to:
-
t
he permanent display of the time and
the exterior temperature (a blue symbol
appears when there is a risk of ice),
-
t
he heating/air conditioning controls,
-
m
enus for adjusting settings for vehicle
functions and systems,
-
a
udio system and telephone controls and
the display of associated information,
-
t
he display of visual parking aids (visual
parking sensor information, Park Assist,
e t c .),
-
I
nternet ser vices and the display of
associated information.
and, depending on equipment, allows:
-
a
ccess to the navigation system controls
and the display of associated information.
Instruments
Page 48 of 360

46
Settings
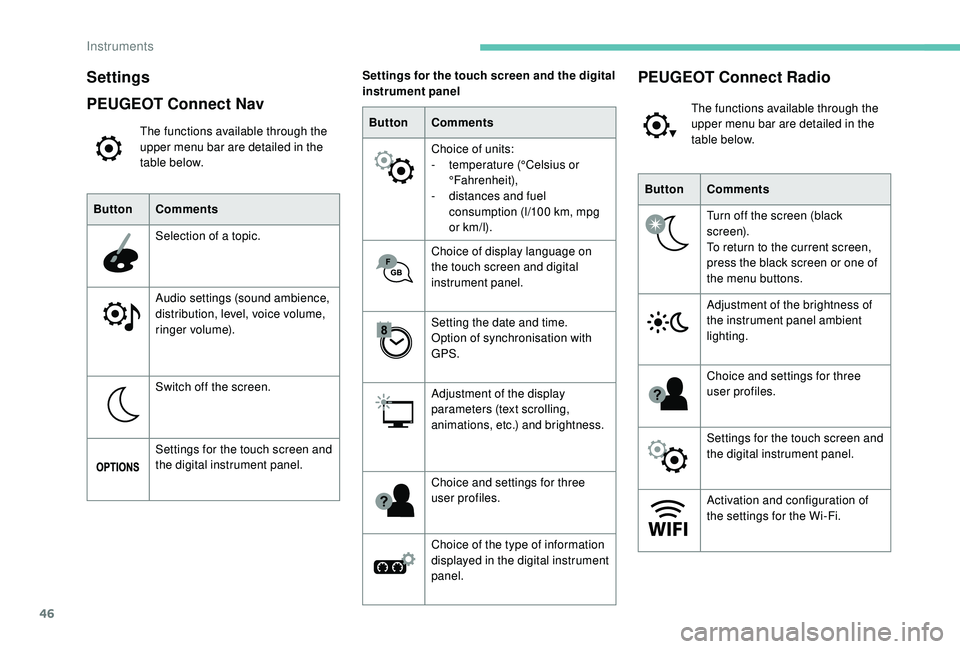
PEUGEOT Connect Nav
The functions available through the
upper menu bar are detailed in the
table below.
Button Comments
Selection of a topic.
Audio settings (sound ambience,
distribution, level, voice volume,
ringer volume).
Switch off the screen.
Settings for the touch screen and
the digital instrument panel. Button
Comments
Choice of units:
-
t
emperature (°Celsius or
°Fahrenheit),
-
d
istances and fuel
consumption (l/100
km, mpg
or km/l).
Choice of display language on
the touch screen and digital
instrument panel.
Setting the date and time.
Option of synchronisation with
GPS.
Adjustment of the display
parameters (text scrolling,
animations, etc.) and brightness.
Choice and settings for three
user profiles.
Choice of the type of information
displayed in the digital instrument
panel.
Settings for the touch screen and the digital
instrument panel
ButtonComments
Turn off the screen (black
screen).
To return to the current screen,
press the black screen or one of
the menu buttons.
Adjustment of the brightness of
the instrument panel ambient
lighting.
Choice and settings for three
user profiles.
Settings for the touch screen and
the digital instrument panel.
Activation and configuration of
the settings for the Wi-Fi.
PEUGEOT Connect Radio
The functions available through the
upper menu bar are detailed in the
table below.
Instruments
Page 49 of 360

47
ButtonComments
Adjustment of the display
parameters (text scrolling,
animations, etc.) and brightness.
Choice of units:
-
t
emperature (°Celsius or
°Fahrenheit),
-
d
istances and fuel
consumption (l/100
km, mpg
or km/l).
Choice of display language on
the touch screen and digital
instrument panel.
Setting the date and time.
Choice of the type of information
displayed in the digital instrument
panel.
Settings for the touch screen and the digital
instrument panel
1
Instruments
Page 82 of 360

80
Please note: an incorrectly latched
backrest compromises the safety of
passengers in the event of sudden
braking or an impact.
The contents of the boot may be thrown
forward – Risk of serious injury!
i-Cockpit Amplify function
This function allows the driving ambiences to
be managed.
Specific system settings are offered for each
ambience.
These ambiences can be personalised in the
touch screen.
Content of an ambience
F Pull lever 2 towards you to unlock the backrest.
The backrest 3 folds fully onto the cushion.
Returning the backrests to
their original position
First check that the outer seat belts are
lying vertically alongside the backrest
latching rings. F
P
ut the backrest 3 in the upright position
and push on it to latch it home.
F
C
heck that the red indicator is no longer
visible in the release grip 1 .
F
E
nsure that the outer seat belts are not
trapped during the manoeuvre. An ambience is defined by the settings for each
of the following systems:
-
t
he passenger compartment
ambient lighting,
(activation / deactivation and
adjustment of brightness)
-
t
he audio ambience,
(choice of predetermined settings for
the audio system equaliser).
- s cented air freshener,
(activation / deactivation, choice of
an air freshener and adjusting the
amount of diffusion).
-
m
ultipoint massage,
(selection of the seat, activation /
deactivation, selection of a type of
massage and a setting for intensity).
-
D
ynamic pack,
(activation / deactivation).
Ease of use and comfort
Page 106 of 360

104
- illuminated bezels for the front cup holders,
- a l ight source for each of the front door
pockets,
-
i
lluminated rails along the panoramic
sunroof blind.
The ambient lighting switches off automatically
when the sidelamps are switched off. The interior ambient lighting can
be activated or deactivated and its
brightness adjusted in the Vehicle /
Driving menu of the touch screen.
The interior ambient lighting is also
managed by the i- Cockpit Amplify
function.
For more information on the
i-Cockpit Amplify function , refer
to the corresponding section.Rear fittings
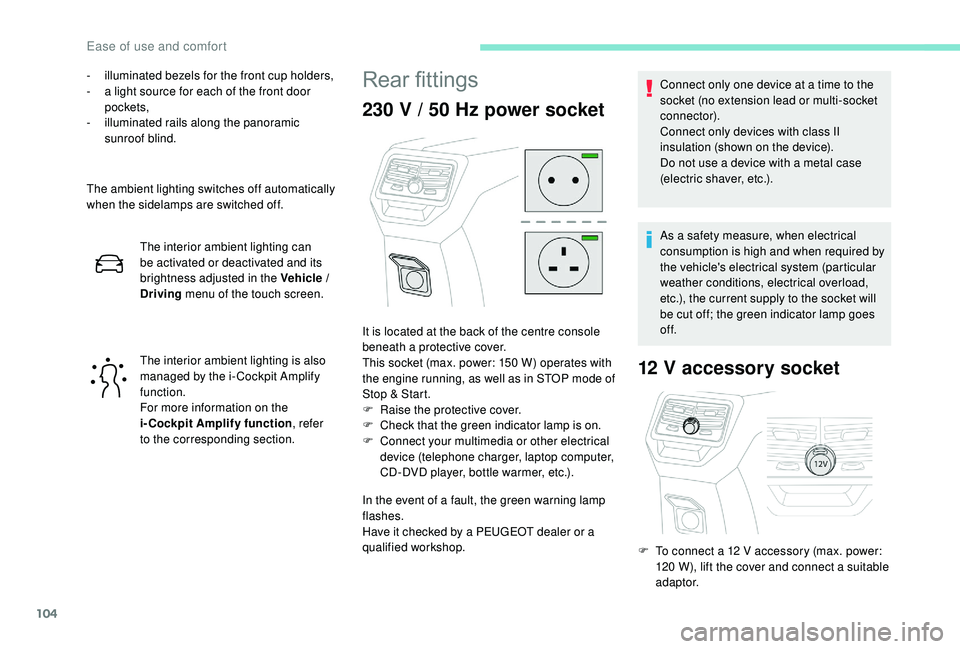
230 V / 50 Hz power socket
In the event of a fault, the green warning lamp
flashes.
Have it checked by a PEUGEOT dealer or a
qualified workshop.
12 V accessory socket
It is located at the back of the centre console
beneath a protective cover.
This socket (max. power: 150
W) operates with
the engine running, as well as in STOP mode of
Stop & Start.
F
Ra
ise the protective cover.
F
C
heck that the green indicator lamp is on.
F
C
onnect your multimedia or other electrical
device (telephone charger, laptop computer,
CD-DVD player, bottle warmer, etc.). Connect only one device at a time to the
socket (no extension lead or multi-socket
connector).
Connect only devices with class II
insulation (shown on the device).
Do not use a device with a metal case
(electric shaver, etc.).
As a safety measure, when electrical
consumption is high and when required by
the vehicle's electrical system (particular
weather conditions, electrical overload,
etc.), the current supply to the socket will
be cut off; the green indicator lamp goes
of f.
F
T
o connect a 12 V accessory (max. power:
120
W), lift the cover and connect a suitable
adaptor.
Ease of use and comfort
Page 114 of 360

112
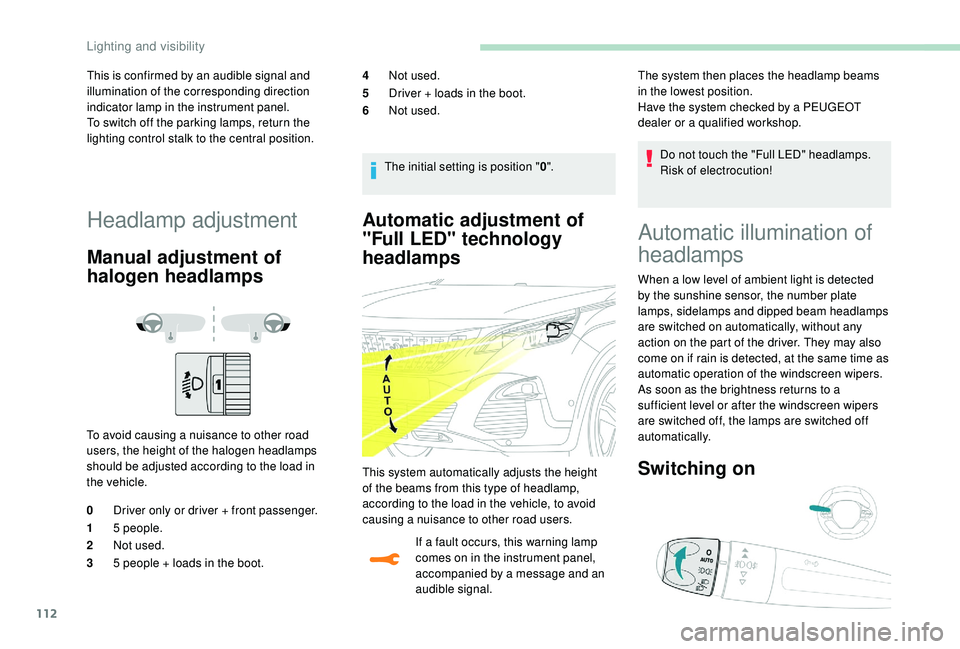
Automatic adjustment of
"Full LED" technology
headlamps
If a fault occurs, this warning lamp
comes on in the instrument panel,
accompanied by a message and an
audible signal.Do not touch the "Full LED" headlamps.
Risk of electrocution!
The system then places the headlamp beams
in the lowest position.
Have the system checked by a PEUGEOT
dealer or a qualified workshop.
Automatic illumination of
headlamps
This is confirmed by an audible signal and
illumination of the corresponding direction
indicator lamp in the instrument panel.
To switch off the parking lamps, return the
lighting control stalk to the central position.
Headlamp adjustment
Manual adjustment of
halogen headlamps
To avoid causing a nuisance to other road
users, the height of the halogen headlamps
should be adjusted according to the load in
the vehicle.
0
Driver only or driver + front passenger.
1 5
people.
2 Not used.
3 5
people + loads in the boot. 4
Not used.
5 Driver + loads in the boot.
6 Not used.
The initial setting is position " 0".
This system automatically adjusts the height
of the beams from this type of headlamp,
according to the load in the vehicle, to avoid
causing a nuisance to other road users. When a low level of ambient light is detected
by the sunshine sensor, the number plate
lamps,
sidelamps and dipped beam headlamps
are switched on automatically, without any
action on the part of the driver. They may also
come on if rain is detected, at the same time as
automatic operation of the windscreen wipers.
As soon as the brightness returns to a
sufficient level or after the windscreen wipers
are switched off, the lamps are switched off
automatically.
Switching on
Lighting and visibility