2018 PEUGEOT 3008 mirror
[x] Cancel search: mirrorPage 203 of 360
201
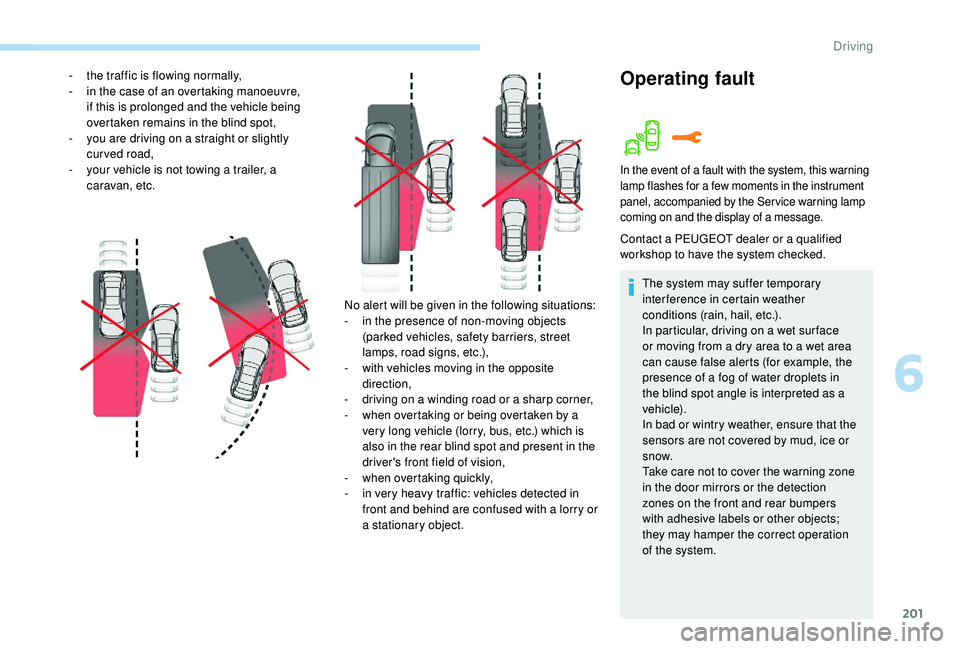
No alert will be given in the following situations:
- i n the presence of non-moving objects
(parked vehicles, safety barriers, street
lamps, road signs, etc.),
-
w
ith vehicles moving in the opposite
direction,
-
d
riving on a winding road or a sharp corner,
-
w
hen overtaking or being overtaken by a
very long vehicle (lorry, bus, etc.) which is
also in the rear blind spot and present in the
driver's front field of vision,
-
w
hen overtaking quickly,
-
i
n very heavy traffic: vehicles detected in
front and behind are confused with a lorry or
a stationary object.
-
t
he traffic is flowing normally,
-
i
n the case of an overtaking manoeuvre,
if this is prolonged and the vehicle being
overtaken remains in the blind spot,
-
y
ou are driving on a straight or slightly
curved road,
-
y
our vehicle is not towing a trailer, a
caravan, etc.
Operating fault
In the event of a fault with the system, this warning
lamp flashes for a few moments in the instrument
panel, accompanied by the Service warning lamp
coming on and the display of a message.
Contact a PEUGEOT dealer or a qualified
workshop to have the system checked.
The system may suffer temporary
interference in certain weather
conditions (rain, hail, etc.).
In particular, driving on a wet sur face
or moving from a dry area to a wet area
can cause false alerts (for example, the
presence of a fog of water droplets in
the blind spot angle is interpreted as a
vehicle).
In bad or wintry weather, ensure that the
sensors are not covered by mud, ice or
snow.
Take care not to cover the warning zone
in the door mirrors or the detection
zones on the front and rear bumpers
with adhesive labels or other objects;
they may hamper the correct operation
of the system.
6
Driving
Page 204 of 360

202
Active Blind Spot
Monitoring System
In addition to the fixed warning lamp in the door
mirror on the side in question, a correction of
trajectory will be felt if you cross a lane marking
with the direction indicators on, to help you
avoid a collision.
Conditions for operation
The following systems must be activated:
-
B
lind Spot Monitoring System,
-
A
ctive Lane Departure Warning System.
For more information on the Blind Spot
Monitoring System and the Active Lane
Departure Warning System , refer to the
corresponding sections.
Parking sensors
This function is a manoeuvring aid which
cannot, in any circumstances, replace
the need for vigilance on the part of the
driver.
The driver must remain attentive and stay
in control of their vehicle.
They must always check the vehicle's
surroundings before undertaking a
manoeuvre.
During the entire manoeuvre, the driver
must ensure that the space remains clear.
Rear parking sensors
The system is switched on by engaging reverse
g e a r.
This is confirmed by an audible signal.
The system is switched off when you come out
of reverse gear.
Audible assistance
The proximity information is given by an
intermittent audible signal, the frequency of
which increases as the vehicle approaches the
obstacle.
The sound emitted by the speaker (right or
left) indicates the side on which the obstacle is
located.
When the distance between the vehicle and
the obstacle becomes less than approximately
thirty centimetres, the audible signal becomes
continuous.
Using sensors located in the bumper, this
function warns of the proximity of obstacles
(e.g. pedestrian, vehicle, tree, barrier) entering
their field of detection.
The system is automatically deactivated
when towing with a towbar approved by
P E U G E O T.
High pressure jet wash
When washing your vehicle, direct the
lance at least 30
cm away from the
sensors.
Driving
Page 207 of 360
205
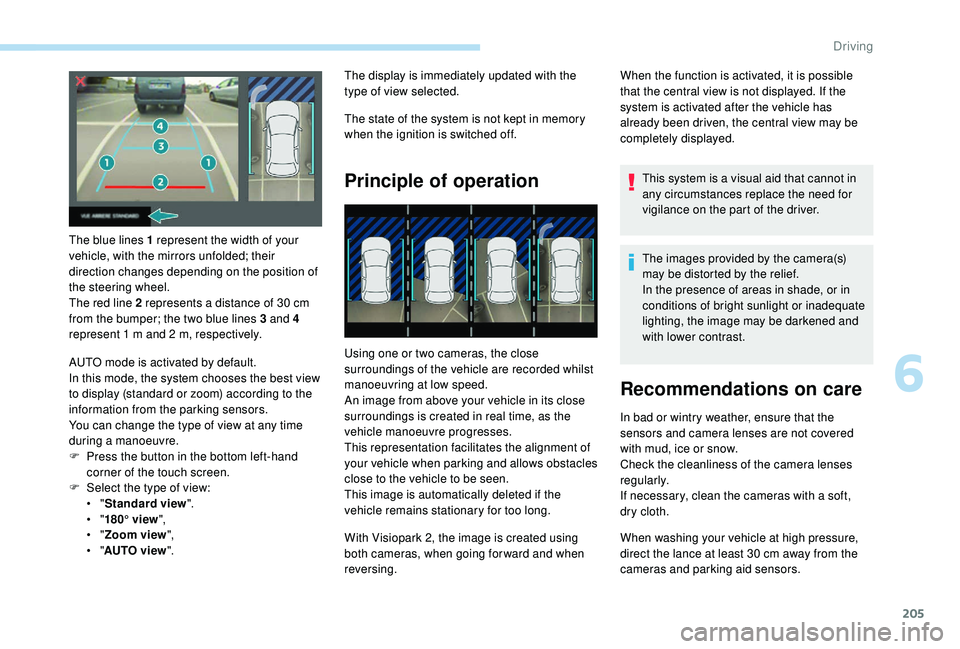
The blue lines 1 represent the width of your
vehicle, with the mirrors unfolded; their
direction changes depending on the position of
the steering wheel.
The red line 2 represents a distance of 30 cm
from the bumper; the two blue lines 3 and 4
represent 1
m and 2 m, respectively.
AUTO mode is activated by default.
In this mode, the system chooses the best view
to display (standard or zoom) according to the
information from the parking sensors.
You can change the type of view at any time
during a manoeuvre.
F
P
ress the button in the bottom left-hand
corner of the touch screen.
F
Sel
ect the type of view:
•
"Standard view ".
•
"180° view ",
•
"Zoom view ",
•
"AUTO view ". The display is immediately updated with the
type of view selected.
The state of the system is not kept in memory
when the ignition is switched off.
Principle of operation
Using one or two cameras, the close
surroundings of the vehicle are recorded whilst
manoeuvring at low speed.
An image from above your vehicle in its close
surroundings is created in real time, as the
vehicle manoeuvre progresses.
This representation facilitates the alignment of
your vehicle when parking and allows obstacles
close to the vehicle to be seen.
This image is automatically deleted if the
vehicle remains stationary for too long.
When the function is activated, it is possible
that the central view is not displayed. If the
system is activated after the vehicle has
already been driven, the central view may be
completely displayed.
This system is a visual aid that cannot in
any circumstances replace the need for
vigilance on the part of the driver.
The images provided by the camera(s)
may be distorted by the relief.
In the presence of areas in shade, or in
conditions of bright sunlight or inadequate
lighting, the image may be darkened and
with lower contrast.
Recommendations on care
In bad or wintry weather, ensure that the
sensors and camera lenses are not covered
with mud, ice or snow.
Check the cleanliness of the camera lenses
regularly.
If necessary, clean the cameras with a soft,
dry cloth.
With Visiopark 2, the image is created using
both cameras, when going for ward and when
reversing. When washing your vehicle at high pressure,
direct the lance at least 30
cm away from the
cameras and parking aid sensors.
6
Driving
Page 208 of 360
206
Visiopark 1
Rear vision
To activate the camera, located in the tailgate,
engage reverse and keep the speed of the
vehicle below 6 mph (10 km/h).
The system is deactivated:
-
a
utomatically above about 6 mph (10 km/h),
-
a
utomatically on opening the tailgate,
-
w
hen shifting out of reverse (the image
remains displayed for 7
seconds),
-
b
y pressing the red cross in the top left-
hand corner of the touch screen.
AUTO mode
Standard view
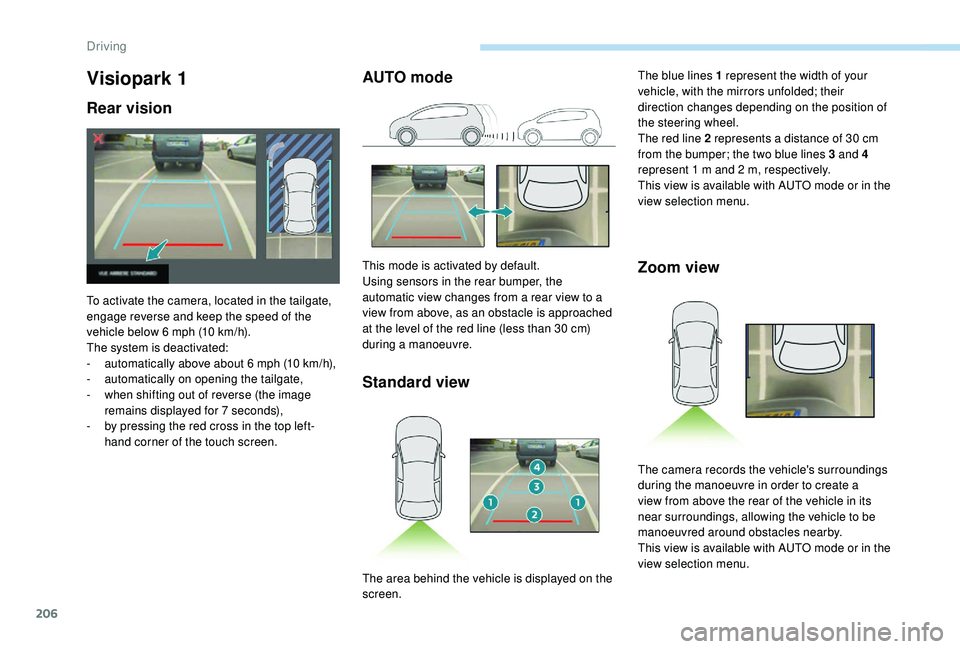
This mode is activated by default.
Using sensors in the rear bumper, the
automatic view changes from a rear view to a
view from above, as an obstacle is approached
at the level of the red line (less than 30
cm)
during a manoeuvre.Zoom view
The blue lines 1 represent the width of your
vehicle, with the mirrors unfolded; their
direction changes depending on the position of
the steering wheel.
The red line 2 represents a distance of 30
cm
from the bumper; the two blue lines 3 and 4
represent 1
m and 2 m, respectively.
This view is available with AUTO mode or in the
view selection menu.
The area behind the vehicle is displayed on the
screen. The camera records the vehicle's surroundings
during the manoeuvre in order to create a
view from above the rear of the vehicle in its
near surroundings, allowing the vehicle to be
manoeuvred around obstacles nearby.
This view is available with AUTO mode or in the
view selection menu.
Driving
Page 209 of 360
207
Obstacles may appear further away than
they actually are in reality.
It is important to check the sides of the
vehicle during the manoeuvre, using the
mirrors.
The rear parking sensors also provide
information on the vehicle's surroundings.
180° view
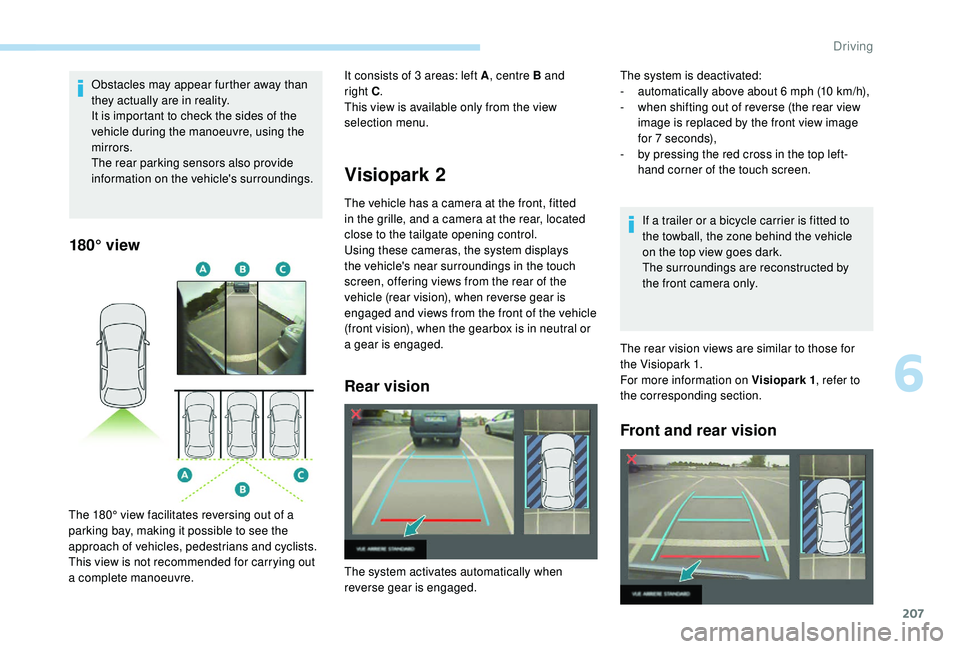
The 180° view facilitates reversing out of a
parking bay, making it possible to see the
approach of vehicles, pedestrians and cyclists.
This view is not recommended for carrying out
a complete manoeuvre.
Visiopark 2
The vehicle has a camera at the front, fitted
in the grille, and a camera at the rear, located
close to the tailgate opening control.
Using these cameras, the system displays
the vehicle's near surroundings in the touch
screen, offering views from the rear of the
vehicle (rear vision), when reverse gear is
engaged and views from the front of the vehicle
(front vision), when the gearbox is in neutral or
a gear is engaged.
Rear vision
It consists of 3 areas: left A, centre B and
right C.
This view is available only from the view
selection menu.
If a trailer or a bicycle carrier is fitted to
the towball, the zone behind the vehicle
on the top view goes dark.
The surroundings are reconstructed by
the front camera only.
The rear vision views are similar to those for
the Visiopark 1.
For more information on Visiopark 1 , refer to
the corresponding section.
Front and rear vision
The system is deactivated:
- a utomatically above about 6 mph (10 km/h),
-
w
hen shifting out of reverse (the rear view
image is replaced by the front view image
for 7
seconds),
-
b
y pressing the red cross in the top left-
hand corner of the touch screen.
The system activates automatically when
reverse gear is engaged.
6
Driving
Page 210 of 360
208
With the engine running and the
speed below 12 mph (20 km/h), the
system is activated via the Vehicle /
Driving menu of the touch screen:
F
Sel
ect " Panoramic visual aid ".
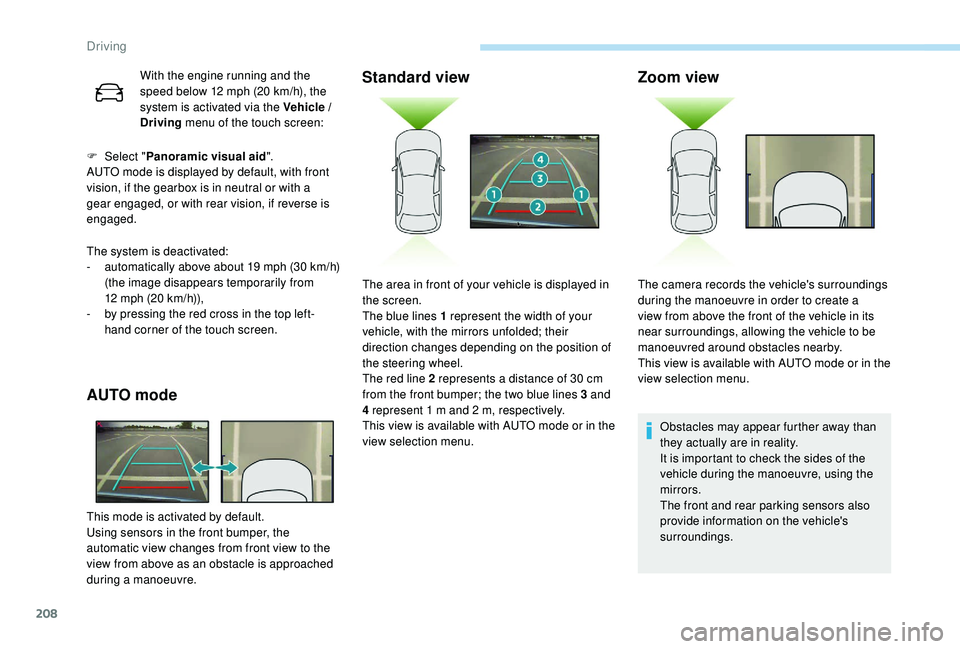
AUTO mode is displayed by default, with front
vision, if the gearbox is in neutral or with a
gear engaged, or with rear vision, if reverse is
engaged.
The system is deactivated:
-
a
utomatically above about 19 mph (30 km/h)
(the image disappears temporarily from
12
mph (20 km/h)),
-
b
y pressing the red cross in the top left-
hand corner of the touch screen.
AUTO mode
This mode is activated by default.
Using sensors in the front bumper, the
automatic view changes from front view to the
view from above as an obstacle is approached
during a manoeuvre.
Standard view Zoom view
Obstacles may appear further away than
they actually are in reality.
It is important to check the sides of the
vehicle during the manoeuvre, using the
mirrors.
The front and rear parking sensors also
provide information on the vehicle's
surroundings.
The area in front of your vehicle is displayed in
the screen.
The blue lines 1 represent the width of your
vehicle, with the mirrors unfolded; their
direction changes depending on the position of
the steering wheel.
The red line 2 represents a distance of 30
cm
from the front bumper; the two blue lines 3 and
4 represent 1
m and 2
m, respectively.
This view is available with AUTO mode or in the
view selection menu. The camera records the vehicle's surroundings
during the manoeuvre in order to create a
view from above the front of the vehicle in its
near surroundings, allowing the vehicle to be
manoeuvred around obstacles nearby.
This view is available with AUTO mode or in the
view selection menu.
Driving
Page 276 of 360
4
12:13
18,5 21,5
23 °C
FM/87.5 MHz
87.5MHz
12:13
18,5 21,5
23 °C
12:13
18,5 21,5
23 °C
12:13
18,5 21,5
23 °C
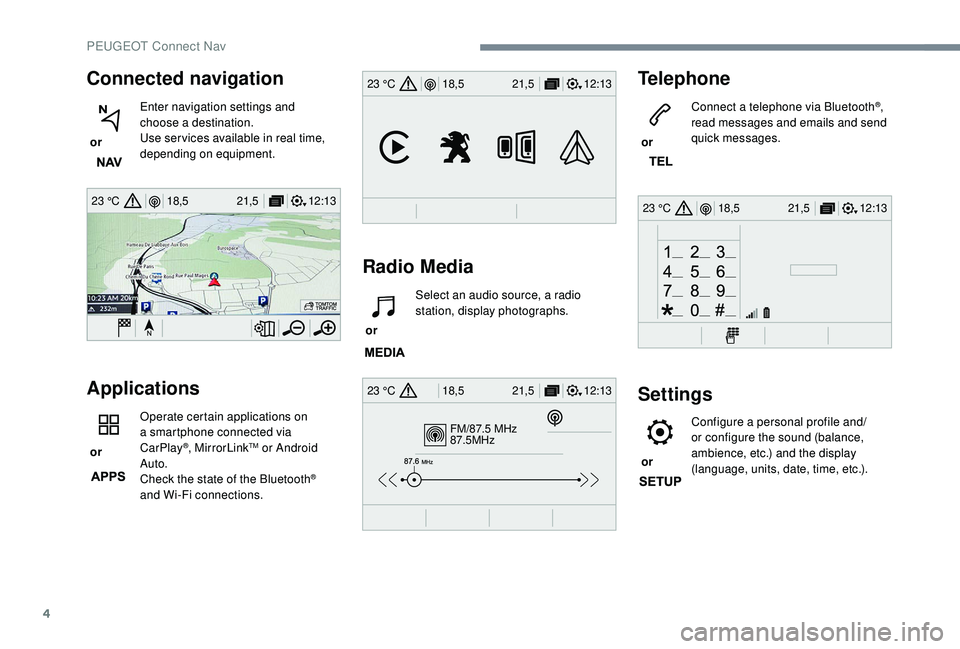
Connected navigation
or Enter navigation settings and
choose a destination.
Use ser vices available in real time,
depending on equipment.
Applications
or Operate certain applications on
a smartphone connected via
CarPlay®, MirrorLinkTM or Android
Auto.
Check the state of the Bluetooth
®
and Wi-Fi connections.
Radio Media Telephone
or
Connect a telephone via Bluetooth
®,
read messages and emails and send
quick messages.
Settings
or Configure a personal profile and/
or configure the sound (balance,
ambience, etc.) and the display
(language, units, date, time, etc.).
or
Select an audio source, a radio
station, display photographs.
PEUGEOT Connect Nav
Page 286 of 360
14
Network connection provided by
the user
Connect a USB cable.
The smartphone charges when
connected by a USB cable.
Bluetooth connection
Wi-Fi connection Restrictions of use:
-
W
ith CarPlay
®, connection sharing is
only with a Wi-Fi connection.
-
W
ith MirrorLink
TM, connection sharing
is only with a USB connection.
The quality of ser vices depends on the
quality of the network connection.
Network connection provided by
the vehicle
The system is automatically
connected to the modem included
for the "Emergency or assistance
calls" ser vices and does not require
a connection provided by the user
via their smartphone.
With the arrival of "TOMTOM
TR AFFIC", the ser vices are
available.
The ser vices offered with connected
navigation are as follows.
A Connected Services pack:
-
Weather,
-
F
illing stations,
-
C
ar park,
-
Tr a f f i c ,
-
P
OI local search.
A Danger zone pack (option).
The processes and standards are
constantly changing; for the communication
process between the smartphone and the
system to work correctly, we recommend
that you update the operating system of
the smar tphone as well as the date and
time of the smar tphone and the system.
Settings specific to
connected navigation
In the "Settings" menu you can create
a profile for just one person or a group
of people with common points, with the
possibility of entering a multitude of
settings (radio presets, audio settings,
navigation history, contact favourites,
etc.); these settings are taken into
account automatically.
or Press Navigation
to display the
primary page.
Press the " MENU" button to go to the
secondary page.
USB connection
Activate the Bluetooth function on
the telephone and ensure that it is
visible to all (see the "Applications"
section).
Select a Wi-Fi network found by the
system and connect to it (see the
"Applications" section).
PEUGEOT Connect Nav