2018 PEUGEOT 3008 headlamp
[x] Cancel search: headlampPage 223 of 360
221
During use
Never release the locking system with a
trailer or load carrier on the towball.
Never exceed the maximum authorised
weight for the vehicle – the Gross Train
Weight or GTW.
It is essential that the maximum
authorised load be complied with on
the towing device: if it is exceeded, this
device may detach from the vehicle,
which is a serious accident risk.
Check that the trailer lamps work
c o r r e c t l y.
Before setting off, check the adjustment
of the headlamp beam height.
For more information on Headlamp
adjustment , refer to the corresponding
section.
Following use
When travelling without a trailer or load
on a towbar-mounted carrier, the towball
must be removed and the protective plug
inserted in the carrier. This measure
applies particularly where the towball
might obscure visibility of the number
plate or its lighting.Fitting the towball
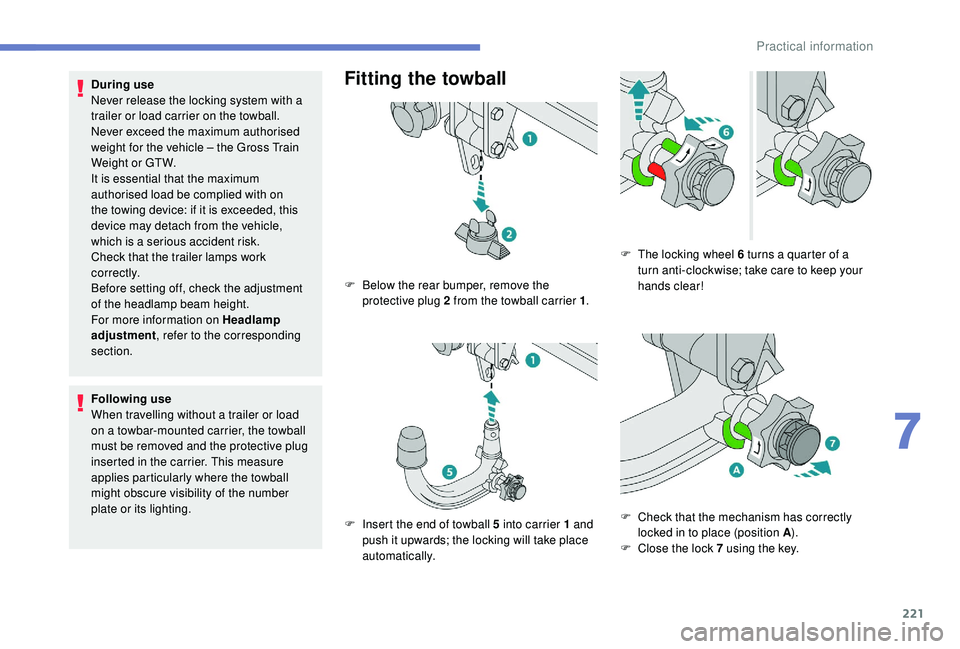
F Below the rear bumper, remove the protective plug 2 from the towball carrier 1 .
F
I
nsert the end of towball 5 into carrier 1 and
push it upwards; the locking will take place
automatically. F
T
he locking wheel 6 turns a quarter of a
turn anti-clockwise; take care to keep your
hands clear!
F
C
heck that the mechanism has correctly
locked in to place (position A ).
F
C
lose the lock 7 using the key.
7
Practical information
Page 225 of 360
223
Maintenance
Correct operation is only possible if the towball
and its carrier are kept clean.
Before cleaning the vehicle with a high-
pressure jet wash, the towball must be removed
and the protective plug fitted to the carrier.Apply the label provided to a clearly visible
area, close to the carrier or in the boot.
Go to a PEUGEOT dealer or a qualified
workshop for any work on the towbar
system.
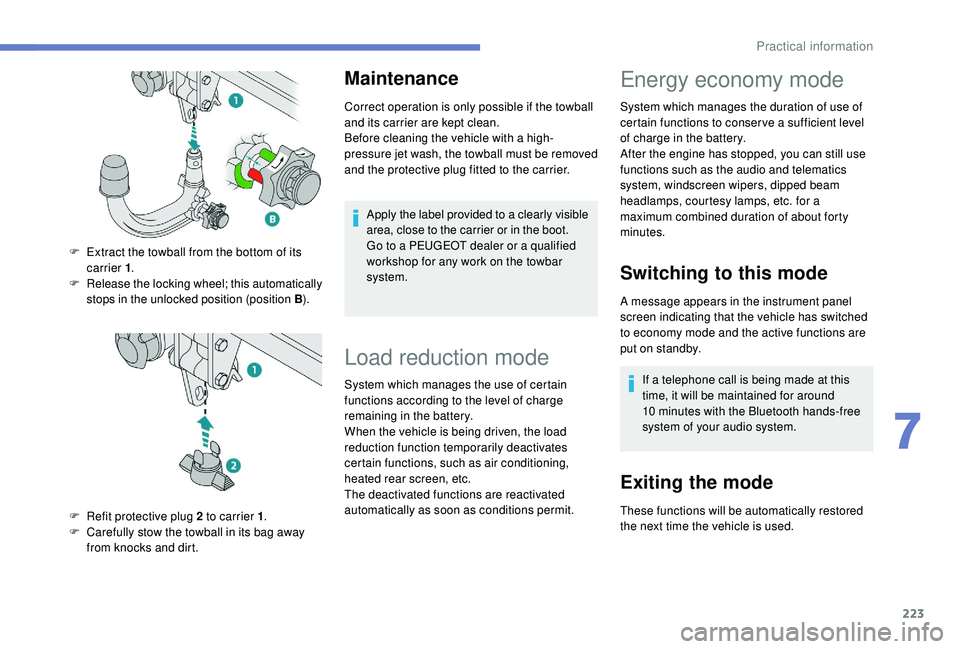
F
E
xtract the towball from the bottom of its
carrier 1 .
F
R
elease the locking wheel; this automatically
stops in the unlocked position (position B ).
F
R
efit protective plug 2 to carrier 1 .
F
C
arefully stow the towball in its bag away
from knocks and dirt.
Load reduction mode
System which manages the use of certain
functions according to the level of charge
remaining in the battery.
When the vehicle is being driven, the load
reduction function temporarily deactivates
certain functions, such as air conditioning,
heated rear screen, etc.
The deactivated functions are reactivated
automatically as soon as conditions permit.
Energy economy mode
System which manages the duration of use of
certain functions to conser ve a sufficient level
of charge in the battery.
After the engine has stopped, you can still use
functions such as the audio and telematics
system,
windscreen wipers, dipped beam
headlamps,
courtesy lamps, etc. for a
maximum combined duration of about forty
minutes.
Switching to this mode
A message appears in the instrument panel
screen indicating that the vehicle has switched
to economy mode and the active functions are
put on standby.
If a telephone call is being made at this
time, it will be maintained for around
10
minutes with the Bluetooth hands-free
system of your audio system.
Exiting the mode
These functions will be automatically restored
the next time the vehicle is used.
7
Practical information
Page 249 of 360
247
After changing a wheel
Put the punctured wheel in the boot or,
depending on version, remove the central cover
first to store it beneath the floor in place of the
spare wheel.With a "space-saver" type spare wheel Visit a PEUGEOT dealer or a qualified
workshop as soon as possible to have the
tightness of the bolts and the pressure of
the spare wheel checked.
Have the punctured tyre examined. After
inspection, the technician will advise you
on whether the tyre can be repaired or if it
must be replaced.
The following is recommended:
-
d
eactivate some driving aid functions
(Active Safety Brake, Adaptive cruise
control with Stop function, etc.), as
indicated on the label attached to the
wheel,
-
d
o not exceed the maximum
authorised speed of 50
mph
(80
km/h).
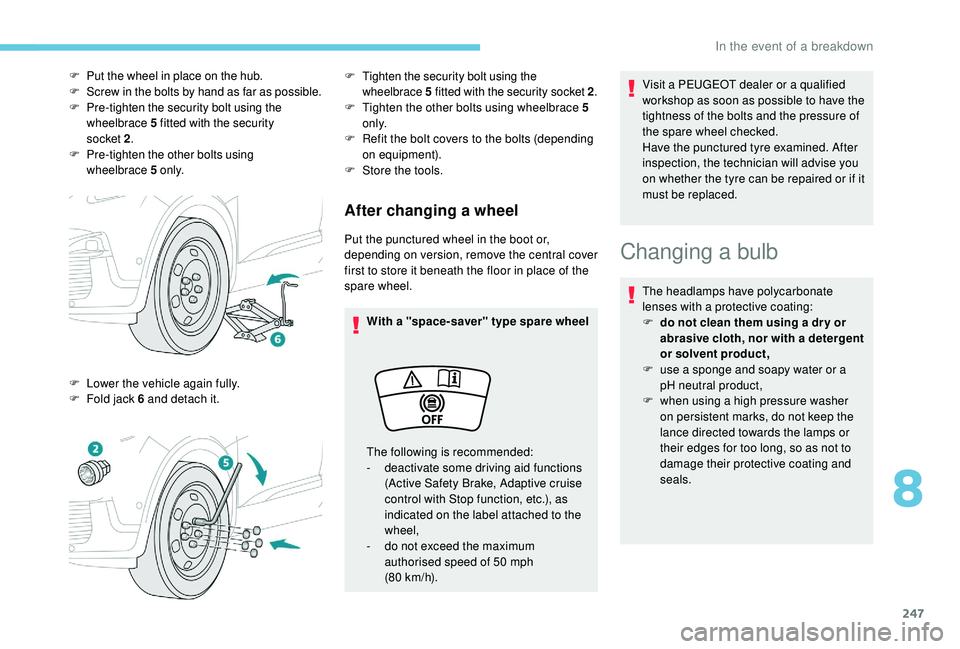
F
P
ut the wheel in place on the hub.
F
S
crew in the bolts by hand as far as possible.
F
P
re-tighten the security bolt using the
wheelbrace 5 fitted with the security
socket
2 .
F P
re-tighten the other bolts using
wheelbrace
5 o
n l y.
F
L
ower the vehicle again fully.
F
F
old jack 6 and detach it.
F Tighten the security bolt using the wheelbrace 5 fitted with the security socket 2 .
F Tighten the other bolts using wheelbrace 5
o n l y.
F
R
efit the bolt covers to the bolts (depending
on equipment).
F
S
tore the tools.
Changing a bulb
The headlamps have polycarbonate
lenses with a protective coating:
F
d
o not clean them using a dr y or
abrasive cloth, nor with a detergent
or solvent product,
F
u
se a sponge and soapy water or a
pH neutral product,
F
w
hen using a high pressure washer
on persistent marks, do not keep the
lance directed towards the lamps or
their edges for too long, so as not to
damage their protective coating and
seals.
8
In the event of a breakdown
Page 250 of 360
248
Changing a bulb must only be done with
the ignition off and after the headlamp
has been switched off for several
minutes – Risk of serious burns!
F
D
o not touch the bulb directly with
your fingers, use a lint-free cloth.
It is essential only to use anti-ultraviolet
(UV) type bulbs, so as not to damage the
headlamp.
Always replace a failed bulb with a
new bulb with the same type and
specification.
In some weather conditions (e.g. low
temperature or humidity), the presence
of misting on the internal sur face of the
glass of the headlamps and rear lamps
is normal; it disappears after the lamps
have been on for a few minutes.
Light emitting diodes (LED)
For the replacement of this type of bulb,
you must contact a PEUGEOT dealer or a
qualified workshop. Halogen bulbs
To ensure good quality lighting, check
that the bulb is correctly positioned in its
housing.
Front lamps
Model with "Full LED" headlamps
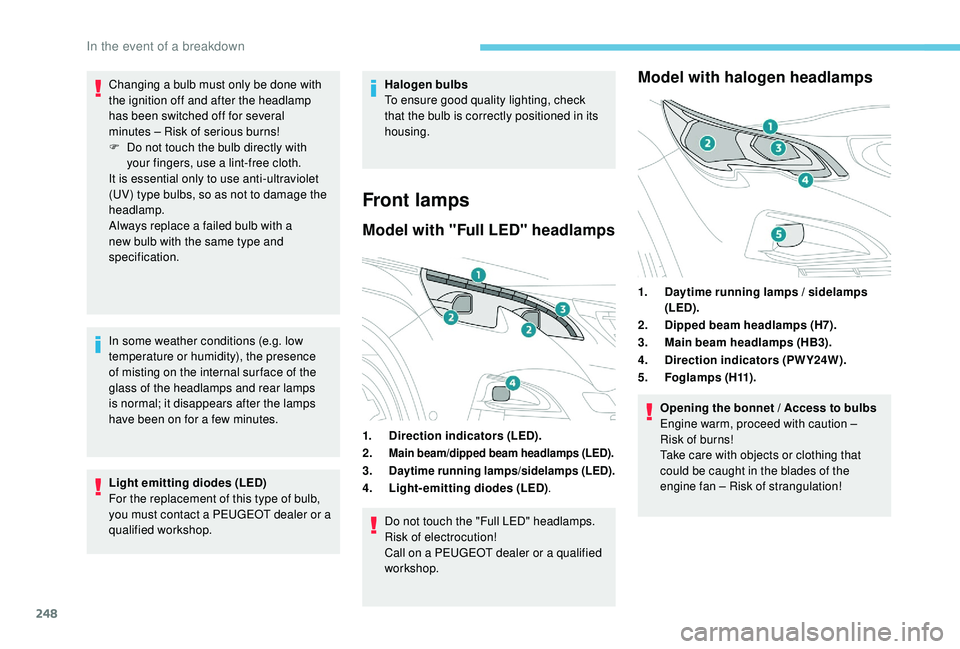
1.
Direction indicators (LED).
2.
Main beam/dipped beam headlamps (LED).
3.Daytime running lamps/sidelamps (LED).
4. Light-emitting diodes (LED) .
Do not touch the "Full LED" headlamps.
Risk of electrocution!
Call on a PEUGEOT dealer or a qualified
workshop.
Model with halogen headlamps
1. Daytime running lamps / sidelamps
(LED).
2. Dipped beam headlamps (H7).
3. Main beam headlamps (HB3).
4. Direction indicators (PWY24W).
5. Fo g l a m p s ( H11) .
Opening the bonnet / Access to bulbs
Engine warm, proceed with caution
–
Risk of burns!
Take care with objects or clothing that
could be caught in the blades of the
engine fan
– Risk of strangulation!
In the event of a breakdown
Page 251 of 360
249
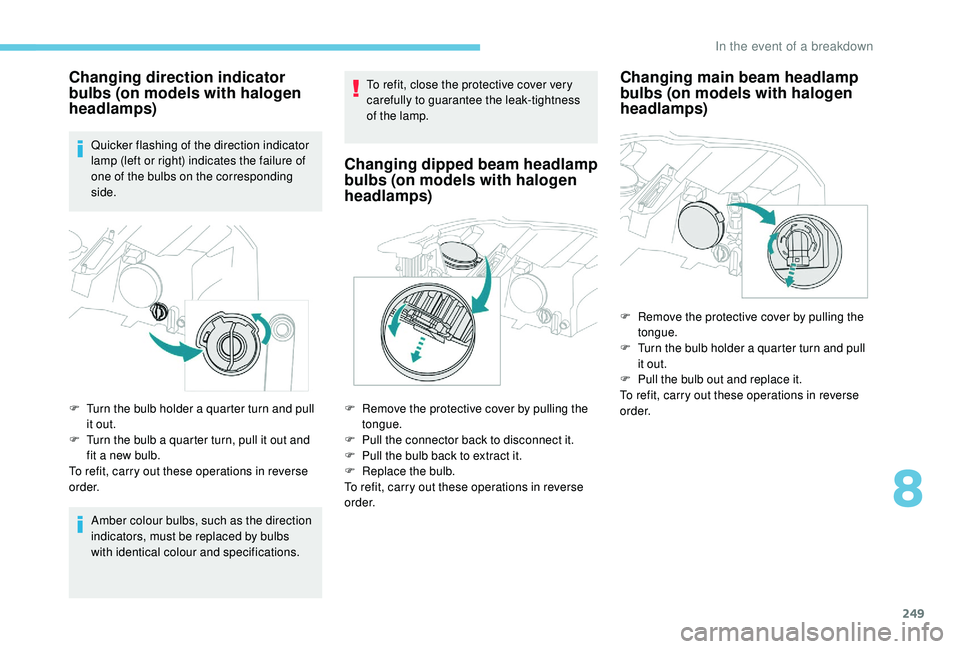
Changing direction indicator
bulbs (on models with halogen
headlamps)
Quicker flashing of the direction indicator
lamp (left or right) indicates the failure of
one of the bulbs on the corresponding
side.
F
T
urn the bulb holder a quarter turn and pull
it out.
F
T
urn the bulb a quarter turn, pull it out and
fit a new bulb.
To refit, carry out these operations in reverse
o r d e r.
Amber colour bulbs, such as the direction
indicators, must be replaced by bulbs
with identical colour and specifications. To refit, close the protective cover very
carefully to guarantee the leak-tightness
of the lamp.
Changing dipped beam headlamp
bulbs (on models with halogen
headlamps)
F Remove the protective cover by pulling the
tongue.
F
P
ull the connector back to disconnect it.
F
P
ull the bulb back to extract it.
F
R
eplace the bulb.
To refit, carry out these operations in reverse
o r d e r.
Changing main beam headlamp
bulbs (on models with halogen
headlamps)
F Remove the protective cover by pulling the tongue.
F
T
urn the bulb holder a quarter turn and pull
it out.
F
P
ull the bulb out and replace it.
To refit, carry out these operations in reverse
o r d e r.
8
In the event of a breakdown
Page 252 of 360
250
To replace this type of bulb, you can also
contact a PEUGEOT dealer or a qualified
workshop.
Direction indicator side repeaters
(LED)
Side spotlamps (LED)
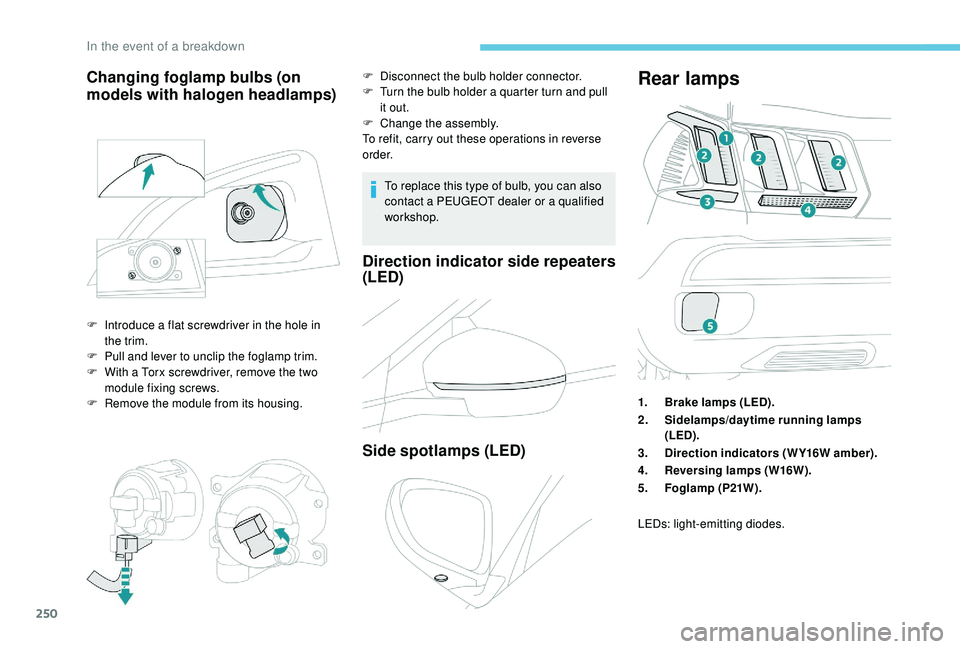
Rear lamps
1.Brake lamps (LED).
2. Sidelamps/daytime running lamps
(LED).
3. Direction indicators (WY16W amber).
4. Reversing lamps (W16W).
5. Foglamp (P21W).
Changing foglamp bulbs (on
models with halogen headlamps)
F Introduce a flat screwdriver in the hole in
the trim.
F
P
ull and lever to unclip the foglamp trim.
F
W
ith a Torx screwdriver, remove the two
module fixing screws.
F
R
emove the module from its housing. F
D
isconnect the bulb holder connector.
F
T
urn the bulb holder a quarter turn and pull
it out.
F
C
hange the assembly.
To refit, carry out these operations in reverse
o r d e r.
LEDs: light-emitting diodes.
In the event of a breakdown
Page 259 of 360
257
12 V battery
Procedure for starting the engine using another
battery or charging a discharged battery.
Version 1 (Full)
Fuse N° Rating (A) Functions
F14 15
AScreenwash pump.
F15 5
APower steering.
F20 25
AScreenwash pump.
F22 15
AHorn.
F23 15
ARight-hand main beam headlamp.
F24 15
ALeft-hand main beam headlamp.
Fuse N° Rating (A) Functions
F8 30
ADiesel emissions control system (AdBlue)
F12 15
AAutomatic gearbox.
F14 5
AAutomatic gearbox.
Version 2 (Eco)
Fuse N° Rating (A) Functions
F16 25
AFront foglamps.
F18 10
ARight-hand main beam headlamp.
F19 10
ALeft-hand main beam headlamp.
Box 1
Box 2
General points
Lead-acid starter batteries
Batteries contain harmful substances
such as sulphuric acid and lead.
They must be disposed of in
accordance with regulations and must
not, in any circumstances, be discarded
with household waste.
Take used remote control batteries and
vehicle batteries to a special collection
point.
Protect your eyes and face before
handling the battery.
All operations on the battery must be
carried out in a well ventilated area and
away from naked flames and sources
of sparks, so as to avoid the risk of
explosion or fire.
Wash your hands afterwards.
8
In the event of a breakdown
Page 351 of 360

267
A
180° rear vision .....................................20 6-207
Accessories .......................................... 121, 15 6
Active Safety Brake..................... 16 -17, 18 9 -191
AdBlue
® ............................................ 20, 32, 234
Additive, Diesel ............................................. 232
Adjusting headlamps
.................................... 112
Adjusting head restraints
................................ 73
Adjusting seats
........................................... 71-73
Adjusting the air distribution
.....................87- 8 9
Adjusting the air flow
................................. 8
7- 8 9
Adjusting the date
......................... 38-40, 31, 18
Adjusting the height and reach of the steering wheel
.................................... 76
Adjusting the lumbar support
..................... 71
-73
Adjusting the seat belt height
................ 1
2 9 -13 0
Adjusting the temperature
........................87- 8 9
Adjusting the time
......................... 38-40, 31, 17
Advanced Grip Control
.......................... 127-128
Advice on driving
................................... 151-152
Airbags
...............................
.............18, 13 3 , 13 8
Airbags, curtain
...................................... 13 4 -13 6
Airbags, front .................................. 13 3 -13 4, 13 6
Airbags, lateral
...................................... 13 4, 13 6
Air conditioning
......................................... 84-86
Air conditioning, automatic
.............................83
Air conditioning, dual-zone automatic
.....86, 90
Air conditioning, manual
..................... 83
-84, 90
Air conditioning, mono-zone
...............84-86, 90
Air intake
................................................... 87- 8 9
Air vents
.................................................... 81- 82
Alarm
............................................................... 58
Amplifier, audio
...............................
................98
Anti-lock braking system (ABS)
..............15, 124
Apple CarPlay connection
........................16, 12
Armrest, front
................................................ 10 0
Armrest, rear
...............................
..................105
Assistance call
...............................
........12 2-123
Assistance, emergency braking
...........124, 19 0
Audio streaming (Bluetooth)
...................24, 9 , 9
B
Backrest, folding ........................................ 7 2-73
Battery ..................... 13, 223 , 231, 257-258 , 260
Battery charge (warning lamp)
.......................13
Battery, charging
................................... 259-260
Battery, remote control
.............................54, 56
Blind
..............................
..................................67
Blind spot monitoring system
..........24, 200-202
Blind spot monitoring system, active
......24, 202
Blind spot sensors
..........................24, 200-201
BlueHDi
............................. 32, 35 , 234 , 237-238
Bluetooth (hands-free)
........ 2
5 -26, 13 -14 , 1 0 -11
Bluetooth (telephone)
......................
25 -27, 13 -15
Bonnet
................................................... 226-227
Boot
............................................. 61- 62, 64, 108
Brake discs
............................................ 232-233
Brake lamps
...............................
...................250
Brakes
........................................ 14 -15, 232-233
Braking assistance system
...........................124
Braking, automatic emergency
...16 -17 , 18 9 -191
Braking, emergency
...................................... 16
0
Brightness
....................................................... 16
Bulbs
............................................................. 248
Bulbs (changing)
....................247-248, 250-252
C
Cable, audio ................................................ 23, 9
Cable, Jack ................................................. 23, 9
Capacity, fuel tank
........................................ 216
Cartridge, fragrance
.............................. 10
0 -101
CD
..................................................... 23 -24, 9, 9
CD, MP3
............................................ 23 -24, 9, 9
Central locking
.......................................... 51,
57
Changing a bulb
..................... 24
7-248, 250-252
Changing a fuse
............................ 25
3-254, 256
Changing a wheel
......................... 2
38-240, 243 Changing a wiper blade
.................
11
9
, 252-253
Changing the remote control battery
..............
56
Charger, induction
.....................................
98-99
Charger, wireless
...................................... 98
-99
Checking the engine oil level
.............................31
Checking the levels .................................. 229 -231
Checking tyre pressures (using the kit)
...240 , 242
Checks .......................................... 228, 231-233
Child lock ................................................ 14 9 -15 0
Children
.................................................. 142-14 6
Children (safety)
..................................... 14 9 -15 0
Child seats
.............13
2, 137-13 8 , 141-142, 148
Child seats, conventional
.......................141-142
Child seats, i-Size
......................................... 14 6
Child seats, ISOFIX
...............................143 -14 6
Cigarette lighter
.............................................. 97
Closing the boot
.................................. 49, 52 , 61
Closing the doors
..........................49, 51- 5 2 , 61
Configuration, vehicle
......................... 3
8-43, 46
Connection, Bluetooth
........ 19,
25 -27, 13 -15 , 11
Connection, MirrorLink
.........................17, 11 -12
Connection, Wi-Fi network
.............................20
Connectivity
.................................................... 98
Container, AdBlue
® ....................................... 23 5
Control, emergency boot release ...................62
Control, emergency door
................................ 54
C
ontrol, heated seats
...................................... 75
Controls, steering mounted
................... 161-165
Control stalk, lighting
................. 25 -26, 109, 111
Control stalk, wipers
.............................. 11
7-12 0
Courtesy lamps
...................................... 102-103
Cover, load space
......................................... 10 6
Cruise control ....172 , 174 -175 , 178 -18 4 , 187 , 189Cruise control, adaptive with
Stop function .........174 -175 , 18 0 -18 4 , 187, 189
Cruise control by speed limit recognition
...............................
............174 -175
Cup holder
....................................................... 96
Customisation
................................................... 9
.
Alphabetical index