2018 PEUGEOT 3008 change time
[x] Cancel search: change timePage 183 of 360
181
Principle of operation
The system automatically adapts the speed of
your vehicle to that of the vehicle in front, to
maintain a constant distance.
If the vehicle in front is driving more slowly, the
system slows, or even stops your vehicle, using
engine braking and the braking system (for
versions fitted with an automatic gearbox).The brake lamps illuminate as soon as
the braking system is activated with
deceleration of the vehicle.
Primarily designed for driving on main
roads and motor ways, this system only
works on moving vehicles
, driving in the
same direction as your vehicle. If the vehicle in front accelerates or changes
lane, the cruise control progressively
accelerates your vehicle to return to the
programmed speed.
If the driver operates a direction indicator to
overtake a slower vehicle, the cruise control
allows your vehicle to temporarily approach
the vehicle in front to assist the overtaking
manoeuvre, though never exceeding the
programmed speed.
The adaptive cruise control system
is a driving aid that cannot, in any
circumstances, replace the need to obser ve
speed limits and safety distances, nor the
need for vigilance on the part of the driver.
It is recommended that you always keep
your feet close to the pedals.
The driver must be ready to take back
control of their vehicle at any time,
using the brake or accelerator pedal as
appropriate.
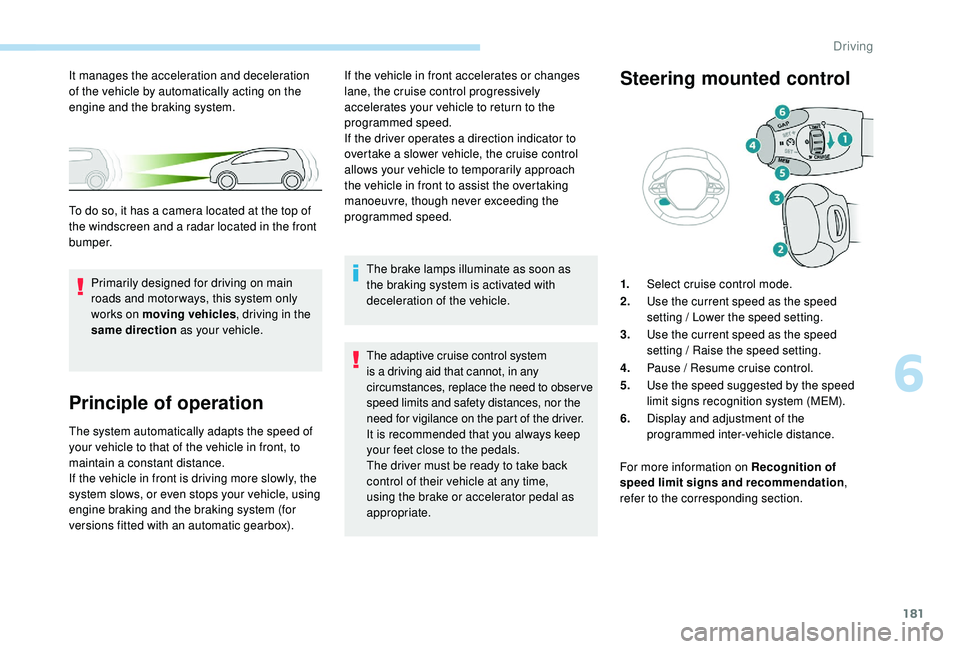
Steering mounted control
1.
Select cruise control mode.
2. Use the current speed as the speed
setting / Lower the speed setting.
3. Use the current speed as the speed
setting / Raise the speed setting.
4. Pause / Resume cruise control.
5. Use the speed suggested by the speed
limit signs recognition system (MEM).
6. Display and adjustment of the
programmed inter-vehicle distance.
For more information on Recognition of
speed limit signs and recommendation ,
refer to the corresponding section.
It manages the acceleration and deceleration
of the vehicle by automatically acting on the
engine and the braking system.
To do so, it has a camera located at the top of
the windscreen and a radar located in the front
b u m p e r.
6
Driving
Page 207 of 360
205
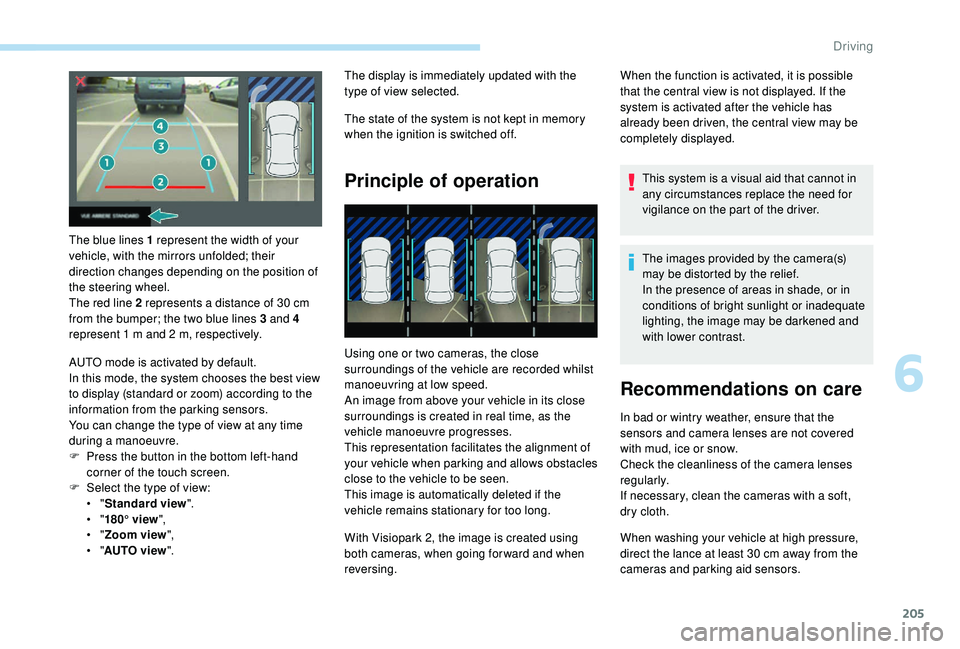
The blue lines 1 represent the width of your
vehicle, with the mirrors unfolded; their
direction changes depending on the position of
the steering wheel.
The red line 2 represents a distance of 30 cm
from the bumper; the two blue lines 3 and 4
represent 1
m and 2 m, respectively.
AUTO mode is activated by default.
In this mode, the system chooses the best view
to display (standard or zoom) according to the
information from the parking sensors.
You can change the type of view at any time
during a manoeuvre.
F
P
ress the button in the bottom left-hand
corner of the touch screen.
F
Sel
ect the type of view:
•
"Standard view ".
•
"180° view ",
•
"Zoom view ",
•
"AUTO view ". The display is immediately updated with the
type of view selected.
The state of the system is not kept in memory
when the ignition is switched off.
Principle of operation
Using one or two cameras, the close
surroundings of the vehicle are recorded whilst
manoeuvring at low speed.
An image from above your vehicle in its close
surroundings is created in real time, as the
vehicle manoeuvre progresses.
This representation facilitates the alignment of
your vehicle when parking and allows obstacles
close to the vehicle to be seen.
This image is automatically deleted if the
vehicle remains stationary for too long.
When the function is activated, it is possible
that the central view is not displayed. If the
system is activated after the vehicle has
already been driven, the central view may be
completely displayed.
This system is a visual aid that cannot in
any circumstances replace the need for
vigilance on the part of the driver.
The images provided by the camera(s)
may be distorted by the relief.
In the presence of areas in shade, or in
conditions of bright sunlight or inadequate
lighting, the image may be darkened and
with lower contrast.
Recommendations on care
In bad or wintry weather, ensure that the
sensors and camera lenses are not covered
with mud, ice or snow.
Check the cleanliness of the camera lenses
regularly.
If necessary, clean the cameras with a soft,
dry cloth.
With Visiopark 2, the image is created using
both cameras, when going for ward and when
reversing. When washing your vehicle at high pressure,
direct the lance at least 30
cm away from the
cameras and parking aid sensors.
6
Driving
Page 231 of 360
229
Checking levels
Check all of these levels regularly, in line with
the manufacturer's service schedule. Top them
up if necessary, unless other wise indicated.
If a level drops significantly, have the
corresponding system checked by a PEUGEOT
dealer or a qualified workshop.The fluid must comply with the
manufacturer's recommendations and
with the vehicle's engine.
Take care when working under the
bonnet, as certain areas of the engine
may be extremely hot (risk of burns) and
the cooling fan could start at any time
(even with the ignition off).
Used products
Avoid prolonged contact of used oil or
fluids with the skin.
Most of these fluids are harmful to health
or indeed very corrosive. Do not discard used oil or fluids into
sewers or onto the ground.
Take used oil to a PEUGEOT dealer or
a qualified workshop and dispose of it in
the containers reser ved for this purpose.
Engine oil level
The check is carried out either when
the ignition is switched on using the
oil level indicator in the instrument
panel for vehicles equipped with an
electric gauge, or using the dipstick.
To ensure that the reading is correct, your
vehicle must be parked on a level sur face
with the engine stopped for more than
30
minutes.
It is normal to top up the oil level between
two ser vices (or oil changes). PEUGEOT
recommends that you check the level, and top
up if necessary, every 3,000
miles (5,000 km).
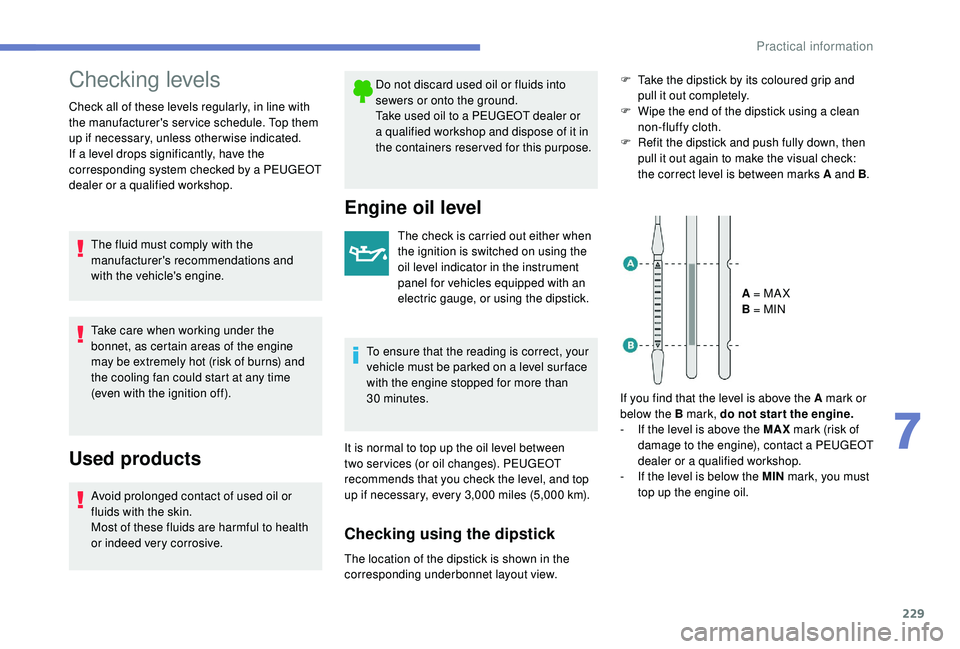
Checking using the dipstick
F Take the dipstick by its coloured grip and pull it out completely.
F
W
ipe the end of the dipstick using a clean
non-fluffy cloth.
F
R
efit the dipstick and push fully down, then
pull it out again to make the visual check:
the correct level is between marks A and B .
A = MA X
B = MIN
If you find that the level is above the A mark or
below the B mark, do not star t the engine.
-
I
f the level is above the MAX mark (risk of
damage to the engine), contact a PEUGEOT
dealer or a qualified workshop.
-
I
f the level is below the MIN mark, you must
top up the engine oil.
The location of the dipstick is shown in the
corresponding underbonnet layout view.
7
Practical information
Page 234 of 360
232
Air filter
Depending on the environment
(e.g. dusty atmosphere) and the
use of the vehicle (e.g. city driving),
replace it twice as often, if
necessary.
Oil filter
Change the oil filter each time the
engine oil is changed.
Particle filter (Diesel)
The start of saturation of the particle
filter is indicated by the temporary
illumination of this warning lamp
accompanied by a message about
the risk of the filter clogging up.
As soon as the traffic conditions permit,
regenerate the filter by driving at a speed
of at least 37
mph (60 km/h) until the
warning lamp goes off.
If the warning lamp stays on, this indicates
a low Diesel additive level.
For more information on Checking levels ,
refer to the corresponding section. On a new vehicle, the first particle
filter regeneration operations may be
accompanied by a "burning" smell, which
is per fectly normal.
Following prolonged operation of the
vehicle at very low speed or at idle,
you may, in exceptional circumstances,
notice the emission of water vapour at the
exhaust on acceleration. This does not
affect the behaviour of the vehicle or the
environment.
Manual gearbox
The gearbox does not require any
maintenance (no oil change).
Automatic gearbox
The gearbox does not require any
maintenance (no oil change).
Brake pads
Brake wear depends on the style
of driving, particularly in the case
of vehicles used in town, over short
distances. It may be necessary to
have the condition of the brakes
checked, even between vehicle
services.
Unless there is a leak in the circuit, a drop in
the brake fluid level indicates that the brake
pads are worn.
Brake disc wear
For information on checking brake
disc wear, contact a PEUGEOT
dealer or a qualified workshop.
Electric parking brake
This system does not require any
routine servicing. However, in the
event of a problem, have the system
checked by a PEUGEOT dealer or a
qualified workshop.
Practical information
Page 273 of 360
1
PEUGEOT Connect Nav
GPS satellite navigation –
A pplications – Multimedia
audio system
– Bluetooth
®
telephone
Contents
First steps
2
S
teering mounted controls
3
M
enus
3
V
oice commands
5
N
avigation
1
1
Connected navigation
1
3
Applications
1
6
Radio
21
D
AB radio (Digital Audio Broadcasting)
2
2
Media
23
T
elephone
2
5
Settings
2
9
Frequently asked questions
3
2The different functions and settings
described vary according to the version
and configuration of your vehicle.
As a safety measure and because it
requires sustained attention by the
driver, the pairing of a Bluetooth mobile
telephone with the Bluetooth hands-free
system of your audio system must be
done with the vehicle stationary
and the
ignition on.
The system is protected in such a way
that it will only operate in your vehicle.
The display of the message Energy
Economy Mode signals that a change to
standby is imminent.
The link below gives access to OSS
(Open Source Software) codes for the
system.
https://www.groupe-psa.com/fr/oss/
https://www.groupe-psa.com/en/oss/
.
PEUGEOT Connect Nav
Page 275 of 360
3
21,518,5
12:1323 °C
In the "Settings" menu you can create
a profile for just one person or a group
of people with common points, with the
possibility of entering a multitude of
settings (radio presets, audio settings,
navigation history, contact favourites,
etc.); these settings are taken into
account automatically.
In very hot conditions, the volume may
be limited to protect the system. It may go
into standby (screen and sound off) for at
least 5
minutes.
The return to normal takes place after
the temperature in the passenger
compartment drops.
Steering mounted controls
Depending on model
Voice commands :
This control is located on the
steering wheel or at the end of the
lighting control stalk (depending on
model).
Short press, system voice
commands.
Long press, smartphone voice
commands via the system. or
Increase volume.
or Mute / Restore the sound.
Or
Mute by pressing the volume
increase and decrease buttons
simultaneously.
Restore the sound by pressing one
of the two volume buttons.
or Decrease volume.
or Media
(short press): change the
multimedia source.
Telephone (short press): start
telephone call.
Call in progress (short press):
access telephone menu.
Telephone (long press): reject an
incoming call, end call; when no call
is in progress, access telephone
menu. or
Radio
(rotate): automatic search for
the previous / next station.
Media (rotate): previous / next track,
move in a list.
Short press : confirm a selection; if
nothing selected, access to presets.
Radio : display the list of stations.
Media : display the list of tracks.
Radio (press and hold): update the
list of stations received.
Menus
Depending on model / Depending on version
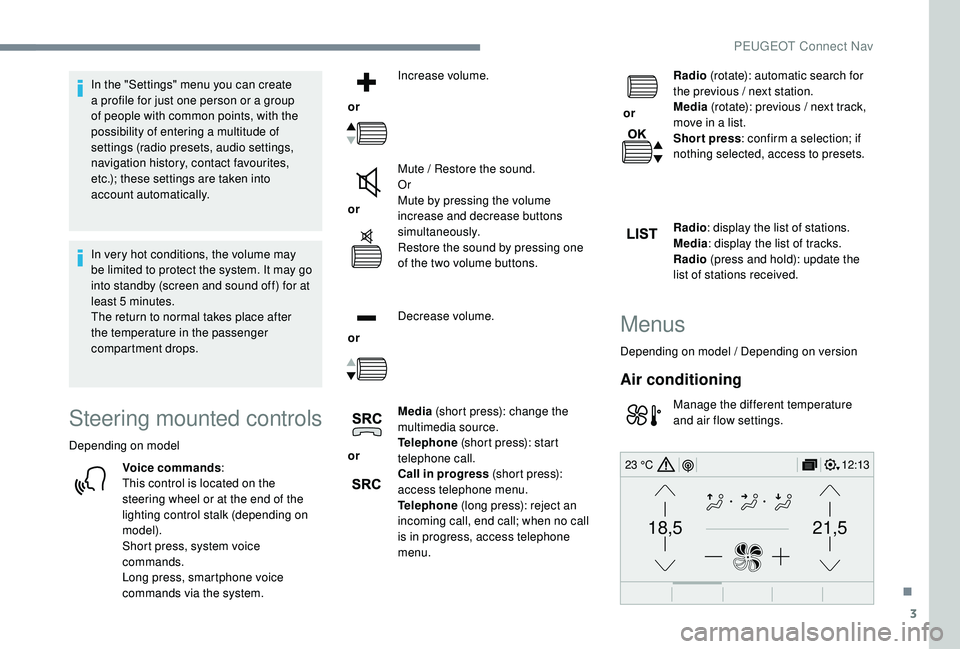
Air conditioning
Manage the different temperature
and air flow settings.
.
PEUGEOT Connect Nav
Page 295 of 360
23
Select "Radio settings ".
Select " General ".
Activate / Deactivate " Station
follow ".
Press " OK".
If "DAB-FM tracking" is activated, there
is a difference of a few seconds when the
system switches to FM analogue radio
with sometimes a variation in volume.
Once the digital signal quality is restored,
the system automatically changes back
to " DA B ".
If the "DAB" station being listened to is
not available on FM (" DAB- FM" option
greyed out), or "DAB-FM tracking" is not
activated, the sound will cut out while the
digital signal is too weak.Media
USB
Insert the USB memory stick in the USB port or
connect the USB device to the USB port using
a suitable cable (not supplied).
To protect the system, do not use a USB
hub.
The system builds playlists (in temporary
memory), an operation which can take from
a few seconds to several minutes at the first
connection.
Reduce the number of non-music files and the
number of folders to reduce the waiting time.
The playlists are updated every time the
ignition is switched off or a USB memory stick
is connected. The lists are memorised: if they
are not modified, the subsequent loading time
will be shorter.
Auxiliary socket (AUX)
(depending on model / depending on equipment)
This source is only available if "Auxiliary input"
has been checked in the audio settings.
Connect the portable device (MP3 player, etc.)
to the auxiliary Jack socket using an audio
cable (not supplied).
First adjust the volume on your portable device
(to a high level). Then adjust the volume of your
audio system.
Display and management of the controls are
via the portable device.
CD player
(depending on model / depending on
equipment)
Insert the CD in the player.
.
PEUGEOT Connect Nav
Page 303 of 360
31
Move the cursor to adjust the
brightness of the screen and/or of
the instrument panel.
or Press Settings
to display the
primary page.
Press the " OPTIONS" button to go to the
secondary page.
Select "System settings ".
Select " Units" to change the units of distance,
fuel consumption and temperature.
Select " Factory settings " to return to the initial
settings.
Returning the system to factory settings
activates the English language by default.
Select " System info " to display the versions of
the different modules installed in the system.Select the language
or Press Settings
to display the
primary page.
Press the " OPTIONS" button to go to the
secondary page.
Select "Languages " to change the
language.
Setting the date
or Press Settings
to display the
primary page.
Press the " OPTIONS" button to go to the
secondary page.
Select "Setting the time- date".
Select " Date".
Press on this button to define the
date. Press "
OK" to confirm.
Select the display format of the date.
Adjustment of the time and date is only
available if "GPS synchronisation" is
deactivated.
The change between winter and summer
time is done by changing the time zone.
Setting the time
or Press Settings
to display the
primary page.
Press the " OPTIONS" button to go to the
secondary page.
Select "Setting the time- date".
Select " Time".
Press this button to adjust the time
using the virtual keypad.
.
PEUGEOT Connect Nav