2018 PEUGEOT 3008 tailgate
[x] Cancel search: tailgatePage 55 of 360
53
At the second press, illumination of the
direction indicators for a few seconds signals
the deadlocking of the vehicle for versions
without alarm.
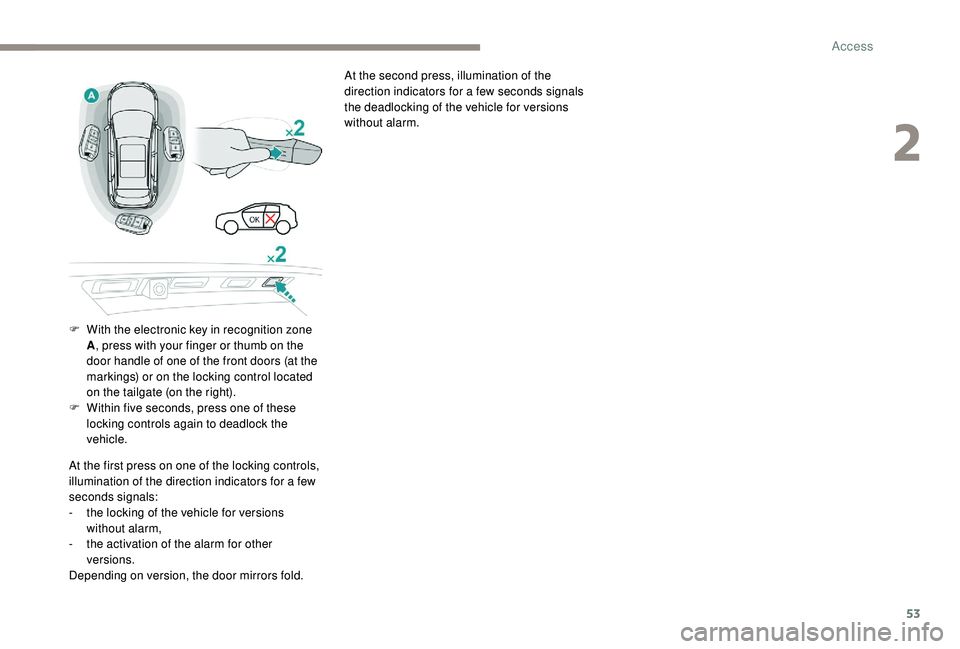
F
W
ith the electronic key in recognition zone
A , press with your finger or thumb on the
door handle of one of the front doors (at the
markings) or on the locking control located
on the tailgate (on the right).
F
W
ithin five seconds, press one of these
locking controls again to deadlock the
vehicle.
At the first press on one of the locking controls,
illumination of the direction indicators for a few
seconds signals:
-
t
he locking of the vehicle for versions
without alarm,
-
t
he activation of the alarm for other
versions.
Depending on version, the door mirrors fold.
2
Access
Page 63 of 360
61
From inside
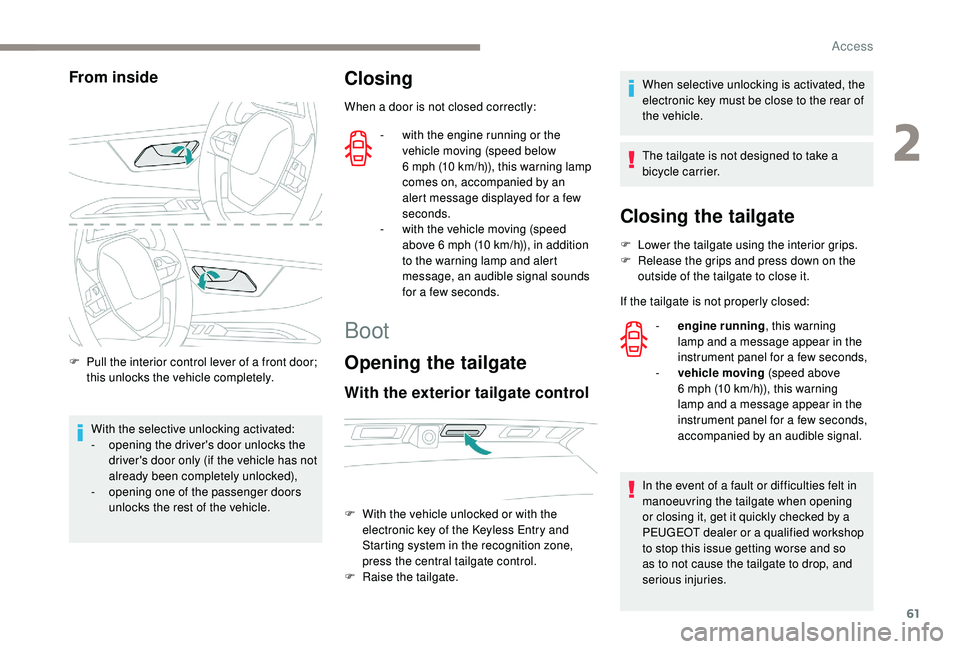
F Pull the interior control lever of a front door; this unlocks the vehicle completely.
With the selective unlocking activated:
-
o
pening the driver's door unlocks the
driver's door only (if the vehicle has not
already been completely unlocked),
-
o
pening one of the passenger doors
unlocks the rest of the vehicle.
Closing
When a door is not closed correctly:
-
w
ith the engine running or the
vehicle moving (speed below
6
mph (10 km/h)), this warning lamp
comes on, accompanied by an
alert message displayed for a few
seconds.
-
w
ith the vehicle moving (speed
above 6
mph (10 km/h)), in addition
to the warning lamp and alert
message, an audible signal sounds
for a few seconds.
Boot
Opening the tailgate
With the exterior tailgate control
When selective unlocking is activated, the
electronic key must be close to the rear of
the vehicle.
The tailgate is not designed to take a
bicycle carrier.
F
W
ith the vehicle unlocked or with the
electronic key of the
K
eyless Entry and
Starting system in the recognition zone,
press the central tailgate control.
F
Ra
ise the tailgate.
Closing the tailgate
F Lower the tailgate using the interior grips.
F R elease the grips and press down on the
outside of the tailgate to close it.
If the tailgate is not properly closed: -
e
ngine running , this warning
lamp and a message appear in the
instrument panel for a few seconds,
-
v
ehicle moving (speed above
6
mph (10 km/h)), this warning
lamp and a message appear in the
instrument panel for a few seconds,
accompanied by an audible signal.
In the event of a fault or difficulties felt in
manoeuvring the tailgate when opening
or closing it, get it quickly checked by a
PEUGEOT dealer or a qualified workshop
to stop this issue getting worse and so
as to not cause the tailgate to drop, and
serious injuries.
2
Access
Page 64 of 360
62
Back-up release
To manually unlock the boot in the event of
a battery or central locking failure.
Unlocking
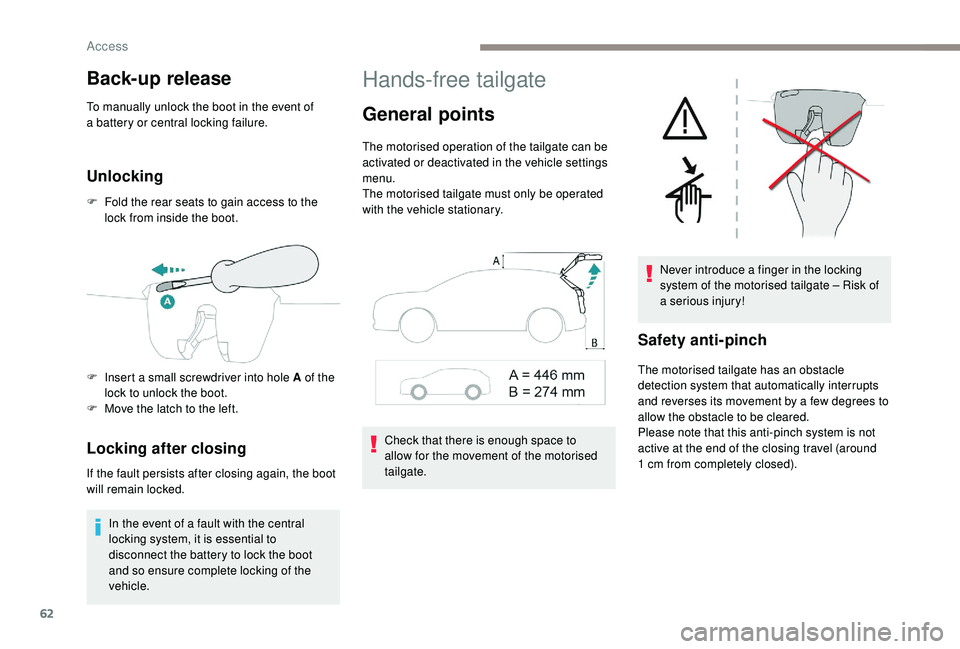
F Fold the rear seats to gain access to the lock from inside the boot.
Locking after closing
If the fault persists after closing again, the boot
will remain locked.
In the event of a fault with the central
locking system, it is essential to
disconnect the battery to lock the boot
and so ensure complete locking of the
vehicle.
Hands-free tailgate
General points
The motorised operation of the tailgate can be
activated or deactivated in the vehicle settings
menu.
The motorised tailgate must only be operated
with the vehicle stationary.
Check that there is enough space to
allow for the movement of the motorised
tailgate. Never introduce a finger in the locking
system of the motorised tailgate – Risk of
a serious injury!
Safety anti-pinch
The motorised tailgate has an obstacle
detection system that automatically interrupts
and reverses its movement by a few degrees to
allow the obstacle to be cleared.
Please note that this anti-pinch system is not
active at the end of the closing travel (around
1
cm from completely closed).
F
I
nsert a small screwdriver into hole A of the
lock to unlock the boot.
F
M
ove the latch to the left.
Access
Page 65 of 360
63
To avoid the risk of injury through pinching
or trapping, before and during operation of
the motorised tailgate:
-
e
nsure that there is no person close to
the rear of the vehicle,
-
w
atch the activity of your passengers,
particularly any children.
Bicycle carrier / Towbar
The motorised tailgate is not designed to
support a bicycle carrier.
When installing a bicycle carrier on a towbar
with connection of a cable to the towbar socket,
the motorised operation of the tailgate will be
automatically deactivated.
If using a towbar or bicycle carrier not
recommended by PEUGEOT, it is essential
to deactivate the motorised operation of the
tailgate.
Motorised operation
Activation / deactivation of the
motorised operation of the tailgate is
done in the Vehicle / Driving
menu
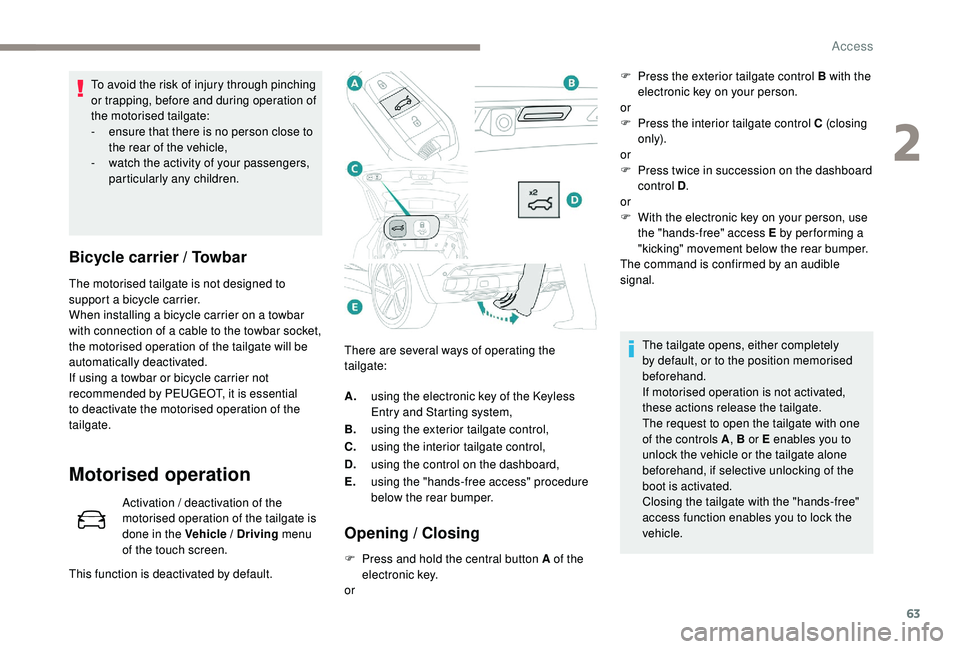
of the touch screen. There are several ways of operating the
tailgate:
Opening / Closing
F Press and hold the central button A of the
electronic key.
or
This function is deactivated by default. A.
using the electronic key of the
K
eyless
Entry and Starting system,
B. using the exterior tailgate control,
C. using the interior tailgate control,
D. using the control on the dashboard,
E. using the "hands-free access" procedure
below the rear bumper. F
P
ress the exterior tailgate control B with the
electronic key on your person.
or
F
P
ress the interior tailgate control C (closing
only).
or
F
P
ress twice in succession on the dashboard
control D .
or
F
W
ith the electronic key on your person, use
the "hands-free" access E by per forming a
"kicking" movement below the rear bumper.
The command is confirmed by an audible
signal.
The tailgate opens, either completely
by default, or to the position memorised
beforehand.
If motorised operation is not activated,
these actions release the tailgate.
The request to open the tailgate with one
of the controls A , B or E enables you to
unlock the vehicle or the tailgate alone
beforehand, if selective unlocking of the
boot is activated.
Closing the tailgate with the "hands-free"
access function enables you to lock the
vehicle.
2
Access
Page 66 of 360
64
At any point, It is possible to interrupt the
operation of the tailgate.
Pressing one of these controls again
interrupts the movement that is under way.
Following the interruption of a movement,
pressing one of these controls again
reverses the movement.
Hands-Free Tailgate Access
Activation and deactivation of the
"Hands-Free Tailgate Access"
function is done in the Vehicle /
Driving menu of the touch screen.
Ensure that you are steady on your
feet before per forming the quick foot
movement.
Take care not to touch the exhaust system
which may be hot – Risk of burns!
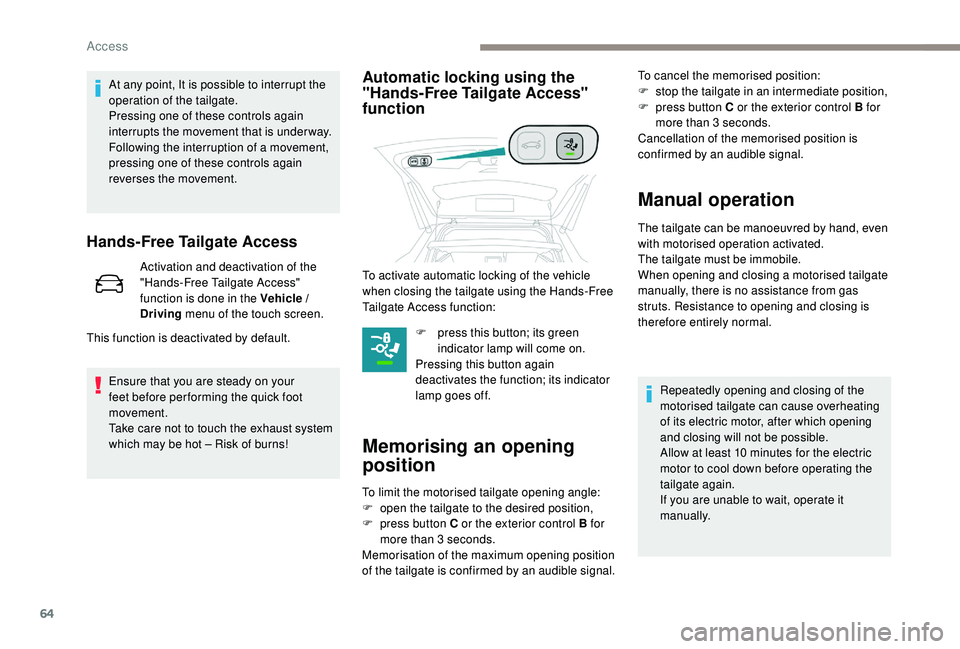
Automatic locking using the
"Hands-Free Tailgate Access"
function
F press this button; its green indicator lamp will come on.
Pressing this button again
deactivates the function; its indicator
lamp goes off.
Memorising an opening
position
To limit the motorised tailgate opening angle:
F o pen the tailgate to the desired position,
F
p
ress button C or the exterior control B for
more than 3
seconds.
Memorisation of the maximum opening position
of the tailgate is confirmed by an audible signal. To cancel the memorised position:
F
s
top the tailgate in an intermediate position,
F
p
ress button C or the exterior control B for
more than 3 seconds.
Cancellation of the memorised position is
confirmed by an audible signal.
Manual operation
The tailgate can be manoeuvred by hand, even
with motorised operation activated.
The tailgate must be immobile.
When opening and closing a motorised tailgate
manually, there is no assistance from gas
struts. Resistance to opening and closing is
therefore entirely normal.
This function is deactivated by default. To activate automatic locking of the vehicle
when closing the tailgate using the Hands-Free
Tailgate Access function:
Repeatedly opening and closing of the
motorised tailgate can cause overheating
of its electric motor, after which opening
and closing will not be possible.
Allow at least 10
minutes for the electric
motor to cool down before operating the
tailgate again.
If you are unable to wait, operate it
manually.
Access
Page 67 of 360
65
Reinitialising the
motorised tailgate
This operation is necessary where there is no
movement – after detection of an obstacle,
connecting or recharging the battery, etc.
F
O
pen the tailgate manually, if necessary.
F
F
ully close the tailgate manually.
If the problem persists, contact a PEUGEOT
dealer or a qualified workshop.
Precautions in use
In wintry conditions
In the event of an accumulation of snow
on the tailgate, clear the snow before
commanding a motorised opening of the
tailgate.
The formation of ice can block the tailgate
and prevent its opening: wait until the ice
melts with the heating of the passenger
compartment.
When washing
When washing the vehicle in an automatic
car wash, do not forget to lock your vehicle
to avoid the risk of unexpected opening.
Recommendations related
to the "Hands-Free Tailgate
Access" function
If several kicking movements to operate the
tailgate have no effect, wait a few seconds
before trying again.
The function automatically deactivates in heavy
rain or following a build-up of snow.
If it does not work, check that the electronic key
is not exposed to a source of electromagnetic
pollution (smartphone, etc.).
The function may not work correctly with a
prosthetic leg.
The function may not work correctly if your
vehicle is fitted with a towbar. -
y
our vehicle is being serviced,
-
y
ou are accessing the spare wheel
(depending on version).
To avoid such operating problems, keep the
electronic key away from the recognition
zone or deactivate the "Hands-Free Tailgate
Access" function.
In some circumstances, the tailgate may open
or close by itself, particularly if:
-
y
ou hitch or unhitch a trailer,
-
y
ou fit or remove a bicycle carrier,
-
y
ou load or unload bicycles from a bicycle
c a r r i e r,
-
y
ou place or lift something behind the
vehicle,
-
an
animal approaches the rear bumper,
-
y
ou are washing your vehicle,
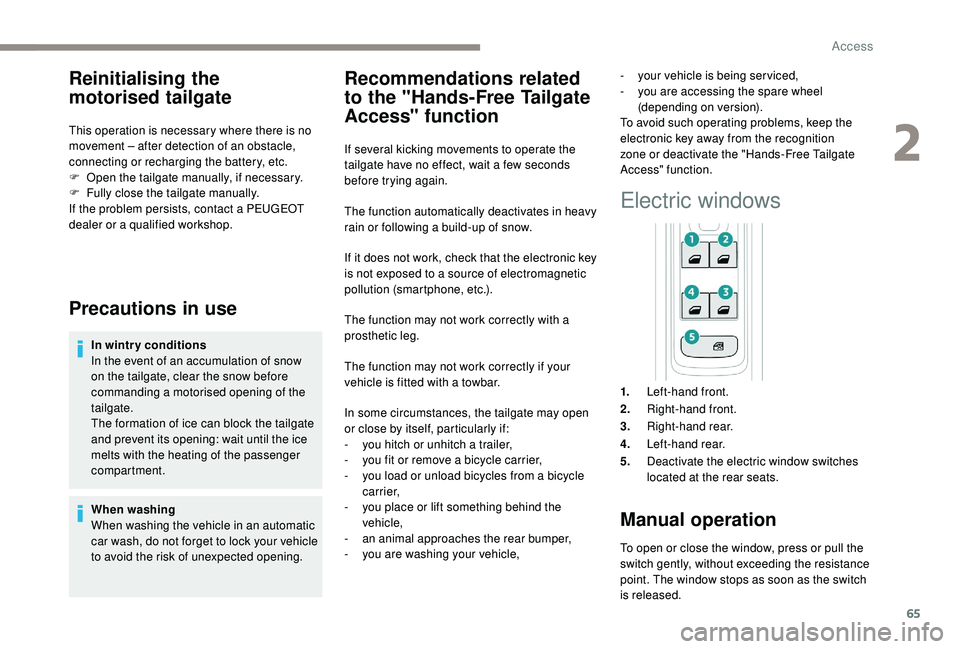
Electric windows
1. Left-hand front.
2. Right-hand front.
3. Right-hand rear.
4. Left-hand rear.
5. Deactivate the electric window switches
located at the rear seats.
Manual operation
To open or close the window, press or pull the
switch gently, without exceeding the resistance
point. The window stops as soon as the switch
is released.
2
Access
Page 108 of 360
106
The stowing rings are designed to
secure luggage using different types of
retaining nets.
Such nets are available as an option or
as an accessory.
For more information, contact a
PEUGEOT dealer.
For the installation of a high load
retaining net, refer to the corresponding
section.
Load space cover
When sharp deceleration occurs, objects
placed on the load space cover can turn
into projectiles.
12 V accessory socket
The connection of an electrical device
not approved by PEUGEOT, such as a
USB charger, may adversely affect the
operation of vehicle electrical systems,
causing faults such as poor radio
reception or inter ference with displays
in the screens.
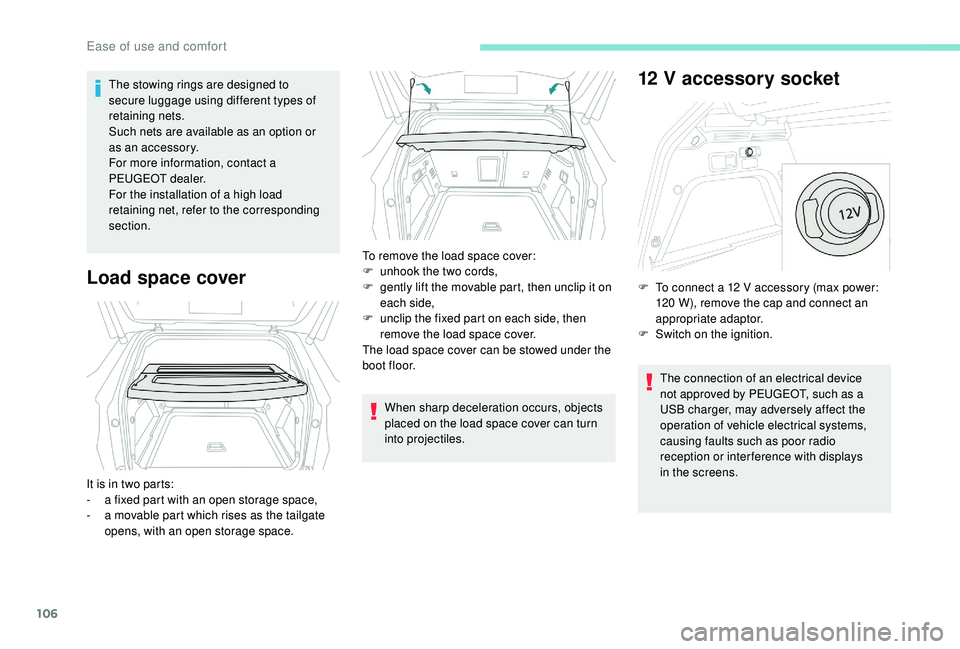
It is in two parts:
-
a f
ixed part with an open storage space,
-
a m
ovable part which rises as the tailgate
opens, with an open storage space. To remove the load space cover:
F
u
nhook the two cords,
F
g
ently lift the movable part, then unclip it on
each side,
F
u
nclip the fixed part on each side, then
remove the load space cover.
The load space cover can be stowed under the
boot floor. F
T
o connect a 12 V accessory (max power:
120 W), remove the cap and connect an
appropriate adaptor.
F
S
witch on the ignition.
Ease of use and comfort
Page 208 of 360
206
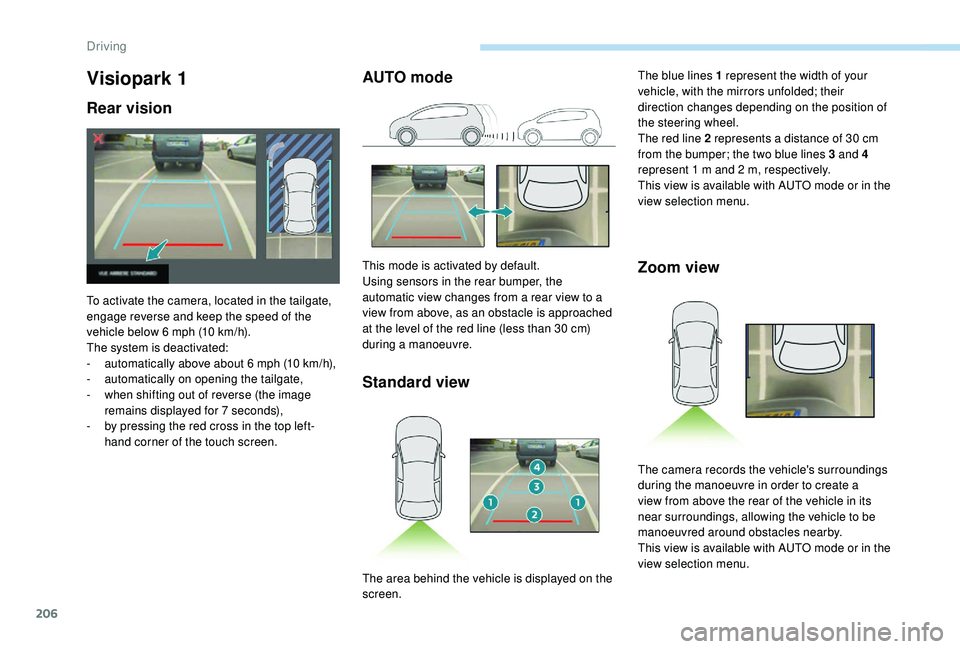
Visiopark 1
Rear vision
To activate the camera, located in the tailgate,
engage reverse and keep the speed of the
vehicle below 6 mph (10 km/h).
The system is deactivated:
-
a
utomatically above about 6 mph (10 km/h),
-
a
utomatically on opening the tailgate,
-
w
hen shifting out of reverse (the image
remains displayed for 7
seconds),
-
b
y pressing the red cross in the top left-
hand corner of the touch screen.
AUTO mode
Standard view
This mode is activated by default.
Using sensors in the rear bumper, the
automatic view changes from a rear view to a
view from above, as an obstacle is approached
at the level of the red line (less than 30
cm)
during a manoeuvre.Zoom view
The blue lines 1 represent the width of your
vehicle, with the mirrors unfolded; their
direction changes depending on the position of
the steering wheel.
The red line 2 represents a distance of 30
cm
from the bumper; the two blue lines 3 and 4
represent 1
m and 2 m, respectively.
This view is available with AUTO mode or in the
view selection menu.
The area behind the vehicle is displayed on the
screen. The camera records the vehicle's surroundings
during the manoeuvre in order to create a
view from above the rear of the vehicle in its
near surroundings, allowing the vehicle to be
manoeuvred around obstacles nearby.
This view is available with AUTO mode or in the
view selection menu.
Driving