2018 PEUGEOT 3008 engine
[x] Cancel search: enginePage 236 of 360
234
AdBlue® (BlueHDi
engines)
To respect the environment and ensure
compliance with the Euro 6 standard, without
adversely affecting the per formance or fuel
consumption of Diesel engines, PEUGEOT
has taken the decision to equip its vehicles
with a system that associates SCR (Selective
Catalytic Reduction) with a Diesel particle filter
(DPF) for the treatment of exhaust gases.
SCR system
Using a liquid called AdBlue® that contains
urea, a catalytic converter turns up to 85% of
the nitrogen oxides (NOx) into nitrogen and
water, which are harmless to health and the
environment.
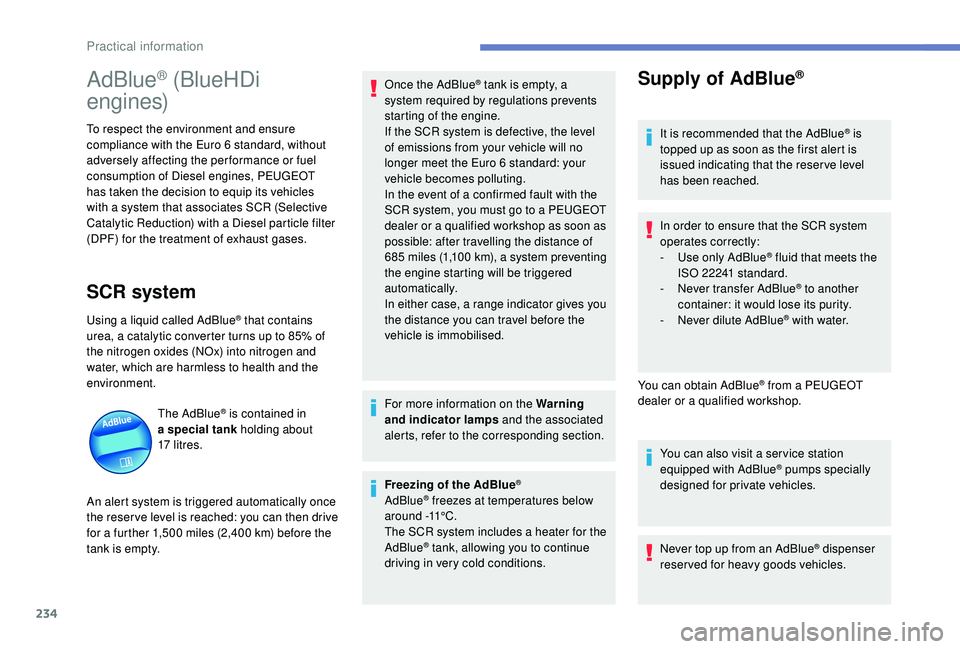
The AdBlue
® is contained in
a special tank holding about
17
litres.
An alert system is triggered automatically once
the reser ve level is reached: you can then drive
for a further 1,500
miles (2,400 km) before the
tank is empty. Once the AdBlue
® tank is empty, a
s
ystem required by regulations prevents
starting of the engine.
If the SCR
system is defective, the level
of emissions from your vehicle will no
longer meet the Euro 6 standard: your
vehicle becomes polluting.
In the event of a confirmed fault with the
SCR system, you must go to a PEUGEOT
dealer or a qualified workshop as soon as
possible: after travelling the distance of
685
m
iles (1,100
k
m), a system preventing
the engine starting will be triggered
automatically.
In either case, a range indicator gives you
the distance you can travel before the
vehicle is immobilised.
For more information on the Warning
and indicator lamps and the associated
alerts, refer to the corresponding section.
Freezing of the AdBlue
®
AdBlue® freezes at temperatures below
around -11°C.
The SCR system includes a heater for the
AdBlue
® tank, allowing you to continue
driving in very cold conditions.
Supply of AdBlue®
It is recommended that the AdBlue® is
topped up as soon as the first alert is
issued indicating that the reser ve level
has been reached.
In order to ensure that the SCR system
operates correctly:
-
U
se only AdBlue
® fluid that meets the
ISO 22241 standard.
-
N
ever transfer AdBlue
® to another
container: it would lose its purity.
-
N
ever dilute AdBlue
® with water.
You can obtain AdBlue
® from a PEUGEOT
dealer or a qualified workshop.
You can also visit a ser vice station
equipped with AdBlue
® pumps specially
designed for private vehicles.
Never top up from an AdBlue
® dispenser
reserved for heavy goods vehicles.
Practical information
Page 237 of 360
235
Recommendations on storage
AdBlue® freezes at about -11°C and
deteriorates above 25°C. Containers should
be stored in a cool area and protected from
direct sunlight.
Under these conditions, the fluid can be kept
for at least a year.
If the fluid has frozen, it can be used once it
has completely thawed out.
Never store AdBlue
® containers in your
vehicle.
Precautions for use
In certain conditions (high temperature, for
example), the risk of release of ammonia
cannot be excluded: do not inhale the fluid.
Ammonia vapour has an irritant effect on
mucous membranes (eyes, nose and throat).
Keep AdBlue
® out of the reach of children,
in its original container.
Procedure
Before starting the top up procedure, ensure
that the vehicle is parked on a flat and level
sur face.
In winter, check that the temperature of the
vehicle is above -11°C. If not, in freezing
weather, the AdBlue
® cannot be poured into the
tank. Park your vehicle somewhere warmer for
a few hours before topping up.
In the event of an AdBlue
® breakdown,
confirmed by the message "Add AdBlue:
Starting impossible", you must top up with
at least 5
litres.
Never pour AdBlue
® into the Diesel fuel
tank. If any AdBlue
® is splashed, or if there
are any spillages on the side of the body,
rinse immediately with cold water or wipe
with a damp cloth.
If the fluid has crystallised, clean it off
using a sponge and hot water.
Important: in the event of a top-up after
a breakdown because of a lack of
AdBlue, you must wait around 5
minutes
before switching on the ignition, without
opening the driver's door, locking
the vehicle, introducing the key into
the ignition switch, or introducing
the key of the
K
eyless Entr y and
Star ting system into the passenger
compartment .
Switch on the ignition, then wait for
10
seconds before starting the engine.
F
S
witch off the ignition and remove the key
from the switch to switch off the engine.
or
F
W
ith
K
eyless Entry and Starting, press the
" START/STOP " button to switch off the
engine.
AdBlue
® is a urea-based solution. This fluid
is non-flammable, colourless and odourless
(stored in a cool place).
In the event of contact with the skin, wash the
affected area with soap and running water. In
the event of contact with the eyes, immediately
rinse the eyes with large amounts of water
or with an eye wash solution for at least
15
minutes. If a burning sensation or irritation
persists, get medical attention.
If swallowed, immediately wash out the mouth
with clean water and then drink plenty of water.
7
Practical information
Page 238 of 360
236
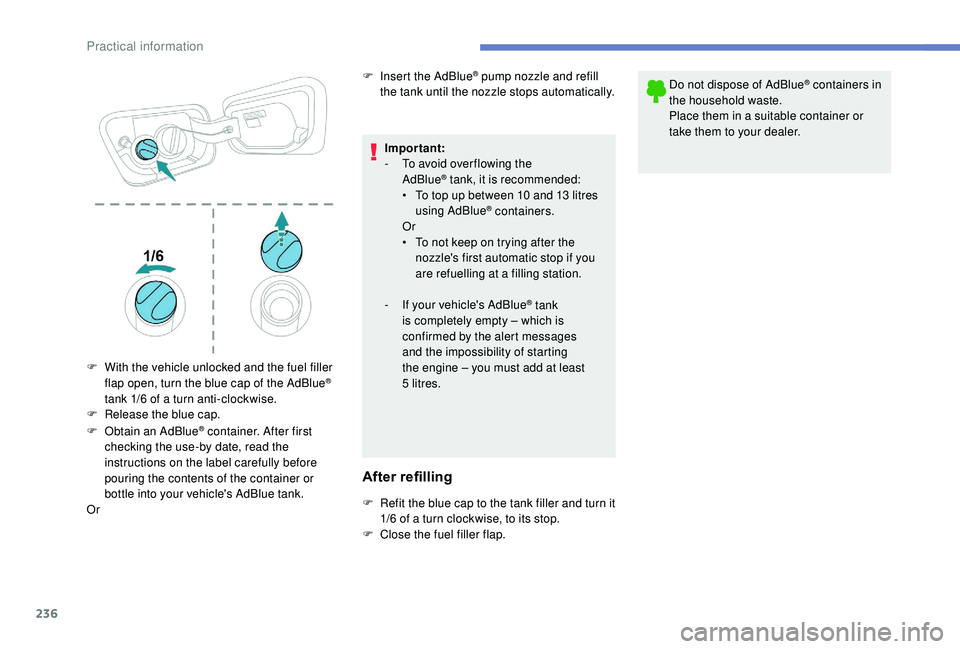
F Obtain an AdBlue® container. After first
checking the use-by date, read the
instructions on the label carefully before
pouring the contents of the container or
bottle into your vehicle's AdBlue tank.
Or F
I
nsert the AdBlue
® pump nozzle and refill
the tank until the nozzle stops automatically.
Important:
-
T
o avoid over flowing the
AdBlue
® tank, it is recommended:
•
T
o top up between 10 and 13 litres
using AdBlue
® containers.
Or
•
T
o not keep on trying after the
nozzle's first automatic stop if you
are refuelling at a filling station.
-
I
f your vehicle's AdBlue
® tank
is completely empty – which is
confirmed by the alert messages
and the impossibility of starting
the engine – you must add at least
5
litres.
After refilling
F Refit the blue cap to the tank filler and turn it 1/6 of a turn clockwise, to its stop.
F
C
lose the fuel filler flap. Do not dispose of AdBlue
® containers in
the household waste.
Place them in a suitable container or
take them to your dealer.
F
W
ith the vehicle unlocked and the fuel filler
flap open, turn the blue cap of the AdBlue
®
tank 1/6 of a turn anti-clockwise.
F
R
elease the blue cap.
Practical information
Page 239 of 360
237
Warning triangle
As a safety precaution, before leaving your
vehicle to set up and install the triangle, switch
on the hazard warning lamps and put on your
high visibility vest.
Storage compartmentAssembling the triangle
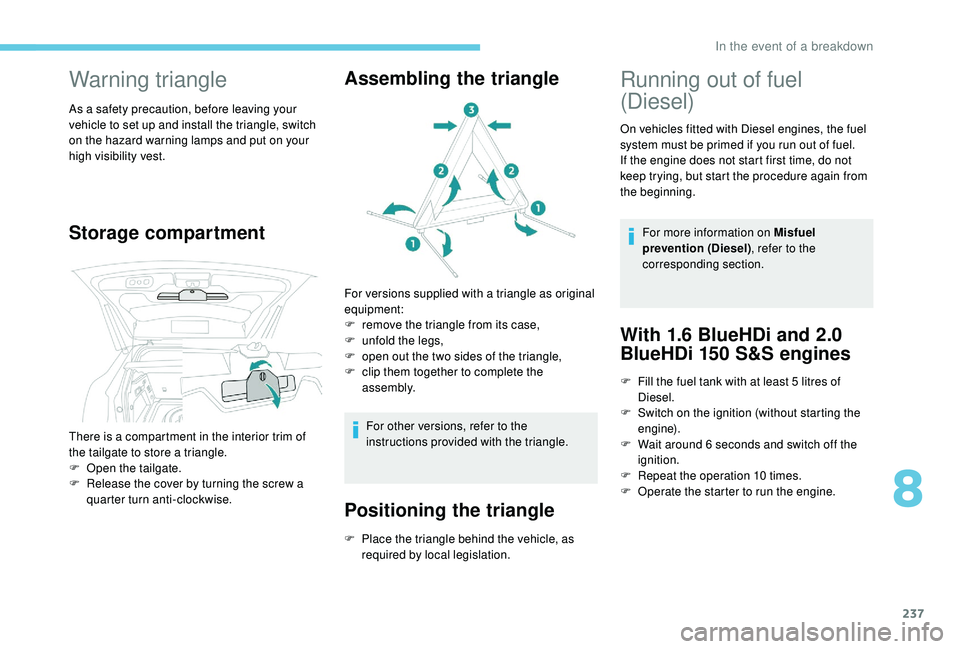
For versions supplied with a triangle as original
equipment:
F
r
emove the triangle from its case,
F
u
nfold the legs,
F
o
pen out the two sides of the triangle,
F
c
lip them together to complete the
assembly.
For other versions, refer to the
instructions provided with the triangle.
Positioning the triangle
There is a compartment in the interior trim of
the tailgate to store a triangle.
F
O
pen the tailgate.
F
R
elease the cover by turning the screw a
quarter turn anti-clockwise.
F
P
lace the triangle behind the vehicle, as
required by local legislation.
Running out of fuel
(Diesel)
On vehicles fitted with Diesel engines, the fuel
system must be primed if you run out of fuel.
If the engine does not start first time, do not
keep trying, but start the procedure again from
the beginning.
For more information on Misfuel
prevention (Diesel) , refer to the
corresponding section.
With 1.6 BlueHDi and 2.0
BlueHDi 150 S&S engines
F Fill the fuel tank with at least 5 litres of
Diesel.
F
S
witch on the ignition (without starting the
engine).
F
W
ait around 6 seconds and switch off the
ignition.
F
R
epeat the operation 10
times.
F
O
perate the starter to run the engine.
8
In the event of a breakdown
Page 240 of 360

238
With 1.5 BlueHDi and 2.0
BlueHDi 180 S&S engines
F Fill the fuel tank with at least 5 litres of
Diesel.
F
S
witch on the ignition (without starting the
engine).
F
W
ait around 1 minute and switch off the
ignition.
F
O
perate the starter to run the engine.
If the engine does not start, repeat the
procedure.
With 2.0 HDi engines
F Put it back in place, clip in the cover and ensure it is clipped in.
F
C
lose the bonnet.
Tool kit
This is a set of tools provided with the vehicle.
Its content depends on your vehicle's
equipment:
-
t
emporary puncture repair kit,
-
spar
e wheel.
Access to the tools
F raise the floor past the two retractable stops,
F
l
ay the floor on these two stops to hold it up.
For versions with a temporary
puncture repair kit:
F unclip the two fixings to open its cover.
For versions with a spare wheel:
F Fill the fuel tank with at least five litres of Diesel.
F
O
pen the bonnet.
F
I
f necessary, unclip the cover to access the
priming pump.
F
L
oosen the degassing screw.
F
U
se the priming pump until fuel appears in
the transparent tube.
F
R
etighten the degassing screw.
F
O
perate the starter until the engine starts (if
the engine does not start at the first attempt,
wait around 15
seconds before trying
again).
F
I
f the engine does not start after a few
attempts, operate the priming pump again
then start the engine. The main tools are stowed in the boot under
t h e f l o o r.
For access to them:
F
o
pen the boot,
F
p
lace the adjustable boot floor in the high
position,
In the event of a breakdown
Page 250 of 360
248
Changing a bulb must only be done with
the ignition off and after the headlamp
has been switched off for several
minutes – Risk of serious burns!
F
D
o not touch the bulb directly with
your fingers, use a lint-free cloth.
It is essential only to use anti-ultraviolet
(UV) type bulbs, so as not to damage the
headlamp.
Always replace a failed bulb with a
new bulb with the same type and
specification.
In some weather conditions (e.g. low
temperature or humidity), the presence
of misting on the internal sur face of the
glass of the headlamps and rear lamps
is normal; it disappears after the lamps
have been on for a few minutes.
Light emitting diodes (LED)
For the replacement of this type of bulb,
you must contact a PEUGEOT dealer or a
qualified workshop. Halogen bulbs
To ensure good quality lighting, check
that the bulb is correctly positioned in its
housing.
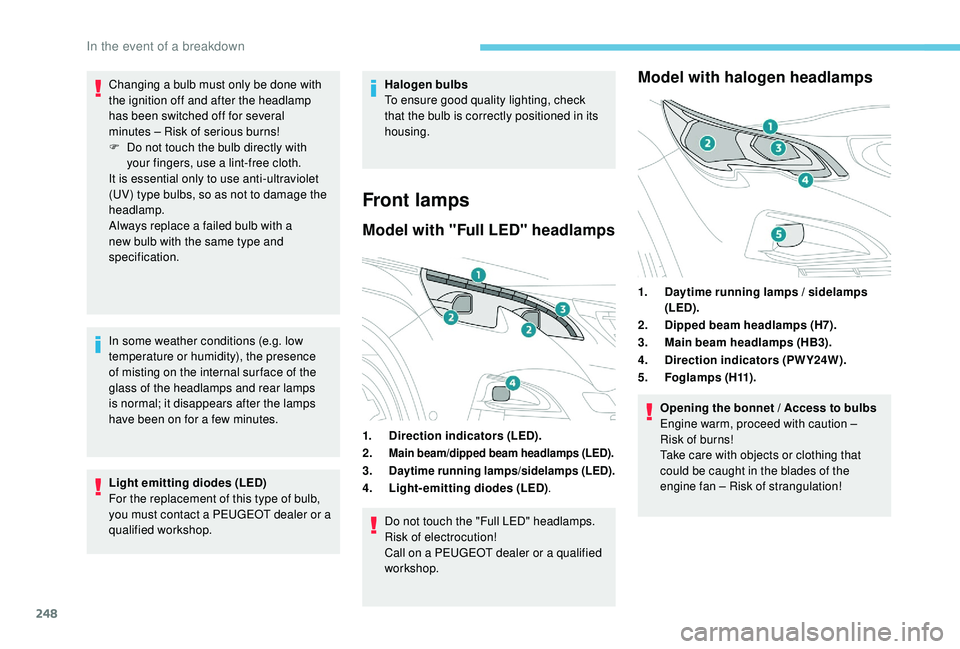
Front lamps
Model with "Full LED" headlamps
1.
Direction indicators (LED).
2.
Main beam/dipped beam headlamps (LED).
3.Daytime running lamps/sidelamps (LED).
4. Light-emitting diodes (LED) .
Do not touch the "Full LED" headlamps.
Risk of electrocution!
Call on a PEUGEOT dealer or a qualified
workshop.
Model with halogen headlamps
1. Daytime running lamps / sidelamps
(LED).
2. Dipped beam headlamps (H7).
3. Main beam headlamps (HB3).
4. Direction indicators (PWY24W).
5. Fo g l a m p s ( H11) .
Opening the bonnet / Access to bulbs
Engine warm, proceed with caution
–
Risk of burns!
Take care with objects or clothing that
could be caught in the blades of the
engine fan
– Risk of strangulation!
In the event of a breakdown
Page 258 of 360

256
Version 2 (Eco)
Fuse N°Rating (A) Functions
F4 15
AHorn.
F5 20
AFront screenwash pump.
F6 20
ARear screenwash pump.
F7 10
A12
V accessory socket.
F8 20
ARear wiper.
F10 30
ALocks.
F11 30
ALocks.
F14 5
AAlarm siren.
F17 5
AInstrument panel.
F22 3
ARain / sunshine sensor.
F24 5
AReversing camera, parking sensors.
F25 5
AAirbags.
F27 5
AAlarm.
F28 5
AEmergency and assistance calls.
F29 20
AAudio system, touch screen, CD player, audio/
navigation system.
F32 15
ACigarette lighter.
F36 5
AGlove box lighting.
Engine compartment fuses
The fusebox is placed in the engine
compartment near the battery.
Access to the fuses
F Release the two latches A .
F R emove the cover.
F
C
hange the fuse.
F
W
hen you have finished, close the cover
carefully then engage the two latches A , to
ensure correct sealing of the fusebox.
In the event of a breakdown
Page 259 of 360
257
12 V battery
Procedure for starting the engine using another
battery or charging a discharged battery.
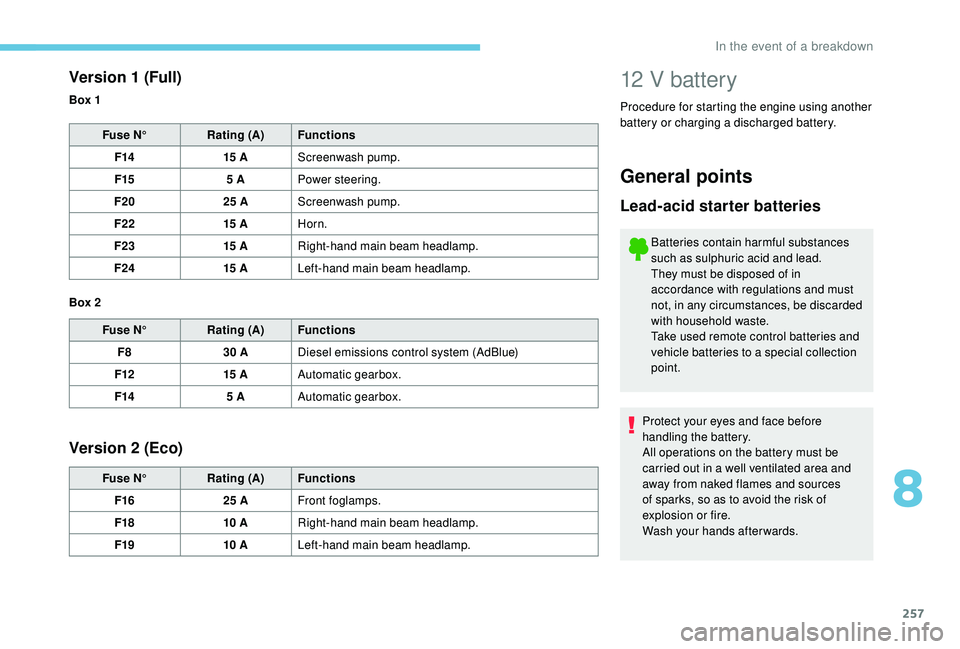
Version 1 (Full)
Fuse N° Rating (A) Functions
F14 15
AScreenwash pump.
F15 5
APower steering.
F20 25
AScreenwash pump.
F22 15
AHorn.
F23 15
ARight-hand main beam headlamp.
F24 15
ALeft-hand main beam headlamp.
Fuse N° Rating (A) Functions
F8 30
ADiesel emissions control system (AdBlue)
F12 15
AAutomatic gearbox.
F14 5
AAutomatic gearbox.
Version 2 (Eco)
Fuse N° Rating (A) Functions
F16 25
AFront foglamps.
F18 10
ARight-hand main beam headlamp.
F19 10
ALeft-hand main beam headlamp.
Box 1
Box 2
General points
Lead-acid starter batteries
Batteries contain harmful substances
such as sulphuric acid and lead.
They must be disposed of in
accordance with regulations and must
not, in any circumstances, be discarded
with household waste.
Take used remote control batteries and
vehicle batteries to a special collection
point.
Protect your eyes and face before
handling the battery.
All operations on the battery must be
carried out in a well ventilated area and
away from naked flames and sources
of sparks, so as to avoid the risk of
explosion or fire.
Wash your hands afterwards.
8
In the event of a breakdown