Page 145 of 203

Vehicle care143Replacing the vehicle batteryNote
Any deviation from the instructions
given in this section may lead to
temporary deactivation or
disturbance of the stop-start system.
When the vehicle battery is being
replaced, please ensure that there
are no open ventilation holes in the
vicinity of the positive terminal. If a
ventilation hole is open in this area, it
must be closed off with a dummy cap, and the ventilation in the vicinity of the
negative terminal must be opened.
Ensure that the battery is always replaced by the same type of battery.
We recommend the use of an originalOpel battery.
Note
Using an AGM vehicle battery
different from the original Opel
vehicle battery may result in a lower
performance.
We recommend that you have the
vehicle battery replaced by a
workshop.Charging the vehicle battery9 Warning
On vehicles with stop-start
system, ensure that the charging potential does not exceed 14.6
volts when using a battery
charger. Otherwise the battery
might be damaged.
Jump starting 3 169.
Stop-start system 3 111.
Warning label
Meaning of symbols: ● No sparks, naked flames or smoking.
● Always shield eyes. Explosive gases can cause blindness or
injury.
● Keep the vehicle battery out of the reach of children.
● The vehicle battery contains sulfuric acid which could cause
blindness or serious burn
injuries.
● See the Owner's manual for further information.
● Explosive gas may be present in the vicinity of the battery.
Page 146 of 203
144Vehicle careWiper blade replacement
Lift the wiper arm. Press release lever
and detach the wiper blade.
Attach the wiper blade slightly angled to the wiper arm and push until it
engages.
Lower wiper arm carefully.
Wiper blade on the rear window
Lift wiper arm. Push the wiper blade,
slightly angled to the wiper arm
downwards until it disengages.
Attach the wiper blade slightly angled
to the wiper arm and push until it
engages.
Lower wiper arm carefully.
Bulb replacement
Switch off the ignition and switch off
the relevant switch or close the doors.
Only hold a new bulb at the base! Do
not touch the bulb glass with bare
hands.
Use only the same bulb type for
replacement.
Replace headlight bulbs from within
the engine compartment.
Bulb check
After a bulb replacement switch on
the ignition, operate and check the
lights.
Page 147 of 203
Vehicle care145Halogen headlights
Low beam and high beam
1. On left vehicle side: rotate and pull
out the filling pipe of the
windscreen washer fluid
container.
2. Remove fuse box cover (left side of the vehicle only).
3. Press both clips together anddetach plug connector from bulb.
4. Remove protective cover.
5. Press spring clip and disengage.
Page 148 of 203
146Vehicle care
6. Remove bulb from reflectorhousing.
7. When fitting a new bulb, engage the lugs in the recesses on the
reflector.
8. Engage the spring clip.
9. Place headlight protective cover in position and close.
10. Ensure the protective cover is placed correctly to prevent water
leak and heavy condensations.
Sidelight/Daytime running light 1. Remove fuse box cover (left side of the vehicle only).2. Rotate the bulb holder anticlockwise and remove.
3. Detach bulb from the bulb holderand replace it.
4. Insert the bulb socket into the reflector and turn clockwise.
Sidelight/daytime running light
with LEDs
Sidelights and daytime running lights
are designed as LEDs and cannot be
changed. Consult a workshop in case
of a defective LED.
Fog lights
1. Tilt the wheel and remove the two
push nuts on the outside of the
wheel liner.
Page 149 of 203
Vehicle care147
2. Disconnect the electricalconnector from the bulb holder.
3. Remove the bulb assembly anticlockwise and pull it straight
out.
4. Insert a new bulb assembly straight into the lamp and rotate
clockwise.
5. Reconnect the electrical connector.
Front turn signal lights
1. Rotate the bulb holderanticlockwise and remove.
2. Rotate bulb anticlockwise and remove from bulb holder.
3. Replace bulb.
4. Insert the bulb holder into the reflector and rotate clockwise.
Tail lightsTail lights, turn signal lights, brake
lights and reversing lights
1. Unscrew both screws.
2. Remove tail light assembly. Take care that the cable duct remains in
position.
Page 150 of 203
148Vehicle care
3. tail light / brake light 1
turn signal light 2
tail light 3
reversing light (passenger side) /
rear fog light (driver's side) 4.4. Rotate bulb holder anticlockwise.
5. Remove bulb holder. Push bulb
into socket slightly, rotate anti-
clockwise, remove and renew
bulb.
6. Insert bulb holder into the tail light
assembly and screw into place.
Connect wiring plug. Install tail
light assembly in body and tighten screws. Close covers and
engage.
7. Switch on ignition, operate and check all lights.
Side turn signal lights
To replace bulb, remove lamp
housing:
1. Slide lamp to the front and remove
it out of the front wing with the rear
end.
Page 151 of 203
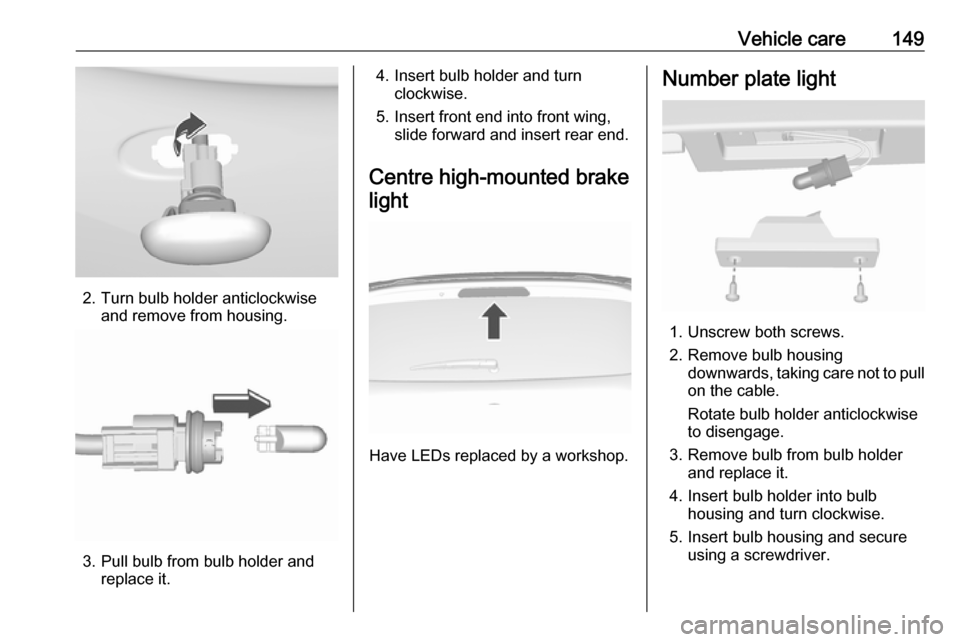
Vehicle care149
2. Turn bulb holder anticlockwiseand remove from housing.
3. Pull bulb from bulb holder andreplace it.
4. Insert bulb holder and turnclockwise.
5. Insert front end into front wing, slide forward and insert rear end.
Centre high-mounted brake light
Have LEDs replaced by a workshop.
Number plate light
1. Unscrew both screws.
2. Remove bulb housing downwards, taking care not to pull
on the cable.
Rotate bulb holder anticlockwise
to disengage.
3. Remove bulb from bulb holder and replace it.
4. Insert bulb holder into bulb housing and turn clockwise.
5. Insert bulb housing and secure using a screwdriver.
Page 152 of 203
150Vehicle careInterior lightsCourtesy light, reading lights 1. To remove, prise the opposite side of the lamp switch using a
flat-blade screwdriver. (Be careful
not to make scratches.)
2. Remove the bulb.
3. Replace the bulb.
4. Reinstall the lamp assembly.
Load compartment light
1. Prise the lamp out with a screwdriver.
2. Remove bulb.
3. Insert new bulb.
4. Install lamp.
Instrument panel illumination
Have bulbs replaced by a workshop.
Electrical system
Fuses
Data on the replacement fuse must
match the data on the defective fuse.
There are two fuse boxes in the
vehicle:
● In the front left of the engine compartment.
● On the driver's side behind a cover in the instrument panel.
Before replacing a fuse, turn off the
respective switch and the ignition.