2018 OPEL INSIGNIA BREAK turn signal
[x] Cancel search: turn signalPage 108 of 323

106Instruments and controlsOn Mid- and Uplevel display select
Info Menu by pressing è on steering
wheel. Press å to select Remaining
Oil Life page.
Remaining oil life duration is indicated
in percentage.
ResetOn Baselevel display press
SET/CLR on turn signal lever for
several seconds to reset. The ignition
must be switched on but engine not
running.
On Mid- and Uplevel display press é on steering wheel to open the
subfolder. Select Reset and confirm
by pressing 9 for several seconds.
The ignition must be switched on but
engine not running.
The system must be reset every time
the engine oil is changed to allow
proper functionality. Seek the
assistance of a workshop.
Next service
When the system has calculated that
engine oil life has been diminished,
Change Engine Oil Soon appears inthe Driver Information Centre. Have
engine oil and filter changed by a
workshop within one week or
500 km (whichever occurs first).
Service information 3 284.
Control indicators The control indicators described are
not present in all vehicles. The
description applies to all instrument
versions. Depending on the
equipment, the position of the control
indicators may vary. When the
ignition is switched on, most control
indicators will illuminate briefly as a
functionality test.
The control indicator colours mean:red:danger, important reminderyellow:warning, information, faultgreen:confirmation of activationblue:confirmation of activationwhite:confirmation of activation
See all control indicators on different
instrument clusters 3 97.
Turn signal
O illuminates or flashes green.
Illuminates briefly
The parking lights are switched on.
Flashes
A turn signal or the hazard warning
flashers are activated.
Rapid flashing: failure of a turn signal
light or associated fuse, failure of turn
signal light on trailer.
Bulb replacement 3 246, Fuses
3 256.
Turn signals 3 142.
Seat belt reminder
Seat belt reminder on front seats X for driver's seat illuminates or
flashes red in the instrument cluster.
Page 111 of 323

Instruments and controls109Flashes
Electric parking brake is in service
mode. Stop vehicle, apply and
release the electric parking brake to
reset.9 Warning
Have the cause of the fault
remedied immediately by a
workshop. Avoid parking on
inclines until the cause of the fault has been remedied.
Antilock brake system
(ABS)
u illuminates yellow.
Illuminates for a few seconds after the
ignition is switched on. The system is ready for operation when the control
indicator extinguishes.
If the control indicator does not go out after a few seconds, or if it illuminates while driving, there is a fault in the
ABS. The brake system remains
operational but without ABS
regulation.
Antilock brake system 3 179.
Gear shifting
R or S with the number of a higher or
lower gear is indicated, when up- or
downshifting is recommended for fuel
saving reasons.
Following distance
E indicates the following distance
setting of the alert timing sensitivity
for the forward collision alert using
filled distance bars.
Forward collision alert 3 198.
Lane keep assist a illuminates green or yellow, or
flashes yellow.
Illuminates green
The system is switched on and ready
to operate.Illuminates yellow
The system approaches a detected
lane marking without using the turn
signal in that direction.
Flashes yellow
The system recognizes that the lane
is departed significantly.
Lane keep assist 3 229
Electronic Stability Control
off
t illuminates yellow.
The system is deactivated.
Electronic Stability Control
and Traction Control system
b illuminates or flashes yellow.
Illuminates A fault in the system is present.
Continued driving is possible. Driving
stability, however, may deteriorate
depending on road surface
conditions.
Page 115 of 323

Instruments and controls113Information displays
Driver Information Centre
The Driver Information Centre is
located in the instrument cluster.
Depending on the version and the
instrument cluster, the Driver
Information Centre is available as
Baselevel display, Midlevel display or Uplevel display.
Driver Information Centre indicates
depending on the equipment:
● overall and trip odometer
● vehicle information and settings
● trip/fuel information
● driving economic information
● driver assistance alerts
● warning messages
● audio and infotainment information
● phone information
● navigation informationBaselevel display
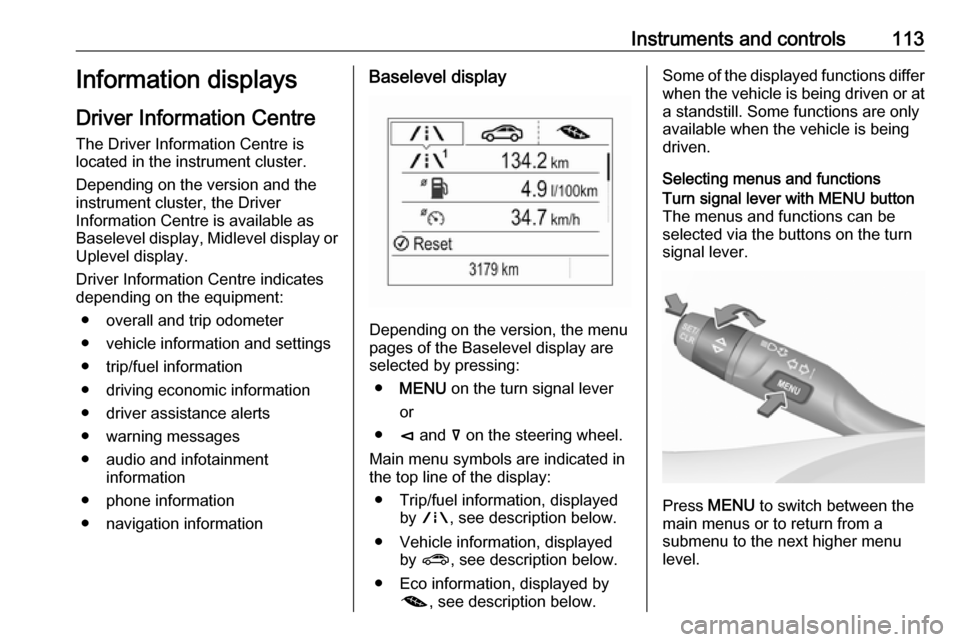
Depending on the version, the menu
pages of the Baselevel display are selected by pressing:
● MENU on the turn signal lever
or
● è and å on the steering wheel.
Main menu symbols are indicated in
the top line of the display:
● Trip/fuel information, displayed by ; , see description below.
● Vehicle information, displayed by ? , see description below.
● Eco information, displayed by @ , see description below.
Some of the displayed functions differ
when the vehicle is being driven or at a standstill. Some functions are only
available when the vehicle is being
driven.
Selecting menus and functionsTurn signal lever with MENU button
The menus and functions can be selected via the buttons on the turnsignal lever.
Press MENU to switch between the
main menus or to return from a
submenu to the next higher menu
level.
Page 126 of 323

124Instruments and controlsThe image can temporarily light up
depending on angel and position of
sunlight.
Switching off
Hold down & to turn the head-up
display off.
Language Preferred language can be set invehicle personalisation menu 3 126.
Units Units can be changed in the settings
menu of the Driver Information Centre
3 113.
Care of head-up display Clean the inside of the windscreen as
needed to remove any dirt or film that
could reduce the sharpness or clarity
of the head-up image.
Clean the head-up display lens in the instrument panel with a soft cloth
sprayed with glass cleaner. Wipe the
lens gently, then dry it.System limitations
Head-up display may not operate
properly when:
● The lens in the instrument panel is covered by objects or
windscreen and lens are not
clean.
● Display brightness is too dim or bright.
● Image is not adjusted to the proper height.
● The driver wears polarised sunglasses.
If the head-up image is not correct for other reasons, contact a workshop.
The windscreen is part of the head-up
display system. Windscreen
replacement 3 39.Vehicle messages
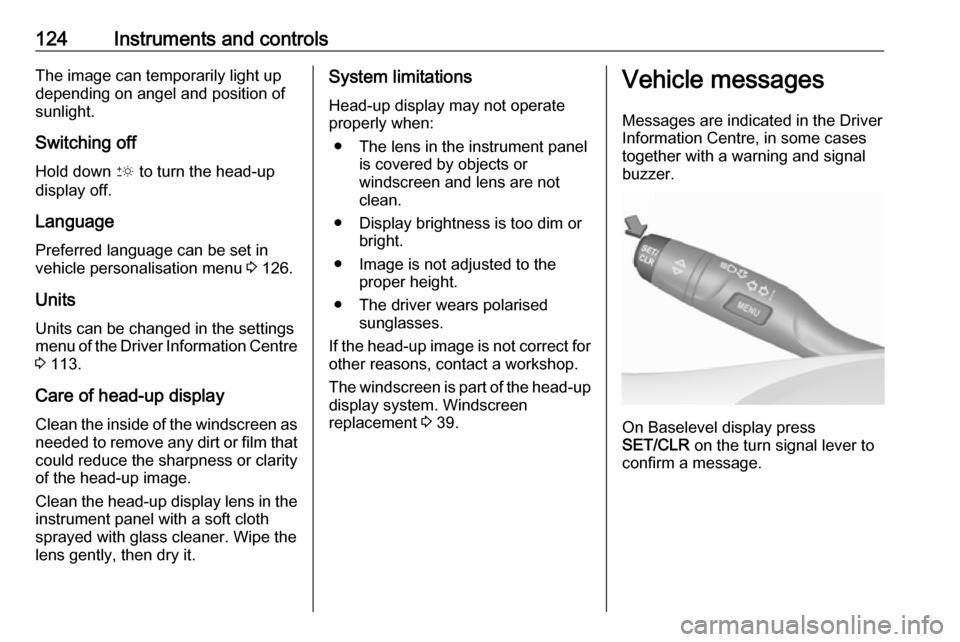
Messages are indicated in the Driver
Information Centre, in some cases
together with a warning and signal
buzzer.
On Baselevel display press
SET/CLR on the turn signal lever to
confirm a message.
Page 135 of 323

Instruments and controls133The following functions are available:● Lock or unlock vehicle.
● Provide information on the vehicle location.
● Honk horn or flash lights.
Stolen vehicle assistance
If the vehicle is stolen, report the theft
to the authorities and request OnStar
stolen vehicle assistance. Use any
phone to call an advisor. Find the respective OnStar phone number on
our country-specific website.
OnStar can provide support in
locating and recovering the vehicle.Theft alert
When the anti-theft alarm system is
triggered, a notification is sent to
OnStar. You are then informed about
this event by text message or email.Restart prevention
By sending remote signals, OnStar
can prevent the vehicle from
restarting once it has been turned off.On-demand diagnostics
At any time e.g. if the vehicle displays a vehicle message, press Z to
contact an advisor and ask to
complete a real-time diagnostic check
to directly determine the issue.
Depending on the results, the advisor
will provide further support.
Diagnostic report
The vehicle automatically transmits
diagnostic data to OnStar which
sends a monthly email report to you
and your preferred workshop.
Note
The workshop notification function
can be disabled in your account.
The report contains the status of key
operating systems of the vehicle like
engine, transmission, airbags, ABS,
and other major systems. It also
provides information on possible
maintenance items and tyre pressure (only with tyre pressure monitoring
system).
To look at the information in greater
detail, select the link within the email
and log in to your account.Destination download
A desired destination can be directly
downloaded to the navigation system.
Press Z to call an advisor and
describe the destination or point of
interest.
The advisor can look up any address
or point of interest and directly send
the destination to the built-in
navigation system.
OnStar settings
OnStar PIN
To have full access to all OnStar
services, a four-digit PIN is required. The PIN has to be personalised when first talking to an advisor.
To change the PIN, press Z to call an
advisor.
Account data
An OnStar subscriber has an account
where all the data is stored. To
request a change of the account
information, press Z and talk to an
advisor or log in to your account.
Page 137 of 323

Lighting135LightingExterior lighting.......................... 135
Light switch .............................. 135
Automatic light control .............136
High beam ............................... 136
High beam assist .....................136
Headlight flash ......................... 138
Headlight range adjustment ....138
Headlights when driving abroad .................................... 138
Daytime running lights .............139
LED headlights ........................ 139
Hazard warning flashers ..........142
Turn and lane-change signals . 142
Front fog lights ......................... 143
Rear fog light ........................... 143
Parking lights ........................... 143
Reversing lights .......................144
Misted light covers ...................144
Interior lighting ........................... 144
Instrument panel illumination control ..................................... 144
Interior lights ............................ 144
Reading lights .......................... 145
Sunvisor lights ......................... 146Lighting features ........................146
Centre console lighting ............146
Entry lighting ............................ 146
Exit lighting .............................. 146
Battery discharge protection ....147Exterior lighting
Light switch
Turn light switch:
AUTO:automatic light control
switches automatically
between daytime running
light and headlight8:sidelights9:headlights
When switching on the ignition,
automatic light control is active.
Control indicator 8 3 111.
Page 139 of 323

Lighting137ActivationTurn signal lever with MENU button
The high beam assist is activated by
pushing the turn signal lever twice at
a speed above 40 km/h.
Turn signal lever with f button
The green control indicator f
illuminates continuously when the
assist is activated, the blue one 7
illuminates when high beam is on.
Control indicator f 3 111.
Deactivation
With high beam on, pull the turn signal lever once to deactivate high beamassist. If a headlight flash is activated when the high beam is off, the high
beam assist will remain activated.
Pushing the indicator lever to activate manual high beam will deactivate
high beam assist. It is also
deactivated when fog lights are
switched on.
Turn signal lever with MENU button:
when high beam is off, push indicator
lever twice to deactivate high beam
assist.
Turn signal lever with f button:
press f once to deactivate high
beam assist.
The latest setting of the high beam
assist is being stored and remains set when the ignition is switched on
again.
Page 142 of 323

140LightingParticular LEDs, based on steeringangle and speed, are additionally
triggered to improve lighting in
curves. This function is activated at
speeds from 40 km/h to 70 km/h and
reacts to steering angle.
Corner light
When turning off, depending on the
steering angle and the turn signal light, particular LEDs are triggered
which illuminate the direction of
travel. It is activated up to a speed of
40 km/h.
Reverse parking function
To assist driver's orientation when
parking, both corner lights and
reversing light illuminate when
headlights are on and reverse gear is
engaged. They remain illuminated for
a short time after disengaging reverse gear or until driving faster than
7 km/h in a forward gear.
High beam assist This feature allows the high beam to
function as main driving light at night.
The camera in the windscreen
detects the lights of oncoming or
preceding vehicles. Each LED on
right or left side can be triggered or
faded out particularly according to the
traffic situation. This gives the best
light distribution without dazzling
other road users. Once activated,
high beam assist remains active and
switches high beam on and off
depending on surrounding
conditions. The latest setting of the
high beam assist will remain after the ignition is switched on again.
High beam assist includes a special
motorway mode. When driving faster
than 115 km/h on motorways, the light
beam becomes smaller to avoid
dazzling of oncoming traffic. When
following vehicles ahead or passing,
mirror dazzling for these vehicles is
reduced.
Activation
Indicator lever with MENU button