Page 613 of 702
HR16DE engine
1. Drive belt location
2. Engine oil filler cap
3. Air cleaner
4. Brake and clutch (if so equipped)fluid reservoir
5. Fusible link
6. Battery
7. Engine coolant reservoir
8. Radiator cap
9. Engine oil dipstick
10. Windshield-washer fluid reservoir
LDI3231
ENGINE COMPARTMENT CHECK
LOCATIONS
Do-it-yourself8-3
Page 621 of 702

CAUTION
∙ Do not substitute engine antifreezecoolant for windshield-washer solu-
tion. This may result in damage to the
paint.
∙ Do not fill the windshield-washer fluid reservoir with washer fluid concen-
trates at full strength. Some methyl
alcohol based washer fluid concen-
trates may permanently stain the
grille if spilled while filling the
windshield-washer fluid reservoir.
∙ Pre-mix windshield-washer fluid con- centrates with water to the manufac-
turer’s recommended levels before
pouring the fluid into the windshield-
washer fluid reservoir. Do not use the
windshield-washer fluid reservoir to
mix the washer fluid concentrate and
water. ∙ Keep the battery surface clean and dry.
Clean the battery with a solution of bak-
ing soda and water.
∙ Make certain the terminal connections are clean and securely tightened.
∙ If the vehicle is not to be used for 30 days or longer, disconnect the nega-
tive (-) battery terminal cable to prevent
discharge.
NOTE:
Care should be taken to avoid situations
that can lead to potential battery dis-
charge and potential no-start conditions
such as: 1. Installation or extended use of elec-
tronic accessories that consume bat-
tery power when the engine is not
running (Phone chargers, GPS, DVD
players, etc.)
2. Vehicle is not driven regularly and/or
only driven short distances.
In these cases, the battery may need to
be charged to maintain battery health.
WARNING
∙ Do not expose the battery to flames, an electrical spark or a cigarette. Hy-
drogen gas generated by the battery
is explosive. Explosive gases can
cause blindness or injury. Do not allow
battery fluid to contact your skin,
eyes, fabrics or painted surfaces. Sul-
furic acid can cause blindness or in-
jury. Af ter touching a battery or bat-
tery cap, do not touch or rub your
eyes. Thoroughly wash your hands. If
the acid contacts your eyes, skin or
clothing, immediately flush with wa-
ter for at least 15 minutes and seek
medical attention.
∙ Do not operate the vehicle if the fluid in the battery is low. Low battery fluid
can cause a higher load on the battery
which can generate heat, reduce bat-
tery life, and in some cases lead to an
explosion.
∙ When working on or near a battery, always wear suitable eye protection
and remove all jewelry.
BATTERY
Do-it-yourself8-11
Page 622 of 702
∙ Battery posts, terminals and relatedaccessories contain lead and lead
compounds. Wash hands af ter
handling.
∙ Keep battery out of the reach of children.
∙ Do not tip the battery. Keep the vent caps tight and the battery level.
1. Remove the vent cap(s) with a screw-driver as shown. Use a cloth to protect
the battery case.
Battery (Type A) (if so equipped)
LDI3216
Battery (Type B) (if so equipped)
WDI0528
8-12Do-it-yourself
Page 623 of 702
.")
2. Check the fluid level in each cell. If it isnecessary to add fluid, add only dis-
tilled water to bring the level up to the
bottom of the filler opening. Do not
overfill. Reinstall the vent cap(s). Vehicles operated in high temperatures or
under severe conditions require frequent
checks of the battery fluid level.
JUMP STARTING
If jump starting is necessary, refer to “Jump
starting” in the “In case of emergency” sec-
tion of this manual. If the engine does not
start by jump starting, the battery may
have to be replaced. It is recommended
that you visit a NISSAN dealer for this ser-
vice.
CAUTION
∙ Do not ground accessories directly to
the battery terminal. Doing so will by-
pass the variable voltage control sys-
tem and the vehicle battery may not
charge completely.
∙ Use electrical accessories with the en- gine running to avoid discharging the
vehicle battery.
Your vehicle is equipped with a variable
voltage control system. This system mea-
sures the amount of electrical discharge
from the battery and controls voltage gen-
erated by the generator.
WDI0529
LDI2250
VARIABLE VOLTAGE CONTROL
SYSTEM (if so equipped)
Do-it-yourself8-13
Page 624 of 702
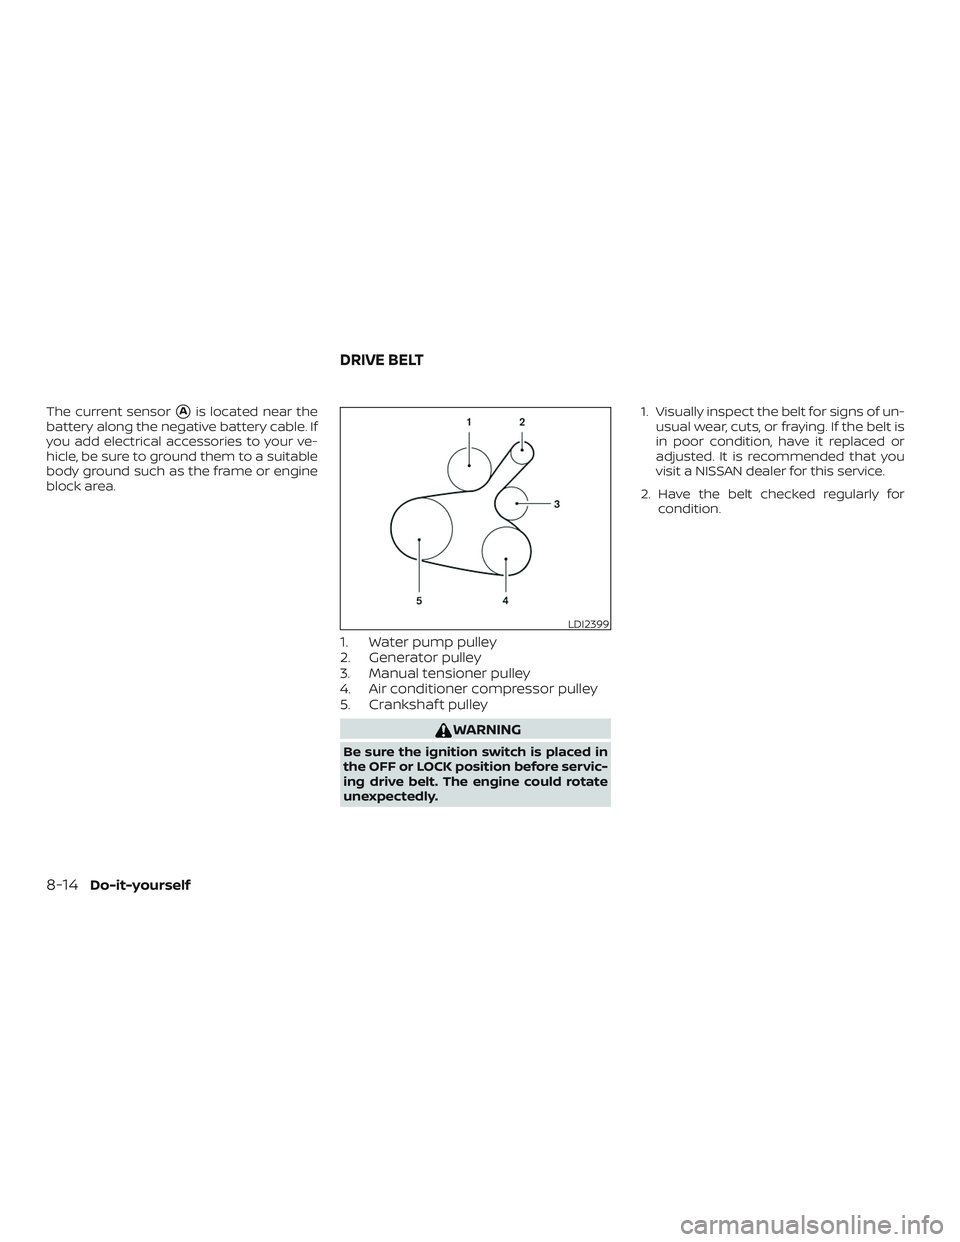
The current sensor�Ais located near the
battery along the negative battery cable. If
you add electrical accessories to your ve-
hicle, be sure to ground them to a suitable
body ground such as the frame or engine
block area.
1. Water pump pulley
2. Generator pulley
3. Manual tensioner pulley
4. Air conditioner compressor pulley
5. Crankshaf t pulley
WARNING
Be sure the ignition switch is placed in
the OFF or LOCK position before servic-
ing drive belt. The engine could rotate
unexpectedly. 1. Visually inspect the belt for signs of un-
usual wear, cuts, or fraying. If the belt is
in poor condition, have it replaced or
adjusted. It is recommended that you
visit a NISSAN dealer for this service.
2. Have the belt checked regularly for condition.
LDI2399
DRIVE BELT
8-14Do-it-yourself
Page 631 of 702

Replace the battery in the key fob as fol-
lows:1. Remove the screw
�A. 2. Insert a small s")
CAUTION
Be careful not to allow children to swal-
low the battery or removed parts.
KEY FOB (if so equipped)
Replace the battery in the key fob as fol-
lows:1. Remove the screw
�A. 2. Insert a small screwdriver into the slit of
the corner
�Band twist it to separate
the upper part from the lower part. Use
a cloth to protect the casing.
3. Replace the battery with a new one. ∙ Do not touch the internal circuit andelectric terminals as doing so could
cause a malfunction.
∙ Make sure that the + side faces the bottom of the case
�C.
Recommended battery: CR1620 or equiva-
lent. 4. Close the lid and install the screw se- curely.
5. Operate the buttons to check its op- eration.
If you need assistance for replacement, it is
recommended that you visit a NISSAN
dealer for this service.
If the battery is removed for any reason
other than replacement, perform step 5. ∙ An improperly disposed battery can
hurt the environment. Always con-
firm local regulations for battery dis-
posal.
SDI2134A
BATTERY REPLACEMENT
Do-it-yourself8-21
Page 633 of 702
 bulb. They can be replaced from insidethe engine compartment without remov-")
Replacing the halogen headlight
bulb
The headlight is a semi-sealed beam type
which uses a replaceable headlight (halo-
gen) bulb. They can be replaced from insidethe engine compartment without remov-
ing the headlight assembly.
CAUTION
∙ High-pressure halogen gas is sealed
inside the bulb. The bulb may break if
the glass envelope is scratched or the
bulb is dropped.
∙ Aiming should not be necessary af ter replacing the H4 bulb. When aiming
adjustment is necessary, it is recom-
mended that you visit a NISSAN dealer
for this service.
∙ Do not leave the headlight assembly open without a bulb installed for a
long period of time. Dust, moisture,
smoke, etc. entering the headlight
body may affect bulb performance.
Remove the bulb from the headlight
assembly just before a replacement
bulb is installed.
∙ Only touch the base when handling the bulb. Never touch the glass enve-
lope. Touching the glass could signifi-
cantly affect bulb life and/or head-
light performance.
∙ Use the same number and wattage as shown in the chart. 1. Disconnect the battery negative cable.
2. Disconnect the electrical connector
�A
from the rear end of the bulb.
3. Pull off the rubber cap
�B.
4. Push and turn the retaining pin
�Cto
loosen it.
5. Remove the headlight bulb. Do not shake or rotate the bulb when remov-
ing it.
6. Install the new bulb in the reverse order of removal.
Fog may temporarily form inside the lens
of the exterior lights in the rain or in a car
wash. A temperature difference between
the inside and the outside of the lens
causes the fog. This is not a malfunction. If
large drops of water collect inside the lens,
it is recommended that you visit a NISSAN
dealer for servicing.
JVM0002X
Do-it-yourself8-23
Page 637 of 702
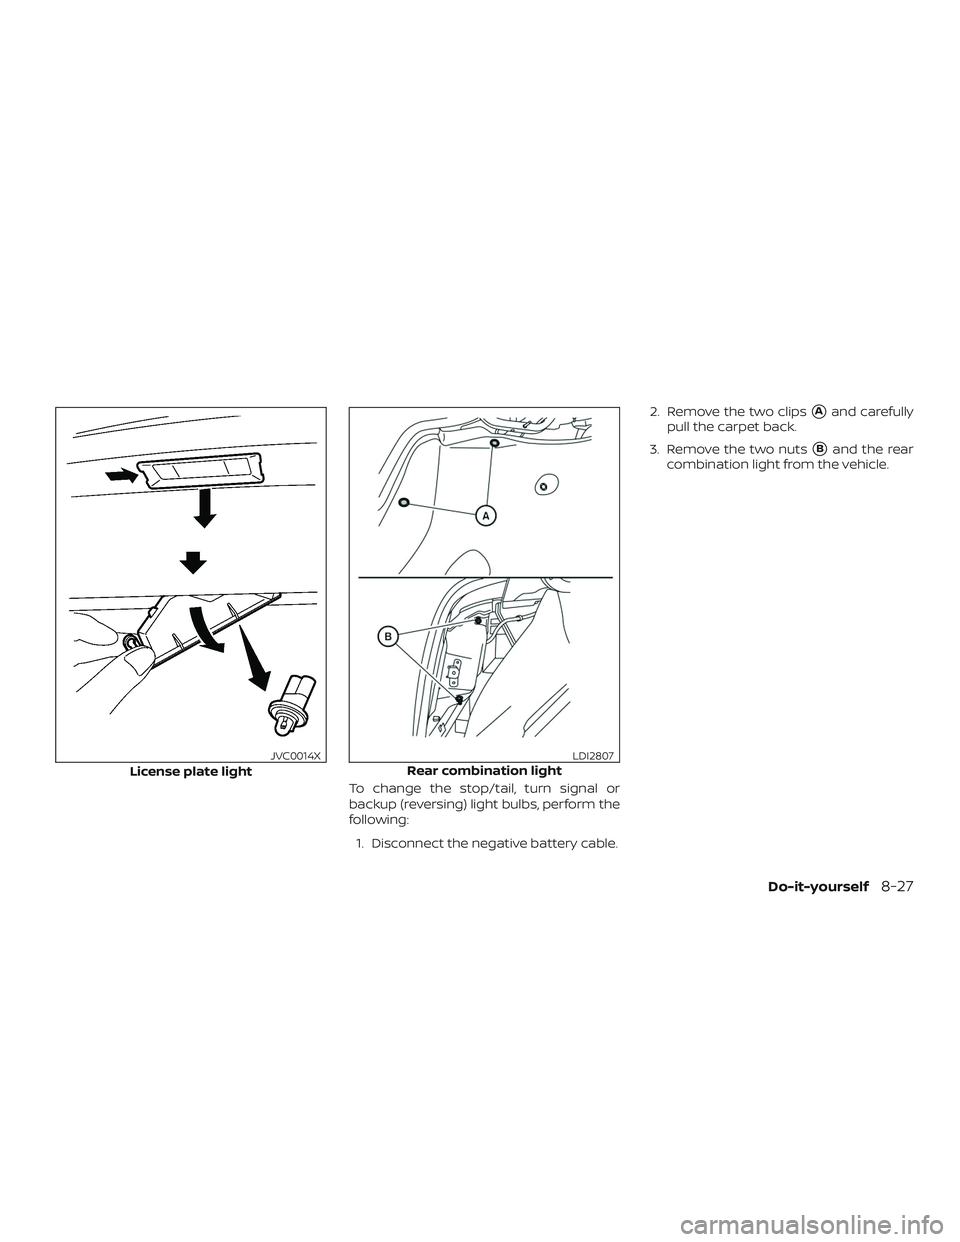
To change the stop/tail, turn signal or
backup (reversing) light bulbs, perform the
following:1. Disconnect the negative battery cable. 2. Remove the two clips
�Aand carefully
pull the carpet back.
3. Remove the two nuts
�Band the rear
combination light from the vehicle.
License plate light
JVC0014XRear combination lightLDI2807
Do-it-yourself8-27
fluid reservoir
5. Fusible link
6. Battery
7. Engine coolant reservoir
8. Radiator cap")